
How to Test a Coil Pack with a Multimeter
Content
Are you having problems with the ignition system?
Does your car misfire every time you try to accelerate, or does the engine just not start?
If your answer to these questions is yes, then your ignition coil may be the problem.
However, for people using older vehicles, this diagnostic process becomes more difficult as coil packs are used instead of modern distributors.
Our guide presents you with everything you need to know about how to test a coil pack with a multimeter.
So, let's begin.
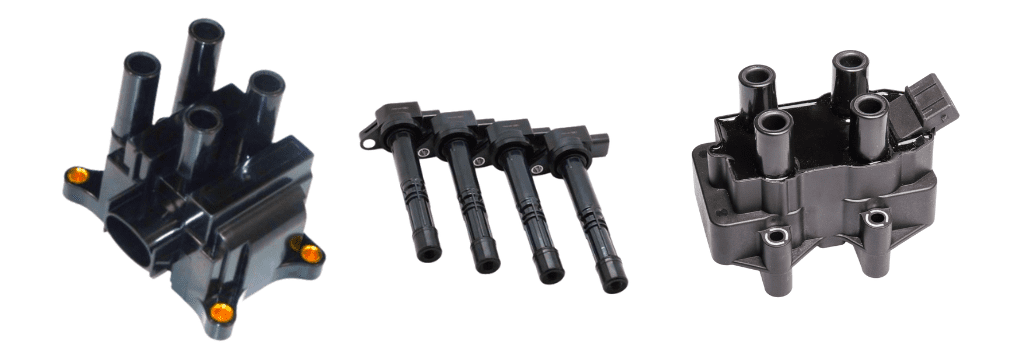
What is a coil pack
A coil pack is a type of ignition coil system common in older vehicles where multiple coils are mounted on a single pack (block) and each coil sends current to one spark plug.
This is the Distributorless Ignition System (DIS), also called the Waste Spark System, which boycotts the need for a distributor since the block serves to some extent as the distributor itself.
Ignition timing from each coil is controlled by the ignition control unit (ICU), with one coil terminal fired on its cylinder's compression stroke and the other terminal being consumed on the other cylinder's exhaust stroke.
In addition to all this, the coil pack works like a conventional ignition coil. Each coil on it consists of two input windings and one output winding.

The two input windings receive 12 volts from the battery, coil around the output winding, and the output winding puts out 40,000 volts or more to the spark plugs to ignite the engine.
These components can fail and cause certain inconveniences, such as engine misfiring, rough idling, or total inability to start.
Sometimes these symptoms can be caused by a component that works with the battery rather than the battery itself, such as an ignition module.
This is why you need to run tests on the coil pack to properly diagnose where your problem is coming from.
If you are using a magneto coil and not a conventional ignition coil, you can check out our Magneto Coil Diagnosis article.
Tools needed to test the coil pack
To run all the tests mentioned here, you will need
- multimeter,
- multimeter probes,
- Wrench or ratchet and socket, and
- New package.
How to Test a Coil Pack with a Multimeter
To diagnose the coil pack, set the multimeter to the 200 ohm range, place the positive and negative probes on the same coil terminals, and check the multimeter reading. A value between 0.3 ohms and 1.0 ohms means the coil is good, depending on the model.
This is just a quick overview of how to diagnose a coil pack by checking its primary resistance.
We will delve into each step of this testing procedure, additionally show you how to test the secondary resistance, and present other ways to diagnose the coil pack in your vehicle.
- Find a coil pack
When your car's engine is off, you want to find where the ignition coil pack is in your engine and take it out so you can easily run tests.
Refer to your engine owner's manual - this is the easiest way to determine where the package is located.

However, if you don't have the manual with you, you can simply trace where the engine spark plug wires lead.
The spark plug is located on the top or side of the main engine, so you keep an eye on where the wires lead.
The coil pack is usually located at the rear or side of the engine.
- Take out the coil pack
To remove the block, you remove the spark plug wires from the coil terminals. Remember that there are several coils in a coil pack.
You disconnect the spark plug wires from the output tower terminals of each of these coils on the package.
When disconnecting wires, we advise labeling each so that they are easier to identify and match when reconnecting.
Finally, you remove the backpack's electrical connector, which is a kind of wide connector that goes into the main body of the backpack.
Now you take out the package with a wrench or, in some cases, a ratchet and socket. Once it's gone, move on to the next step.
- Set multimeter to 200 ohm range
To measure the resistance of the primary input windings of each coil in the package, you set the multimeter to the 200 ohm range.
The ohm setting is represented by the omega (Ω) symbol on the meter.
- Place multimeter leads on primary terminals
The input terminals are two identical tabs that either look like bolts or bolt threads. They are connected to the primary windings inside the coil.
Each coil in the package has these terminals and you want to make this placement to test each one.
- Check multimeter
Once the multimeter leads make proper contact with these terminals, the meter will report a reading. As a general rule, a good ignition coil should have a resistance between 0.3 ohms and 1.0 ohms.
However, the specifications of your motor model determine the correct resistance measurement. If you get the correct value, then the coil is good and you move on to testing each of the other coils.
A value outside of the appropriate range means the coil is defective and you may need to replace the entire package. You may also get an "OL" reading, which means there is a short circuit inside the coil and it should be replaced.
Now we move on to the stages of testing the secondary resistance.
- Set the multimeter to the 20 kΩ range
To measure the secondary resistance of the ignition coil, you set the multimeter to the 20kΩ (20,000Ω) range.
As mentioned earlier, the resistance setting is represented by the omega (Ω) symbol on the meter.
- Place the sensors on the coil terminals
The output terminal is a single projecting tower that connects to the secondary winding inside the ignition coil.
This is the terminal that your spark plug wires were connected to before you disconnected them.
You will test each of the input terminals against the output terminal.
Place one of your multimeter probes into the output rack so that it touches the metal part of it, then place the other probe on one of your input terminals.
- Look at the multimeter
At this point, the multimeter shows you the resistance value.
A good ignition coil is expected to have a total value between 5,000 ohms and 12,000 ohms. Because the multimeter is set to the 20 kΩ range, these values are in the range 5.0 to 12.0.
The appropriate value depends on the specifications of your ignition coil model.
If you get a value in the appropriate range, the coil terminals are in good condition and you move on to other coils.
If you get a reading outside of this range, then one of the leads is bad and you may need to replace the entire coil pack.
Reading "OL" means a short circuit inside the coil. Remember that you are testing each primary coil against the output coil.
Checking spark power
Another way to check a coil pack for problems is to see if each of its coils is putting out the right amount of voltage to power their respective spark plugs.

This helps clear things up if your engine starts but misfires when trying to accelerate.
To do this, you will need an ignition coil tester. There are different types of ignition coil testers that have different applications.
The most common are the built-in ignition tester, ignition spark tester, and COP ignition tester.
The built-in ignition tester serves as the connecting wire connecting the output post of the coil, which usually contains the spark wire, to the spark plug.
When ignition is initiated, this tester will show you spark, helping you determine if the coil is producing spark or not.
On the other hand, an ignition spark tester is used instead of a spark plug and will show spark if present.
Finally, the COP Ignition Tester is an inductive tool that helps measure spark in a coil-on-plug system without having to remove the coil or spark plug.
Testing by substitution
The easiest and most expensive method of diagnosing a coil pack for problems is to simply replace it with a new one.
If you replace the entire package with the new package and your car runs perfectly, then you know the old package had problems and your problem is fixed.
However, if symptoms persist after replacing the coil pack, the problem may be with the coil connector, one of the spark plugs, the ignition control unit, or the ignition switch.
Visual inspection
Another easy way to diagnose problems with an ignition coil is to visually inspect it, as well as its associated components, for physical damage.
These physical signs show up as burn marks, melting, or cracks on the coil pack, spark plug wires, or electrical connectors. Leaks from the coil pack can also signal that it has failed.
Conclusion
Checking the ignition coil pack in your car for a malfunction is not as difficult as you might think.
The most important key points of verification are the correct setting of the multimeter and the correct connection of the probes to the terminals.
F.A.Q.
How do I know if my coil pack is defective?
Signs of a bad coil pack include engine misfiring, check engine light coming on, rough idling, or total failure to start the engine. You can also use a multimeter to troubleshoot.
How to check coil power?
To determine if a coil is producing enough spark, you need a built-in ignition tester or an ignition spark tester installed as a spark plug. They allow you to safely measure the spark from the coil.
