How to check your oil
Your car needs oil to function properly. If there is no oil, too little oil, or old and worn oil, the engine can be severely damaged or destroyed. The oil is responsible for lubricating all major engine components, reducing engine wear and dissipating engine heat. Periodic oil changes are essential, and checking will help you know when the oil needs to be changed.
The oil should be checked regularly to ensure that the engine has enough oil and that it is not contaminated. It is recommended to check the oil level about once a month, and if the level is low, you should add more oil to the engine. Checking and adding oil are usually simple operations that most people can handle on their own.
Here is a quick overview of how to check the oil in your car:
How to check the oil
Let the car cool down - Allow the vehicle to cool before attempting to check the oil.
A warning: Never check the oil when the engine is hot. It is best to check the oil in the morning before the car starts, as all the oil will drain back into the oil pan. If this is not possible, let the machine cool down for at least 10 minutes.
Attention: The vehicle must be parked on a level surface so that the oil is evenly distributed in the oil pan. A car parked on a hill can give false readings.
Open the hood - In most vehicles, the hood release lever is located on the left side of the steering column, under the dashboard.
Release the hood - Feel for the latch under the hood to fully open the hood.
Prop up the hood - When the hood is open, use the hood support to hold it up.
Find the dipstick - In most vehicles, the dipstick knob is yellow. A front wheel drive vehicle will have the dipstick located closer to the front of the engine, while a rear wheel drive vehicle will have the dipstick closer to the center of the engine.
Remove and reinsert the dipstick - Pull out the dipstick and dry it with a clean towel. This ensures that the measurement is correct. Fully insert the dipstick into place, and then pull it out again to check the oil film on the dipstick.
Functions: If the probe gets stuck on the way back, turn it over. The tube it enters is bent and the probe bends in the direction of the tube. If you have trouble returning the dipstick, pull it out and wipe it clean again.
- Check oil level - There should be two marks on the dipstick indicating the levels "add" and "full". The oil film should be between these two marks. If it is close to the "add" mark or below the "add" mark, the vehicle needs more oil.
Functions: If your car is constantly indicating oil needs, there is probably a leak in the system that should be checked and repaired as soon as possible.
AttentionNote: Some vehicles, especially newer European vehicles, do not use a dipstick. If you can't find the dipstick, check your owner's manual for instructions on how to check the oil in your particular vehicle.
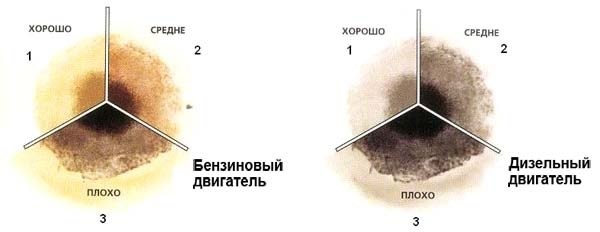
- Determine the color of the oil. Rub some oil between your fingers and look at the color. If the oil is black or brown, then this is normal. If the color is light milky, this may indicate that the radiator is leaking coolant into the oil and needs to be repaired.
Attention: If you feel any particles in the oil, this may indicate engine damage, so you should call a certified mechanic to inspect the vehicle as soon as possible.
Checking the oil is a painless and simple task necessary for proper vehicle maintenance. This is a part of car maintenance that the average car owner can perform without much hassle and will help keep your car in top condition. When you're done, you can add oil to your car.
AvtoTachki service specialists will be happy to conduct a more thorough inspection of your car's oil and give expert advice on everything from oil types to filters. AvtoTachki supplies high quality conventional or synthetic Castrol oil with every engine oil change.