How to independently install a fly swatter deflector on the hood
Content
Every car owner tries to make his faithful horse look beautiful and be protected from the negative effects of external factors. There are many ways to do this, and one of them is a deflector or a fly swatter, which is installed on the hood of the car. To install such an accessory, it is not necessary to go to a car service; you can cope with the work yourself.
What is the hood deflector (fly swatter)
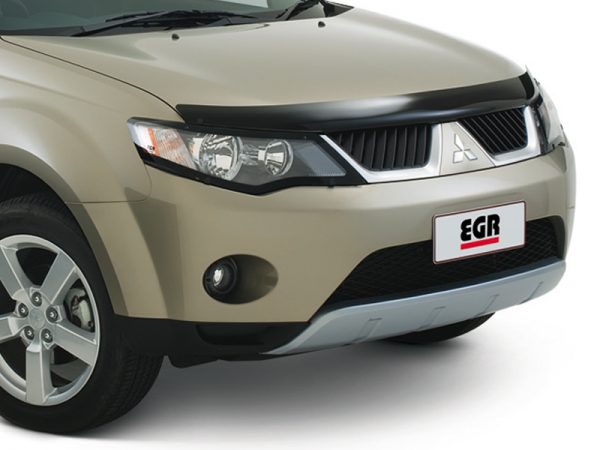
The hood deflector, also called a fly swatter, is a plastic plate that matches the shape of the front hood. While driving, this accessory:
- protects the hood from chips caused by stones or other solid objects;
- changes the direction of air flow, so flying debris is removed from the windshield;
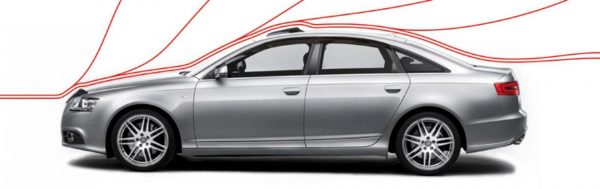
 The deflector changes the direction of air flow and takes it away from the hood, windshield
 - serves as a decoration for the car (for an amateur).
Due to its shape, the deflector directs the air flow upwards, whereas it used to flow around the bonnet and windshield.
The maximum efficiency of the swatter will be at a speed exceeding 70 km / h.

To avoid the accumulation of dust, sand and other debris under the deflector, it is attached at a distance of 10 mm from the hood and during washing with a stream of water, all debris is easily removed. Some drivers are afraid to use such an accessory, as they believe that the paintwork will be damaged at the attachment points and the beauty of the car will deteriorate. It is in vain:
- for a high-quality deflector, the mount does not damage the coating of the car;
- the shape of the accessory is developed for each car brand separately. Not only aerodynamic performance is taken into account, but also the appearance, which should be in harmony with the car;
- deflectors are made of durable material that can be transparent, black or the color of the car.
Disadvantages of a deflector:
- while driving on an uneven road, it may rattle a little, but it all depends on the quality of the installation;
- the aerodynamic properties of the car deteriorate slightly, but this is relevant only in the case of participation in races;
- fuel consumption increases slightly.
What are the types of hood deflectors
In our market, most often there are Australian EGR deflectors and Russian ones - SIM.
In both cases, high-strength acrylic glass is used for the manufacture of such an accessory. During installation, it is not necessary to make holes in the hood. During installation, the paintwork is not damaged.
EGR
EGR is one of the first manufacturers to produce air deflectors for different car brands. And now the company continues to be among the leaders, therefore it supplies its products to all well-known American, European and Asian car factories.
SIMs.
The Russian trade mark SIM also feels confident in this direction. Production is located in Barnaul. A full production cycle has been created here, from development to the manufacture of deflectors. Models are produced for all domestic car models, as well as for most foreign cars.

This accessory can be of different widths:
- standard - 7–8 cm;
- wide - more than 10 cm;
- narrow - 3-4 cm.
They also differ in the type of attachment:
- under the seal;
- on adhesive tape;
- on special metal or plastic clips.
Deflector installation procedure
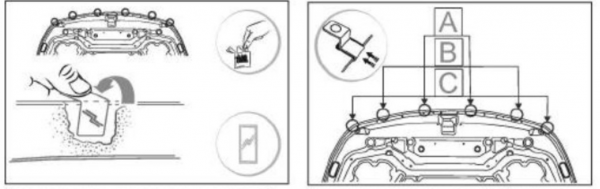
Depending on the brand of car and on the model of the deflector, its fastening will differ. Before starting work, the place where the double-sided tape will be glued is degreased. To ensure the safety of the paintwork (LCP), you can additionally treat this place with automotive wax.
For work you will need:
- deflector with a set of fasteners;
- Screwdriver Set;
- soft sponge;
- degreaser and car wax;
- construction hair dryer. With its help, double-sided tape is heated so that it sticks better;
- ordinary scotch tape. It is glued in the places where the clips are installed for additional protection of the paintwork.
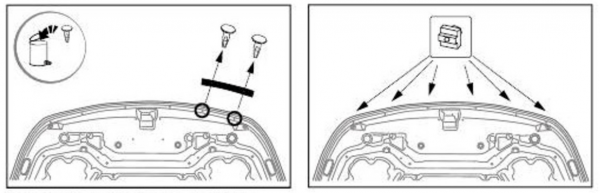
Mounting to the inside of the bonnet
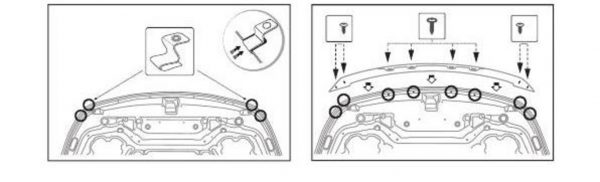
Installation is carried out by putting the deflector on the lower edge of the hood, and then it is fixed on the reverse side with clips and self-tapping screws.
Installation procedure:
- Open the hood and apply a fly swatter to it. From the inside, the factory holes are determined where the deflector will be fixed.
- Using a screwdriver, at certain points of attachment of the fly swatter, remove the seal from the hood.
- Mount clips. Do this in the holes that are under the seal on the inside of the hood.The clips are mounted in the holes located under the hood seal.
- Install the deflector. Bend the elastic at the places where the clips are installed and put the deflector on the clips. They fix in the designated holes.
- Fix the deflector. With self-tapping screws that come with the deflector, the fly swatter is fixed on the clips through the sealant.The deflector is fixed with screws through the seal to the clips.
- Check the correctness of the installation. There should be about 10 mm between the installed fly swatter and the hood.
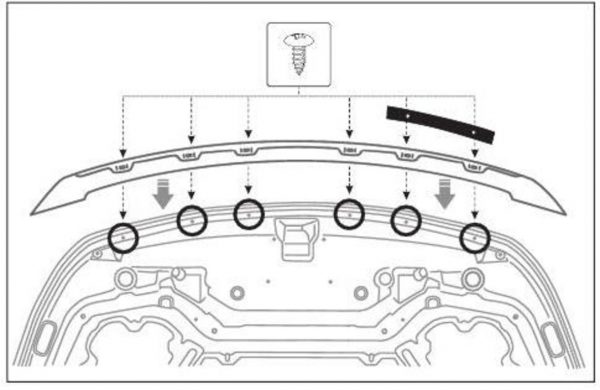
Locking on the outside of the bonnet
In this case, installation is carried out on the clips installed on top of the hood. There is also no need to make additional holes in the hood.
Installation procedure:
- Attach the deflector to the hood and determine the mounting locations for the clips.
- Degrease the attachment points.
- Paste over the attachment points of the clip. This is done with duct tape on both sides of the hood.
- Clips are mounted.
- Fix the deflector. It is applied to the clips, if everything is done correctly, then the holes will match. After that, it is fixed with screws.The deflector is applied to the clips and fixed with screws.
- Special clasps can be used. One part of them is already connected to the deflector. In order to install, it is enough to determine where the second part of the fasteners will be located on the hood. It is degreased and fixed with a fly swatter.
- They check the reliability of installation and whether the installed accessory does not interfere with opening the hood.
Some deflector options can have both top and bottom attachments. Thus, a more reliable fixation is provided, but installation is a little more complicated.
Video: installation of a hood deflector

Any owner can independently install a deflector on the hood of his car. There is nothing complicated here - it is enough to follow the developed instructions and do the work carefully. While there is no alternative to the fly swatter. It helps to save money on the purchase of automotive cosmetics used to repair paintwork damage and prolongs the life of the windshield.

