How to make a torpedo on a car
Content
If you plan to change the interior design of your car, then you can not do without the front panel, or, as it is called in everyday life, torpedoes. You can choose a new color and texture scheme for it. Or you can use similar materials as described above and just lightly freshen up scratched and worn siding. Many motorists do not risk pulling the panel with their bare hands, for fear of spoiling the appearance of the cabin. However, the biggest difficulty in this process is deciding to start working. Also, if you already have experience in upholstery of other interior elements, this task will also not be difficult for you.
The choice of material for the upholstery of the front panel of the machine
The torpedo is constantly in sight, which means that its appearance and quality will attract the attention of both you and other passengers. The choice of material for the transportation of the front panel must be approached responsibly. In most cases, the following materials are used in car interior trim:
- leather (artificial and natural);
- alcantara (another name is artificial suede);
- vinyl.
Do not choose material from the Internet. Photos and descriptions do not give you a complete picture of the product. Before making a purchase, go to a specialty store and feel each of the materials it offers. It is also worth noting the manufacturer and the name of the shade. After that, you can order goods in the online store with peace of mind.
Genuine Leather
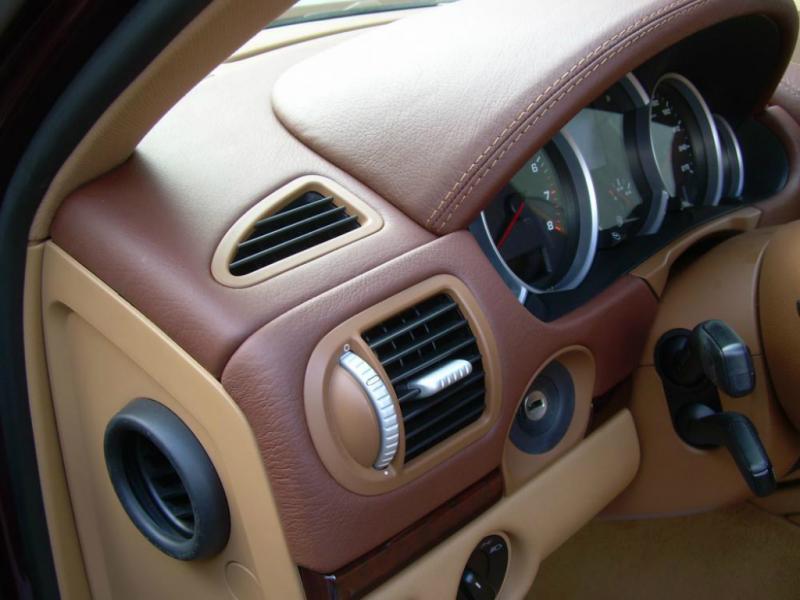
Genuine leather is a good choice for the upholstery of the front panel. This is a durable material that is not afraid of temperature extremes, moisture and fire. In addition, its surface is resistant to mechanical damage. Of course, it is not worth scratching the skin with a fingernail on purpose, but white stripes will not appear on their own. Leather is easily cleaned of dirt by regularly wiping it with a damp cloth. You can not be afraid that the panel will burn out in the sun, it is not afraid of ultraviolet radiation. And it’s not worth talking about the appearance of genuine leather - it will perfectly fit into the interior of even the most expensive and pretentious car.
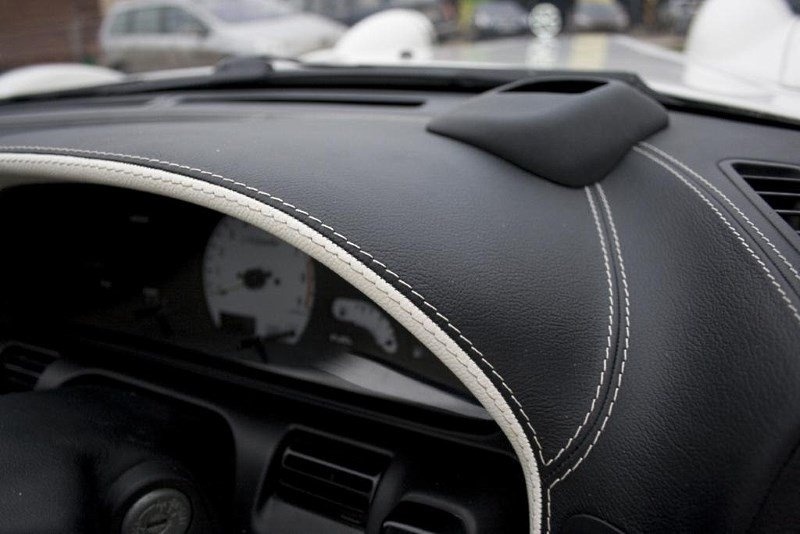
genuine leather gives the interior of the car a sophisticated look
Eco leather
If natural leather is too expensive for you, use its modern substitute: eco-leather. This type of material is called environmentally friendly, because during operation it does not emit harmful substances. It does not look like a cheap leatherette of the late 90s, it is a durable, moisture-resistant, vapor-permeable material that can retain its appearance for a long time. Do not be afraid that the eco-leather upholstery will crack after a short time. According to the performance characteristics, the material is not inferior to natural leather. In addition, eco-leather is suitable for allergic drivers.

eco-leather has good performance characteristics, but is much cheaper than natural
Alcantara
Alcantara has recently become one of the most popular upholstery materials, including the dashboard. This is a non-woven synthetic material that feels like suede to the touch. It combines a velvety smooth surface with easy maintenance and high wear resistance. Like leather, it does not fade in the sun. High humidity and temperature changes also do not affect it negatively. Many drivers prefer to upholster the entire cabin with Alcantara to create an atmosphere of home comfort. Others use it to style individual elements to soften the harshness of the skin. In any case, Alcantara is the best option to fit a torpedo.
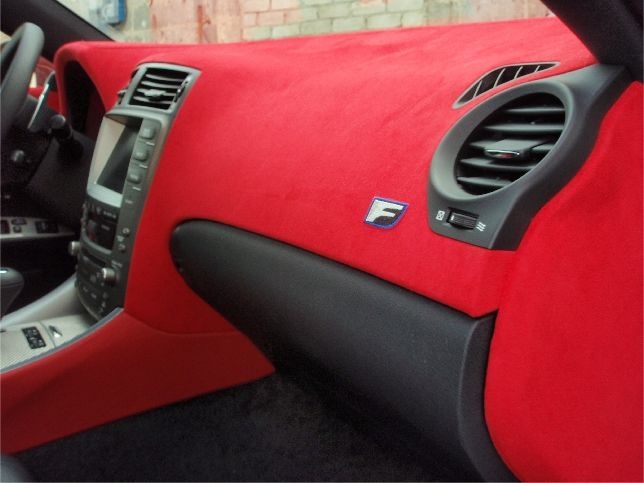
Alcantara is a synthetic fabric similar to suede.
Vinyl
If you want to create an unusual interior design, consider using vinyl wrap. There is a wide variety of textures and colors on the market today. You can choose a calm black or gray color, or you can find an acid green faux python fabric. Chrome-plated films, as well as films with carbon or metal effect, are very popular. They are even easier to care for than leather. Vinyl films have, perhaps, only one drawback - they are easy to accidentally scratch. But the low price allows you to drag the panel as many times as you like.
using vinyl film, you can imitate various materials, including carbon
To save money, some motorists do not buy special automotive material, but a similar one designed for furniture upholstery. At first glance, it seems that there is no difference between them. However, this is not the case: leather upholstery and other materials are designed to be used at a constant comfortable temperature in the cabin. The car heats up in the bright sun and cools down in the cold. Furniture materials in such conditions will quickly crack.
Do-it-yourself car torpedo hauling
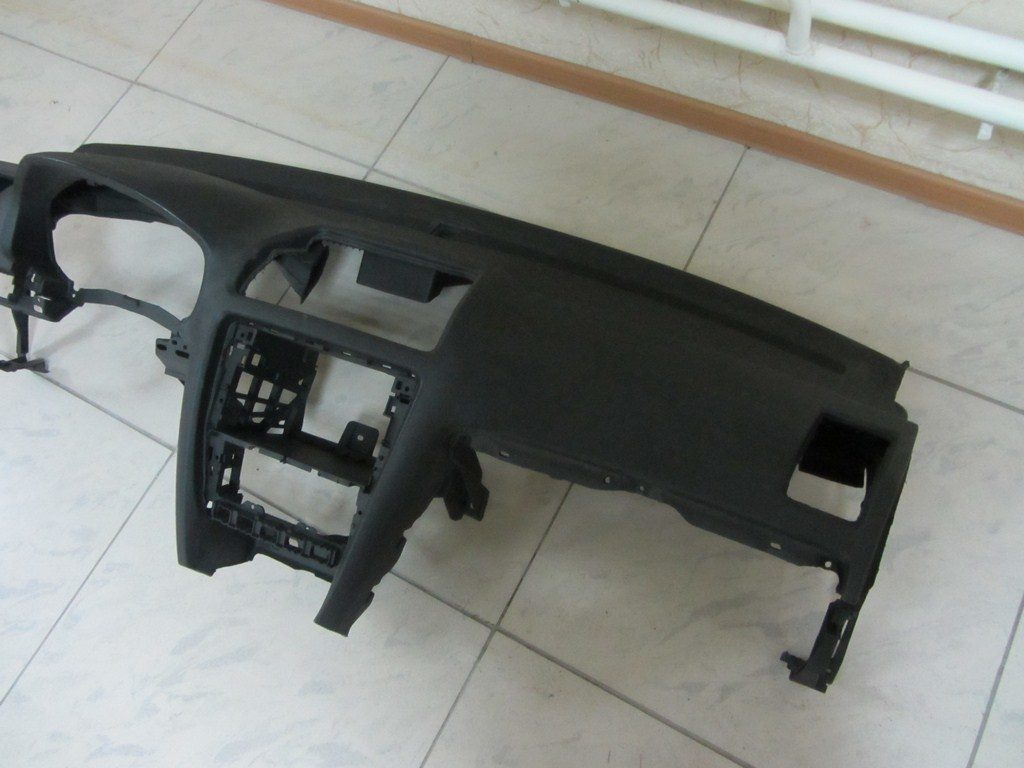
The transfer of the front panel begins with its disassembly. This is a rather laborious process. Also, the scheme of fasteners and clamps does not match with different car models. A large number of wires are connected to the panel, and if you are afraid of damaging them, contact a car service for help.
If you want to do it yourself, then do not neglect the instruction manual for the car - all the details and fasteners are described in detail there. Removing the torpedo always begins with disconnecting the battery terminals. After you have de-energized your car, you can start disassembling it.
before proceeding with the hauling of the panel, it must be disassembled
As a rule, disassembling the steering wheel takes more time than hauling itself. Be careful and don't forget to disconnect any cables you find.
Tools
To tow a torpedo, you will need the following tools:
- a set of screwdrivers for disassembly;
- sandpaper (both coarse-grained and fine-grained);
- degreaser;
- antistatic fabric;
- self-adhesive backing or masking tape;
- marker;
- sharp tailor's scissors;
- roller or spatula with a plastic sheet;
- sewing machine with foot and needle for leather (if you chose this material);
- special glue for leather (or any other material you use);
- hair dryer (better building);
- stretching material
Preparatory stage
When the torpedo is disassembled, it must be prepared for transportation with new material. This is done in the following way.
- The part is degreased with a special tool. It is not recommended to use acetone-based products for this.
- The surface over the entire area is polished first with coarse-grained sandpaper, and then with finer-grained sandpaper.
- Dust remaining after grinding is removed with an antistatic cloth.
In case of severe damage to the body, you can putty the panel with a special compound for plastic. When the surface is completely dry, you can start making patterns and transporting the product.
Further actions will depend on the shape of the panel. If it is quite simple, with unexpressed right angles and bends, then you can try to glue the torpedo from a single piece of materials. But if the shape is complex and has many bends, then you need to make a cover in advance. Otherwise, the lining will fall in folds.
The cover is made as follows:
- Paste the surface of the panel with a transparent non-woven film or adhesive tape
- Carefully inspect the shape of the part. All sharp sections should be circled with a marker on the film (adhesive tape). At this stage, mark the places of your future seams. Do not do too much - it can ruin the look of the panel.
- Remove the film from the torpedo and lay it on the material from the wrong side. Transfer the contours of the details, paying attention to the seams. Don't forget to add 10mm on each side of the piece. You will need this for sewing.
- Cut out the details carefully.
- Attach the parts to the control panel. Make sure the dimensions and shape match.
- Sew the details at the seams.
If you don't have a suitable sewing machine, you can go a little different and glue the pieces directly to the surface of the panel. But in this case, you need to act especially carefully - this approach is dangerous for the appearance of cracks in the joints. If you can't properly stretch and position the material, it will separate and detach from the torpedo.
Making a cover for the front panel
To stitch pieces of material, use special threads for natural and artificial leather. They are strong enough and elastic, so the seams do not tear or deform.
Tightening technology
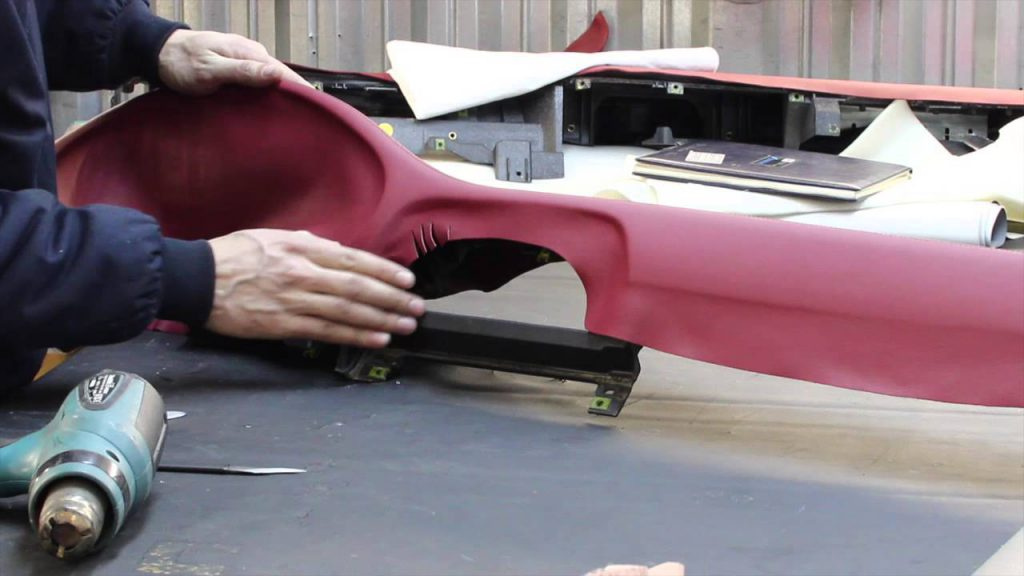
If you decide to drag the panel with a single piece of material, be prepared for painstaking work.
- First of all, apply special glue to the surface. You need to wait a while until the composition dries, but do not dry it completely.
- Place the material against the top edge of the panel and press lightly.
- To repeat the shape of a torpedo, the skin must be heated with a hair dryer and stretched. Do this as carefully as possible so as not to damage the material.
- Before you firmly press the material to the surface, make sure that it has taken the desired shape. This approach is convenient when working with deep wells and holes: first, the skin is stretched, and then the edges are fixed.
- In the process of leveling the surface, you can help yourself with rollers or plastic spatulas.
- Fold the edges inward, glue. Cut off the excess.
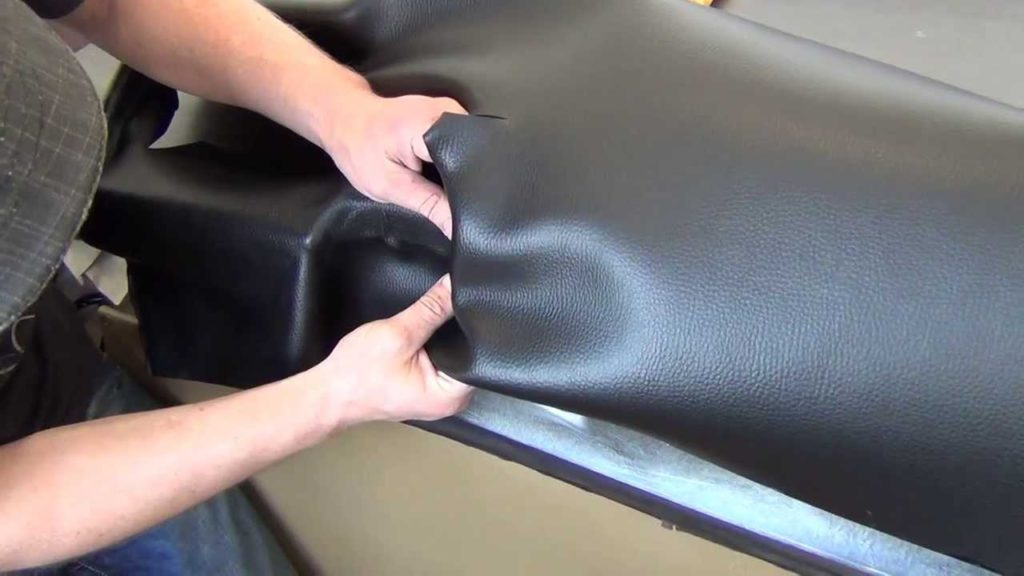
carefully stretch and straighten the folds when transporting in one piece of material
If you have prepared a cover in advance, the process of tightening will be much faster and easier. All you have to do is place the blank on the surface with the adhesive, make sure all the curves are in place, and then press and level the surface.
The cost of self-upholstery of the front panel of the car
The amount you spent on transporting the torpedo directly depends on the cost of the material. The average price of high-quality natural perforated leather is about 3 thousand rubles per linear meter. A standard size panel will not take more than two meters.
Eco-leather is already much cheaper - it can be found for 700 rubles, although there are more expensive options. The price of vinyl film ranges from 300 to 600 rubles, depending on the type and quality. As for Alcantara, its cost is comparable to natural leather, so you won’t be able to save on artificial suede.
High-quality high-temperature glue will cost you 1,5 thousand rubles per can. We do not recommend using cheap superglue or Moment glue - you will be disturbed by an obsessive smell, and the coating itself will deteriorate when the car is very hot. Threads for leather goods are sold at a price of 400 rubles per spool. Suppose you already have a hair dryer and a sewing machine at home, which means that there will be no additional costs for equipment.
Thus, for the material we receive from 1,5 to 7 thousand rubles, plus 2 thousand for consumables. As you can see, even choosing expensive leather, you can find 10 thousand rubles. In the salon, the price of this procedure starts from 50 thousand rubles.
The process of transporting a car torpedo with your own hands is very nuanced. However, the difference in price between do-it-yourself work and the service of a car repair shop is so great that you can spend time studying the instructions, and then the transportation itself. In addition, it will not take much time - you can disassemble the panel in 1,5-2 hours. The same amount of time will be spent on pasting. And if you find an assistant, things will go much faster.
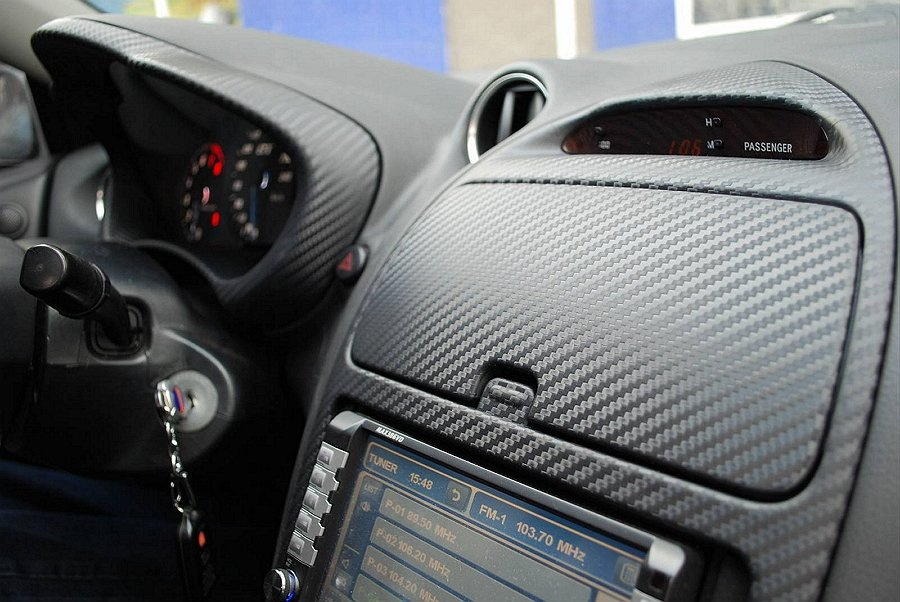
An automobile torpedo or dashboard is a panel located in the front of the cabin, on which instruments, controls and a steering wheel are located. It is made of high density plastic.
The torpedo in the car is damaged as a result of an accident, from constant contact with the hands of the driver and passengers, carelessly thrown into it by various objects. If the front panel of the car has lost its appearance, it can be replaced or restored. These parts are expensive for dismantling and in stores, moreover, it is not always possible to find suitable components for old car models. They use various ways to restore the instrument panel with their own hands, consider them and reflect on the most popular option - painting.
Do-it-yourself car torpedo repair methods
Automatic recovery of the torpedo is carried out in one of three ways:
- Do-it-yourself torpedo painting
- You can glue a torpedo on a car with PVC film. The advantages of vinyl finishes include a wide selection of textures and colors of PVC films, their durability and strength. The disadvantage of this method is that not all polymers used to make boards adhere well to PVC, so after a while the film peels off the surface.
- Upholstery of the instrument panel with leather is an expensive way to finish. Leather (natural or artificial) is a durable and wear-resistant material that makes the interior of the cabin luxurious. Carrying a torpedo with your own hands requires experience on the part of the artist, since the work with the skin is very delicate. In order not to spoil expensive material, it is better to entrust this robot to an experienced craftsman.
A popular way to restore the appearance yourself is to paint the board, so let's look at this in more detail.
Preparation for painting

Restoration of a torpedo begins with a preparatory stage, which includes disassembly and preparation of the surface of the part for applying paint.
In order not to stain the interior and protect it from the unpleasant smell of solvents and paint, the torpedo was removed. Carry out the disassembly of the dashboard in the following sequence so as not to damage the part:
- Disconnect the negative battery terminal.
- Disassemble removable elements: steering wheel, plugs, decorative elements.
- Loosen or open the clasps.
- Carefully move the panel aside and disconnect the electrical wiring from the power devices.
- Pull the panel out through the front passenger compartment door.
- Disassemble devices and buttons.
The torpedo in the car is constantly in contact with the hands of the driver and passengers, which accumulates dirt and grease. These contaminants contribute to the peeling of the new paint, so the panel is thoroughly washed with soapy water, dried and degreased. For cleaning, you can use household detergents: a special car shampoo, a solution of laundry soap, dishwashing liquid and others. Solvents such as acetone, industrial alcohol or white spirit are suitable for degreasing, as well as special car sponges and wipes impregnated with a degreaser.
A clean, grease-free torpedo is sanded to eliminate irregularities. If this step is done poorly, layers of paint will only emphasize cracks and scratches on the surface of the part. Grinding is done with sandpaper of different abrasiveness. You need to start grinding with a larger “sandpaper”, and finish with the smallest one.
Clue! Sandpaper is a hard abrasive material, so if you work carelessly, you will not only not remove bumps, but will also cause new scratches. To protect the surface from damage, use paper with the least amount of sand. Soak the "sandpaper" for 15 minutes in cold water to give it elasticity.
After grinding, technological dust is formed on the surface of the panel, which spoils the painting result. It is gently wiped with a cloth or a special sticky cloth. The polished dust-free surface is primed for better adhesion of paint and polymer. It is better to use a spray primer for plastic surfaces, which is easy to apply and contains a plasticizer that extends the life of the panel. The primer is applied in 2 thin layers with an interval of 15 minutes. Before painting, the surface is degreased again.
Painting
You can paint the torpedo with the help of special paints for plastic or coloring compounds for the car body. The paint is sprayed from a spray gun at a distance of 20 cm from the surface of the part. Restoration of the dashboard of a car is rarely done with spray paints, since they cannot be used to achieve a uniform color. Such compositions are usually used for painting individual elements of the panel.
Painting is carried out in a ventilated area, protected from dust and direct sunlight. The paint is applied in three layers:
- The first layer, the thinnest, is called exposed, since after its application, the errors made during grinding are accentuated. The appeared defects are carefully polished with fine abrasive paper. The first layer of paint is applied with minimal overlaps, that is, adjacent strips overlap only along the edge, while unpainted surface areas are not allowed.
- The second layer is applied over the first wet one. Adjacent strips of this layer should overlap each other by half.
- The third coat of paint is applied in the same way as the first.
The dashboard can be matte and glossy. Experts advise not to open the torpedo with varnish, as the glare of light creates an additional load on the driver's vision and distracts him from the road.
If you want the surface of the devices to be shiny, varnish them. The varnish is applied in 2 layers, 20 minutes after painting. For plastic parts in contact with the hands of the driver and passengers, two-component polyurethane varnishes are suitable. They form a smooth shiny surface, but do not leave fingerprints, which is important for a part that often comes into contact with the hands of the driver and passengers.
The time for complete drying of the board is several days. After this time, it is inspected, the defects that appeared during painting are eliminated, and installed in the cabin.
Dashboard painting features
Do-it-yourself dashboard repair has differences, since the panel is not made of metal, like other auto parts, but of plastic. Interacting with drugs and dyes, polymers release harmful substances that accumulate in the cabin and affect the health of the driver and passengers. To prevent this from happening, choose degreasers, primers and paints that are approved for use on plastic parts.
Demand colors
Designers advise painting the board in the color of the interior, choosing a slightly lighter shade. This reduces the strain on the driver's eyes. To make the interior of the cabin original, you can use one of the current colors: anthracite (charcoal color with a powder effect) or titanium (gold tone with a matte or dazzling gloss).
The repair of car dashboards with “liquid rubber” paint is popular. This composition, when dried, forms a rich and smooth matte surface, pleasant to the touch and resistant to negative influences.
Consider the main options for adjusting the elements of the board. Since each brand of car has its own particular design, you may not be able to accurately reproduce the ideas below in your car, but in any case, the sequence of actions will be the same.
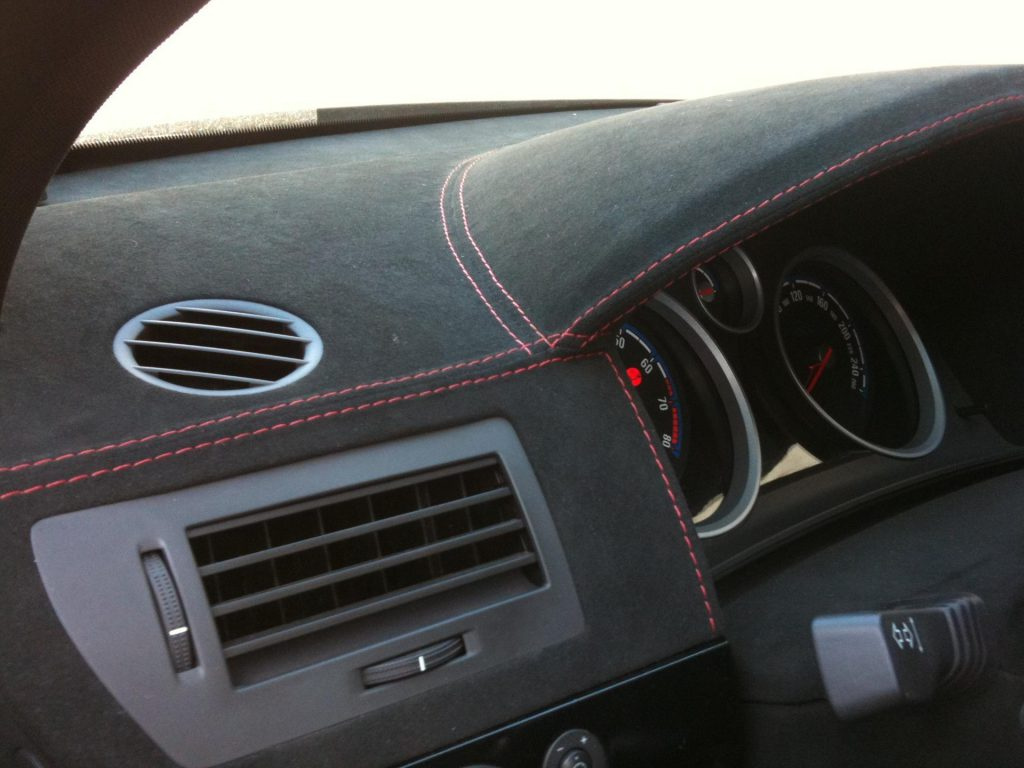
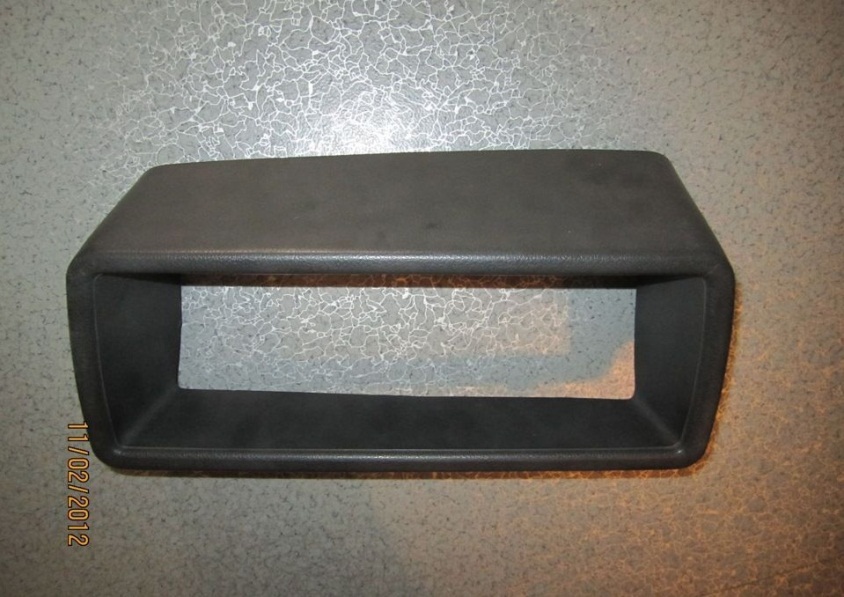
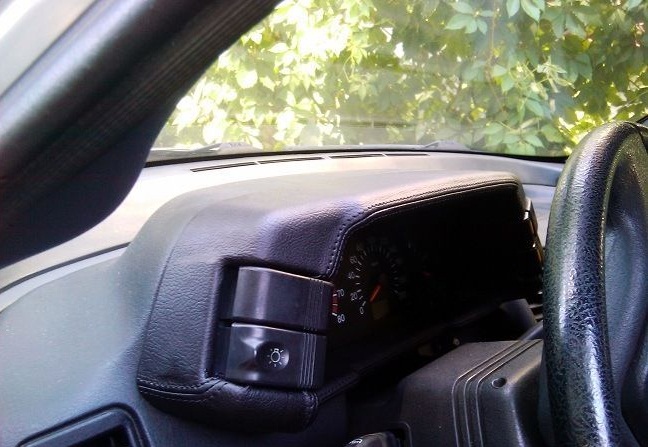
1. Padding of the instrument mask
Installing a visor from a board is not an easy task, the complex shape of the part does not allow the skin to be pulled out without a seam.
The dashboard visor can be upholstered in Alcantara, leatherette or genuine leather. The material and neat stitching complete the panel beautifully.
// don't try to drag the panel with a rug, it's ugly
In the event that the part is strongly curved, you cannot do without a pattern and seams.
First you need to disassemble the casing from the board by unscrewing 2 bolts at the top and 2 at the bottom. Now you can remove the pattern, marking the places where the seams will pass. It is better to add 1 cm for each seam. For a pattern, a dense drawing paper or paper tape is perfect.

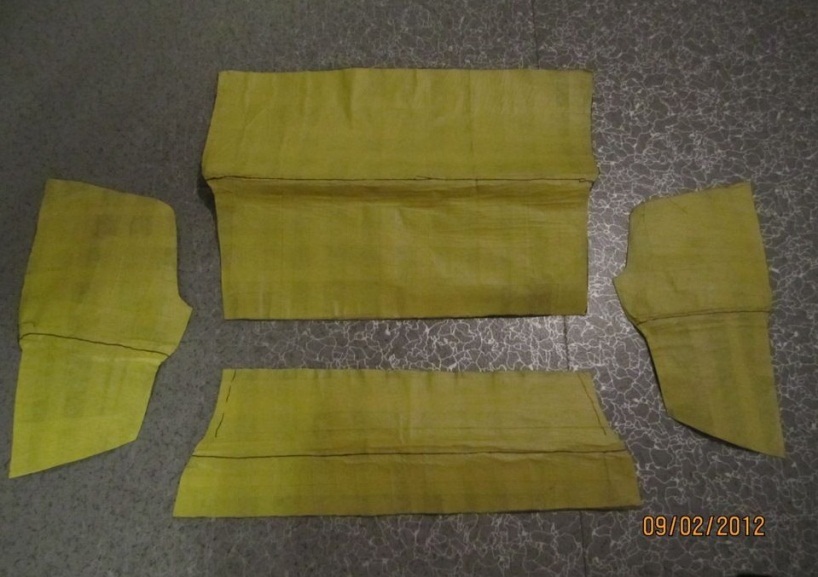
We transfer the resulting template to the material and sew the parts with a sewing machine. It is recommended to use an American collar seam. After that, it remains only to glue the resulting cover on the visor.

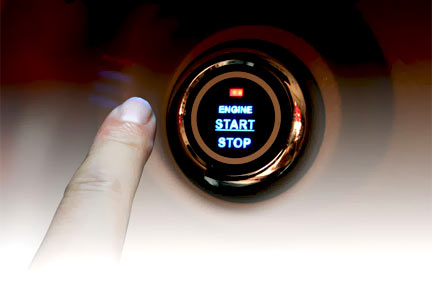
2. Start the engine from the button
Push button start is an ignition method that transitions seamlessly from luxury cars to mid-range cars. An increasing number of modern cars are getting rid of the old engine starting system.
There are several options (schemes) for installing the engine start button. They differ in several nuances:
1. The key is used to start the engine through the button (the key turns on the ignition, the button starts the engine)
2. The key is not used to start the engine through the button (pressing the button completely replaces the key)
3. Through the button, you can separately turn on the ignition (pressed the button - the ignition turned on, pressed the button and the brake pedal - started the engine)
Let's try to show the main connection points of the engine start button.
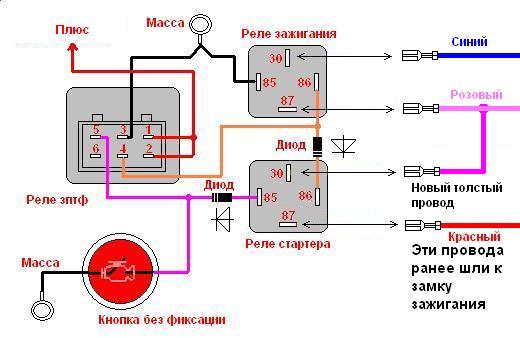
1. Start the engine with one button (ignition key)
This method, in our opinion, is the easiest.
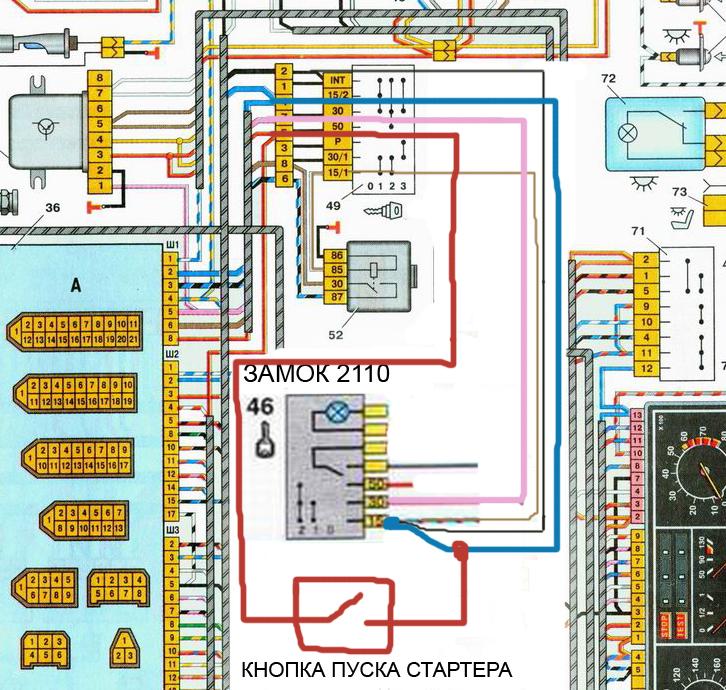
The button does not work when the engine is running, that is, the starter does not turn, but starts working after the engine is turned off and the ignition is turned on with the key.
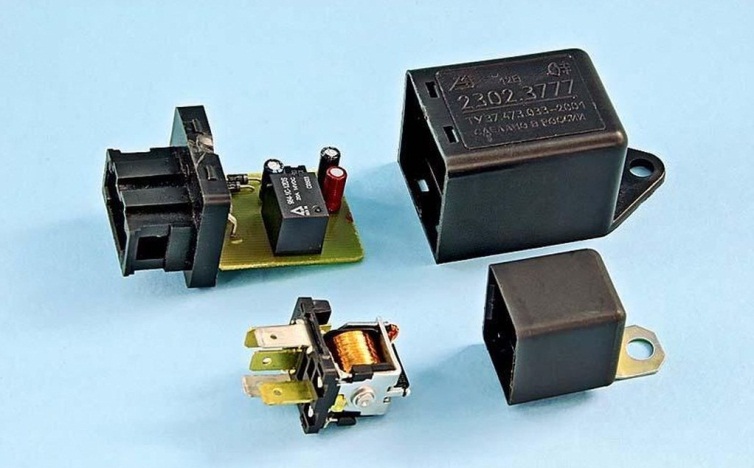
We take an ignition relay with a block of wires. (total 4 wires, 2 high current circuits (yellow contacts on the relay itself) and 2 low current circuits (white contacts).
We pull the wire from the high-current circuit to the 15th contact of the ignition switch, and the second to the 30th contact of the same lock (one pink and the second red).

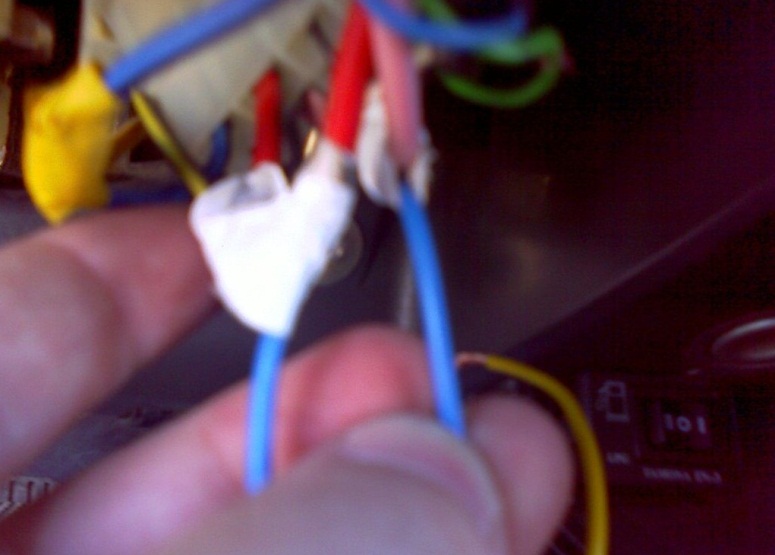
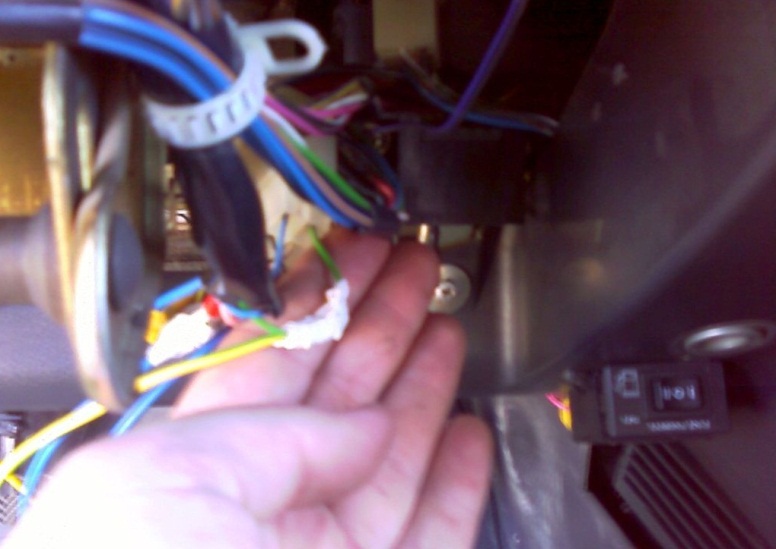
We start one wire from the low-current circuit to ground, and the second on the green wire + appears when the power is turned on and we bridge the wire from the relay to the green wire with our button.
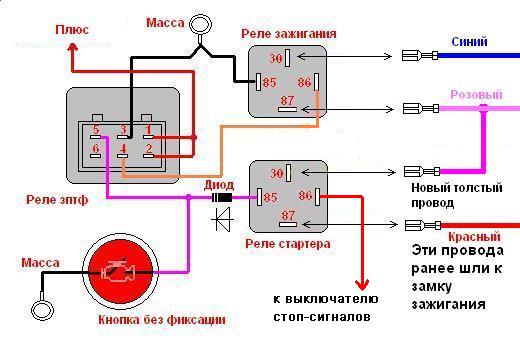
2. Engine start with one button (no ignition key)
The circuit uses a rear fog lamp relay. You can buy it or build it yourself.
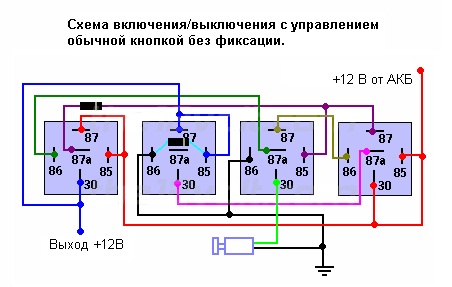
You need a large cable with a terminal connected to pink.
There are also thin wires - we isolate the red and blue with a strip, and we either pull the gray to the ignition, or connect it to the red, otherwise the BSC will not work. Any diode will do.
It is convenient to connect the button illumination and relay power to the alarm. If the motor has stopped, press the button; the ignition will turn off; press the button again; the engine will start.
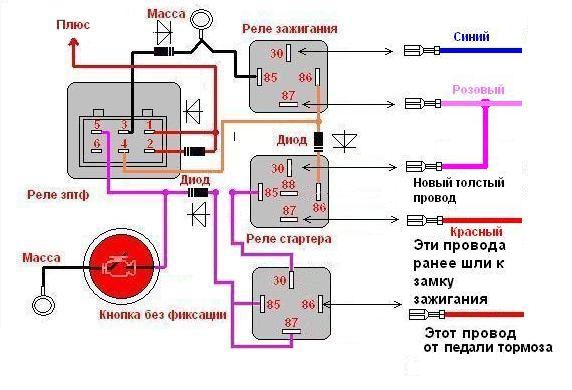
3. Button to start the engine with the pedal depressed.
We took the circuit with the rear fog lamp relay as a basis and finalized it.
We use a button with fixation, which we connect to contacts 87 and 86 of the ignition relay. She can start the engine. It is more correct to make a separate ignition switch through the pedal.
Usually, to start the engine, use the brake pedal to turn on the ignition through the button.
Alternatively, you can still use not the pedal, but the handbrake, because there is also a trailer.
To start the engine from the button on the brake pedal, you must:
86 starter relay connect to brake lights, or use a relay (as you prefer)
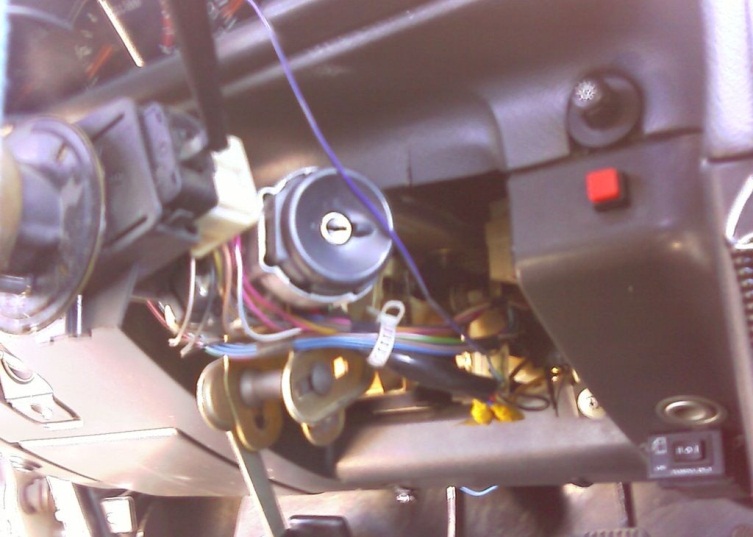
As an engine start button, you can use:
Domestic car buttons (for example, the trunk opening button VAZ 2110 (non-latching)
Universal buttons (lockable and non-lockable)
Foreign car buttons (eg BMW)
Edit button (apply image yourself)
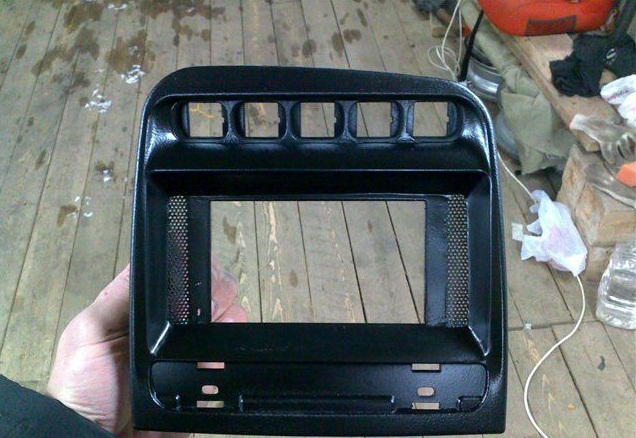
3. Browser Frame
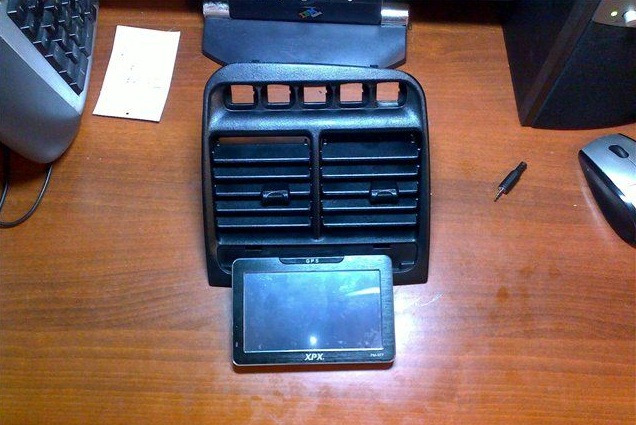
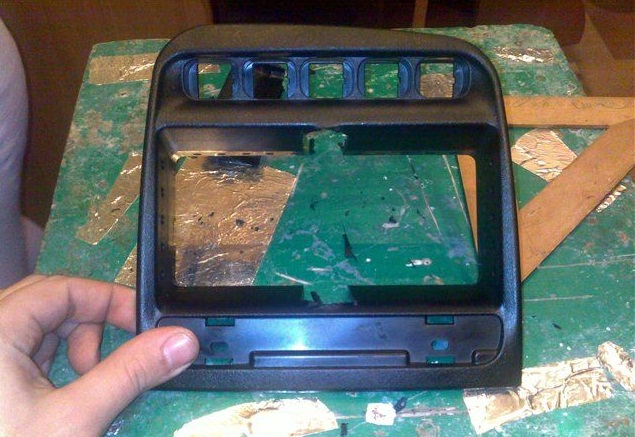
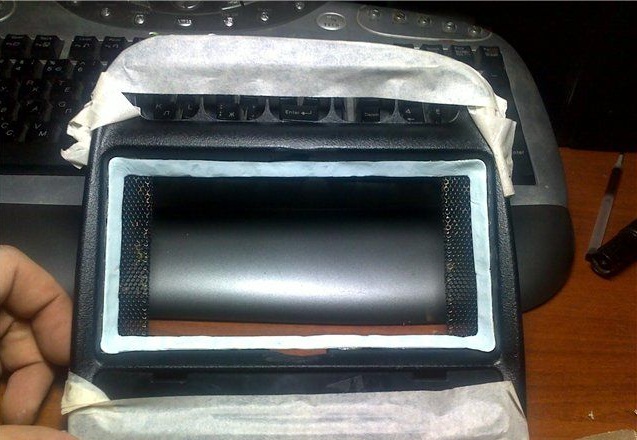
One of the best places to embed a navigator in many cars is the center air duct, but that needs some work to be done.
It is possible to mount the monitor on a baffle up to 7 inches, but here we will consider the location of the XPX-PM977 navigator at 5 inches.
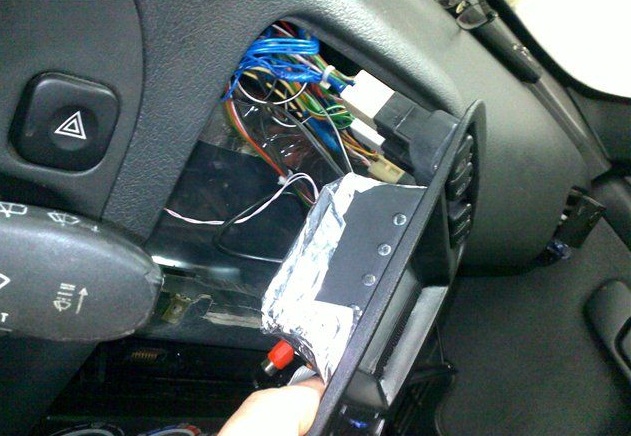
First, remove the baffle. Next, cut out the central partition and the sides of the back so that the monitor is recessed and parallel to the front surface of the deflector. We use the browser cover as the basis of the framework. To remove spaces, we use column grids.
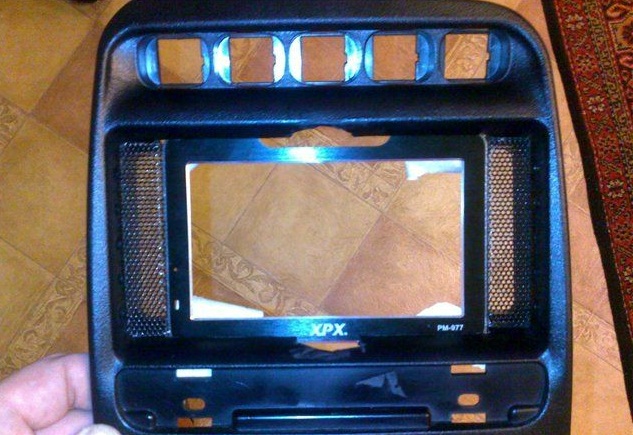
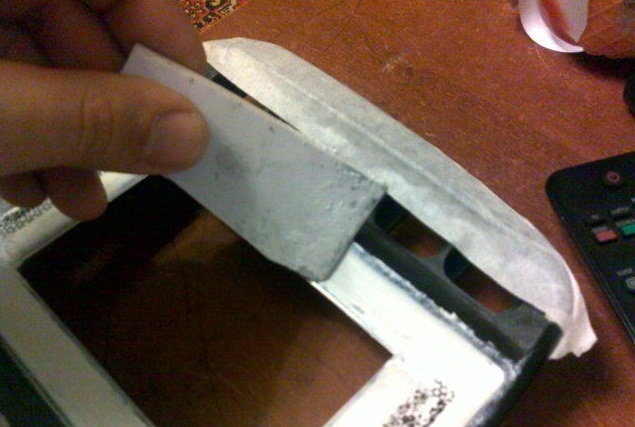
We used masking tape to glue and sculpt the frame with epoxy. After drying, remove and glue the frame with glue
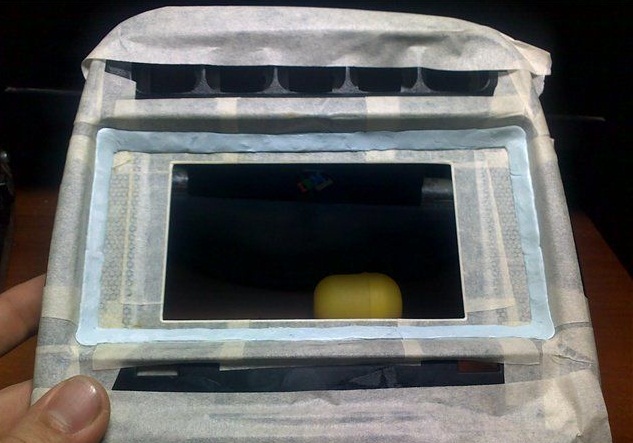
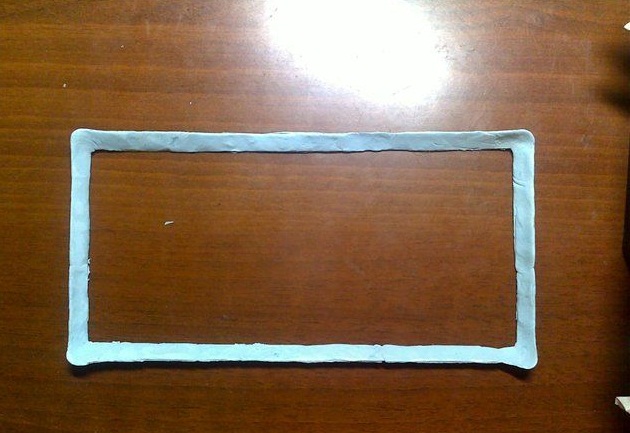
We apply putty and wait until it hardens. Then we remove the excess with fine-grained sandpaper, then repeat until an even shape is obtained.
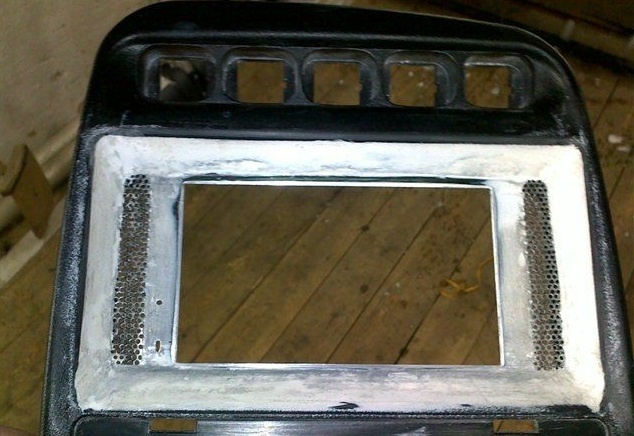
It remains only to paint the frame. We use spray paint, apply it in several layers.
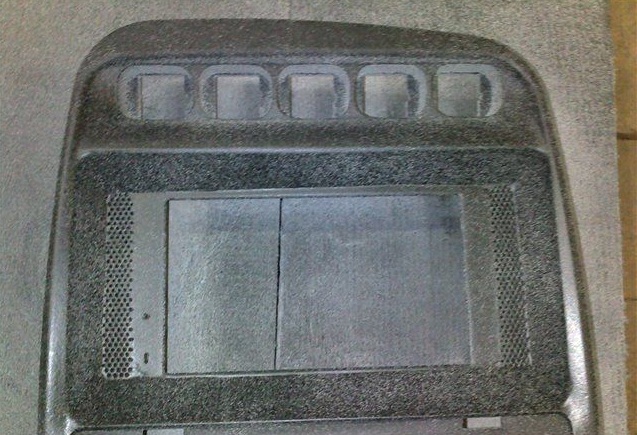
We blocked the airflow of the navigator with a sheet of celluloid and masking tape. Attach a barrier.
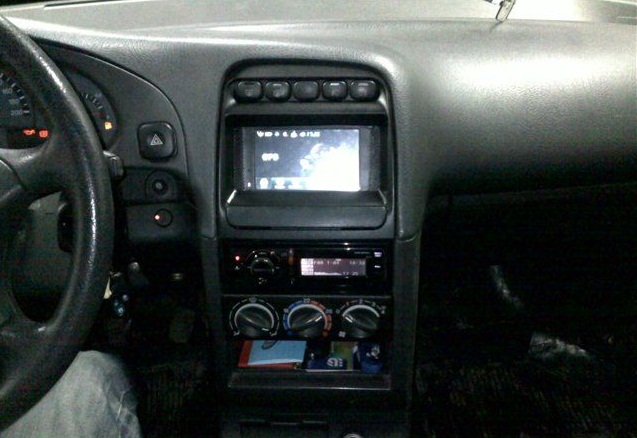
By analogy, you can build a tablet on the panel, and if you wish, you can also make it removable.
Behind the grilles (which run along the edges of the browser) you can put a diode backlight with a strip of LEDs. It will look great.
Like a blue ribbon.
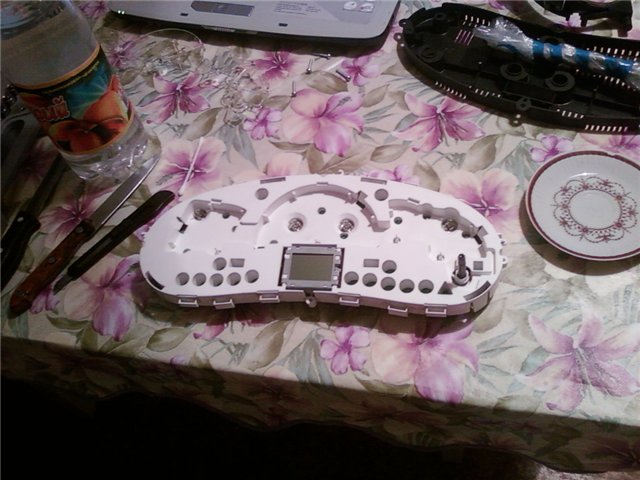
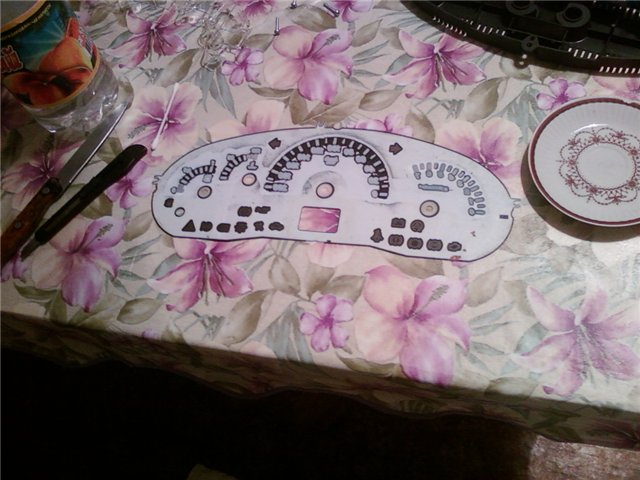
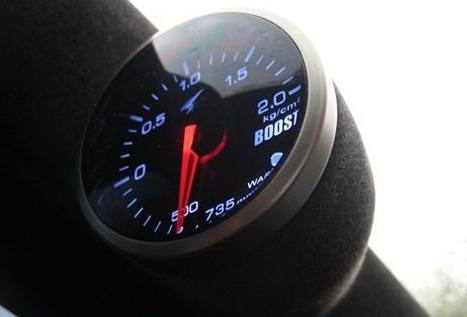
4. Illumination of the instrument panel
We decided to use 3 colors for lighting at once.
Gauges: with blue illumination.
Numbers are empty
Red zones are respectively red.
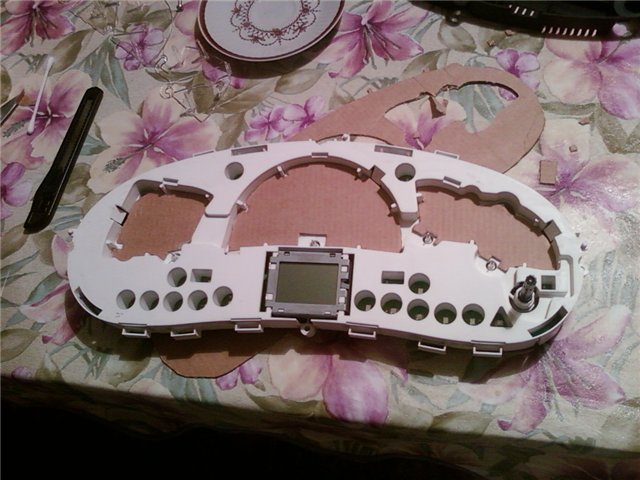
First, remove the instrument cluster. Then you need to carefully remove the arrows. Then carefully remove the backing from the numbers. Made from thick polyethylene tape. The backing is glued on. With a careful and competent effort, it is removed well.
You should get something like this:
Next, you need to lay the substrate on top of the paper face down. There is a light filter on his back. Which we erase with a cotton swab dipped in alcohol. Then we clean the coating used to attach the filter.
You should get the following
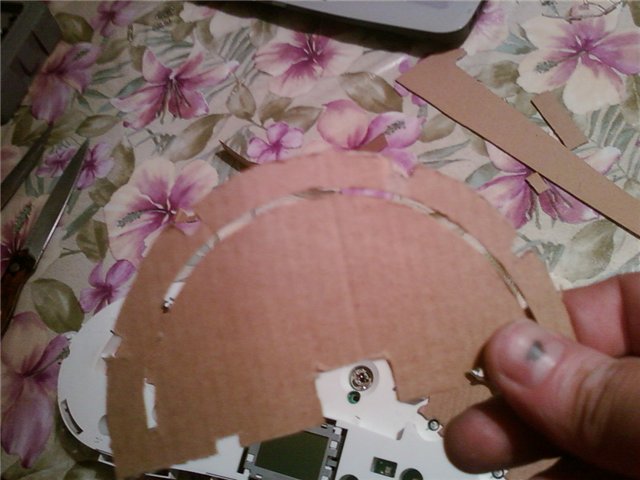
Now you can start cutting out the base where the LEDs will be soldered. You can use textolite, if not then thick cardboard. On it we cut out the base for the diodes.
We use different colors of LEDs, so it is necessary to make a light shot (otherwise the colors will mix). We make a slot in the center of the base to create a light input between the two diode scales. We cut out a ruler from the same cardboard in size and height and insert it into a slot made between two rows of diodes.
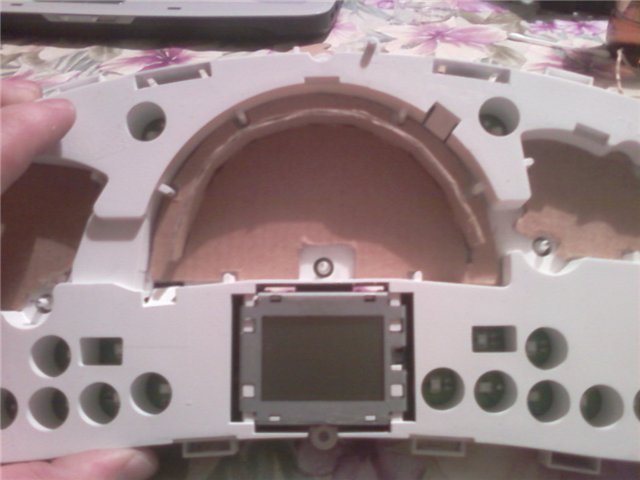
Now you need to solder the LEDs in parallel:
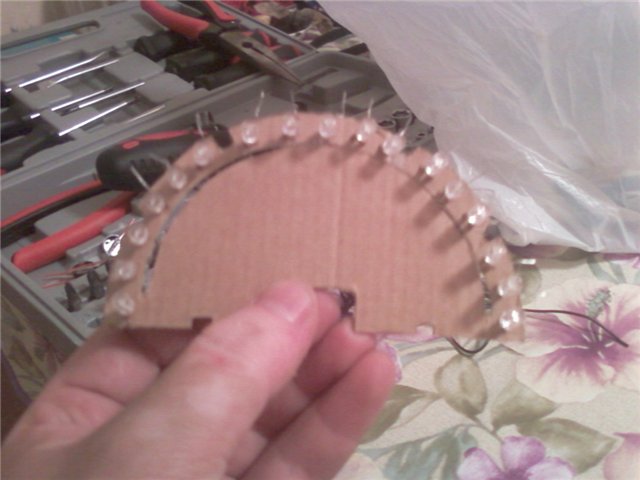
For the arrows, solder two red LEDs to the base and point their lenses straight up.
Similarly, we highlight all other scales and numbers.
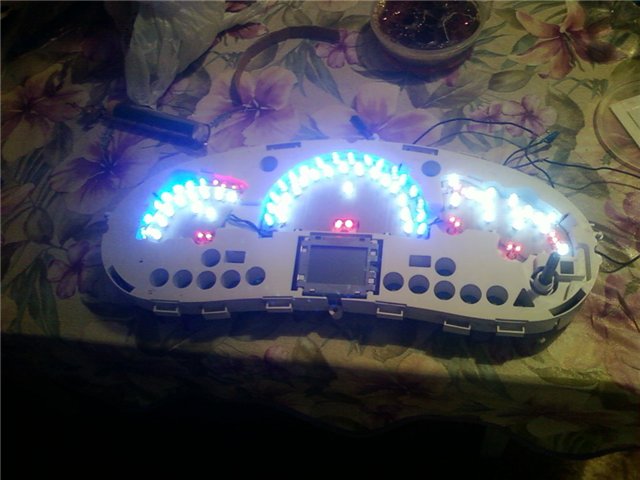
We solder + and - to the tracks of regular bulbs and, observing the polarity, solder the wires.
Now we need to adjust the arrows. We carefully attach them to the motor drives, while planting them deeply is not worth it, otherwise the arrows will cling to the scales. After we collect everything in the reverse order and connect.
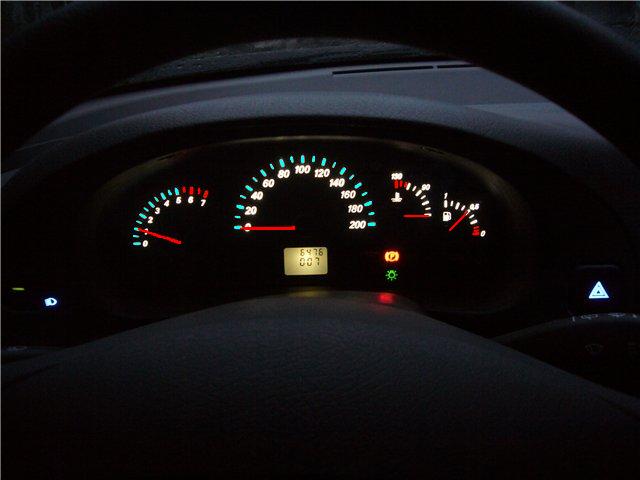
An interesting modification of such lighting is possible. You can take diodes from three RGB crystals (they are brighter and more reliable than usual + their brightness can be adjusted) and install by connecting to such a controller..
Let's explain the difference! In this case, by default, the backlight will shine in exactly the same way (only much brighter), but if you wish, by pressing the button on the remote control, you can change the color of the backlight of the device and another plus: turn it on in light and music mode!
You can also add lighting to the front passenger's footwell by connecting it to the same controller. To do this, we recommend using this tape. It turns out that the illumination of the panel and the legs glow in the same color or simultaneously in the light and music mode.
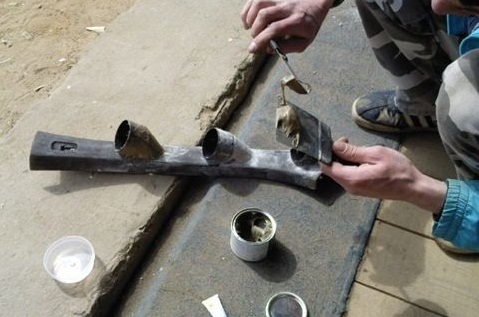
5. Make a rack for additional devices
A radical and very interesting solution - podiums for additional devices on the windowsill.
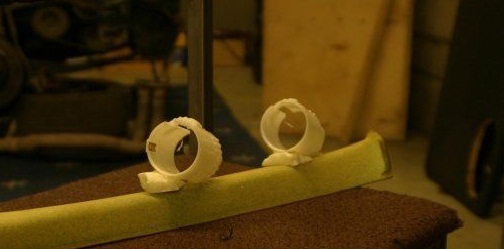
To begin with, we measured a convenient distance between the sensors, inside the cabin. We remove the plastic support, clean it with sandpaper so that the glue holds better.
Cups may not come with appliances, then they can be made from a plastic tube of the desired diameter. Now you need to temporarily fix the resulting podiums at the right angle. After that, we test the devices again and cut holes in the rack to make them deep enough. At this stage, the most important thing is to see if they are conveniently located.
Now, in order for everything to be beautiful, you need to make a smooth descent from the device to the rack. This can be done in many ways.
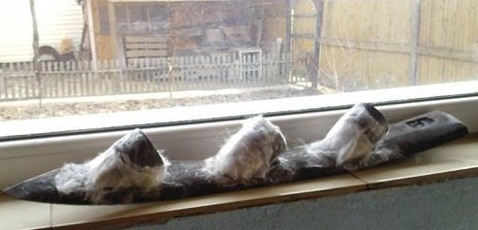
In one embodiment, pieces of plastic or cardboard tubes can be used. We cut out small molds and glue them so that we get a smooth descent from the sensor to the grid.
In another option, any fabric that needs to wrap our blanks is suitable. We fix the fabric with tweezers so that it does not slip.
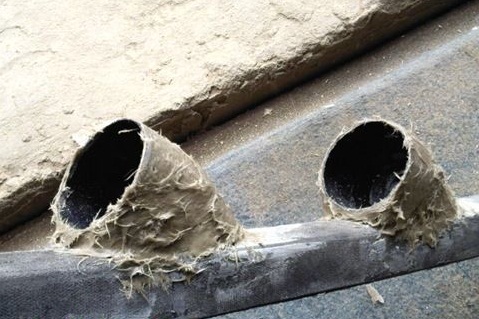
We lay the fiberglass on cardboard, pipe or fabric, and then apply epoxy glue. Here it is also important to apply fiberglass to the frame to securely fix the tool pockets. After that, we wait until our design dries.
Next, we cut off the excess fiberglass and clean the frame. You can’t work without a respirator during the stripping process, it’s harmful! Then, using fiberglass putty, we create the smooth shapes we need. We do this until we get a flat surface. The next layer will be putty for plastic. Apply, wait for drying, clean. Repeat this until the surface is as smooth as possible.
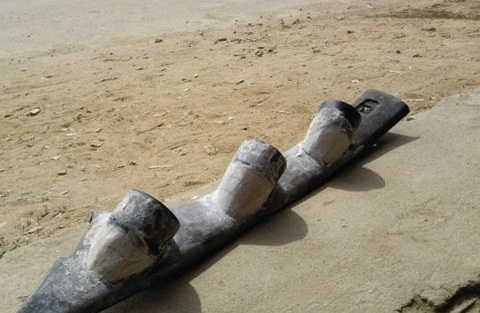
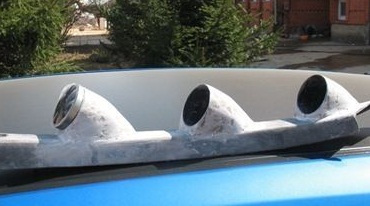
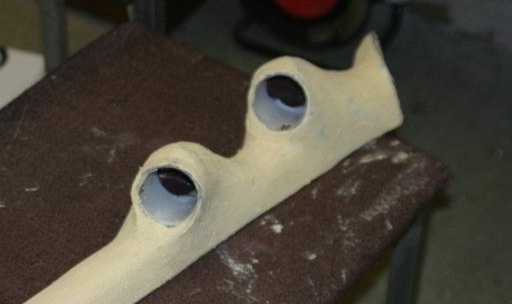
It remains only to create an attractive image for our catwalks. To do this, we use a primer, followed by hauling with paint or material (a more complex option). Finally, we insert the devices and connect them.
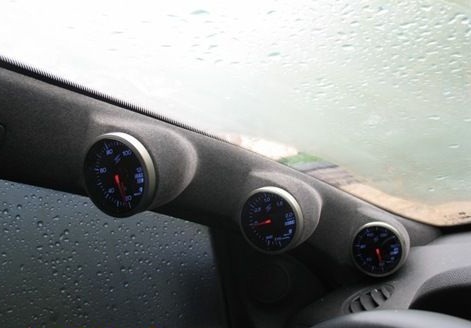
A very interesting addition would be to install a neon ring in the space between the edges of the device and the end of the glass, or, alternatively, on the inside along the visor of the device, in your case. It would be very futuristic! This will require about 2 meters of flexible neon (for example, blue) and the same controller. This kit was able to illuminate all devices + decorate the panel.