How to choose, repair and install a crankshaft on a VAZ 2106
Content
An internal combustion engine cannot be imagined without a crankshaft, since it is this part that allows you to move the vehicle from its place. The pistons are characterized only by translational movement, and the transmission requires torque, which can be obtained thanks to the crankshaft. Over time, the mechanism wears out and requires repair work. Therefore, it is important to know what to do and in what sequence, what tools to use.
Why do we need a crankshaft in a VAZ 2106 engine
The crankshaft (crankshaft) is an important part of the crank mechanism of any engine. The operation of the unit is aimed at converting the energy of combustion gases into mechanical energy.
Description of the crankshaft VAZ 2106
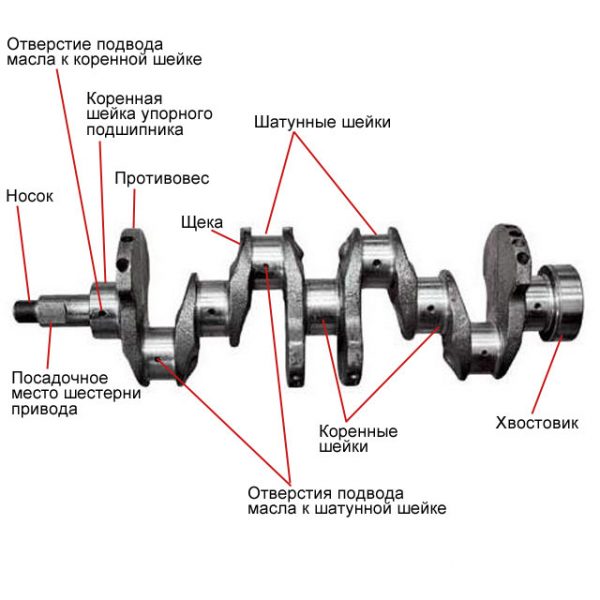
The crankshaft has a rather complex design, with connecting rod journals located on the same axis, which are connected by means of special cheeks. The number of connecting rod journals on the VAZ 2106 engine is four, which corresponds to the number of cylinders. The connecting rods connect the journals on the shaft to the pistons, resulting in reciprocating movements.
Consider the main elements of the crankshaft:
- The main journals are the supporting part of the shaft and are installed on the main bearings (located in the crankcase).
- Connecting rod necks. This part is designed to connect the crankshaft to the connecting rods. The connecting rod journals, unlike the main ones, have a constant displacement to the sides.
- Cheeks - a part that provides the connection of two types of shaft journals.
- Counterweights - an element that balances the weight of the connecting rods and pistons.
- The front of the shaft is the part on which the pulley and gear of the timing mechanism are mounted.
- Rear end. A flywheel is attached to it.
Seals are installed in front and behind the crankshaft - oil seals, which prevent oil from escaping to the outside. The entire mechanism of the crankshaft rotates thanks to special plain bearings (liners). This part is a thin steel plate coated with a low friction material. To prevent the shaft from moving along the axis, a thrust bearing is used. The material used in the manufacture of the crankshaft is carbon or alloy steel, as well as modified cast iron, and the production process itself is carried out by casting or stamping.
The crankshaft of the power unit has a complex device, but the principle of its operation is quite simple. In the engine cylinders, the fuel-air mixture ignites and burns, resulting in the release of gases. During the expansion, the gases act on the pistons, which leads to translational movements. The mechanical energy from the piston elements is transferred to the connecting rods, which are connected to them through the sleeve and the piston pin.
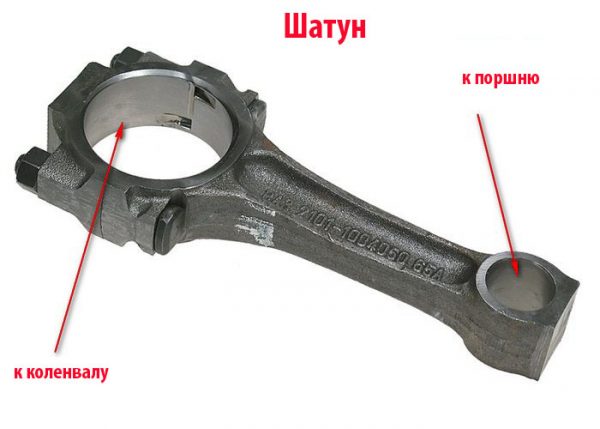
An element such as a connecting rod is connected to the crankshaft journal using an insert. As a result, the translational movement of the piston is converted into rotation of the crankshaft. When the shaft makes a half turn (turns 180˚), the crankpin moves back, thereby ensuring the return of the piston. Then the cycles are repeated.
No less important in the operation of the crankshaft is the process of lubricating rubbing surfaces, which include connecting rod and main journals. It is important to know and remember that the lubricant supply to the shaft occurs under pressure, which is created by the oil pump. Oil is supplied to each main journal separately from the general lubrication system. Lubricant is supplied to the necks of the connecting rods through special channels that are located in the main journals.
Neck dimensions
The main and connecting rod journals wear out as the engine is used, which leads to a violation of the correct operation of the power unit. In addition, wear can be associated with various kinds of engine problems. These include:
- low pressure in the lubrication system;
- low oil level in the crankcase;
- overheating of the motor, which leads to dilution of the oil;
- poor quality lubricant;
- heavy clogging of the oil filter.
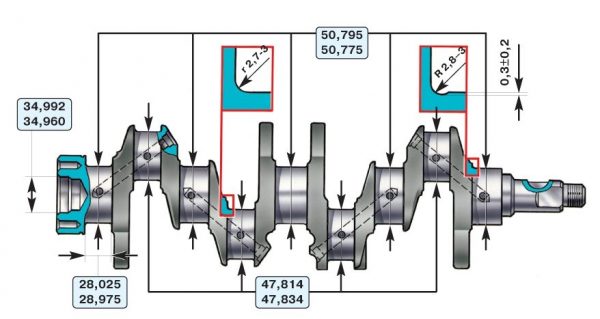
The listed nuances lead to damage to the surface of the shaft journals, which indicates the need for repair or replacement of the assembly. To assess the wear of the necks, you need to know their dimensions, which are shown in the table.
Table: crankshaft journal diameters
| Connecting rod | Indigenous | ||||||||
| Ratings | Repair | Ratings | Repair | ||||||
| 0,25 | 0,5 | 0,75 | 1 | 0,25 | 0,5 | 0,75 | 1 | ||
| 47,814 | 47,564 | 47,314 | 47,064 | 46,814 | 50,775 | 50,525 | 50,275 | 50,025 | 49,775 |
| 47,834 | 47,584 | 47,334 | 47,084 | 46,834 | 50,795 | 50,545 | 50,295 | 50,045 | 49,795 |
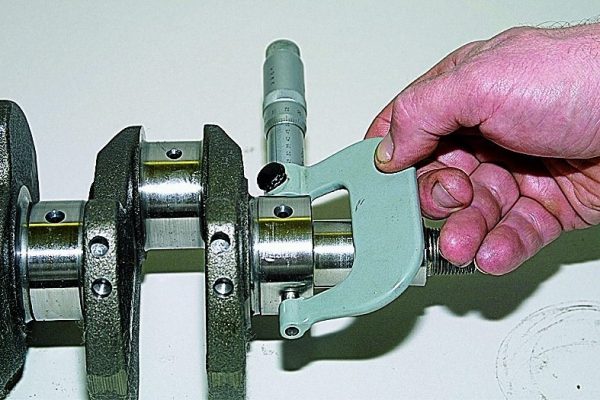
What to do when the necks are worn
What are the actions for wear of the crankshaft journals on the VAZ 2106? First, troubleshooting is carried out, measurements are taken with a micrometer, after which the crankshaft journals are polished on special equipment to a repair size. In garage conditions, this procedure cannot be done. Grinding of the necks is carried out to the closest size (based on the given tables). After processing, thickened liners (repair) are installed in accordance with the new size of the necks.
If the engine is being overhauled, it will not be superfluous to inspect the oil pump, blow out the oil channels of the cylinder block, as well as the crankshaft itself. Attention should be paid to the cooling system. If there are signs of wear or damage on the elements of the engine or its systems, parts and mechanisms need to be repaired or replaced.
Video: grinding the crankshaft on the machine

Crankshaft selection
The need to choose a crankshaft for a VAZ 2106, like for any other car, arises in the event of an engine repair or to improve engine performance. Regardless of the tasks, it must be remembered that the crankshaft must be heavy, with heavy counterweights. If the part is chosen correctly, mechanical losses will be significantly reduced, as well as other loads on the mechanisms.
In the process of choosing a node, even if it is new, close attention is paid to its surface: there should not be any visible flaws, such as scratches, chips, scuffs. In addition, attention is paid to a number of characteristics of the crankshaft, namely coaxiality, ovality, taper and diameter of the necks. During the assembly of the motor, the crankshaft is balanced to balance all rotating elements. For this procedure, a special stand is used. At the end of balancing, fix the flywheel and continue the process again. After that, the clutch basket and other elements (pulleys) are mounted. There is no need for balancing with the clutch disc.
Installing the crankshaft on the VAZ 2106
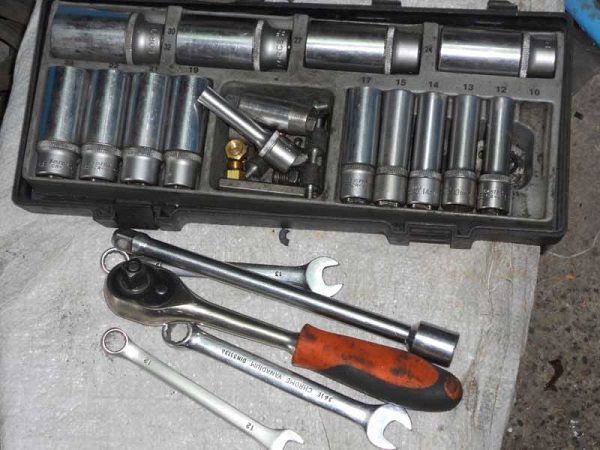
Before proceeding with the installation of the crankshaft on the "six", you will need to prepare the cylinder block: wash and clean it from dirt, and then dry it. The installation process is impossible without tools, so you need to take care of their preparation:
- a set of keys;
- Screwdriver Set;
- micrometer;
- consumables (inserts, oil seals, half rings);
- torque wrench.
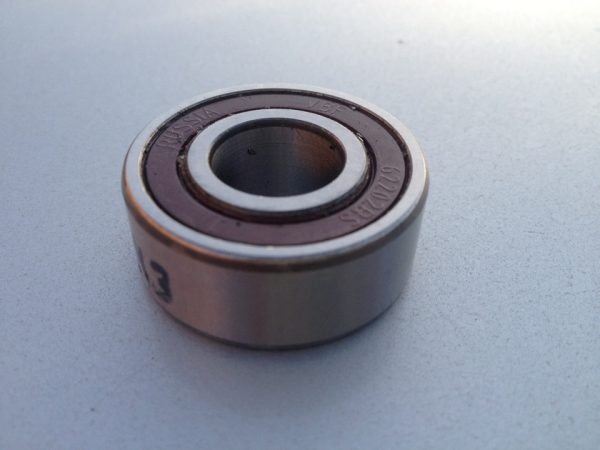
Crankshaft bearing
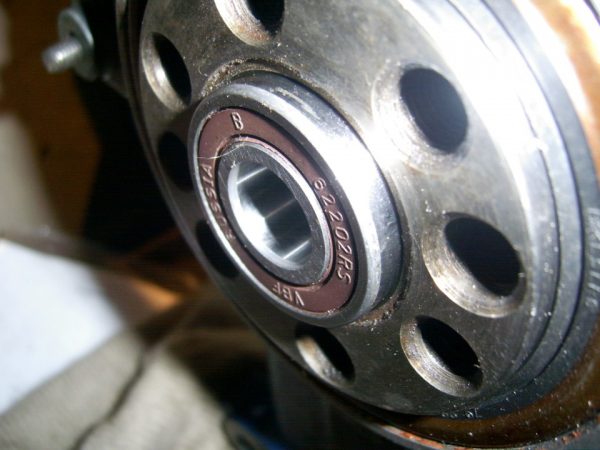
A bearing with a wide cage is installed at the rear of the VAZ 2106 crankshaft, into which the input shaft of the gearbox is inserted. When overhauling the power unit, it will be useful to check the performance of the bearing. Common malfunctions of this part are the appearance of play and crunching. To replace the bearing, you can use a special puller or resort to a simple method - knocking out with a hammer and chisel. In addition to the fact that the part will need to be dismantled, it is important to purchase a product of the appropriate dimension, namely 15x35x14 mm.
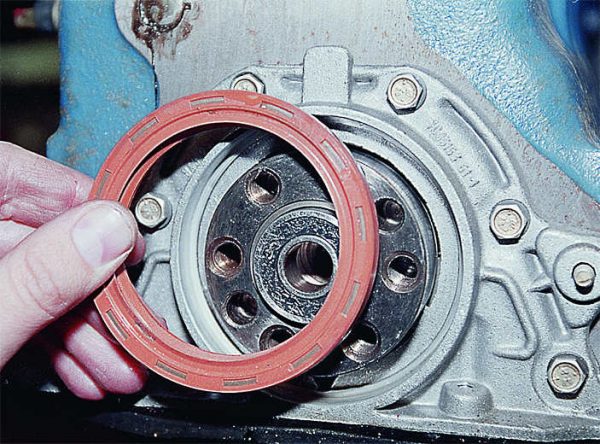
Crankshaft oil seals
The front and rear oil seals must be replaced during engine repairs, regardless of their service life. It is much easier to dismantle the old and install new cuffs on a removed engine. Both seals are mounted in special covers (front and rear).

There should not be any difficulties in extracting the old oil seals: first, using the adapter (beard), the previously installed seal is knocked out, and then, using a mandrel of a suitable size, a new part is pressed in. When buying new cuffs, pay attention to their sizes:
- 40*56*7 for front;
- 70*90*10 for back.
Inserts
If various defects or signs of wear are found on the surface of the liners, the bearings must be replaced, since they cannot be adjusted. To determine whether the dismantled liners can be used in the future, it will be necessary to measure between them and the connecting rod, as well as the main shaft journals. For main journals, the allowable size is 0,15 mm, for connecting rod journals - 0,1 mm. In case of exceeding the permissible limits, the bearings must be replaced with parts with a greater thickness after the necks are bored. With the correct selection of liners for the appropriate neck size, the rotation of the crankshaft should be free.
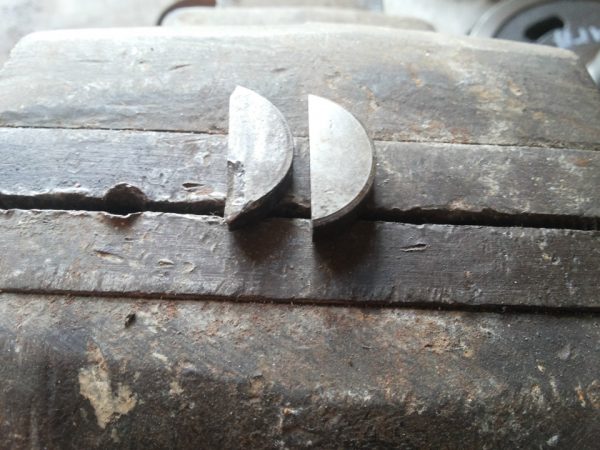
half rings
Thrust half rings (crescents) prevent axial displacement of the crankshaft. Similar to liners, they do not have to be adjusted. With visible defects of the semi-rings, the part must be replaced. In addition, they must be replaced if the axial clearance of the crankshaft exceeds the allowable one (0,35 mm). New crescents are selected according to the nominal thickness. The axial clearance in this case should be 0,06–0,26 mm.
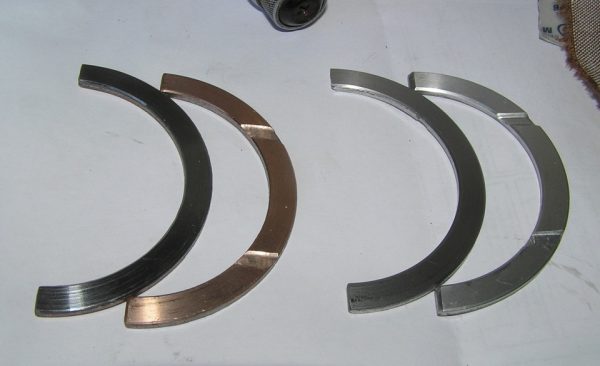
Half rings are installed on the "six" on the fifth main bearing (the first from the flywheel). The material for the manufacture of elements can be different:
- on the flywheel side - bronze, ceramic-metal, copper;
- from the front side - bronze, steel-aluminum.
Which of the listed parts to choose depends on the preferences of the car owner. Experienced craftsmen advise installing bronze products. In addition to the material, attention should be paid to the fact that the half-rings have slots for lubrication. The front crescent is installed with slots to the shaft, the rear crescent - outward.
How to install a crankshaft on a VAZ 2106
When the diagnostics have been carried out, troubleshooting of the crankshaft, possibly boring, the necessary tools and parts have been prepared, you can proceed to install the mechanism on the engine. The process of mounting the crankshaft on the "Lada" of the sixth model consists of the following steps:
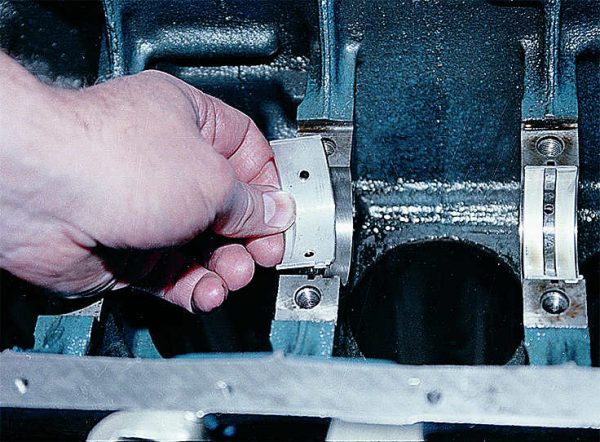
- We press in the bearing of the input shaft of the gearbox.
 We install the bearing in the rear of the crankshaft using a suitable mandrel.
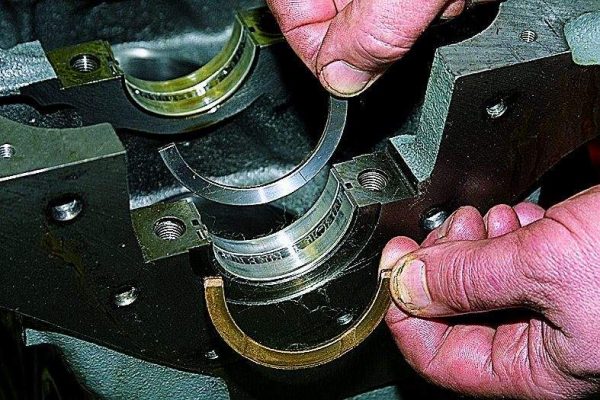
 - We install root bearings. The assembly is carried out carefully to avoid confusion: the main ones are larger and have a groove for lubrication (an insert without a groove is installed on the third seat), unlike connecting rods.Before laying the crankshaft in the block, it is necessary to install the main bearings
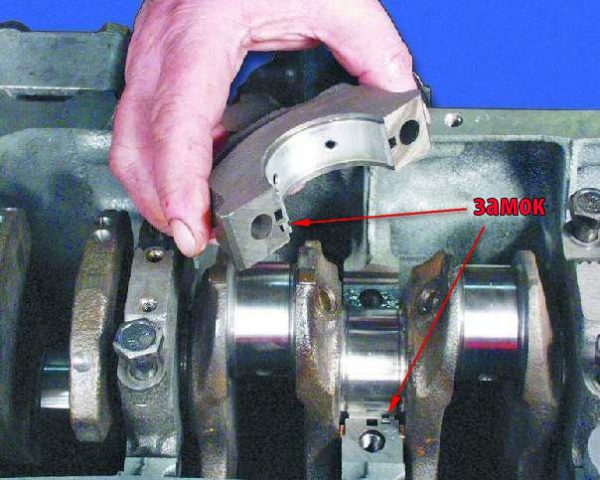
- We insert half rings.Half rings must be installed correctly: the front one is slotted to the shaft, the rear one is outward
- Apply clean engine oil to the crankshaft journals.
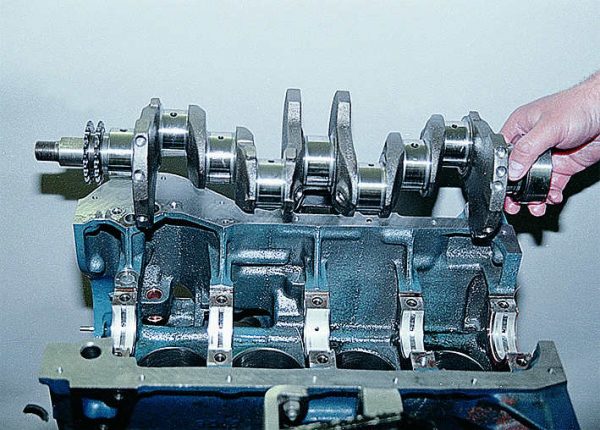
- We place the shaft in the engine block.The crankshaft is carefully placed in the cylinder block, avoiding shock
- We put the covers with the main bearings with the lock to the lock, after which we tighten them with a torque of 68–84 Nm, after wetting the bolts with engine oil.When installing covers with main bearings, the elements should be positioned lock to lock
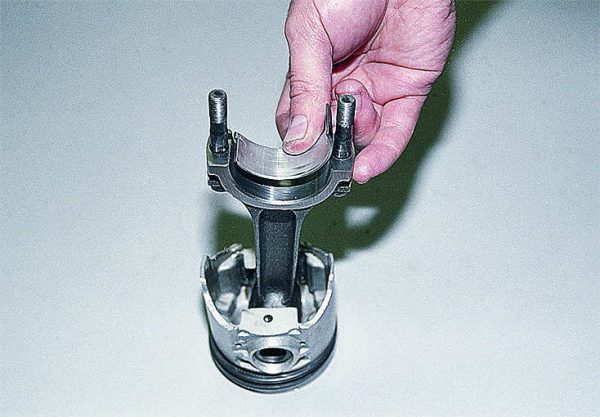
- We mount the connecting rod bearing shells and fix the connecting rods themselves with a torque of not more than 54 Nm.To mount the connecting rod bearings, we insert one half of the bearing into the connecting rod, and then, placing the piston in the cylinder, install the second part and tighten
- We check how the crankshaft rotates: the part should rotate freely, without jamming and backlash.
- Install the rear crankshaft seal.
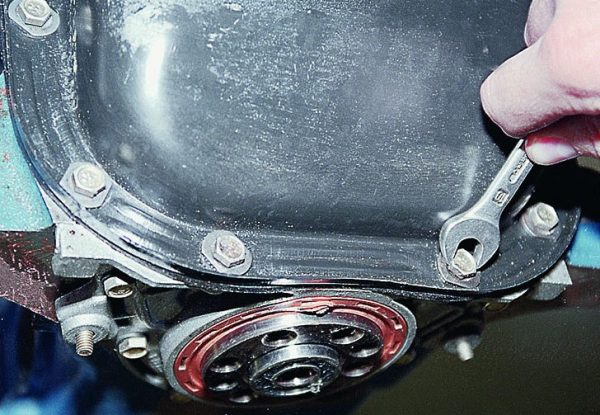
- Attach the tray cover.To install the pallet cover, you will need to put on the gasket, the cover itself, and then fix it
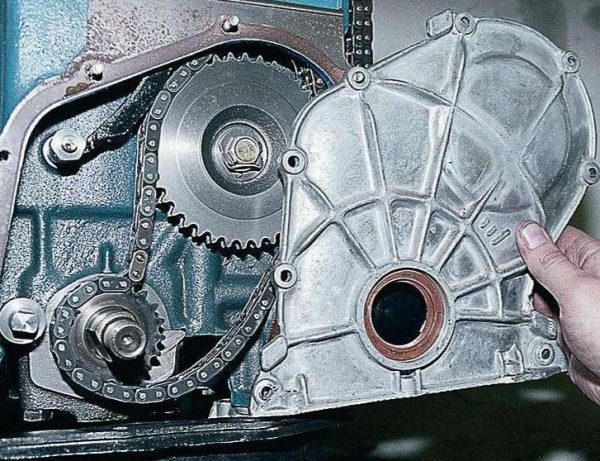
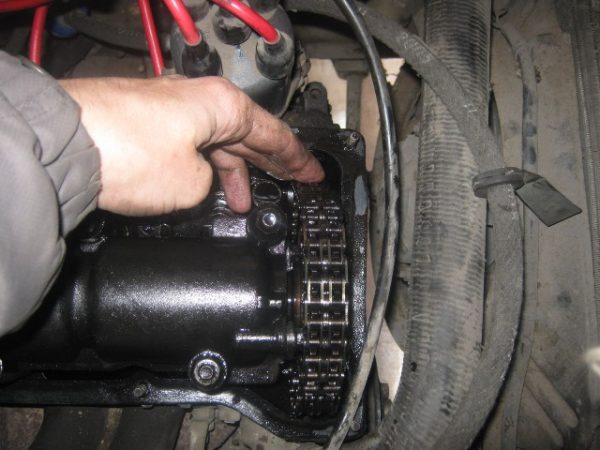
- We make installation of a promshaft ("piglet"), gears, chains.We install the promshaft and gears before we install the timing cover
- We mount the timing cover with an oil seal.The front cover of the engine is installed together with the oil seal
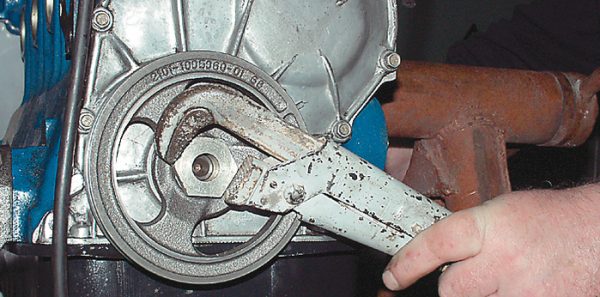
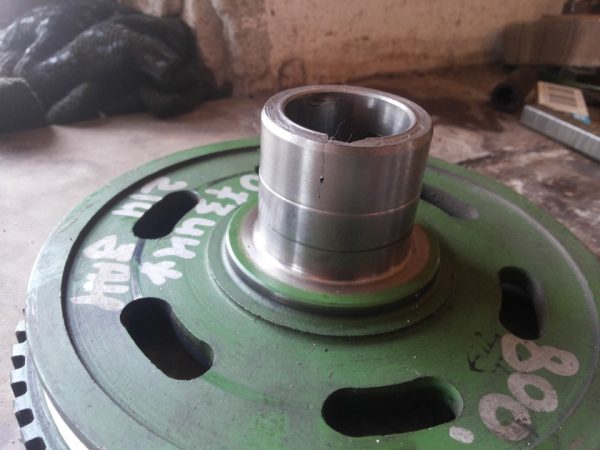
- We install the crankshaft pulley and fasten it with a 38 bolt.Having installed the crankshaft pulley on the shaft, we fix it with a bolt of 38
- We install elements of the timing mechanism, including the cylinder head.
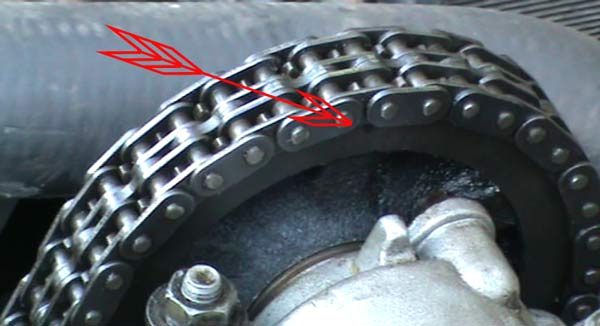
- We pull the chain.After installing the head and securing the sprocket to the camshaft, you will need to tighten the chain
- We set marks on both shafts.For proper engine operation, the position of the camshaft and crankshaft is set according to the marks
- We carry out the installation of the remaining parts and assemblies.

To improve sealing, engine gaskets are recommended to be installed using a sealant.
Video: installing the crankshaft on the "classic"

Crankshaft pulley
The generator and water pump on the VAZ 2106 are driven by a belt from the crankshaft pulley. When carrying out repair work with the engine, attention should also be paid to the condition of the pulley: is there any visible damage (cracks, scuffs, dents). If defects are found, the part should be replaced.
During installation, the pulley on the crankshaft must sit evenly, without distortion. Despite the fact that the pulley sits quite tightly on the shaft, a key is used to prevent rotation, which can also be damaged. A defective part must be replaced.
Crankshaft marks
In order for the engine to work flawlessly, after installing the crankshaft, the correct ignition setting is necessary. There is a special ebb on the crankshaft pulley, and on the cylinder block there are three marks (two short and one long) corresponding to the ignition timing. The first two indicate the angle of 5˚ and 10˚, and the long one - 0˚ (TDC).
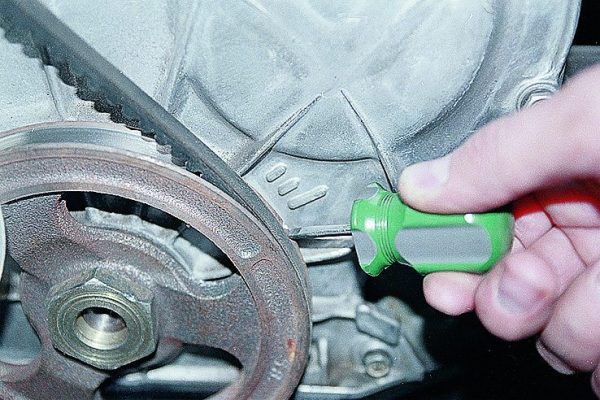
The mark on the crankshaft pulley is located opposite the length of the risks on the cylinder block. There is also a mark on the camshaft sprocket that must be aligned with the ebb on the bearing housing. To rotate the crankshaft, a special key of the appropriate dimension is used. According to the marked marks, the piston of the first cylinder is at the top dead center, while the slider on the ignition distributor must be installed opposite the contact of the first cylinder.
Despite the fact that the crankshaft is a critical part of any engine, even a novice car mechanic can repair the mechanism, with the exception of the grinding stage. The main thing is to select the elements according to the dimensions of the shaft, and then follow the step-by-step instructions for assembling it.

