Carburetor DAAZ 2105: do-it-yourself device, repair and adjustment
Content
Two-chamber carburetors of the Ozone series were developed on the basis of products of the Italian brand Weber, which were installed on the first Zhiguli models - VAZ 2101-2103. Modification DAAZ 2105, designed for gasoline engines with a working volume of 1,2–1,3 liters, differs little from its predecessor. The unit retained an important quality - reliability and relative simplicity of design, which allows the motorist to independently regulate the fuel supply and eliminate minor malfunctions.
Purpose and device of the carburetor
The main function of the unit is to ensure the preparation and dosage of the air-fuel mixture in all engine operating modes without the participation of electronic systems, as is implemented in more modern cars with an injector. The DAAZ 2105 carburetor, mounted on the intake manifold mounting flange, solves the following tasks:
- provides a cold start of the motor;
- supplies a limited amount of fuel for idling;
- mixes fuel with air and sends the resulting emulsion to the collector at the operating modes of the power unit;
- doses the amount of the mixture depending on the angle of opening of the throttle valves;
- organizes the injection of additional portions of gasoline during the acceleration of the car and when the accelerator pedal is pressed “to the stop” (both dampers are maximally open).
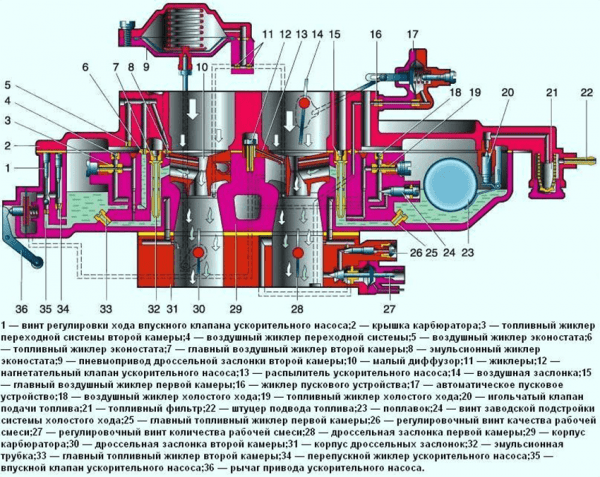
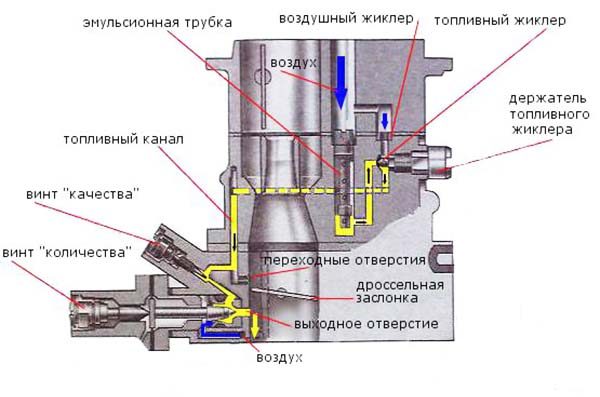
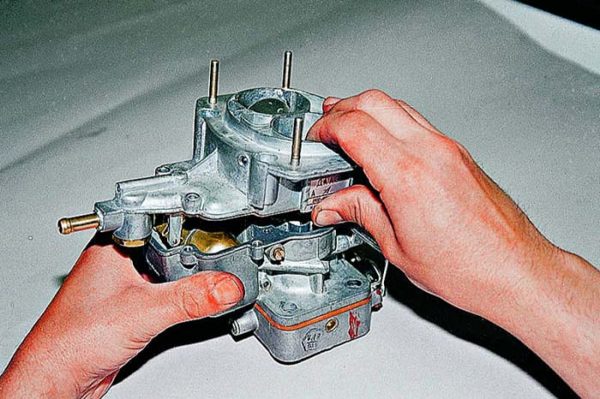
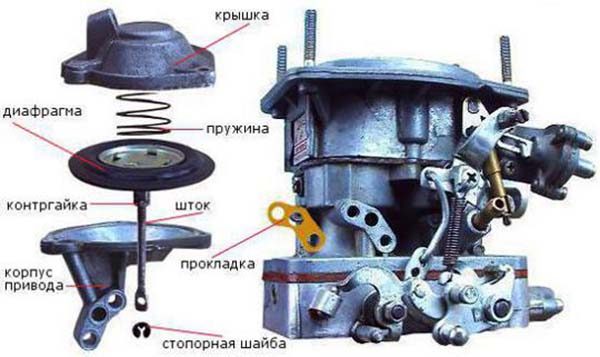
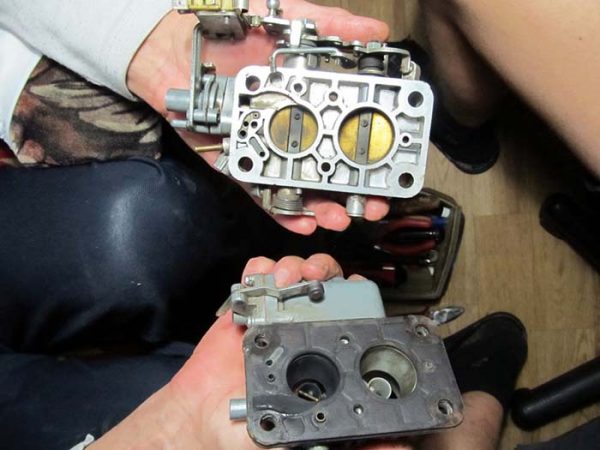
The carburetor consists of 3 parts - a cover, a main block and a throttle body. The lid contains a semi-automatic starting system, a strainer, a float with a needle valve and an econostat tube. The upper part is attached to the middle block with five M5 screws.

The device of the main part of the carburetor is more complex and includes the following elements:
- float chamber;
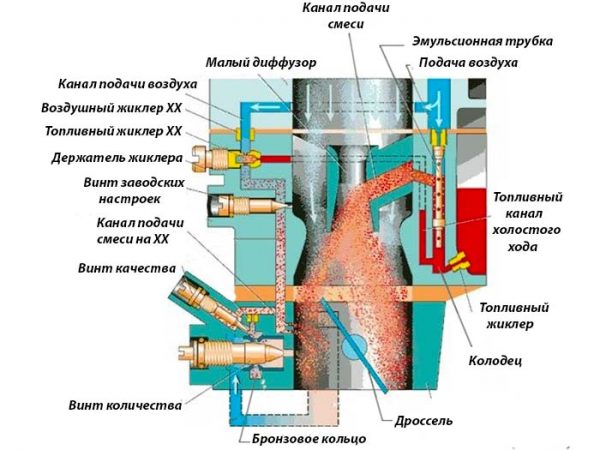
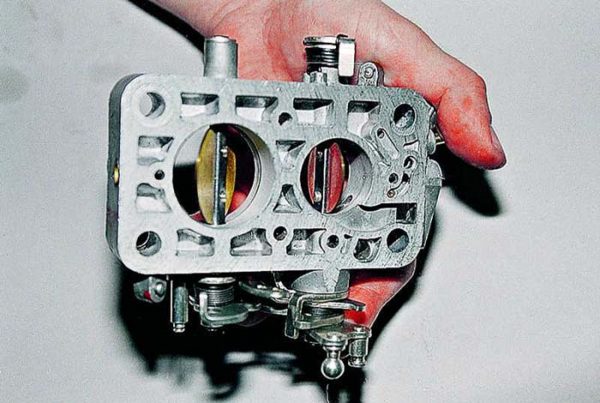
- the main dosing system - fuel and air jets, large and small diffusers (shown in detail in the diagram);
- pump - accelerator, consisting of a membrane unit, a shut-off ball valve and a sprayer for fuel injection;
- channels of the transition system and idling with jets;
- vacuum drive unit for the secondary chamber damper;
- channel for supplying gasoline to the econostat tube.
 In the middle block of the carburetor are the main metering elements - jets and diffusers
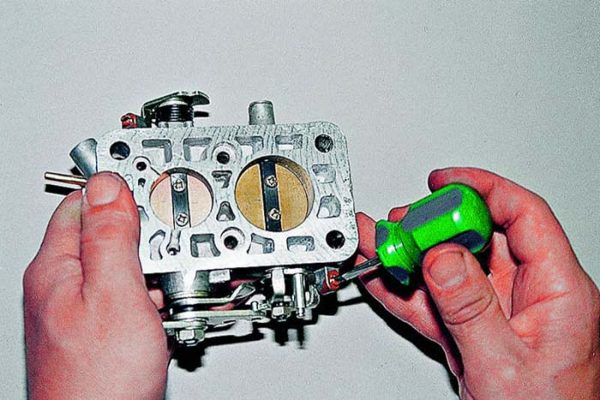
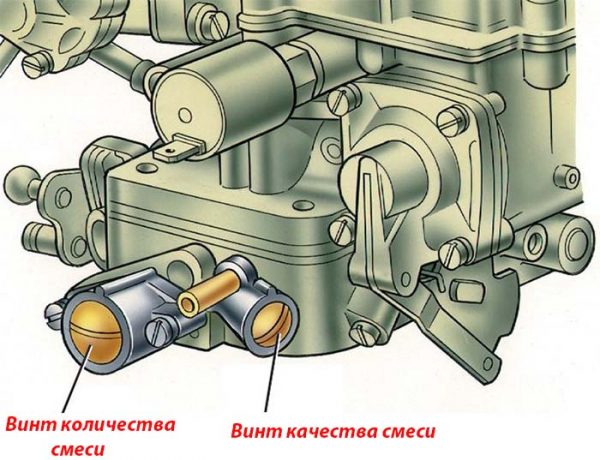
In the lower part of the unit, axles with throttle valves and main adjusting screws are installed - the quality and quantity of the air-fuel mixture. Also in this block are the outputs of many channels: idle, transitional and starting systems, crankcase ventilation and vacuum extraction for the ignition distributor membrane. The lower part is attached to the main body with two M6 screws.
Video: device units DAAZ 2105

The algorithm works
Without a general understanding of the principle of operation of the carburetor, it is difficult to repair and adjust it. Actions at random will not give a positive result or cause more harm.
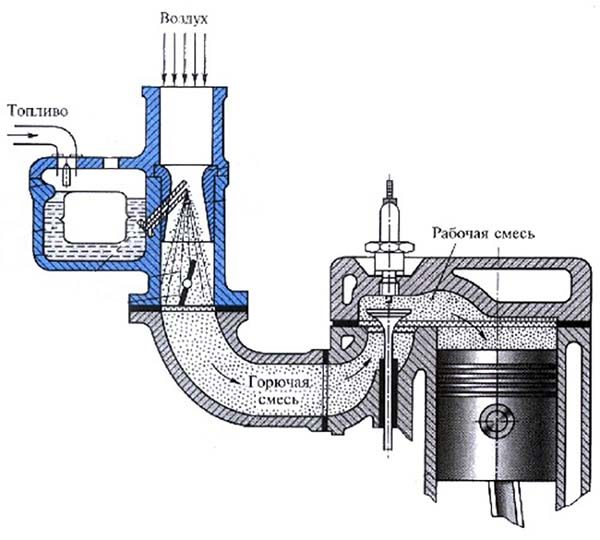
The principle of carburation is based on the supply of fuel due to the rarefaction created by the pistons of an atmospheric gasoline engine. The dosage is carried out by jets - parts with calibrated holes built into the channels and capable of passing a certain amount of air and gasoline.
The work of the DAAZ 2105 carburetor begins with a cold start:
- The air supply is blocked by a damper (the driver pulls the suction lever), and the throttle of the primary chamber is slightly opened by a telescopic rod.
- The motor draws the most enriched mixture from the float chamber through the main fuel jet and a small diffuser, after which it starts up.
- So that the engine does not “choke” with a large amount of gasoline, the starting system membrane is triggered by rarefaction, slightly opening the air damper of the primary chamber.
- After the engine warms up, the driver pushes the choke lever, and the idle system (CXX) begins to supply the fuel mixture to the cylinders.Starter choke closes chamber until engine starts
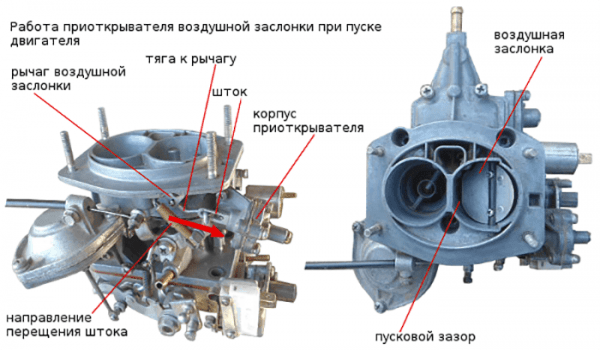
On a car with a serviceable power unit and carburetor, a cold start is made without pressing the gas pedal with the choke lever fully extended.
At idle, the throttles of both chambers are tightly closed. The combustible mixture is sucked in through an opening in the wall of the primary chamber, where the CXX channel exits. An important point: in addition to the metering jets, inside this channel there are adjusting screws for quantity and quality. Please note: these controls do not affect the operation of the main dosing system, which operates when the gas pedal is depressed.
The further algorithm of the carburetor operation looks like this:
- After pressing the accelerator pedal, the throttle of the primary chamber opens. The engine begins to suck in fuel through a small diffuser and main jets. Note: CXX does not turn off, it continues to work in conjunction with the main fuel supply.
- When the gas is pressed sharply, the accelerator pump membrane is activated, injecting a portion of gasoline through the nozzle of the sprayer and the open throttle directly into the manifold. This eliminates "failures" in the process of dispersing the car.
- Further increase in crankshaft speed causes an increase in vacuum in the manifold. The force of the vacuum begins to draw in the large membrane, pulling open the secondary chamber. The second diffuser with its own pair of jets is included in the work.
- When both valves are fully open and the engine does not have enough fuel to develop maximum power, gasoline begins to be sucked directly from the float chamber through the econostat tube.When the throttle is opened, the fuel emulsion enters the manifold through the idle channels and through the main diffuser
To prevent a "failure" when opening the secondary damper, a transition system is involved in the carburetor. In structure, it is identical to the CXX and is located on the other side of the unit. Only a small hole for the fuel supply is made above the closed throttle valve of the secondary chamber.
Faults and solutions
Adjusting the carburetor with screws does not help to get rid of problems and is done once - during the tuning process. Therefore, if a malfunction occurs, you cannot thoughtlessly turn the screws, the situation will only worsen. Find out the true cause of the breakdown, eliminate it, and then proceed to the adjustment (if necessary).
Before attempting to repair the carburetor, make sure that the ignition system, the fuel pump, or weak compression in the engine cylinders are not the culprit. A common misconception: shots from a silencer or carburetor are often mistaken for a unit malfunction, although there is an ignition problem here - a spark on a candle forms too late or early.
What malfunctions are directly related to the carburetor:
- the engine does not start - seizes and immediately stalls;
- the engine does not idle;
- "Dips" when you sharply press the accelerator pedal;
- the power unit "does not pull" or is unstable;
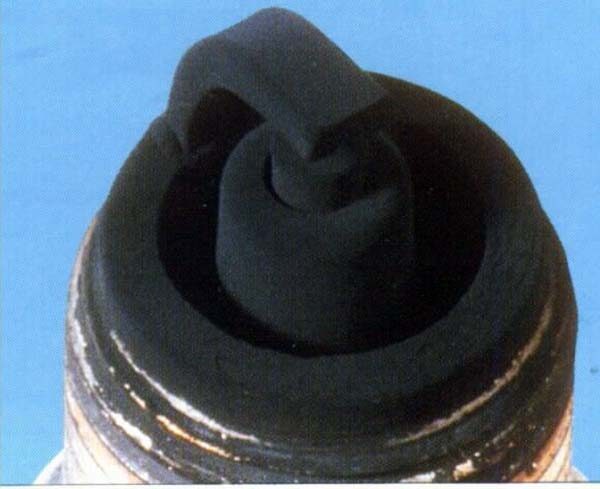
- increased consumption of gasoline, accompanied by black smoke from the exhaust pipe and the formation of soot on the spark plug electrodes.Black deposits on the spark plug electrodes occur when an enriched mixture is supplied
These problems have several causes, so it is proposed to consider them separately.
Difficulty starting the engine
If the cylinder-piston group of the VAZ 2105 engine is in working condition, then sufficient vacuum is created in the manifold to suck in the combustible mixture. The following carburetor malfunctions can make it difficult to start:
- When the engine starts and immediately stalls “cold”, check the condition of the starter membrane. It does not open the air damper and the power unit "chokes" from an excess of fuel.The membrane is responsible for the automatic opening of the air damper
- During a cold start, the engine seizes several times and starts only after pressing the gas pedal - there is a lack of fuel. Make sure that when the suction is extended, the air damper closes completely (the drive cable may have come off), and there is gasoline in the float chamber.
- “On a hot” engine does not start immediately, it “sneezes” several times, there is a smell of gasoline in the cabin. Symptoms indicate that the fuel level in the float chamber is too high.

Checking the fuel in the float chamber is done without disassembly: remove the air filter cover and pull the primary throttle rod, simulating the gas pedal. In the presence of gasoline, the spout of the accelerator pump, located above the primary diffuser, should be sprayed with a dense jet.
When the level of gasoline in the carburetor chamber exceeds the allowable level, fuel may flow into the manifold spontaneously. A hot engine will not start - it first needs to throw excess fuel from the cylinders into the exhaust tract. To adjust the level, follow these steps:
- Remove the air filter housing and unscrew the 5 carburetor cover screws.
- Disconnect the fuel line from the fitting and remove the cover by disconnecting the telescopic rod.
- Shake out the remaining fuel from the element, turn it upside down and check the operation of the needle valve. The simplest way is to draw in air from the fitting with your mouth, a serviceable “needle” will not allow you to do this.
- By bending the brass tongue, adjust the height of the float above the plane of the cover.The gap from the float to the plane of the cover is set according to the ruler or template
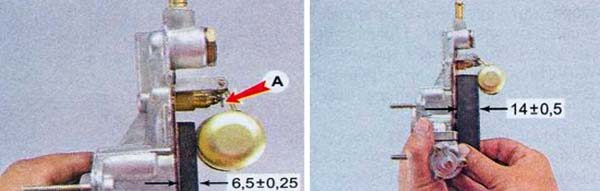
With the needle valve closed, the distance between the float and the cardboard spacer should be 6,5 mm, and the stroke on the axis should be about 8 mm.
Video: adjusting the fuel level in the float chamber

Lost idle
If the engine stalls at idle, troubleshoot in this order:
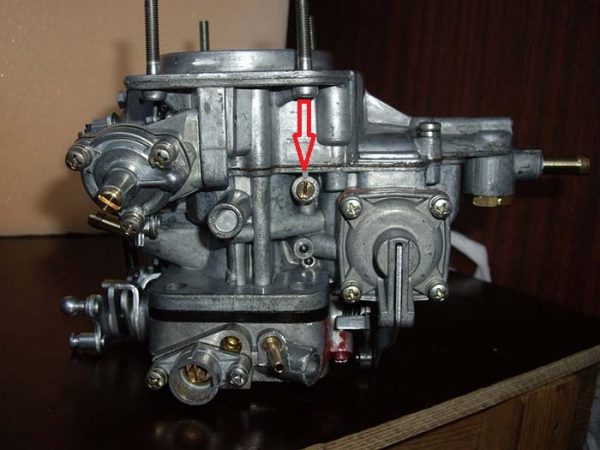
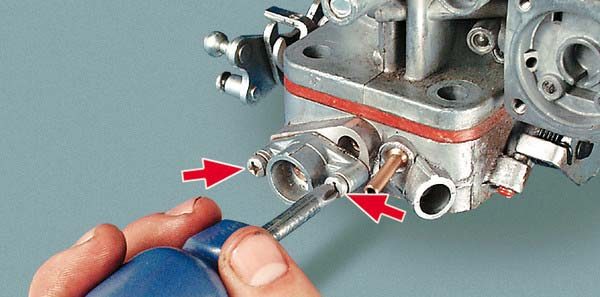
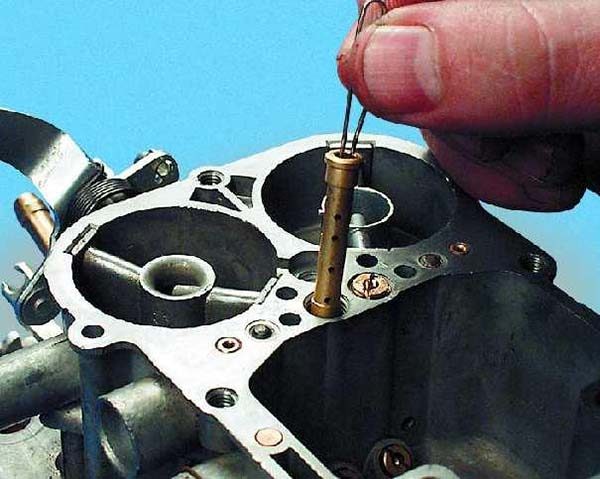
- The first action is to unscrew and blow out the idle fuel jet, located on the right side of the middle part of the carburetor.The CXX fuel jet is in the middle part next to the accelerator pump diaphragm
- Another reason is the CXX air jet is clogged. It is a calibrated bronze bushing pressed into the channel of the middle block of the unit. Remove the carburetor cover as described above, find a hole with a bushing on top of the flange, clean it with a wooden stick and blow it.The CXX air jet is pressed into the carburetor body
- The idle channel or outlet is clogged with dirt. In order not to remove or disassemble the carburetor, buy an aerosol cleaning fluid in a can (for example, from ABRO), unscrew the fuel jet and blow the agent into the hole through the tube.The use of an aerosol liquid makes it easier to clean the carburetor

If the previous recommendations did not resolve the problem, try blowing aerosol fluid into the throttle body opening. To do this, dismantle the mixture quantity adjusting block together with the flange by unscrewing 2 M4 screws. Pour detergent into the opened hole, do not turn the quantity screw itself! If the result is negative, which happens quite rarely, contact the carburetor master or completely disassemble the unit, which will be discussed later.
The culprit of the unstable operation of the engine at idle is rarely the carburetor. In especially neglected cases, air leaks into the collector from under the “sole” of the unit, between sections of the body or through a crack that has formed. To find and fix the problem, the carburetor must be disassembled.
How to get rid of "failures"
The culprit of the "failures" when you sharply press the accelerator pedal in the vast majority of cases is the pump - the carburetor accelerator. To fix this annoying problem, follow these steps:
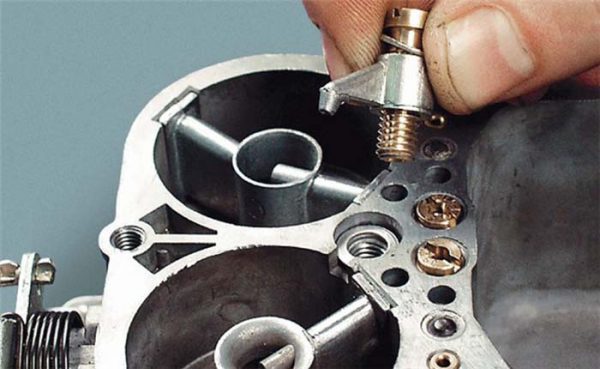
- Putting a rag under the lever that presses the pump membrane, unscrew the 4 M4 screws and remove the flange. Remove the membrane and check its integrity, if necessary, replace with a new one.When removing the cover and membrane, make sure that the spring does not fall out.
- Remove the top cover of the carburetor and unscrew the nozzle of the atomizer held by a special screw. Thoroughly blow through the calibrated holes in the atomizer and screw. It is allowed to clean the spout with a soft wire with a diameter of 0,3 mm.Spout-shaped atomizer unscrews together with clamping screw
- The cause of a weak jet from the atomizer may be the souring of the ball valve built into the middle block next to the pump diaphragm. Use a thin screwdriver to unscrew the bronze screw (located on top of the housing platform) and remove the flange with the membrane. Fill the hole with cleaning fluid and blow out.
In old heavily worn carburetors, problems can be created by a lever, whose working surface has been significantly worn out and underpressures the "nickle" of the diaphragm. Such a lever should be changed or the worn end should be carefully riveted.
Small jerks when the accelerator is pressed “all the way” indicate contamination of the channels and jets of the transition system. Since its device is identical to the CXX, fix the problem according to the instructions presented above.
Video: cleaning the accelerator pump ball valve

Loss of engine power and sluggish acceleration
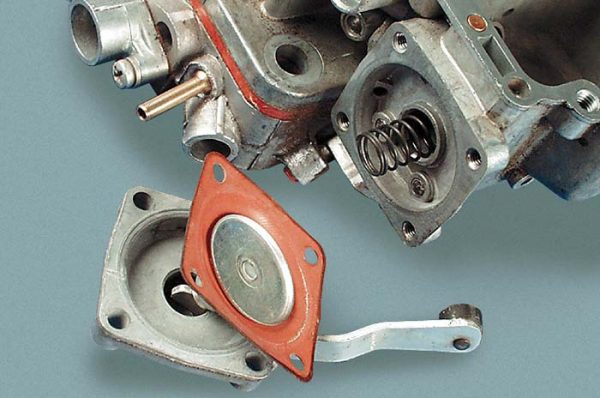
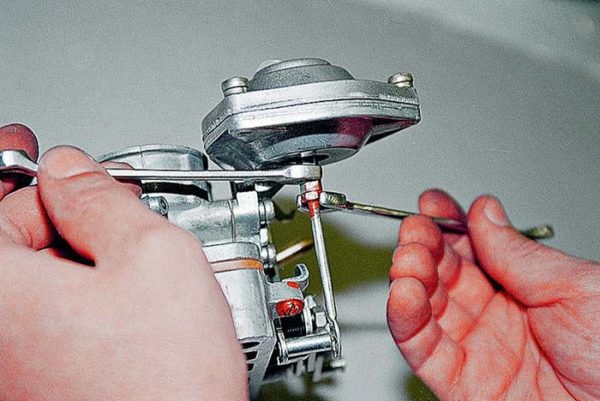
There are 2 reasons why the engine loses power - lack of fuel and failure of the large membrane that opens the throttle of the secondary chamber. The last failure is easy to detect: unscrew the 3 M4 screws securing the vacuum drive cover and get to the rubber diaphragm. If it is cracked, install a new part and assemble the drive.
In the flange of the vacuum drive there is an air channel outlet sealed with a small rubber ring. When disassembling, pay attention to the condition of the seal and, if necessary, change it.
With a working secondary throttle drive, look for the problem elsewhere:
- Using a 19 mm wrench, unscrew the plug on the cover (located near the fitting). Remove and clean the filter mesh.
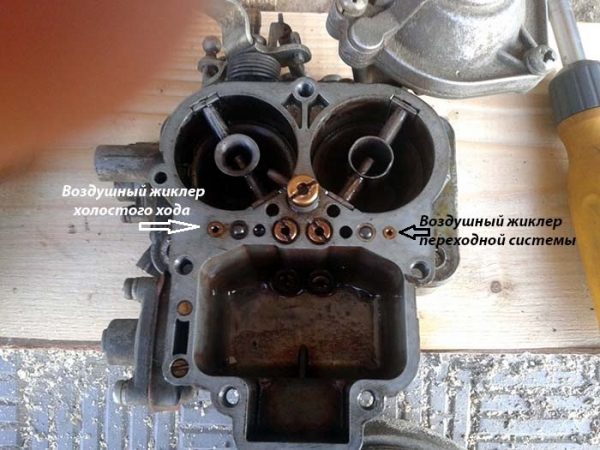
- Remove the cover of the unit and unscrew all the main jets - fuel and air (do not confuse them). Using tweezers, remove the emulsion tubes from the wells and blow washing liquid into them.The emulsion tubes are located in wells under the main air jets.
- Having covered the middle part of the carburetor with a rag, blow out the wells of the air and fuel jets.
- Gently clean the jets themselves with a wooden stick (a toothpick will do) and blow with compressed air. Assemble the unit and check the behavior of the machine by a control run.
The reason for the lack of fuel may be a low level of gasoline in the float chamber. How to properly adjust it is described above in the appropriate section.
Problems with high gas mileage
Giving too rich a mixture to the cylinders is one of the most common problems. There is a way to make sure that it is the carburetor that is to blame: with the engine idling, fully tighten the quality screw, counting the turns. If the engine does not stall, get ready for repair - the power unit draws fuel from the float chamber, bypassing the idle system.
To begin with, try to get by with a little blood: remove the cap, unscrew all the jets and generously treat the accessible holes with an aerosol agent. After a few minutes (exactly indicated on the can), blow through all the channels with a compressor developing a pressure of 6-8 bar. Assemble the carburetor and make a test run.
An over-enriched mixture makes itself felt with black soot on the electrodes of the spark plugs. Clean the spark plugs before the test run, and check the condition of the electrodes again upon return.
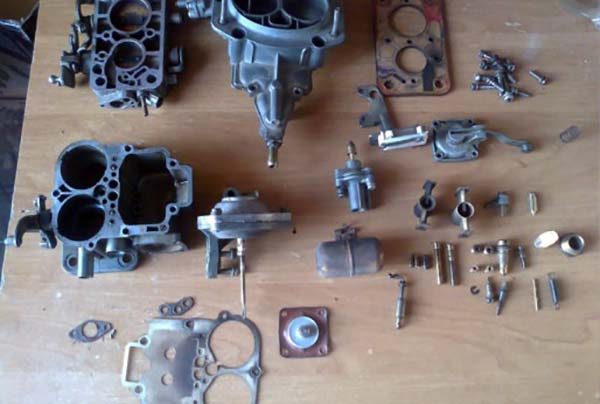
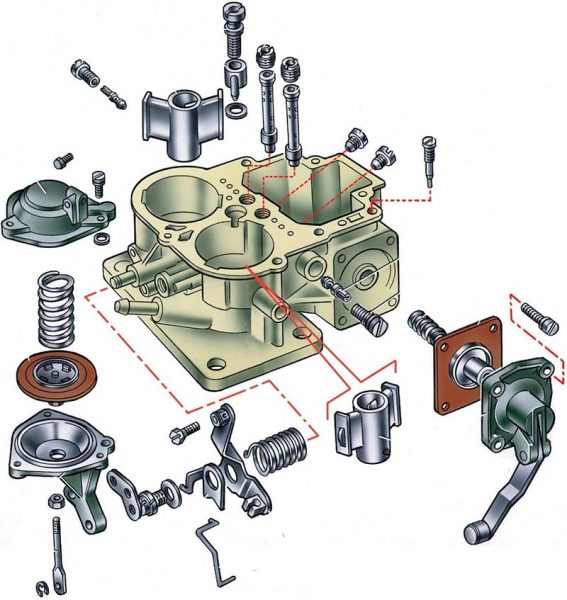
If local flushing does not work, disassemble the carburetor in this order:
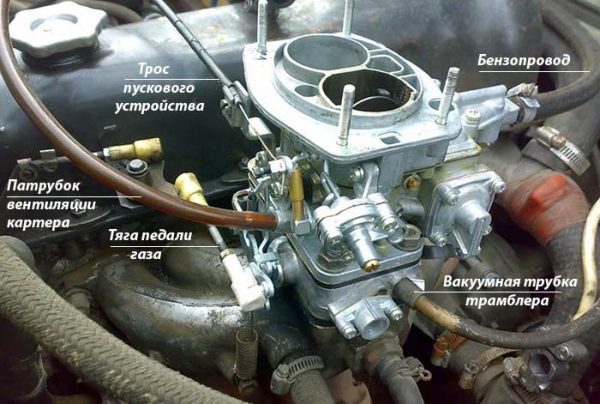
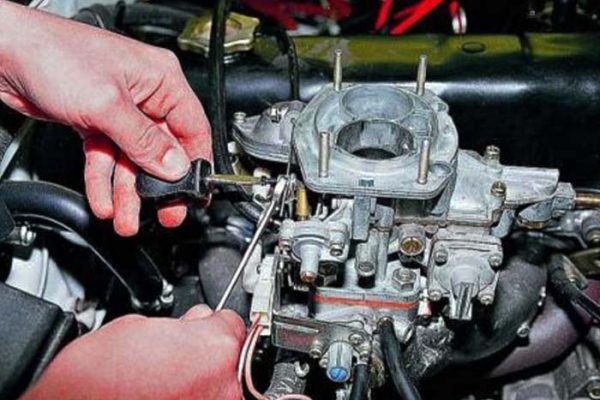
- Disconnect the fuel pipe, gas pedal rod, starter cable and 2 tubes - crankcase ventilation and distributor vacuum.Before removing the carburetor, you need to disconnect 2 drives and 3 pipes
- Remove the top cover.
- Using a 13 mm wrench, unscrew the 4 nuts securing the unit to the manifold flange.
- Remove the carburetor from the studs and unscrew the 2 M6 screws holding the bottom. Separate it by disengaging the vacuum drive and trigger links.Between the bottom and middle of the carburetor there are 2 cardboard spacers that need to be replaced
- Dismantle the “plate” of the vacuum drive by unscrewing 2 M5 screws. Turn out the quality and quantity screws, all jets and the nozzle of the atomizer.
The next task is to thoroughly wash all channels, chamber walls and diffusers. When directing the canister tube into the holes of the channels, make sure that the foam comes out from the other end. Do the same with compressed air.
After purging, turn the bottom towards the light and check that there are no gaps between the throttle valves and the walls of the chambers. If any are found, the dampers or the lower block assembly will have to be changed, since the engine draws fuel uncontrollably through the slots. Entrust the operation of replacing chokes to a specialist.
Performing a complete disassembly of the DAAZ 2105 carburetor, it is recommended to do the full range of operations listed in the previous section: clean the jets, check and change the membranes, adjust the fuel level in the float chamber, and so on. Otherwise, you run the risk of finding yourself in a situation where one breakdown endlessly replaces another.
As a rule, the lower plane of the middle block is arched from heating. The flange must be ground on a large grinding wheel, after pulling out the bronze bushings. The rest of the surfaces should not be sanded. When assembling, use only new cardboard spacers. Install the carburetor in place and proceed to the setting.
Video: complete disassembly and repair of the Ozone carburetor

Adjustment instructions
To set up a cleaned and operable carburetor, prepare the following tool:
- short flat screwdrivers with a narrow and wide slot;
- open-end wrench size 10 mm;
- the same, 8 mm in size;
- narrow pliers.
The initial adjustment consists in fitting the trigger cable and the gas pedal linkage. The latter is easily adjusted: the plastic tip is set opposite the hinge on the carburetor axis by twisting along the thread. Fixation is made with a nut for a key size of 10 mm.
The suction cable is configured as follows:
- Push the lever in the passenger compartment to the stop, put the air damper in a vertical position.
- Pass the cable through the eye of the cover, insert the end into the hole of the latch.
- While holding the “keg” with pliers, tighten the bolt with a wrench.
- Move the choke lever to make sure the damper opens and closes fully.
The next step is to check the throttle opening of the secondary chamber. The stroke of the diaphragm and the rod must be sufficient to open the damper by 90°, otherwise unscrew the nut on the rod and adjust its length.
It is important to clearly set the throttle support screws - they should support the levers in the closed state. The goal is to avoid friction of the damper edge against the chamber wall. It is unacceptable to adjust the idle speed with the support screw.
The accelerator pump does not need additional adjustment. Make sure that the lever wheel is adjacent to the rotating sector, and the end is against the "heel" of the membrane. If you want to improve acceleration dynamics, replace the regular atomizer marked "40" with an enlarged size "50".
Idling is adjusted in the following order:
- Loosen the quality screw by 3-3,5 turns, the quantity screw by 6-7 turns. Using the starting device, start the engine. If the crankshaft speed is too high, reduce it with the quantity screw.
- Let the engine warm up, remove the suction and set the crankshaft speed to 900 rpm using the quantitative screw, guided by the tachometer.
- Stop the engine after 5 minutes and check the condition of the spark plug electrodes. If there is no soot, the adjustment is over.
- When black deposits appear on the candle, clean the electrodes, start the engine and tighten the quality screw by 0,5-1 turn. Display the tachometer readings at 900 rpm with the second screw. Let the engine run and check the spark plugs again.Adjusting screws control the flow of the fuel mixture at idle
The best way to set up a DAAZ 2105 carburetor is to connect a gas analyzer to the exhaust pipe that measures the level of CO. To reach the optimal consumption of gasoline, you need to achieve readings of 0,7-1,2 at idle and 0,8-2 at 2000 rpm. Remember, adjusting screws do not affect gasoline consumption at high crankshaft speeds. If the readings of the gas analyzer exceed 2 CO units, then the size of the fuel jet of the primary chamber should be reduced.
Ozone carburetors of the DAAZ 2105 model are considered relatively easy to repair and adjust. The main problem is the decent age of these units, produced since the times of the USSR. Some copies have worked out the required resource, as evidenced by a large backlash in the throttle axes. Heavily worn carburetors are not tuneable, so they have to be replaced entirely.

