How to replace the power steering control unit
Symptoms of a power steering control module failure include an illuminated EPS (electric power steering) warning light or difficulty driving.
The Power Steering ECU has been designed to help solve a persistent problem with most traditional power steering systems. With conventional belt-driven hydraulic power steering, the belt was attached to a series of pulleys (one on the crankshaft and one on the power steering pump). Continuous operation of this belt-driven system placed enormous stress on the engine, resulting in loss of engine power, fuel efficiency and increased vehicle emissions. As vehicle engine efficiency and emission reduction became the primary concern of most car manufacturers before the turn of the century, they solved many of these problems by inventing the electric power steering motor. This system eliminated the need for power steering fluid, power steering pumps, belts, and other components that powered this system.
In some cases, if there is a problem with this system, your electronic power steering system will automatically shut down to prevent damage due to overheating. First of all, this manifests itself when driving on steep slopes with a large number of turns. In these cases, the system is fine and normal operation will resume after the temperature drops. However, if there is a problem with the power steering control module, it may display several general warning signs that will alert the driver to replace that component. Some of these symptoms include the EPS light on the dashboard coming on or driving problems.
Part 1 of 1: Power Steering Control Module Replacement
Necessary materials
- Socket wrench or ratchet wrench
- flashlight
- Penetrating Oil (WD-40 or PB Blaster)
- Standard size flat head screwdriver
- Replacing the power steering control unit
- Protective equipment (safety goggles and gloves)
- Scan Tool
- Special tools (if requested by the manufacturer)
Step 1: Disconnect the car battery. Before removing any parts, locate the vehicle battery and disconnect the positive and negative battery cables.
This step should always be the first thing you do when working on any vehicle.
Step 2: Remove the steering column from the steering box.. Before removing the inner dash or shrouds, make sure you can remove the steering column from the steering box first.
This is often the hardest part of the job and you should first make sure you have the right tools and experience to do it before removing other components.
To remove the steering column, on most domestic and imported vehicles, follow these steps:
Remove engine covers and other components that block access to the steering gear. It can be an engine cover, an air filter housing and other parts. Remove all electrical connections to the steering column and steering gear.
Locate the steering gear and steering column connection. It is usually connected by a series of bolts (two or more) which are fastened with a bolt and nut. Remove the bolts holding the two components together.
Set the steering column shaft aside and proceed into the driver's cab to remove the instrument panel and steering wheel.
Step 3: Remove the steering column covers. Each vehicle has different instructions for removing the steering column cover. There are usually two bolts on the sides and two on the top or bottom of the steering column that are hidden by plastic covers.
To remove the steering column cover, remove the plastic clips covering the bolts. Then remove the bolts that secure the housing to the steering column. Finally, remove the steering column covers and set them aside.
Step 4: Remove the steering wheel. In most vehicles, you will need to remove the airbag center piece from the steering wheel before you can remove the steering wheel.
Consult your service manual for these exact steps.
After you have removed the airbag, you can usually remove the steering wheel from the steering column. On most vehicles, the steering wheel is attached to the column with one or five bolts.
Step 5: Remove the dashboard. All vehicles have different steps and requirements for removing the dashboard, so check your service manual for specific steps to follow.
Most power steering control units can only be accessed with the instrument panel lower covers removed.
Step 6: Remove the bolts securing the steering column to the vehicle.. On most domestic and imported vehicles, the steering column is attached to a housing that attaches to the firewall or vehicle body.
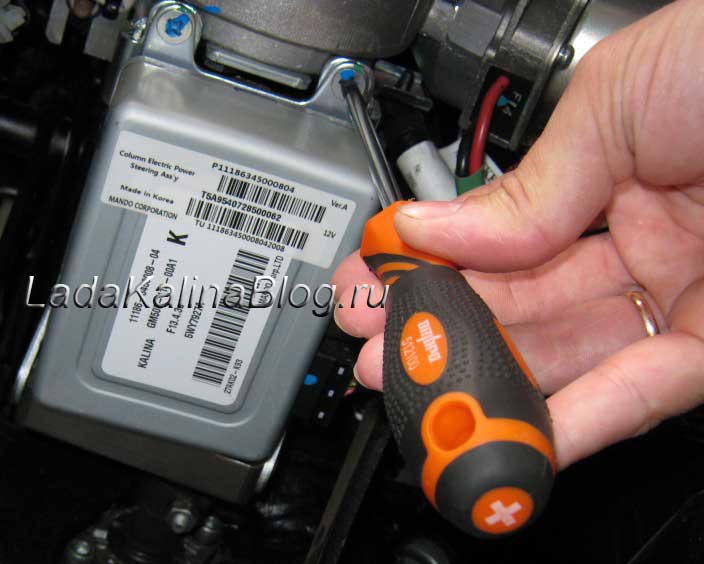
Step 7: Remove the wiring harness from the power steering control module.. There are usually two electrical harnesses connected to the steering control unit.
Remove these harnesses and mark their location with a piece of tape and a pen or colored marker.
Step 8: Remove the steering column from the car.. By removing the steering column, you can replace the power steering control unit at a workbench or other location away from the vehicle.
Step 9: Replace the power steering control module.. Using the instructions provided to you by the manufacturer in the service manual, remove the old power steering control unit from the steering column and install the new system.
They are usually attached to the steering column with two bolts and can only be installed one way.
Step 10: Reinstall the steering column. Once the new power steering control unit has been successfully installed, the rest of the project is simply putting everything back together in the reverse order of removal.
Install the steering column from the driver's cab. Attach the steering column to the firewall or body. Connect the electrical harnesses to the power steering control module. Reinstall the instrument panel and steering wheel.
Reinstall the airbag and connect the electrical connectors to the steering wheel. Reinstall the steering column covers and reattach them to the steering gear.
Connect all electrical connections to the steering gear and steering column inside the engine compartment. Reinstall any engine covers or components that you had to remove to gain access to the steering box.
Step 12: Test Run and Driving. Connect the battery and erase all error codes in the ECU using a scanner; they must be reset in order for the system to communicate with the ECM and operate correctly.
Start the car and turn the steering wheel left and right to make sure the steering is working properly.
Once you have completed this simple test, drive the vehicle on a 10-15 minute road test to ensure that the steering system is working properly under various road conditions.
If you have read these instructions and are still not 100% sure about completing this repair, contact one of the local ASE certified mechanics from AvtoTachki to perform the power steering control unit replacement for you.