How to replace the crankshaft position sensor
The crankshaft position sensor, along with the camshaft sensor, helps the vehicle determine top dead center, among other engine management tasks.
Your car's computer uses data from the crankshaft position sensor to determine where top dead center is. Once it finds top dead center, the computer counts the number of teeth on the so-called tone wheel to calculate engine speed and know exactly when to turn on the fuel injectors and ignition coils.
When this component fails, your engine may run poorly or not at all. The steps below to replace the crankshaft position sensor are the same for most engines. While on most vehicles the sensor is located at the front of the engine near the crankshaft pulley, there are many different engine designs so please refer to your vehicle's factory service manual for detailed instructions on where to find the crankshaft position sensor and any specific service. instructions.
Part 1 of 1: Replacing the crankshaft position sensor
Necessary materials
- Jack
- Jack stands
- Ratchet and socket set (1/4” or 3/8” drive)
- New crankshaft position sensor
Step 1: Prepare the car. Jack up the vehicle high enough to access the crankshaft position sensor. Secure the vehicle in this position with jack stands.
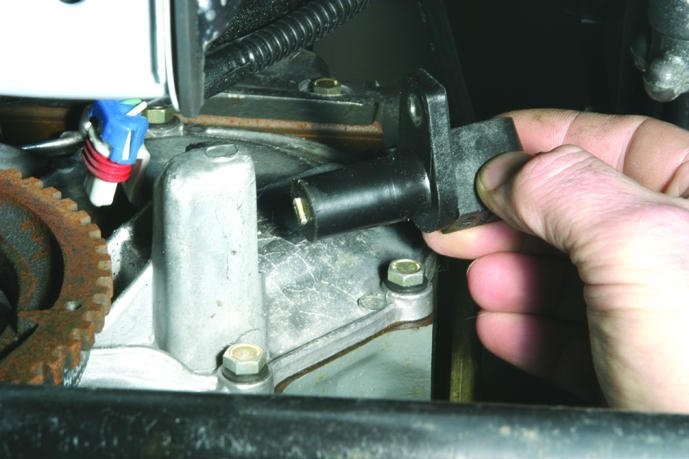
Step 2: Disconnect the electrical connector. Disconnect the sensor electrical connector from the engine wiring harness.
Step 3: Locate and remove the crankshaft position sensor.. Locate the sensor on the front of the engine near the crankshaft pulley and use an appropriately sized socket and ratchet to remove the sensor clamp bolt.
Gently but firmly twist and pull the sensor to remove it from the engine.
Step 4: Prepare the o-ring. Lightly lubricate the O-ring on the new sensor to ease installation and prevent damage to the O-ring during installation.
Step 5: Install the new sensor. Gently but firmly screw the new crankshaft position sensor into place. Reinstall the original bolt and tighten to the torque specified in the factory service manual.
Step 6: Connect the electrical connector Insert the new crankshaft position sensor into the engine wiring harness, making sure the connector clip is engaged so that the sensor does not come off during operation.
Step 7: Lower the car. Carefully remove the jacks and lower the vehicle.
Step 8: Clearing codes If the check engine light is on, use a scan tool to read your vehicle's computer for DTCs (Diagnostic Trouble Codes). If DTCs were detected during this diagnostic test. Use the scan tools to clear the codes and start the car to ensure proper operation.
By following the guidelines above, you should be able to successfully replace a failed crankshaft position sensor. However, if you are not comfortable doing the work yourself, a certified technician, such as from AvtoTachki, can replace the crankshaft position sensor for you.