How to replace the yaw rate sensor
Yaw rate sensors monitor traction, stability, and anti-lock braking to alert you when the vehicle leans dangerously.
The yaw rate sensors are designed to keep the vehicle within certain safety parameters by connecting to the stability, abs and traction control systems of most modern vehicles. The yaw rate sensor monitors your vehicle's traction control, stability control, and anti-lock braking system to alert you when your vehicle's lean (yaw) reaches an unsafe level.
Part 1 of 2: Removing the old yaw rate sensor
Necessary materials
- Hex socket set (metric and standard sockets)
- Pliers in assortment
- Screwdriver assortment
- Combination wrench set (metric and standard)
- Disposable gloves
- flashlight
- Set of metric and standard keys
- There is a pry
- Ratchet (drive 3/8)
- Socket set (metric and standard 3/8 drive)
- Socket set (metric and standard 1/4 drive)
- Torx socket set
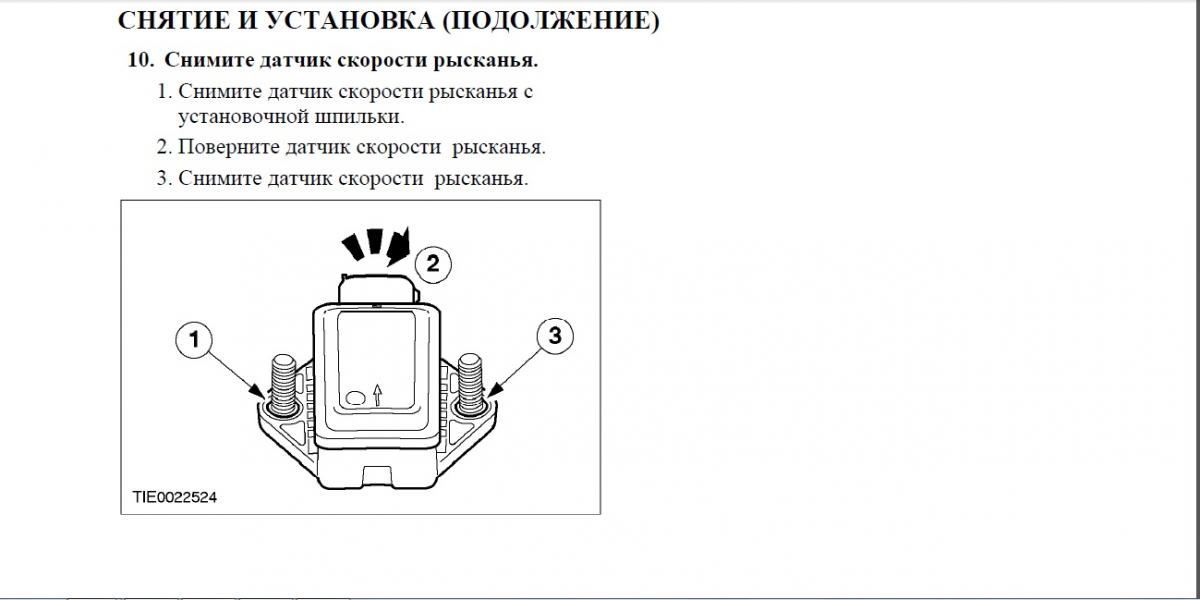
Step 1. Remove the old yaw rate sensor.. The first thing you need to do is disconnect the battery before dealing with electrical products. Now you can find out where your yaw rate sensor is. Most vehicles have the sensor under the center console or driver's seat, but some also have it under the dash.
Now you want to get in there and remove all the parts of your interior that you need to access that yaw rate sensor.
Once you've gained access to the yaw rate sensor, you want to unplug it and unscrew it from the car so you can compare it to a new one.
Part 2 of 2: Installing the New Yaw Rate Sensor
Step 1. Install a new yaw rate sensor.. Now you want to reinstall the new sensor in the same location where you removed the failed sensor. Now you can plug it back in, I would go ahead and make sure it works by plugging in a scan tool that can see the sensor, or you may need a certified mechanic to do this part for you.
Step 2: Programming the New Yaw Rate Sensor. You may need to recalibrate the sensor, and some vehicles may require special programming hardware, so be aware that this process will require a dealer or a specialized technician with the correct software and tools.
Step 3: Interior Installation. Now that it has been tested and works properly, you can start reassembling your interior. Just repeat the same process as removing everything but in reverse order to make sure you don't miss a single step or part of your interior.
Step 4: Test drive the car after repair. You really want to make sure your yaw sensor is working properly, so you need to take it out on the open road and test it. Preferably on a road with curves so you can actually check with the sensor the angles you are going to go, if all goes well you won't have a single problem and I think it's a job well done.
Replacing the yaw rate sensor is a vital part of your vehicle's handling and braking, as well as safety. Therefore, I recommend not to ignore the signs such as the abs traction control light or the check engine light, whenever any of these come on, it is recommended to have your vehicle diagnosed right away. You can do this work without leaving your home, under the guidance of a programmer-mechanic, if you do not have the opportunity to do this part of the work.