How to replace a door mirror
Content
- Part 1 of 5. Checking the condition of the outside rearview mirror
- Part 2 of 5: Removal and installation of triangular mount mirror on cars before 1996
- Part 3 of 5: Removal and installation of the outside rear-view mirror on dual vehicles with top and side rear-view mirrors.
- Part 4 of 5: Removal and installation of an external rear-view mirror
- Part 5 of 5: Checking the outside rearview mirror
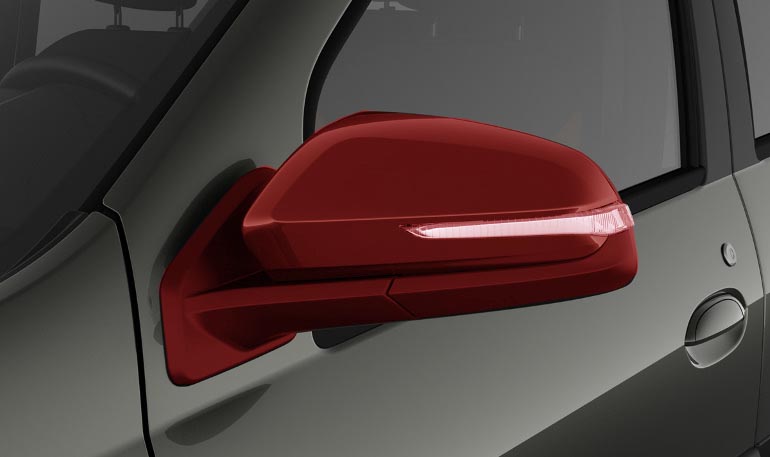
The side view mirror needs to be replaced if it hangs from its body or if the electronics inside the mirror are malfunctioning.
An automotive door mirror, also known as a side mirror, is a mirror mounted on the outside of a vehicle to help the driver see areas behind, to the sides of the vehicle, and beyond the driver's peripheral vision.
The side mirror is manually or remotely adjustable vertically and horizontally to provide adequate illumination for drivers of different heights and seating positions. Remote adjustment can be mechanical with Bowden cables or electrical with geared motors. The mirror glass may also be electrically heated and may include electrochromic dimming to reduce driver glare from the headlights of following vehicles. Increasingly, the side mirror includes turn signal repeaters of the car.
Mirrors on different vehicles can be mounted on doors, fenders, windshield and hood (for buses and larger vehicles). Mirrors mounted on vehicle doors come in three different types: triangular mount (a luxurious chrome design commonly found on older cars), top or front and bottom mount (common on vehicles with two twin wheels), and rear side mount (mounted on inside the vehicle). Door).
Today's mirrors may have electric heaters to adjust the climate for cold conditions. These mirrors will melt ice and snow from them so that drivers can see the areas behind the car.
Mirrors can be damaged in many ways. The most common ways are breaking off the mirror body and hanging it on the wires. Occasionally, the mirror inside the housing will fall out due to a hard impact or a strong push from the vehicle to the ground, such as when hitting a speed bump at 50 miles per hour. In other cases, the electronics in the mirror fail, causing the mirror to not adjust or heat up.
When replacing a mirror on a vehicle, it is recommended to install a mirror from the manufacturer. The aftermarket mirror installation may not align and the harness may not connect to the harness cable in the door. It is not safe to manually tie the mirror to the wiring harness. This can cause the wires to heat up and/or the mirror resistance to be too high, leading to premature system failure.
- Attention: Driving with a missing or cracked mirror is a safety hazard and is against the law.
Part 1 of 5. Checking the condition of the outside rearview mirror
Step 1: Locate a door with a damaged, stuck, or broken exterior mirror.. Visually inspect the exterior mirror for external damage.
For electronically adjustable mirrors, carefully tilt the mirror glass up, down, left, and right to see if the mechanism inside the outside mirror is binding. Other mirrors: Feel the glass to make sure it is free and can move.
Step 2: On the electronically controlled door mirrors, locate the mirror adjustment switch.. Place the selector on the mirror and make sure the electronics work with the mirror mechanics.
Step 3: Turn on the heated mirror switch, if applicable.. Check if the glass on the mirror starts to radiate heat.
Part 2 of 5: Removal and installation of triangular mount mirror on cars before 1996
Necessary materials
- socket wrenches
- crosshead screwdriver
- Flat head screwdriver
- Ratchet with metric and standard sockets
Step 1: Park your vehicle on a level, firm surface..
Step 2: Install wheel chocks around the rear wheels.. Apply the parking brake to prevent the rear wheels from moving.
Step 3: Install a nine volt battery in the cigarette lighter.. This will keep your computer running and save the current settings in the car.
If you don't have a nine-volt battery, no big deal.
Step 4: Open the car hood to disconnect the battery.. Disconnect the ground cable from the negative battery terminal by turning off power to the door lock actuator.
Step 5: Find the Mirror to Replace. Loosen the hex screw or Phillips head screw and remove the cover between the mirror bracket and the door.
Step 6: Remove the three mounting bolts securing the mirror base to the door.. Remove the mirror assembly and remove the rubber or cork seal.
Step 7: Install a new rubber or cork seal to the mirror base.. Place the mirror on the door, install the three fixing bolts and fix the mirror on the door.
Step 8: Place the cover on the mirror base between the mirror bracket and the door.. Tighten the hex screw or Phillips head screw to secure the cover in place.
Part 3 of 5: Removal and installation of the outside rear-view mirror on dual vehicles with top and side rear-view mirrors.
Necessary materials
- socket wrenches
- crosshead screwdriver
- Flat head screwdriver
- Ratchet with metric and standard sockets
Step 1: Find the Mirror to Replace. Remove two or three bolts on the bottom bracket that attaches to the door.
Step 2: Remove the mirror. Remove two or three bolts on the top bracket.
It is installed on the front side of the door or the top of the door. While holding the mirror, remove it from the door.
Step 3: Take a new mirror and bring it to the door.. While holding the mirror, install the two or three top or front fixing bolts.
Step 4: Install the bolts on the bottom bracket. Let the mirror hang and install the two or three bottom bolts to the bottom bracket.
Part 4 of 5: Removal and installation of an external rear-view mirror
Necessary materials
- socket wrenches
- transparent silicone
- crosshead screwdriver
- Disposable gloves
- Electric cleaner
- Flat head screwdriver
- lyle door tool
- white spirit cleaner
- Pliers with needles
- Ratchet with metric and standard sockets
- Torque bit set
Step 1: Remove the panel from the inside of the door.. Make sure you are working on the side you want to remove the mirror from.
Step 2: Remove screws and clips. Gently pry the panel away from the door all the way around and remove the screws that hold the door handle in place.
Remove the screws in the middle of the door panel. Use a flathead screwdriver or a door opener (preferred) to remove the clips around the door, but be careful not to damage the painted door around the panel.
Step 3: Remove the panel. Once all the clamps are loose, grab the top and bottom panel and pry it slightly away from the door.
Lift the entire panel straight up to release it from the latch behind the door handle.
- Attention: Some doors may have screws that secure the door panel to the door. Be sure to remove the screws before removing the door panel to avoid damaging it.
If you need to remove the power window handle:
Pry off the plastic trim on the handle (the handle is a metal or plastic lever with a metal or plastic clip). Remove the Phillips screw securing the door handle to the shaft, then remove the handle. A large plastic washer and a large coil spring will come off along with the handle.
- Attention: Some vehicles may have torque screws that secure the panel to the door.
Step 4: Disconnect the Door Latch Cable. Remove the speaker wire harness in the door panel.
Disconnect the wiring harness at the bottom of the door panel.
Step 5: Remove the plastic film from the front half of the door.. Do this carefully and you will be able to seal the plastic again.
- Attention: This plastic is needed to create a water barrier on the outside of the inner door panel. While you're doing this, check that the two drain holes at the bottom of the door are clear and that debris has not accumulated at the bottom of the door.
Step 6: Remove the harness from the mirror to the panel in the door.. Remove the three mirror mounting screws from the inside of the door and the mirror from the door.
Step 7: Clean the Harness Connections. Clean these connections in the door and door panel with an electric cleaner.
Step 8: Install the New Door Mirror. Screw in the three bolts and fix the mirror with the specified tightening torque.
Connect the harness from the new mirror to the cluster harness in the door. Refer to the instructions that came with your new mirror for installation torque specifications.
- Attention: If you don't have specifications, apply blue threadlocker to the bolts on the mirror and hand tighten 1/8 turn.
Step 9: Put the plastic film back on the front half of the door.. You may need to apply clear silicone to seal the sheet.
Step 10: Connect the wire harness at the bottom of the door panel.. Install the harness to the speaker in the door.
Connect the door latch cable to the door handle.
Step 11: Install the door panel on the door. Slide the door panel down and towards the front of the vehicle to make sure the door handle is in place.
Insert all door latches into the door, securing the door panel.
If you need to install a window handle handle, install the window handle handle and make sure the window handle handle spring is in place before attaching the handle.
Screw a small screw into the window handle handle to secure it, and install a metal or plastic clip onto the window handle handle.
Step 12: Open the car hood. Reconnect the ground cable to the negative battery post.
Remove the nine volt fuse from the cigarette lighter.
Step 13: Tighten the battery clamp.. This guarantees a good connection.
- AttentionA: If you didn't have a XNUMX-volt power saver, you'll have to reset all of your car's settings, such as the radio, power seats, and power mirrors.
Part 5 of 5: Checking the outside rearview mirror
Step 1. Check the mechanical mirror.. Move the mirror up, down, left and right to check if the movement is correct.
Check the mirror glass to make sure it is tight and clean.
Step 2: Test the Electronic Mirror. Use the mirror adjustment switch to move the mirror up, down, left, and right.
Be sure to check both rear-view mirrors by switching the switch from the left mirror to the right. Check the glass to make sure it is securely attached to the motor in the mirror housing. Turn on the mirror defroster switch and check if the mirror gets hot. Make sure the mirror glass is clean.
If your outside mirror does not work after installing a new mirror, further diagnostics may be required or an electrical component in the outside rearview mirror circuit may be faulty. If the problem persists, you should seek the assistance of one of AvtoTachki's certified mechanics to check the outside rearview mirror assembly and replace it if necessary.