How to Replace the Exhaust Gas Recirculation (EGR) Cooler
Content
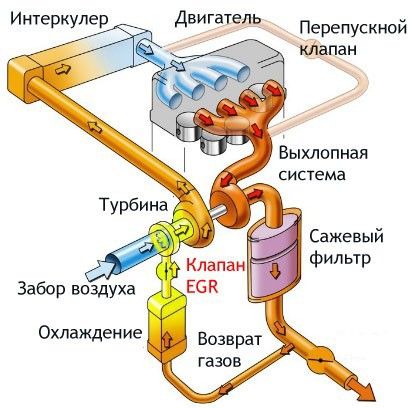
Exhaust gas recirculation (EGR) coolers lower the temperature of the exhaust gases before they enter the vehicle's engine. EGR coolers are mainly for diesel.
The Exhaust Gas Recirculation (EGR) system is used to lower combustion temperatures and reduce nitrogen oxide (NOx) emissions. This is achieved by reintroducing the exhaust gases into the combustion chamber of the engine to cool the combustion flame. In some cases, an EGR cooler is used to lower the temperature of the exhaust gases before they enter the engine. The engine coolant passes through the EGR cooler, absorbing heat. As a rule, EGR coolers are installed on diesel engines.
Common signs of a failing or malfunctioning EGR cooler include engine overheating, exhaust leaks, and Check Engine light coming on due to insufficient flow or exhaust. If you suspect your EGR cooler may be having a problem, you may need to replace it.
- AttentionA: The following process depends on the vehicle. Depending on the design of your vehicle, you may need to remove some other parts first before you can access the EGR cooler.
Part 1 of 3: Find the EGR Cooler
To safely and effectively replace the EGR control solenoid, you will need a few basic tools:
Necessary materials
- Air compressor (optional)
- Cooling System Vacuum Fill Tool (optional) ntxtools
- Pallet
- Free repair manuals from Autozone
- Protective gloves
- Repair manuals (optional) Chilton
- Safety glasses
Step 1: Locate the EGR cooler.. The EGR cooler is installed on the engine. Some vehicles also use more than one coolant.
Refer to your vehicle owner's manual to determine the location of the EGR cooler in your vehicle.
Part 2 of 3: Remove the EGR Cooler
Step 1: Disconnect the negative battery cable. Disconnect the negative battery cable and set it aside.
Step 2: Drain the coolant from the radiator.. Place a drain pan under the vehicle. Drain the coolant from the radiator by opening a cock or by removing the lower radiator hose.
Step 3: Remove the EGR cooler fasteners and gasket.. Remove the EGR cooler fasteners and gasket.
Throw away the old gasket.
Step 4: Disconnect the EGR cooler clips and brackets, if equipped.. Disconnect the clamps and cooler brackets by unscrewing the bolts.
Step 5: Disconnect the EGR cooler inlet and outlet hoses.. Loosen the clamps and remove the cooler inlet and outlet hoses.
Step 6: Carefully Discard Old Parts. Remove the EGR cooler and discard the gaskets.
Part 3 of 3: Install the EGR Cooler
Step 1: Install a new cooler. Place the new cooler in the engine compartment of your vehicle.
Step 2: Connect the EGR cooler inlet and outlet hoses.. Insert the inlet and outlet pipes into place and tighten the clamps.
Step 3: Install New Gaskets. Install new gaskets in place.
Step 4: Connect the EGR cooler clamps and brackets.. Connect the clamps and cooler brackets, then tighten the bolts.
Step 5: Install the EGR cooler fasteners.. Insert new EGR cooler fasteners and gasket.
Step 6: Fill the radiator with coolant. Reinstall the lower radiator hose or close the drain cock.
Fill the radiator with coolant and bleed the air from the system. This can be done by opening the exhaust valve if your vehicle is equipped with one, or by using a cooling system vacuum filler connected to shop air.
Step 7: Connect the negative battery cable.. Reconnect the negative battery cable and tighten it.
Replacing the EGR cooler can be a big job. If this seems like something you'd rather leave to the professionals, the AvtoTachki team offers expert EGR cooler replacement services.