How to replace a brake cylinder
Content
The wheel cylinder of the brake system fails if the brakes are soft, react poorly, or brake fluid leaks.
Brakes are an important part of a car's safety. Therefore, when there is a problem with a wheel brake cylinder, it should be replaced by an experienced mechanic and repaired immediately. The braking system of modern vehicles consists of highly developed and efficient anti-lock braking systems, often applied through disc brake components. However, most modern vehicles on the road still use the traditional drum brake system on the rear wheels.
The drum brake system consists of several parts that must work in concert to effectively apply pressure to the wheel hubs and slow the vehicle. The brake cylinder is the main part that helps the brake pads to exert pressure on the inside of the drum, thereby slowing down the vehicle.
Unlike brake pads, shoes or the brake drum itself, the wheel brake cylinder is not subject to wear. In fact, it is very rare for this component to break or even fail. However, there are times when a brake cylinder may wear out earlier than expected.
When you press the brake pedal, the brake master cylinder fills the wheel cylinders with fluid. The pressure generated by this fluid drives the brake cylinder to the brake pads. Because the brake wheel cylinder is made of steel (on the outer cover) and the rubber seals and components are on the inside, these internal components can wear out due to excessive heat and heavy use. Trucks and larger, heavier vehicles (such as Cadillac, Lincoln Town Cars, and others) tend to have brake cylinder failure more often than others.
In this case, they must be replaced when servicing the brake drums; you should replace the old brake pads and make sure all the components inside the rear brake drum are also replaced at the same time.
For the purposes of this article, the process of replacing a brake cylinder is explained, but we recommend that you purchase a service manual for your vehicle to learn the exact steps for servicing the entire rear brake system. Do not replace the brake cylinder without replacing the brake pads and rotating the drums (or replacing them), as this can cause uneven wear or brake failure.
Part 1 of 3: Understanding the Symptoms of a Damaged Brake Cylinder
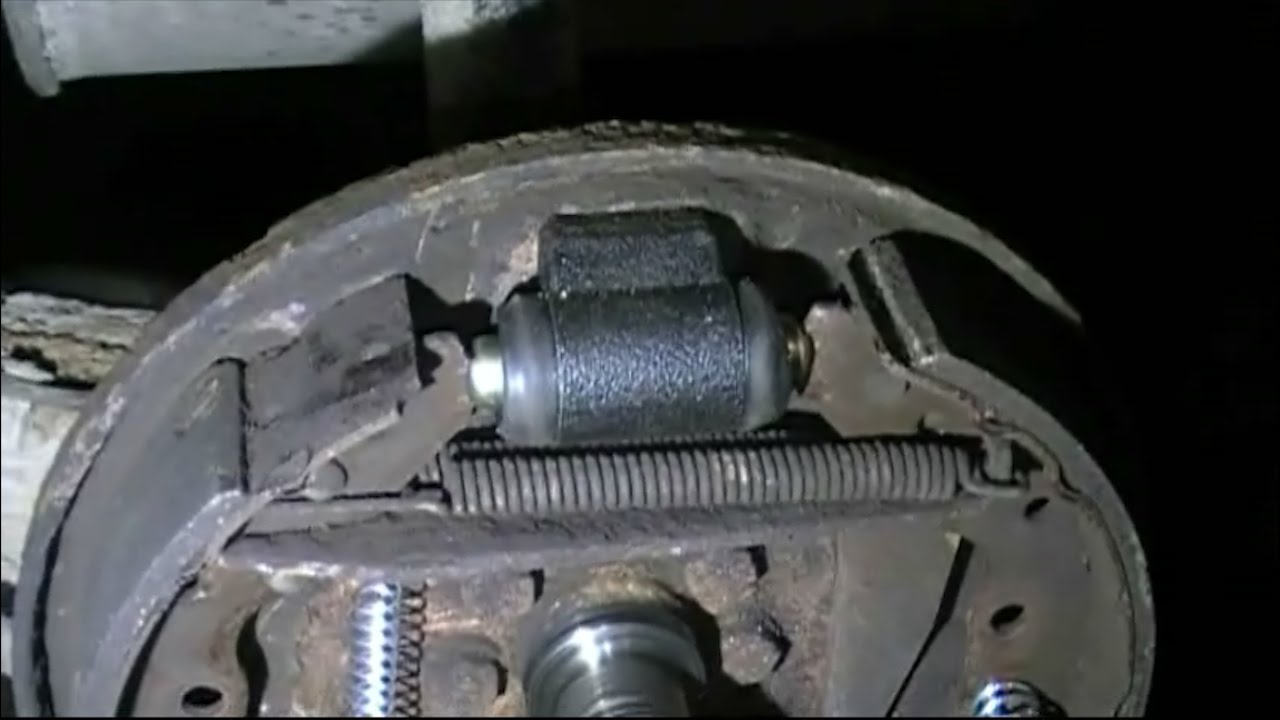
The image above shows the internal components that make up a typical wheel brake cylinder. As you can clearly see, there are several separate parts that need to work and fit together in order for this block to help your car slow down.
Typically, the parts that fail inside the brake wheel cylinder include the cups (rubber and wear due to corrosive fluid exposure) or the return spring.
Rear brakes play a vital role in slowing down or stopping a car. Although they typically account for 25% of the braking action, without them the vehicle would lose control in the most basic stopping situations. Paying attention to the warning signs or symptoms of a bad brake cylinder can help you diagnose the exact source of your braking problems, and save you money, time, and a lot of frustration.
Some of the most common warning signs and symptoms of brake cylinder damage include the following:
Brake Pedal Fully Depressed: When the brake cylinder loses its ability to supply brake fluid pressure to the brake pads, the pressure inside the master cylinder is reduced. This is what causes the brake pedal to go to the floor when pressed. In some cases, this is caused by a loose, damaged or broken brake line; but the most common reason for brakes to sink to the floor is a broken rear brake cylinder.
You hear a lot of noise from the rear brakes: If you hear loud grinding noises coming from the back of the car when you stop, this indicates two possible problems: the brake pads are worn and hit the brake drum or the brake cylinder is losing brake fluid pressure and the brake pads pressed unevenly.
The brake cylinder can work on one side, but not on the other. This causes one of the boots to apply pressure while the other stays in place. Since the system works smoothly, the lack of dual pressure can cause sounds like grinding or worn brake pads.
Brake fluid leaking from wheel cylinders: A quick inspection of the rear wheels and rear of the brake drum will usually reveal that brake fluid is leaking if the brake cylinder is broken internally. Not only will this result in the rear brakes not working at all, but the entire drum will typically be covered in brake fluid. When this happens, you will have to replace all the components inside the drum.
Part 2 of 3: How to Buy a Replacement Brake Cylinder
Once you have correctly diagnosed that the brake problem is caused by a damaged or broken wheel brake cylinder, you will need to purchase replacement parts. As noted above, it is recommended to replace the brake pads and springs when installing a new brake cylinder, however, in any case, it is recommended to replace the brake cylinder when installing new brake pads. There are many reasons for this. First, when you're working on the rear brakes, it's easier to rebuild the entire drum at once. In addition, many OEMs and aftermarket companies sell complete rear drum kits that include new springs, wheel cylinder and brake pads.
Secondly, when you install new brake pads, they will be thicker, making it difficult for the piston to effectively press inside the old wheel cylinder. This situation may cause the brake cylinder to leak and necessitate repeating this step.
Since there are many options for buying a new brake cylinder, here are some tips for buying a replacement part. Following these guidelines will ensure that your part is of high quality and will perform without defects for many years:
Make sure the brake cylinder meets SAE J431-GG3000 standards for manufacturing and quality assurance. This number will appear on the box and is often stamped on the part itself.
Purchase a premium wheel cylinder kit. You will often find two different types of packs: Premium and Standard. The premium wheel cylinder is made from high quality metal, rubber seals and has a much smoother bore to help provide smoother brake pad pressure. The difference in price between the two versions is minimal, but the quality of the "Premium" slave cylinder is much higher.
Make sure the air bleed screws inside the wheel cylinder are corrosion resistant.
OEM Metal Matching: Wheel cylinders are made from metal, but often different metals. If you have an OEM steel wheel cylinder, make sure your replacement part is also made from steel. Make sure the brake cylinder is covered by a lifetime warranty: This is usually the case for aftermarket wheel cylinders, so if you go down this path, make sure it has a lifetime warranty.
Whenever you buy replacement brake parts, always check if they fit your vehicle before trying to remove old parts. Also, make sure you have all the new springs, seals, and other parts that come with the wheel cylinder in your rear drum brake replacement kit.
Part 3 of 3: Brake Cylinder Replacement
Necessary materials
- End wrenches (in many cases metric and standard)
- Wrenches and special brake tools
- New brake fluid
- Phillips and standard screwdriver
- Rear brake bleeding equipment
- Rear drum brake repair kit (including new brake pads)
- Set of ratchets and sockets
- Replacing the brake cylinder
- Safety glasses
Protective gloves
Attention: For a detailed list of tools required for your vehicle, please refer to your vehicle's service manual.
A warning: Always buy and refer to your service manual for exact instructions on how to safely perform this job in your case.
Step 1: Disconnect the battery cables from the positive and negative terminals.. It is always recommended to disconnect battery power when replacing any mechanical components.
Remove the positive and negative cables from the terminal blocks and make sure they are not connected to the terminals during the repair.
Step 2: Raise the vehicle with a hydraulic lift or jack.. If you are using jacks to raise the rear axle, be sure to install wheel chocks on the front wheels for safety reasons.
Step 3: Remove rear tires and wheel. It is recommended to replace wheel brake cylinders in pairs, especially when replacing other rear brake components.
However, you must do this job one wheel at a time. Remove one wheel and tire and complete brake service on that wheel before moving to the other side.
Step 4: Remove the drum cover. The drum cover is usually removed from the hub without removing any screws.
Remove the drum cover and inspect the inside of the drum. If it's scratched or has brake fluid on it, there are two things you can do: replace the drum with a new one, or take the drum to a professional brake repair shop to have it rotated and resurfaced.
Step 5: Remove the retaining springs with a vise.. There is no proven method for performing this step, but it is often best to use a pair of vises.
Remove the springs from the brake cylinder to the brake pads. Refer to the service manual for the exact steps recommended by the manufacturer.
Step 6: Remove the rear brake line from the wheel cylinder.. Then you need to remove the brake line from behind the brake cylinder.
This is usually best done with a line wrench rather than a pair of vises. If you don't have the right size wrench, use a vise. Be careful not to kink the brake line when removing the brake line from the wheel cylinder, as this may cause the line to break.
Step 7: Loosen the brake cylinder bolts on the back of the wheel hub.. As a rule, the wheel cylinder is attached to the rear of the hub with two bolts.
In many cases this is a 3/8″ bolt. Remove the two bolts with a socket wrench or socket and ratchet.
Step 8: Remove the old wheel cylinder from the car.. Once the springs, brake line and two bolts are removed, you can remove the old brake cylinder from the hub.
Step 9: Remove Old Brake Pads. As stated in the previous sections, we recommend replacing the brake pads each time a wheel cylinder is replaced.
Please refer to the service manual for the exact procedures to follow.
Step 10: Clean the rear and inside of the rear hub with brake cleaner.. If you have a damaged brake cylinder, it's probably due to a brake fluid leak.
When rebuilding rear brakes, you should always clean the rear hub with a brake cleaner. Spray a generous amount of brake cleaner on the front and rear of the rear brakes. When performing this step, place a tray under the brakes. You can also use a wire brush to remove excess brake dust that has built up on the inside of the brake hub.
Step 11: Turn or grind the brake drums and replace if worn.. Once the brakes are disassembled, determine if you should flip the rear drum or replace it with a new one.
If you plan to operate the vehicle for a long period of time, it is recommended that you purchase a new rear drum. If you've never sharpened or sanded a rear drum, take it to the machine shop and they'll do it for you. The main thing is to make sure that the drum you install on new brake pads is clean and free of debris.
Step 12: Install New Brake Pads. Once the brake housing has been cleaned, you will be ready to reassemble the brakes.
Start by installing new brake pads. Refer to the service manual for instructions on how to complete this process.
Step 13: Install New Wheel Cylinder. After installing new pads, you can proceed to install a new brake cylinder.
The installation process is the reverse of removal. Follow these guidelines, but see your service manual for exact instructions:
Attach the wheel cylinder to the hub with two bolts. Make sure the "plungers" are installed on the new wheel cylinder.
Connect the rear brake line to the wheel cylinder and attach the new springs and clips from the kit to the wheel cylinder and brake pads. Reinstall the brake drum that has been machined or new.
Step 14: Bleeding the Brakes. Since you have removed the brake lines and there is no brake fluid in the brake wheel cylinder, you will have to bleed the brake system.
To complete this step, follow the recommended steps in your vehicle's service manual as each vehicle is unique. Make sure the pedal is stable before doing this step.
- A warning: Improper bleeding of the brakes will cause air to enter the brake lines. This can lead to brake failure at high speeds. Always follow the manufacturer's recommendations for bleeding the rear brakes.
Step 15 Reinstall the wheel and tire..
Step 16: Complete this process on the other side of the same axis.. It is always recommended to service the brakes on the same axle at the same time.
After you have replaced the brake cylinder on the damaged side, replace it and complete the rebuilding of the brake on the opposite side. Complete all steps above.
Step 17: Lower the car and spin the rear wheels..
Step 18 Connect the battery.
Once you have completed this process, the rear brakes should be fixed. As you can see from the steps above, replacing a brake cylinder is fairly easy, but can be very tricky and requires the use of special tools and procedures to ensure that the brake lines bleed properly. If you have read these instructions and decide that this might be too difficult for you, contact one of your local AvtoTachki certified mechanics to have the brake cylinder replaced for you.
