How to replace the front output shaft seal on most vehicles
The oil seal on the front output shaft is faulty when unusual noises or leaks come from the transfer case.
The output shaft front oil seal is located on the front of the transfer case on XNUMXWD vehicles. It seals oil in the transfer case at the point where the output shaft meets the front driveshaft yoke. If the front output shaft seal fails, the oil level in the transfer case may drop to a level that could cause damage. This can cause premature wear to the gears, chain, and any moving parts inside the transfer case that require oil to lubricate and cool.
If the seal is not replaced quickly enough, it will leak moisture from daily driving into the transfer case. When moisture enters the transfer case, it almost instantly contaminates the oil and negates its ability to lubricate and cool. When the oil is contaminated, failure of internal parts is inevitable and should be expected very quickly.
When a transfer case is damaged internally due to this type of oil starvation, overheating, or contamination, it is possible that the transfer case will be damaged in such a way that it could render the vehicle unusable. More importantly, if the transfer case fails while driving, the transfer case can jam and lock up the wheels. This may result in loss of vehicle control. Symptoms of front output shaft seal failure include leakage or noise coming from the transfer case.
This article will show you how to replace the front output shaft seal. There are several different types of transfer case, so its features may not be the same in all situations. This article will be written for general use.
Method 1 of 1: Replacing the Front Output Shaft Seal
Necessary materials
- Disconnect - ½" drive
- Extension set
- fat pencil
- Hammer - Medium
- Hydraulic jack
- Jack stands
- Large socket, standard (⅞ to 1 ½) or metric (22 mm to 38 mm)
- Masking tape
- Pipe wrench - large
- Puller kit
- Seal remover
- Towel/cloth shop
- Socket set
- Wrench
- Wheel chocks
Step 1: Raise the front of the car and install the jacks.. Jack up the front of the vehicle and install jack stands using the factory recommended jack and stand points.
Make sure the struts are installed to allow access to the area around the front of the transfer case.
A warning: Always make sure that the jacks and stands are on a solid base. Installation on soft ground may cause injury.
A warning: Never leave the weight of the vehicle on the jack. Always lower the jack and place the weight of the vehicle on the jack stands. Jack stands are designed to support the weight of a vehicle for an extended period of time whereas a jack is designed to support this type of weight for only a short period of time.
Step 2: Install rear wheel chocks.. Install wheel chocks on both sides of each rear wheel.
This reduces the chance that the vehicle will roll forward or backward and fall off the jack.
Step 3: Mark the position of the driveshaft, flange and yoke.. Mark the position of the cardan shaft, yoke and flange relative to each other.
They need to be reinstalled the same way they came out to avoid vibration.
Step 4: Remove the bolts securing the drive shaft to the output flange.. Remove the bolts securing the driveshaft to the output shaft yoke/flange.
Make sure that the bearing caps do not separate from the cardan joint. The needle bearings inside can become dislodged and fall out, damaging the universal joint and requiring replacement. Hit the driveshaft flange to loosen it just enough to be removed.
- Attention: On driveshafts that use tie-down bands to secure the universal joint, it is highly recommended to wrap all four sides of the universal joint with tape around the perimeter to hold the bearing caps in place.
Step 5: Secure the front driveshaft so it's out of the way. With the driveshaft still connected to the front differential, secure it to the side and out of the way.
If it later turns out to be interfering, you may have to go ahead and remove it entirely.
Step 6: Remove the front output shaft yoke lock nut.. While holding the front output yoke with a large pipe wrench, use a ½” drive breaker bar and a suitable size socket to remove the nut securing the yoke to the output shaft.
Step 7: Remove the plug with a puller. Install the puller on the yoke so that the center bolt is located on the output front output shaft.
Lightly press on the center bolt of the puller. Tap the clamp several times with a hammer to loosen the clamp. Remove the yoke to the end.
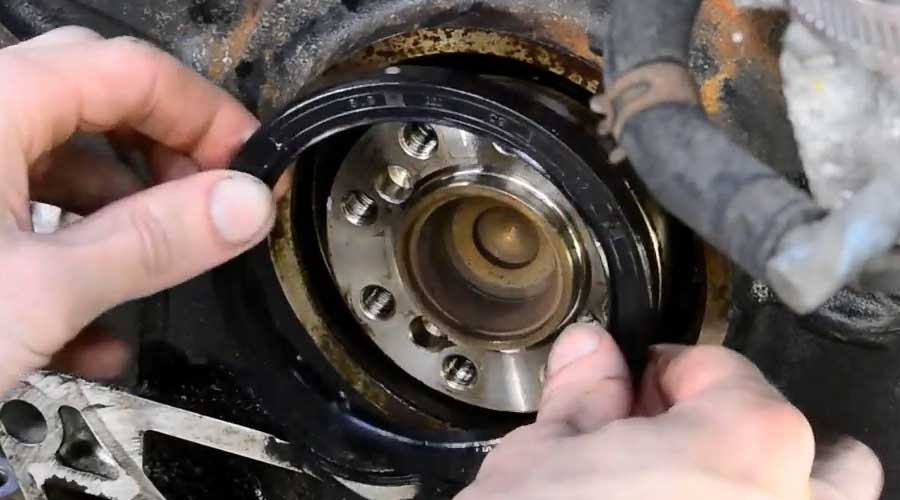
Step 8: Remove the front output shaft seal.. Using an oil seal remover, remove the output shaft front oil seal.
It may be necessary to remove the seal by pulling on it a little at the same time bypassing the seal.
Step 9: Clean the seal surfaces. Use shop towels or rags to wipe the mating surfaces on both the yoke where the seal is located and the transfer case pocket where the seal is installed.
Clean areas with solvent to remove oil and dirt. Alcohol, acetone and brake cleaner are suitable for this application. Just make sure no solvent gets inside the transfer case as this will contaminate the oil.
Step 10: Install the new seal. Apply a small amount of grease or oil around the inner lip of the replacement seal.
Reinstall the seal and tap the seal lightly to activate it. Once the seal has set, use the extension and hammer to push the seal into place in small increments using a criss-cross pattern.
Step 11: Install the front output shaft yoke.. Apply a small amount of grease or oil to the area of the yoke where the seal moves.
Also apply some grease to the inside of the fork where the splines engage with the output shaft. Align the marks you made earlier so that the yoke returns to the same position it was taken off. Once the splines are engaged, push the fork back in place so that the output shaft nut can be screwed in far enough to engage a couple of threads.
Step 12: Install the front output shaft yoke nut.. While holding the yoke with a pipe wrench in the same way as when removing it, tighten the nut to manufacturer's specifications.
Step 13: Reinstall the drive shaft. Align the marks made earlier and install the front driveshaft in place. Be sure to tighten the bolts to manufacturer's specifications.
- Attention: Ideally, the fluid level should be checked when the vehicle is level. This is actually not possible on most vehicles due to clearance issues.
Step 14 Check the fluid level in the transfer case.. Remove the fluid level plug on the transfer case.
If the level is low, add the correct oil, usually until fluid starts to run out of the hole. Replace fill plug and tighten.
Step 15: Remove the jacks and wheel chocks.. Raise the front of the vehicle using a hydraulic jack and remove the jack supports.
Let the vehicle lower and remove the wheel chocks.
Although this repair may seem complicated to most people, with a little diligence and patience, it can be successfully completed. The output shaft front oil seal is a small part that is inexpensive, but if it is not taken care of when it fails, it can lead to an extremely expensive repair. If at some point you feel that you cannot do without the help of your hands when replacing the front output shaft seal, contact one of the professional AvtoTachki technicians.