How to replace the front axle enable switch on most vehicles
The switch that turns on the front axle fails when it gets stuck, does not activate the four-wheel drive, or is difficult to engage.
Most manufacturers install a switch on the dash to activate the front axle in the selected AWD system. This switch sends a low voltage signal to the relay. The relay is designed to use a low voltage signal to actuate an internal switch and allows a high voltage signal to be sent from the battery to the actuator on the transfer case to turn on the front wheels.
When using such a relay, there is much less load on the charging and electrical systems throughout the car. This not only reduces stress on all components involved, but also allows carmakers to significantly reduce weight. With the increasing complexity of the modern car and the need for more and more wiring, weight has become a major factor in car design today.
Symptoms of a bad front axle enable switch include the switch not working, getting stuck, and not even activating on a four wheel drive vehicle.
This article focuses on replacing the front axle enable switch. The usual place most manufacturers use is on the dashboard. There are a few minor variations on the actual location of the front axle enable switch on the dashboard, but this article is written so that you can apply the basic principles to get the job done.
Part 1 of 1: Front Axle Engage Switch Replacement
Necessary materials
- Screwdriver assortment
- Shop light or flashlight
- Small mount
- Socket set
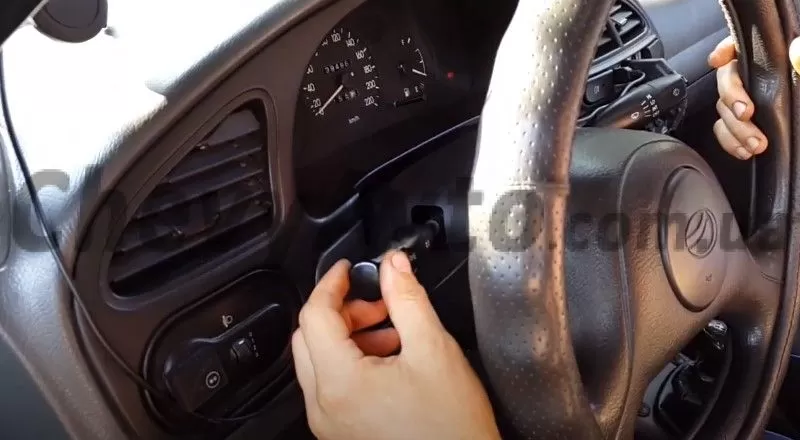
Step 1: Locate the front axle enable switch on the dashboard.. Locate the front axle enable switch located on the dashboard.
Some manufacturers use pushbutton type switches, but the vast majority use a rotary type switch as shown in the picture above.
Step 2. Remove the decorative panel in which the switch is installed.. The trim panel can be removed by gently prying it out with a small screwdriver or pry bar.
Some models will require any combination of screws and/or bolts to be removed in order to remove the trim panel. Be careful not to scratch the dashboard when removing the trim panel.
Step 3: Remove the switch from the trim panel.. Remove the switch from the trim panel by pressing the back of the switch and pushing it through the front of the trim panel.
Some switches require you to release the latches on the back before this is done. The locking tabs can either be pressed together by hand or lightly pry with a screwdriver before pushing the switch out. Again, some manufacturers require the removal of screws or other hardware in order to pull the switch out.
- Attention: For some models, you need to remove the switch bezel by pulling it out. The switch is removed from the back using the same basic steps.
Step 4: Disconnect the electrical connector. The electrical connector can be removed by releasing the latch(s) and separating the connector from the switch or pigtail.
- Attention: The electrical connector may connect directly to the rear of the front axle enable switch, or may have an electrical pigtail that needs to be disconnected. If there is a question, you can always look at a replacement to see how it is installed, or ask a mechanic for advice.
Step 5: Compare the replacement front axle enable switch with the old one.. Please note that the appearance and dimensions are the same.
Also make sure the electrical connector has the same number and orientation of pins.
Step 6: Insert the electrical connector into the replacement front axle enable switch.. You should either feel or hear when the connector goes deep enough into the switch or pigtail to engage the retaining clips.
Step 7: Insert the switch back into the bezel. Install the switch back into the front panel in the reverse order it was removed.
Install it from the front and insert until it clicks, or from the back on the rotary switch. Also, reinstall all fasteners holding the switch in place.
Step 8: Reinstall the front bezel. Align the bezel with the notch in the dash it came out of with the replacement switch installed and put it back in place.
Again, you should feel or hear the latches click into place. Also, reinstall any fasteners removed during disassembly.
- A warning: The selectable XNUMXWD system is not designed for use on hard surfaces such as asphalt or concrete. Operating these systems on this type of surface can result in costly transmission damage.
Step 9: Check the operation of the replacement front axle enable switch.. Start the car and drive up to a place with a loose surface.
Find a surface made up of grass, gravel, dirt, or any material that moves as you drive over it. Set the front axle enable switch to the "4H" or "4Hi" position. Almost all manufacturers either illuminate the switch when all-wheel drive is on, or display a notification on the instrument cluster. Place the vehicle in Drive mode and test the AWD system.
A warning: Most selectable 45WD systems are designed for use on loose road surfaces only. Also, most of them are not designed for use at highway speeds. Consult your owner's manual for operating ranges, but most are limited to a top speed of XNUMX mph in the high range.
AttentionNote: While all-wheel drive can help increase traction in adverse conditions, it will not help stop the vehicle in an emergency. Therefore, it is absolutely essential that you use common sense when driving in adverse conditions. Always remember that adverse conditions will require longer braking distances.
The selectable all-wheel drive system is very useful. This gives you a little extra traction when the weather gets nasty. Ice storms, snow buildup or just rain are much less annoying when all-wheel drive is available. If at some point you feel that you would do well to replace the front axle switch, entrust the repair to one of AvtoTachki's professional technicians.