How to replace the trunk lock actuator
Content
The trunk of the car is locked with a trunk lock, which uses an electronic or mechanical lock drive. A bad drive prevents the lock from working properly.
The trunk lock drive consists of a locking mechanism and a series of levers that open the locking mechanism. In newer vehicles, the term "actuator" sometimes refers only to an electronic trigger that performs the same function. On older cars, this part is only mechanical. The concept is the same for both systems and this guide covers both.
Both systems will have a cable going to the front of the car, to the release mechanism, which is usually found on the floorboard on the driver's side. Newer vehicles will also have an electrical connector going to the actuator and a small motor mounted on it that will activate the mechanism remotely via a key fob.
The steps below describe how to replace the trunk lock actuator on your vehicle if it is malfunctioning.
Part 1 of 2: Disconnecting the old trunk lock actuator
Necessary materials
- Suitable replacement trunk lock actuator
- flashlight
- flat screwdriver
- Pliers with thin jaws
- crosshead screwdriver
- Socket wrench
- trim panel removal tool
Step 1. Access the trunk and locate the trunk lock actuator.. Chances are if you need to replace this part, one or more of the normal trunk release methods are not working. If your car was manufactured in 2002 or later, you can always manually open the trunk using the emergency release lever.
If the key and manual release on the floorboard on the driver's side cannot open the trunk and your car was made before 2002, you will need to use a flashlight and perform the next step from inside the trunk or cargo area. You will need to fold down the rear seats and physically access this area.
Step 2: Remove the plastic cover and trunk lining.. The plastic cover on the trunk lock actuator will be removed with a slight pressure on the edge. This can usually be done by hand, but if you're having trouble, use a flat head screwdriver or trim panel removal tool.
The tailgate carpet may also need to be removed if your vehicle has one. Pry out the plastic clips with the trim panel remover and set the carpet aside.
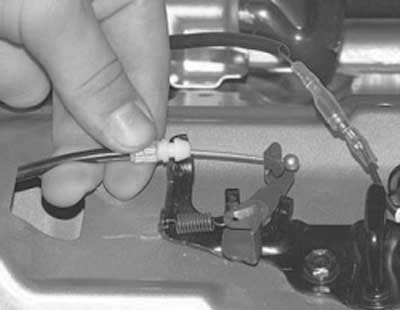
Step 3: Disconnect drive cables and all electrical connectors.. The cables will slide out of the mounting bracket or guide and the ball end of the cable will move out of the way and out of its socket to release the cable from the drive assembly.
If there is an electrical connector, pinch the tab on the side and pull hard straight away from the actuator to remove it.
- Functions: If you cannot reach the cable with your fingers due to the design of the tailgate lock actuator, use needle nose pliers or a flathead screwdriver to release the ball end of the cable from its socket.
On vehicles with remote trunk controls, you will notice that both manual and electronic drive systems are bundled together.
If you have a trunk that won't open and you access the trunk from the rear seat, manually activate the mechanism using a screwdriver or needle nose pliers. If you have one, use the emergency release mechanism to open the trunk. At this point, you will remove covers, cables, and all electrical connectors as in steps 2 and 3.
Step 4: Remove the old drive. Using a socket wrench or Phillips screwdriver, remove the bolts that secure the actuator to the vehicle.
If your vehicle has an electronic remote drive, you may not be able to access the electrical connector that goes to the drive motor. If so, after you have removed the bolts holding the actuator to the tailgate, remove the electronic connector while removing the actuator from the vehicle.
Part 2 of 2: Connecting the new trunk lock actuator
Step 1: Install the new trunk lock actuator. Starting with the electrical connector, if your actuator is equipped with one, begin reconnecting the trunk lock actuator. Slide the connector onto the tab on the drive and gently push until it clicks into place.
Then align the drive housing with the mounting holes on the vehicle and use a socket wrench to tighten the mounting bolts.
Step 2: Connect trunk lock cables.. To reconnect the drive cables, place the ball end of the cable into the socket before placing the cable retainer in the guide bracket of the drive itself. You may need to manually push down on the spring-loaded latch to get the ball end and detent into the correct position.
- Attention: Some vehicles use a metal rod instead of a cable at the connection to the actuator. This type of connection is made with a plastic retaining clip that fits over the tip of the rod. The concept is the same as for the cable type, but sometimes it can be a little more difficult to reconnect due to the lack of flexibility.
Step 3: Reinstall the trunk trim and trunk lock cover.. Reinstall the trunk trim, aligning the connectors with the corresponding holes on the tailgate, and firmly press each connector until it clicks into place.
The actuator cover will have similar slots that align with the holes in the actuator and it will snap into place in the same way.
Step 4: Check Your Work. Before closing the trunk, check the operation of all unlocking mechanisms. To do this, use a screwdriver and simulate the closing of the latch mechanism on the actuator. Thus, check each of the trigger mechanisms. If all release cables work correctly, the job is complete.
With just a few tools and some free time, you can replace a faulty trunk lock actuator yourself. However, if you prefer to have this work done by a professional, you can always contact one of AvtoTachki certified specialists who will come and replace the trunk lock actuator for you. Or, if you just have repair questions, feel free to ask a mechanic for quick and detailed advice on your problem.