How to replace the water pump pulley
Content
The V-ribbed belt or drive belt drives the engine water pump pulley, which turns the water pump. A bad pulley causes this system to fail.
The water pump pulleys are designed to be driven by a drive belt or V-ribbed belt. Without a pulley, the water pump will not turn unless it is driven by a timing belt, timing chain, or electric motor.
There are two types of pulleys used to drive an engine water pump:
- V-Pulley
- Multi-groove pulley
A V-groove pulley is a single-depth pulley that can only drive one belt. Some V-groove pulleys may have more than one groove, but each groove must have its own belt. If the belt breaks or the pulley breaks, then only the chain with the belt is no longer functional. If the alternator belt has broken, but the water pump belt has not broken, the engine can continue to run as long as the battery is charged.
A multi-groove pulley is a multi-groove pulley that can only drive a serpentine belt. The V-ribbed belt is convenient in that it can be driven from the front and back. The serpentine belt design serves well, but when a pulley or belt breaks, all accessories, including the water pump, fail.
As the water pump pulley wears out, it expands, causing the belt to slip. Cracks can also form on the pulley if the bolts are loose or too much load is applied to the pulley. Also, the pulley may bend if the belt is at an angle due to an accessory that is not properly aligned. This will cause the pulley to have a wobble effect. Other signs of a bad water pump pulley include engine grinding or overheating.
Part 1 of 4: Preparing to Replace the Water Pump Pulley
Having all the necessary tools and materials in place before starting work will allow you to get the job done more efficiently.
Necessary materials
- Hex key set
- socket wrenches
- Switch
- flashlight
- socket
- Jack stands
- Protective leather gloves
- Ratchet with metric and standard sockets
- Replacing the water pump pulley
- Poly V-belt removal tool specially designed for your vehicle.
- Wrench
- Screw bit Torx
- Wheel chocks
Step 1: Inspect the water pump pulley.. Open the hood in the engine compartment. Take a flashlight and visually inspect the water pump pulley for cracks and make sure it is out of alignment.
Step 2: Start the engine and check the pulley.. With the engine running, check that the pulley is working properly. Watch for any wobble or note if it makes any sounds, as if the bolts are loose.
Step 3: Position your vehicle. Once you have identified the problem with the water pump pulley, you will need to fix the car. Park your vehicle on a level, firm surface. Make sure the transmission is in park (for automatic transmission) or in first gear (for manual transmission).
Step 4: Fix the wheels. Place wheel chocks around tires that will remain on the ground. In this case, the wheel chocks will be located around the front wheels, since the rear of the car will be raised. Engage the parking brake to lock the rear wheels and prevent them from moving.
Step 5: Raise the car. Using a jack recommended for the weight of your vehicle, raise the vehicle at the indicated jack points until the wheels are completely off the ground. For most modern cars, the jack points are on a weld right under the doors along the bottom of the car.
Step 6: Secure the car. Place stands under the jacks, then you can lower the car onto the stands.
Part 2 of 4: Removing the old water pump pulley
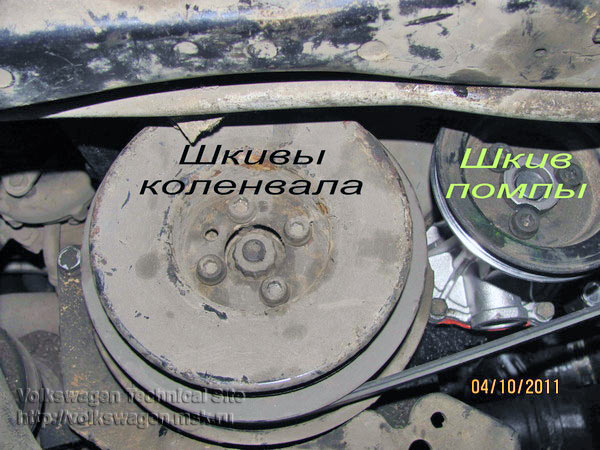
Step 1 Locate the water pump pulley.. Locate the pulleys to the engine and locate the pulley that goes to the water pump.
Step 2. Remove all components that stand in the way of the drive or V-ribbed belt.. To gain access to the drive or V-ribbed belt, you need to remove all parts that interfere.
For example, on front-wheel drive vehicles, some of the belts run around the engine mounts; they will need to be removed.
For rear wheel drive vehicles:
Step 3: Remove the belt from the pulleys. First, find the belt tensioner. If you are removing the V-ribbed belt, you will need to use a breaker to turn the tensioner and loosen the belt.
If your vehicle has a V-belt, you can simply loosen the tensioner to loosen the belt. When the belt is loose enough, remove it from the pulleys.
Step 4: Remove the Clutch Fan. If you have a sleeved or flexible fan, remove this fan using protective leather gloves.
Step 5: Remove the pulley from the water pump.. Remove the mounting bolts that secure the pulley to the water pump. Then you can pull out the old water pump pulley.
For front wheel drive vehicles:
Step 3: Remove the belt from the pulleys. First, find the belt tensioner. If you are removing the ribbed belt, you will need to use the ribbed belt removal tool to turn the tensioner and loosen the belt.
If your vehicle has a V-belt, you can simply loosen the tensioner to loosen the belt. When the belt is loose enough, remove it from the pulleys.
- Attention: To remove the pulley bolts, you may have to go under the car or go through the fender next to the wheel to access the bolts.
Step 4: Remove the pulley from the water pump.. Remove the mounting bolts that secure the pulley to the water pump. Then you can pull out the old water pump pulley.
Part 3 of 4: Installing the New Water Pump Pulley
For rear wheel drive vehicles:
Step 1: Install the new pulley on the water pump shaft.. Screw in the pulley mounting bolts and tighten them by hand. Then tighten the bolts to the recommended specifications to be shipped with the pulley. If you don't have any specifications, you can tighten the bolts up to 20 ft-lbs and then 1/8 turn more.
Step 2: Replace the clutch fan or flexible fan.. Using protective leather gloves, install the clutch fan or flexible fan back onto the water pump shaft.
Step 3: Replace all belts with pulleys.. If the previously removed belt was a V-belt, you can simply slide it over all the pulleys and then move the tensioner to adjust the belt.
If the belt you removed earlier was a poly V-belt, you will need to put it on all but one of the pulleys. Before installation, find the simplest pulley within reach so that the belt is next to it.
Step 4: Complete Reinstallation of the Corresponding Belt. If you are reinstalling the V-ribbed belt, use a breaker to loosen the tensioner and slide the belt over the last pulley.
If you are reinstalling the V-belt, move the tensioner and tighten it. Adjust the V-belt by loosening and tightening the tensioner until the belt is loose to its width, or about 1/4 inch.
For front wheel drive vehicles:
Step 1: Install the new pulley on the water pump shaft.. Screw in the fixing bolts and tighten them by hand. Then tighten the bolts to the recommended specifications to be shipped with the pulley. If you don't have any specifications, you can tighten the bolts up to 20 ft-lbs and then 1/8 turn more.
- Attention: To install the pulley bolts, you may have to go under the car or go through the fender next to the wheel to access the bolt holes.
Step 2: Replace all belts with pulleys.. If the previously removed belt was a V-belt, you can simply slide it over all the pulleys and then move the tensioner to adjust the belt.
If the belt you removed earlier was a poly V-belt, you will need to put it on all but one of the pulleys. Before installation, find the simplest pulley within reach so that the belt is next to it.
Step 3: Complete Reinstallation of the Corresponding Belt. If you are reinstalling the ribbed belt, use the ribbed belt tool to loosen the tensioner and slide the belt over the last pulley.
If you are reinstalling the V-belt, move the tensioner and tighten it. Adjust the V-belt by loosening and tightening the tensioner until the belt is loose to its width, or about 1/4 inch.
Part 4 of 4: Lowering the Vehicle and Checking the Repair
Step 1: Clean up your workspace. Gather all tools and equipment and get them out of the way.
Step 2: Remove Jack Stands. Using a floor jack, raise the vehicle at the indicated jack points until the wheels are completely off the jack stands. Remove the jack stands and move them away from the vehicle.
Step 3: Lower the car. Lower the vehicle with a jack until all four wheels are on the ground. Pull the jack out from under the car and set it aside.
At this point, you can also remove the wheel chocks from the rear wheels and set them aside.
Step 4: Test drive the car. Drive your car around the block. As you drive, listen for any unusual sounds that may be caused by the replacement pulley.
- AttentionA: If you install the wrong pulley and it is larger than the original pulley, you will hear a loud chirping sound as the drive or V-ribbed belt tightens the pulley.
Step 5: Inspect the Pulley. When you're done with the test drive, grab a flashlight, open the hood and look at the water pump pulley. Make sure the pulley is not bent or cracked. Also, make sure the drive belt or V-ribbed belt is properly adjusted.
If your vehicle continues to make noises after replacing this part, further diagnosis of the water pump pulley may be required. If this is your case, or you just prefer to have this repair done by a professional, you can always call one of AvtoTachki's certified technicians to diagnose or replace the water pump pulley.