How to replace a wheel stud
Content
Car wheel studs hold the wheels on the hub. Wheel studs take a lot of pressure and wear out with too much force, causing rust or damage.
Wheel studs are designed to hold the wheels on the drive or intermediate hub. When the car is turning, the wheel stud must withstand the pressure applied to it along the vertical and horizontal axis, as well as pushing or pulling. Wheel studs wear and stretch over time. When someone over-tightens the lug nut, they usually apply too much pressure, causing the nut to spin on the wheel stud. If a wheel stud is worn or damaged in this way, the stud will show rust or damage to the threads.
Necessary materials
- Hex key set
- socket wrenches
- Brass drill (long)
- Switch
- Elastic cord
- 320-grit sandpaper
- flashlight
- Jack
- Gear lubrication
- Hammer (2 1/2 pounds)
- Jack stands
- Large flat screwdriver
- Lint-free fabric
- Oil drain pan (small)
- Protective clothing
- Spatula / scraper
- Ratchet with metric and standard sockets
- Rotor wedge screw set
- Safety glasses
- Seal installation tool or block of wood
- Filling removal tool
- Tire iron
- Wrench
- Screw bit Torx
- Wheel chocks
Part 1 of 4: Preparing to remove the wheel stud
Step 1: Park your vehicle on a level, firm surface.. Make sure the transmission is in park (for automatic transmission) or in first gear (for manual transmission).
Step 2: Install wheel chocks around the rear wheels, which will remain on the ground.. In this case, the wheel chocks will be located around the front wheels, since the rear of the car will be raised. Engage the parking brake to keep the rear wheels from moving.
Step 3: Loosen the clamp nuts. If you are using a pry bar to remove the wheels from the vehicle, use the pry bar to loosen the lug nuts. Do not unscrew the nuts, just loosen them.
Step 4: Raise the car. Using a jack recommended for the weight of the vehicle, raise the vehicle at the indicated jack points until the wheels are completely off the ground.
Step 5: Install Jacks The jack stands should be located under the jacking points. Then lower the car onto the jacks. For most modern cars, the jack stand attachment points are on a weld right under the doors along the bottom of the car.
Step 6: Put on your goggles. This will protect your eyes from flying debris as you remove the wheel studs. Wear gloves that are resistant to gear grease.
Step 7: Remove Clamp Nuts. Using a pry bar, remove the nuts from the wheel studs.
Step 8: Remove the wheels from the wheel studs.. Use chalk to mark the wheels if you need to remove more than one wheel.
Step 9: Remove the front brakes. If you are working on the front wheel studs, you will need to remove the front brakes. Remove the fixing bolts on the brake caliper.
Remove the caliper and hang it on the frame or coil spring with an elastic cord. Then remove the brake disc. You may need rotor wedge screws to remove the rotor from the wheel hub.
Part 2 of 4: Removing a Damaged or Broken Wheel Stud
For vehicles with tapered bearings and hubs for installing seals
Step 1: Remove the wheel hub cap. Place a small pallet under the cover and remove the cover from the wheel hub. Drain the oil from the bearings and hub into a sump. If there was grease in the bearings, some grease may leak out. It's good to have a bearing drain pan.
- Attention: If you have XNUMXWD locking hubs, you will need to remove the locking hubs from the drive hub. Be sure to pay attention to how all the pieces come out so you know how to put them back together.
Step 2: Remove the outer nut from the wheel hub.. Use a hammer and a small chisel to knock out the tabs on the snap ring if there is one. Slide the hub and catch the small tapered bearing that will fall out.
Step 3: Drain remaining gear oil from the wheel hub.. Turn the hub over to the back side where the oil seal is located.
- Attention: After removing the wheel hub, the seal in the hub will shear slightly when it separates from the spindle from the axle. This will destroy the seal and must be replaced before the wheel hub can be reinstalled. You will also need to inspect the wheel bearings for wear when the wheel hub is removed.
Step 4: Remove the wheel seal. Use a seal removal tool to remove the wheel seal from the wheel hub. Pull out the larger bearing that is inside the wheel hub.
Step 5: Clean the two bearings and inspect them.. Make sure the bearings are not painted or pitted. If the bearings are painted or pitted, they must be replaced. This means they have overheated or been damaged by debris in the oil.
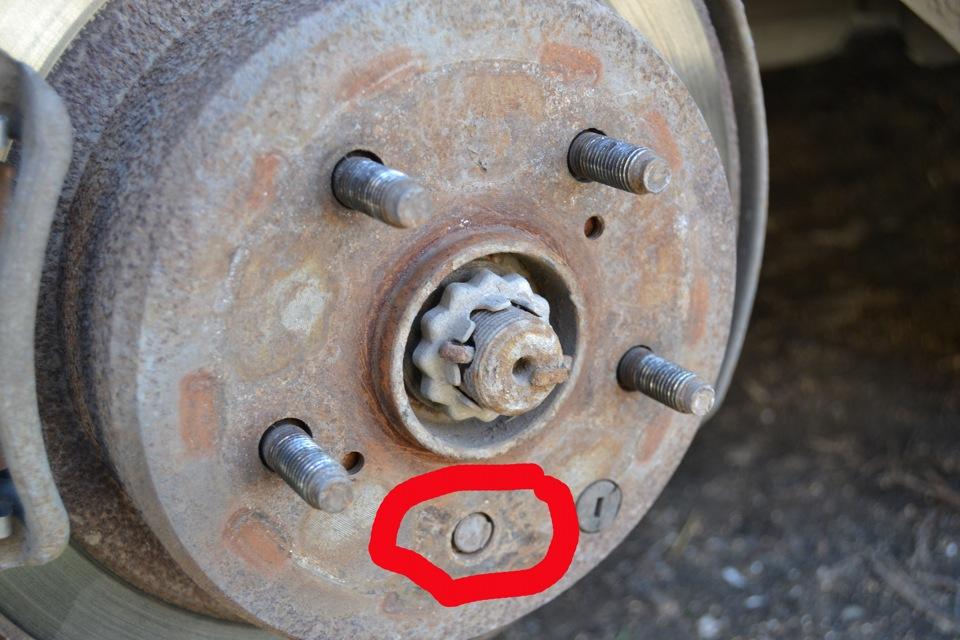
Step 6: Knock out wheel studs to be replaced.. Turn the wheel hub over so that the threads of the wheel studs are facing up. Knock out the studs with a hammer and a brass drift. Use a lint-free cloth to clean the threads inside the wheel hub mounting holes.
- Attention: It is recommended to replace all wheel studs on a wheel hub with a broken stud. This ensures that all studs are in good condition and will last a long time.
For vehicles with pressed-in bearings and bolt-on hubs
Step 1: Disconnect the harness from the ABS sensor at the wheel hub.. Remove the brackets that secure the harness to the steering knuckle on the axle.
Step 2: Remove mounting bolts. Using a crowbar, unscrew the mounting bolts that secure the wheel hub to the suspension. Remove the wheel hub and lay the hub down with the wheel stud threads facing up.
Step 3: Knock out wheel studs. Use a hammer and a brass drift to knock out the wheel studs that need to be replaced. Use a lint-free cloth to clean the threads inside the wheel hub mounting hose.
- Attention: It is recommended to replace all wheel studs on a wheel hub with a broken stud. This ensures that all studs are in good condition and will last a long time.
For vehicles with solid rear drive axles (banjo axles)
Step 1: Remove the rear brakes. If the rear brakes have disc brakes, remove the mounting bolts on the brake caliper. Remove the caliper and hang it on the frame or coil spring with an elastic cord. Then remove the brake disc. You may need rotor wedge screws to remove the rotor from the wheel hub.
If the rear brakes have drum brakes, remove the drum by hitting it with a hammer. After a few hits, the drum will begin to come off. You may need to push back the rear brake pads to remove the drum.
After removing the drum, remove the fasteners from the brake pads. Make sure you do one wheel at a time if you are doing both left and right wheel studs. So you can look at another brake assembly for the circuit.
Step 2: Place a pan under the rear axle between the axle housing and the wheel studs.. If your axle has a bolt-on flange, remove the four bolts and slide the axle out. You can skip to step 7 to continue.
If your axle does not have a bolt-on flange, you will need to remove the axle from the banjo body. Follow steps 3 to 6 to complete this procedure.
Step 3: Removing the banjo body cover. Place a drip tray under the banjo body cover. Remove the banjo body cover bolts and pry off the banjo body cover with a large flathead screwdriver. Let the gear oil flow out of the axle housing.
Step 4 Locate and remove the locking bolt.. Rotate the inner spider gears and cage to locate the retaining bolt and remove it.
Step 5: Pull the Shaft Out of the Cage. Rotate the cage and remove the cross pieces.
- Attention: If you have a hard lock or limited slip system, you will need to remove the system before removing the cross. It is recommended that you take photographs or write down what you need to do.
Step 6: Remove the axle from the body. Insert the axle shaft and remove the c-lock inside the cage. Slide the axle out of the axle housing. The side gear on the axle shaft will fall into the cage.
Step 7: Knock out wheel studs. Place the axle shaft on the workbench or blocks. Use a hammer and a brass drift to knock out the wheel studs that need to be replaced. Use a lint-free cloth to clean the threads inside the wheel hub mounting hose.
- Attention: It is recommended to replace all wheel studs on a wheel hub with a broken stud. This ensures that all studs are in good condition and will last a long time.
Part 3 of 4: Installing the new wheel stud
For vehicles with tapered bearings and hubs for installing seals
Step 1: Install new wheel studs.. Turn the hub over so that the end of the seal is facing you. Insert the new wheel studs into the splined holes and hammer them into place with a hammer. Make sure the wheel studs are fully seated.
Step 2: Lubricate the bearings. If the bearings are in good condition, lubricate the larger bearing with gear oil or grease (whichever comes with it) and place it in the wheel hub.
Step 3: Get a new wheel hub seal and place it on the hub.. Use a seal installation tool (or a block of wood if you don't have an installer) to drive the seal into the wheel hub.
Step 4: Mount the wheel hub onto the spindle.. If there was gear oil in the wheel hub, fill the hub with gear oil. Lubricate the small bearing and place it on the spindle in the wheel hub.
Step 5: Insert Gasket or Inner Lock Nut. Put on the outer lock nut to secure the wheel hub to the spindle. Tighten the nut until it stops, then loosen it. Use a torque wrench and tighten the nut to specification.
If you have a lock nut, torque the nut to 250 ft-lbs. If you have a two nut system, torque the inner nut to 50 ft lbs and the outer nut to 250 ft lbs. On trailers, the outer nut should be torqued to 300 to 400 ft.lbs. Bend the locking tabs down when finished tightening.
Step 6: Install the cap on the wheel hub to cover the gear oil or grease.. Be sure to use a new gasket to create a good seal on the cap. If there was gear oil in the wheel hub, you will need to remove the center plug and fill the cap until the oil runs out.
Close the cap and turn the hub. You will need to do this four or five times to fill the hub completely.
Step 7: Install the brake disc onto the wheel hub.. Place the caliper with brake pads back onto the rotor. Torque the caliper bolts to 30 ft-lbs.
Step 8: Put the wheel back on the hub.. Put on the union nuts and tighten them firmly with a pry bar. If you are going to use an air or electric impact wrench, make sure the torque does not exceed 85-100 pounds.
For vehicles with pressed-in bearings and bolt-on hubs
Step 1: Install new wheel studs.. Turn the hub over so that the end of the seal is facing you. Insert the new wheel studs into the splined holes and hammer them into place with a hammer. Make sure the wheel studs are fully seated.
Step 2: Install the wheel hub on the suspension and install the mounting bolts.. Torque bolts to 150 ft. lbs. If you have a CV shaft that goes through the hub, make sure you torque the CV shaft axle nut to 250 ft-lbs.
Step 3: Connect the harness back to the ABS wheel sensor.. Replace the brackets to secure the harness.
Step 4: Install the rotor on the wheel hub.. Install the caliper with pads on the rotor. Torque the caliper mounting bolts to 30 ft-lbs.
Step 5: Put the wheel back on the hub.. Put on the union nuts and tighten them firmly with a pry bar. If you are going to use an air or electric impact wrench, make sure the torque does not exceed 85-100 pounds.
For vehicles with solid rear drive axles (banjo axles)
Step 1: Install new wheel studs.. Place the axle shaft on the workbench or blocks. Insert the new wheel studs into the splined holes and hammer them into place with a hammer. Make sure the wheel studs are fully seated.
Step 2: Insert the axle shaft back into the axle housing.. If you had to remove the flange, tilt the axle shaft to align it with the splines inside the axle gears. Install flange bolts and torque to 115 ft-lbs.
Step 3: Replace the side gears. If you had to remove the axle through the banjo body, then after installing the axle shaft into the axle shaft, put the side gears on the C-locks and install them on the axle shaft. Push the shaft out to lock the axle shaft in place.
Step 4: Put the gears back in place.. Make sure the spider gears are aligned.
Step 5: Insert the shaft back into the cage through the gears.. Secure the shaft with a locking bolt. Tighten the bolt by hand and an additional 1/4 turn to lock it in place.
Step 6: Clean and Replace Gaskets. Clean the old gasket or silicone on the banjo body cover and banjo body. Place a new gasket or new silicone on the banjo body cover and install the cover.
- Attention: If you had to use any kind of silicone to seal the banjo body, be sure to wait 30 minutes before refilling the differential with oil. This gives the silicone time to harden.
Step 7: Remove the fill plug on the differential and fill the banjo body.. The oil should flow slowly out of the hole when it is full. This allows oil to flow along the axle shafts, lubricate the outer bearings and maintain the correct amount of oil in the housing.
Step 8: Reinstall drum brakes.. If you had to remove the drum brakes, install the brake shoes and fasteners on the base plate. You can use the other rear wheel as a guide to see how it works together. Put on the drum and adjust the rear brakes.
Step 9: Reinstall disc brakes. If you had to remove the disc brakes, install the rotor on the axle. Install the caliper on the rotor with pads on. Torque the caliper mounting bolts to 30 ft-lbs.
Step 10: Put the wheel back on the hub.. Put on the union nuts and tighten them firmly with a pry bar. If you are going to use an air or electric impact wrench, make sure the torque does not exceed 85-100 pounds.
Part 4 of 4: lowering and checking the car
Step 1: Raise the car. Using a jack recommended for the weight of the vehicle, raise it under the vehicle at the indicated jack points until the wheels are completely off the ground.
Step 2: Remove Jack Stands. Remove the jack stands and keep them away from the vehicle. Then lower the car to the ground.
Step 3: Tighten the wheels. Use a torque wrench to tighten the lug nuts to your vehicle's specifications. Make sure you use the star pattern for the puff. This prevents the wheel from beating (beating).
Step 4: Test drive the car. Drive your car around the block. Listen for any unusual noises or vibrations. When you get back from the road test, recheck the lug nuts for looseness. Use a flashlight and check for new damage to the wheels or studs.
If your vehicle continues to make noise or vibrate after changing the wheel studs, the wheel studs may need to be checked further. If the problem persists, you should seek the help of one of AvtoTachki's certified mechanics who can replace the wheel studs or diagnose any related problems.