Carburetor DAAZ 2107: disassembly, flushing, adjustment
Content
In a car, the most important unit is the power unit. However, without a properly adjusted carburetor, its operation is impossible. Even the slightest malfunction of any element in this mechanism can cause a violation of the stable operation of the motor. At the same time, most problems can be fixed independently in the garage.
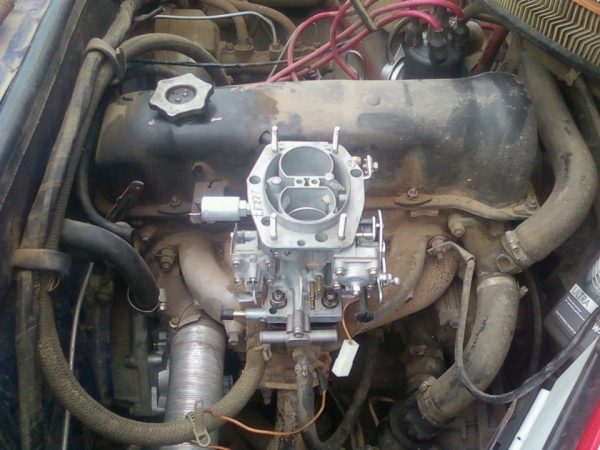
Carburetor DAAZ 2107
The GXNUMX carburetor, like any other, mixes air and gasoline and supplies the finished mixture to the engine cylinders. To understand the device and the functioning of the carburetor, as well as to identify and eliminate possible malfunctions with it, you need to familiarize yourself with this unit in more detail.
Who produces and on what models VAZ is installed
The DAAZ 2107 carburetor was manufactured at the Dimitrovgrad Automotive Plant and installed on different Zhiguli models, depending on the product modification:
- 2107–1107010–20 were equipped with engines of the latest versions of the VAZ 2103 and VAZ 2106 with a vacuum corrector;
- 2107–1107010 were put on "fives" and "sevens" with engines 2103 (2106);
- carburetors 2107-1107010-10 were installed on engines 2103 (2106) with a distributor without a vacuum corrector.
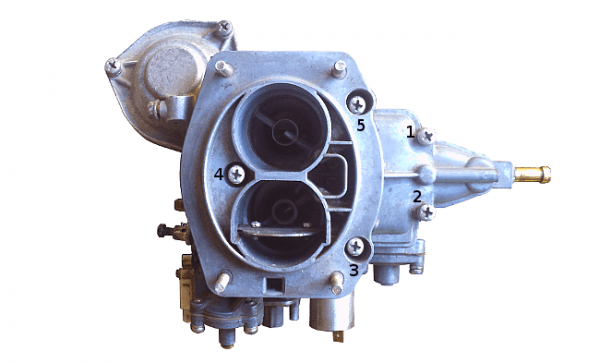
Carburetor device
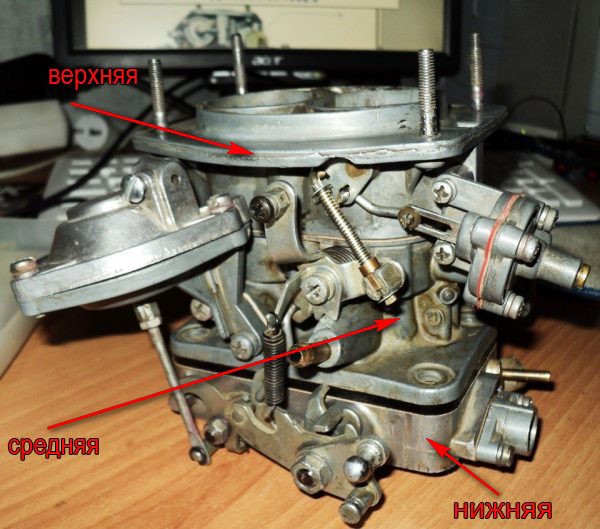
DAAZ 2107 is made of a metal case, which is characterized by increased strength, which minimizes deformation and temperature effects, mechanical damage. Conventionally, the corpus can be divided into three parts:
- top - made in the form of a cover with fittings for hoses;
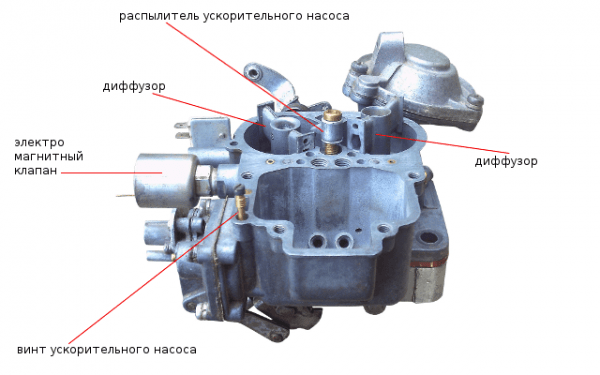
- middle - the main one, in which there are two chambers with diffusers, as well as a float chamber;
- lower - throttle valves (DZ) are located in it.
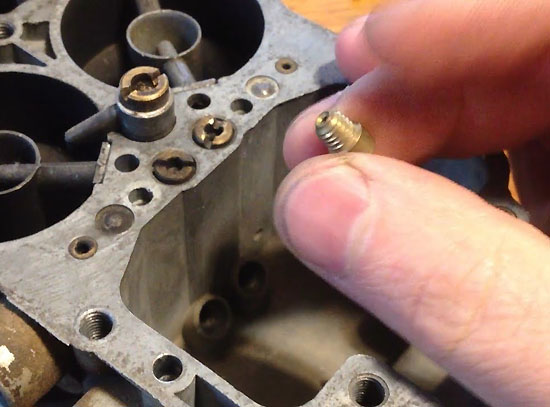
The main elements of any carburetor are jets, which are designed to pass fuel and air. They are a part with an external thread and an internal hole of a certain diameter. When the holes are clogged, their throughput decreases, and the proportions in the process of formation of the working mixture are violated. In such a situation, it is necessary to clean the jets.
The jets are not subject to wear, so their service life is unlimited.
The "Seven" carburetor has several systems:
- float chamber - maintains fuel at a certain level for stable engine operation at any speed;
- the main dosing system (GDS) - operates in all engine operating modes, except for idling (XX), supplying a balanced gasoline-air mixture through emulsion chambers;
- system XX - responsible for the operation of the engine in the absence of load;
- start system - provides a confident start of the power plant to a cold one;
- econostat, accelerator and secondary chamber: the accelerator pump contributes to the instantaneous supply of fuel during acceleration, since the GDS is unable to provide the required amount of gasoline, and the second chamber and econostat come into operation when the engine develops the most power.
Learn how to choose a carburetor: https://bumper.guru/klassicheskie-modeli-vaz/toplivnaya-sistema/kakoy-karbyurator-luchshe-postavit-na-vaz-2107.html
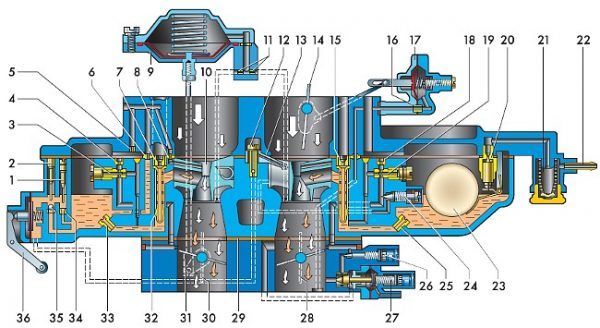
How the carburetor works
The operation of the device can be described as follows:
- Fuel from the gas tank is pumped by the gasoline pump into the float chamber through a filter and a valve that determines the level of its filling.
- From the float tank, gasoline is fed through jets into the carburetor chambers. Then the fuel passes into the emulsion cavities and tubes, where the working mixture is formed, which is fed into the diffusers by means of atomizers.
- After starting the motor, the electromagnetic type valve closes the XX channel.
- During operation at XX, fuel is taken from the first chamber and passes through a jet connected to the valve. When gasoline flows through the jet XX and part of the transition system of the primary chamber, a combustible mixture is created that enters the corresponding channel.
- At the moment the DZ is slightly opened, the mixture is injected into the carburetor chambers through the transition system.
- The mixture from the float tank passes through the econostat and enters the atomizer. When the motor runs at maximum frequency, the accelerator starts to function.
- The accelerator valve is unlocked when filling with fuel and closes when the mixture supply stops.
Video: device and operation of the carburetor

DAAZ 2107 carburetor malfunctions
There are many small details in the design of the carburetor, each of which is of great importance because it does a certain job. If at least one of the elements fails, the stable operation of the node is disrupted. Quite often, problems arise when starting a cold engine or at the time of acceleration. The carburetor is considered faulty if the following symptoms appear:
- when working at XX, the engine works with dips, i.e., it is unstable;
- when trying to overclock, there is some delay;
- increased fuel consumption;
- Difficulty starting the engine after a long period of inactivity.
Each of these signs indicates the need for repair or adjustment work. Consider the most common malfunctions of the "seven" carburetor.
Pours gasoline
The essence of the problem boils down to the fact that gasoline enters the mixing device in more quantities than necessary, and the check valve does not divert excess fuel into the gas tank. As a result, drops of gasoline appear on the outside of the carburetor. To eliminate the malfunction, it is necessary to clean the fuel jets and their channels.
Shoots
If you hear "shots" from the carburetor, the problem is usually due to excessive fuel flow into it. The malfunction manifests itself in the form of sharp twitches during movement. The solution to the problem is flushing the node.
Gasoline is not supplied
The occurrence of a malfunction may be due to clogged jets, a breakdown of the fuel pump, or malfunctions of the gasoline supply hoses. In such a situation, blow out the supply pipe with a compressor and check the fuel pump. If no problems have been identified, you will have to dismantle the assembly and flush.
Second camera not working
Problems with the secondary chamber manifest themselves in the form of a decrease in vehicle dynamics by almost 50%. The malfunction is associated with jamming of the remote sensing, which has to be replaced with a new part.
Accelerator pump not working
If there is a problem with the booster, fuel may not flow or may be delivered in a short and sluggish jet, resulting in delays during acceleration. In the first case, the reason lies in the clogging of the fuel jet of the accelerator pump or the ball sticking to the check valve sleeve. With a poor jet, the ball may hang or the diaphragm may not be tightly connected between the carburetor body and the cover. The way out of the situation is to clean the parts and check their condition.
Engine stalls when pressing on the gas
If the engine starts and runs flawlessly at idle, but stalls when you try to move off, most likely there is an insufficient level of gasoline in the float compartment. As a result, it is only enough to start the power unit, and at the moment the remote sensing is opened, the level becomes too low, which requires its adjustment.
Setting up the carburetor DAAZ 2107
With a trouble-free start of the motor and stable operation in any mode (XX or under load), the device does not need to be adjusted. The need for a procedure arises only with characteristic symptoms that coincide with the signs of malfunctions. Tuning should be started only with full confidence in the smooth operation of the ignition system, adjusted valves, and the absence of problems with the fuel pump. In addition, adjustment work may not lead to the desired results if the device is clearly clogged or leaking. Therefore, before setting up the node, it is necessary to inspect and evaluate its appearance.
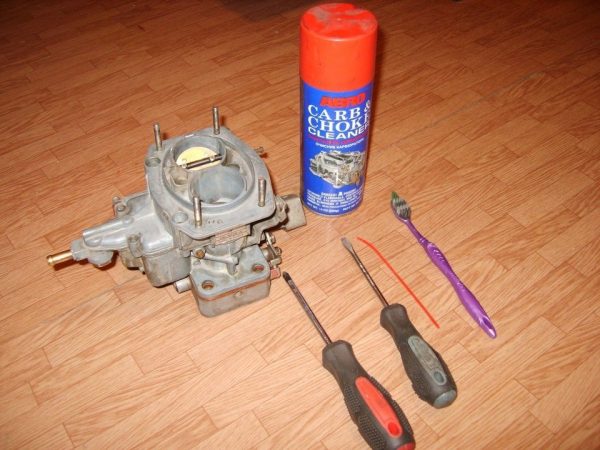
To make an adjustment, you will need the following list:
- a set of standard keys;
- screwdriver;
- passages;
- rags.
XX adjustment
The most significant reason why you have to adjust the idle speed of the carburetor is when the engine is unstable at idle, while the tachometer needle constantly changes its position. As a result, the power unit simply stalls. Armed with a flat screwdriver, proceed to the adjustment:
- We start the engine to warm up to a temperature of + 90˚С. If it stalls, pull the suction cable.
 We start the engine and warm it up to an operating temperature of 90 ° C
 - After warming up, we turn off the engine, remove the suction and find two adjusting screws on the carburetor, which are responsible for the quality and quantity of the mixture supplied to the cylinders. We twist them completely, and then we unscrew the first screw by 4 turns, and the second by 3.Idling adjustment is carried out with screws of quality (1) and quantity (2)
- We start the engine. By adjusting the quantity, we set 850–900 rpm according to the tachometer readings.
- With the quality screw, we achieve a decrease in speed by wrapping it, and then we unscrew it by half a turn.
- For more precise adjustment, the sequence of actions can be repeated.


Video: how to adjust XX on the "classic"

Float adjustment
To carry out this procedure, you will need to dismantle the air filter and its housing, as well as cut strips of cardboard with a width of 6,5 and 14 mm, which will be used as a template.
We perform the work in the following sequence:
- Remove the carburetor cover.
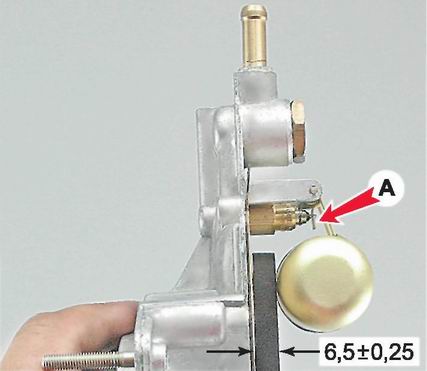
- We install it on the end so that the float holder only slightly touches the valve ball.
- We check the gap with a 6,5 mm template and, if the distance differs from the required one, adjust the tongue (A) by changing its position.To adjust the fuel level in the float chamber, you need to measure the distance between the float, which barely touches the needle valve ball and the carburetor cover
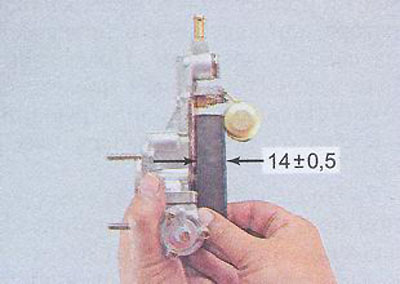
- Again we put the cover vertically and move the float to the farthest position, measuring the distance with a template of 14 mm.The gap between the float in the extreme position and the carburetor cap should be 14 mm
- If the gap differs from the norm, we bend the stop of the float bracket.To set the correct clearance of the float stroke, it is necessary to bend the bracket stop
If the procedure is done properly, the float should have a stroke of 8±0,25 mm.
Video: how to adjust the carburetor float

Adjustment of the starting mechanism and air damper
First you need to prepare a 5 mm template and a piece of wire 0,7 mm thick, after which you can start setting up:
- We remove the filter housing and remove dirt from the carburetor, for example, with a rag.
- We pull out the suction in the cabin.To adjust the starter, it is necessary to pull out the choke cable
- With a template or drill, we measure the gap between the wall of the first chamber and the edge of the air damper.To measure the gap between the edge of the air damper and the wall of the first chamber, you can use a 5 mm drill or a cardboard template
- If the parameter differs from the template, unscrew the special plug.There is an adjusting screw under the plug.
- Adjust the screw with a flat screwdriver, setting the desired gap, then screw the plug into place.To adjust the position of the air damper, turn the corresponding screw
Throttle valve adjustment
DZ is adjusted after removing the carburetor from the engine in the following sequence:
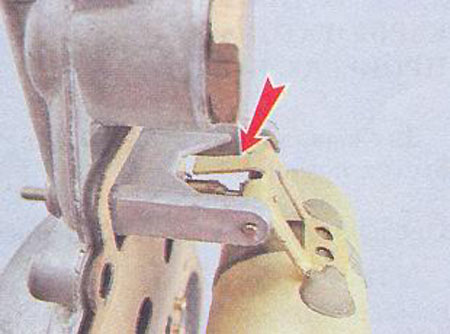
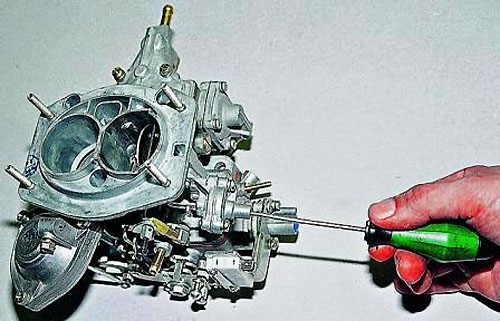
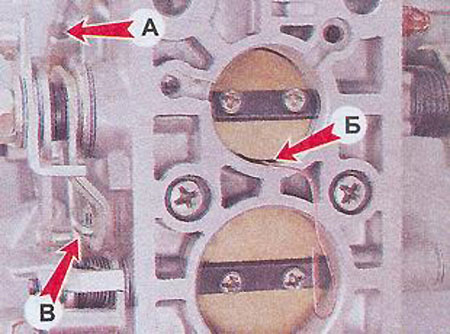
- Rotate lever A counterclockwise.To adjust the throttle, turn lever A counterclockwise.
- Wire 0,7 mm check the gap B.
- If the value differs from the required one, we bend the rod B or rearrange its edge into another hole.
Read how to choose an engine for VAZ 2107: https://bumper.guru/klassicheskie-modeli-vaz/dvigatel/kakoy-dvigatel-mozhno-postavit-na-vaz-2107.html
Video: checking and adjusting throttle clearance

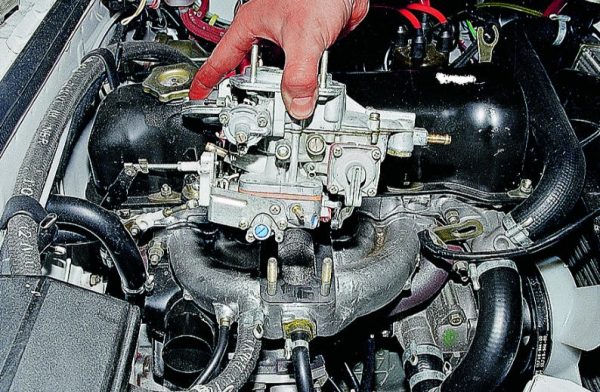
Dismantling the carburetor
Sometimes the carburetor needs to be dismantled, for example, for replacement, repair or cleaning. For such work, you need to prepare a set of tools, consisting of open-end wrenches, screwdrivers and pliers. If the damage is minor, then there is no need to remove the device.
For safety reasons, dismantling the carburetor is recommended to be carried out on a cold engine.
Then we perform the following sequence of actions:
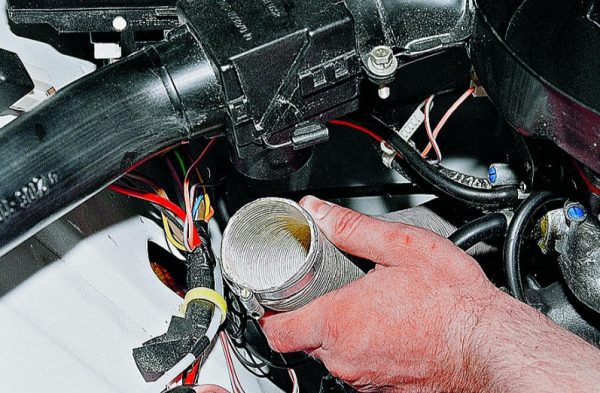
- In the engine compartment, loosen the clamp on the corrugated pipe and tighten it.We remove the corrugated pipe for the intake of warm air, after loosening the clamp
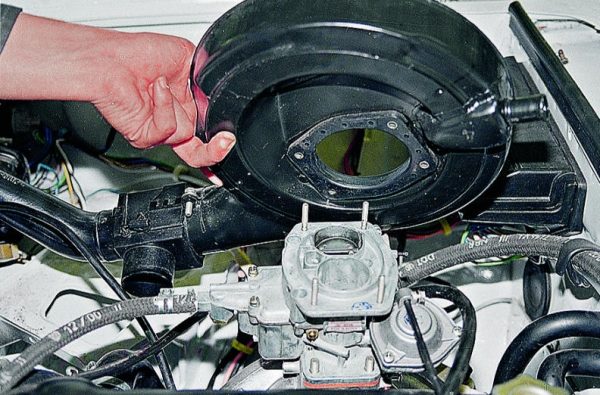
- Dismantle the air filter housing.Unscrew the fasteners, remove the air filter housing
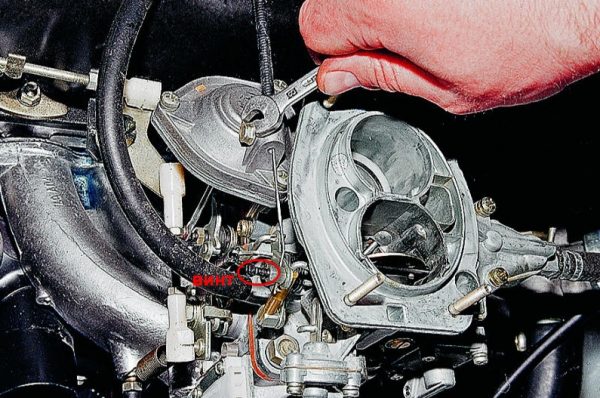
- We unscrew the fasteners of the suction cable sheath on the carburetor and loosen the cable itself with a screwdriver.To remove the suction cable, unscrew the bolt and screw that hold it.
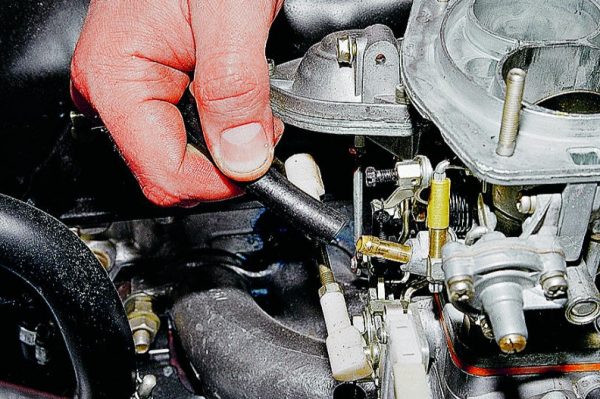
- We tighten the hose that removes crankcase gases.We pull the crankcase exhaust hose from the carburetor fitting
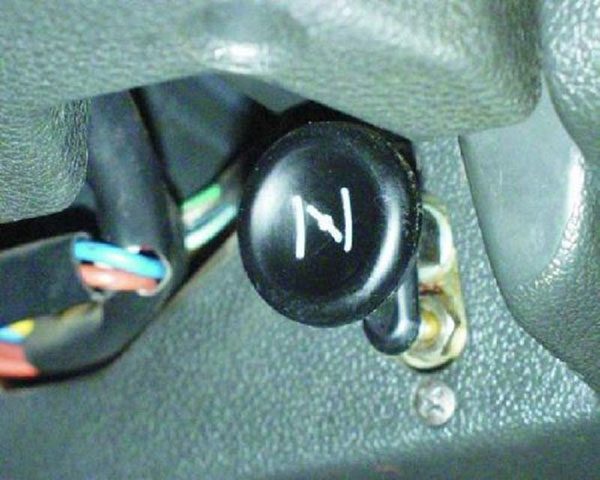
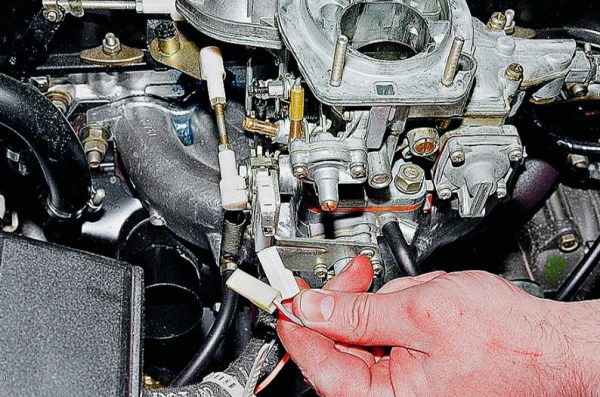
- We remove the wires of the microswitches of the economizer control system XX.We disconnect the wires from the microswitches of the economizer control system XX
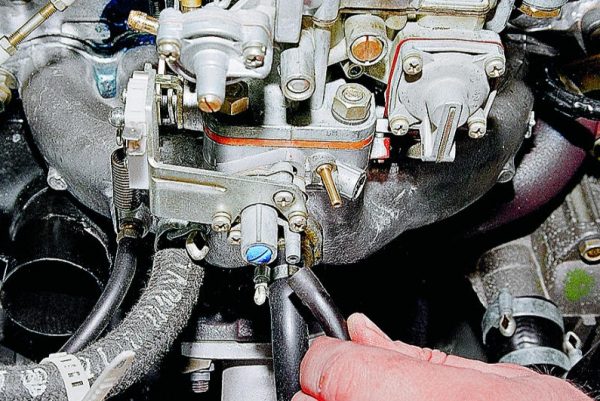
- We pull off the tube from the vacuum ignition timing regulator from the fitting.From the corresponding fitting, remove the tube from the vacuum ignition timing regulator
- Pull the hose off the economizer housing.Remove the tube from the economizer housing
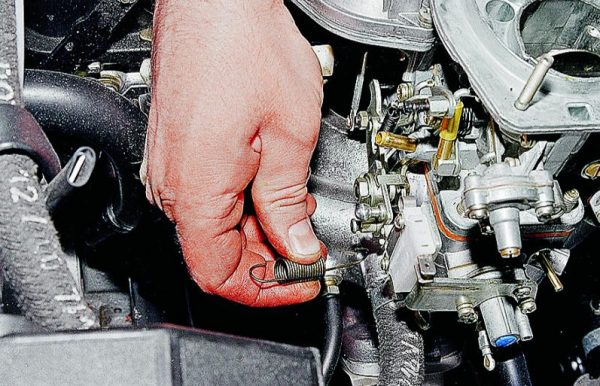
- Remove the spring.Removing the return spring from the carburetor
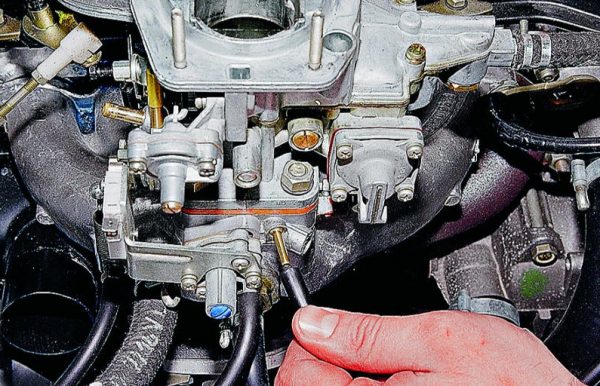
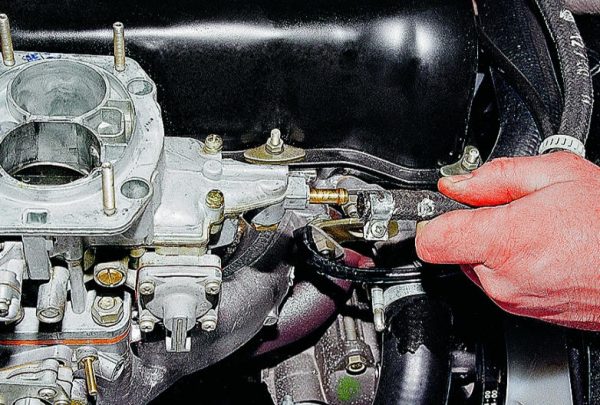
- Loosen the clamps holding the fuel hoses with a flat screwdriver and tighten the latter.After loosening the clamp, remove the hose that supplies fuel to the carburetor
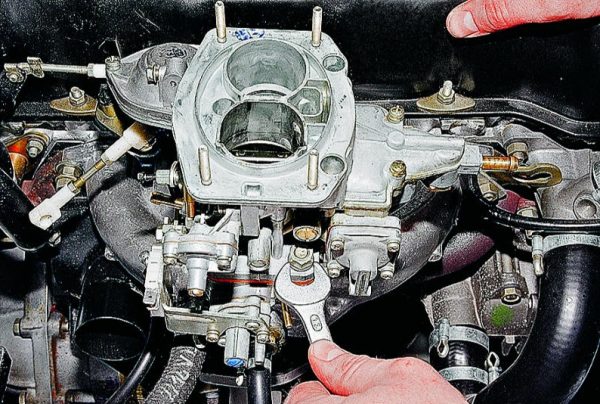
- Using a 14 wrench, unscrew the carburetor mounting nuts.The carburetor is attached with four nuts to the intake manifold, unscrew them
- We dismantle the device from the studs.After unscrewing the fasteners, remove the carburetor from the studs
More about the device and repair of the distributor: https://bumper.guru/klassicheskie-modeli-vaz/elektrooborudovanie/zazhiganie/zazhiganie-2107/trambler-vaz-2107.html
Video: how to remove the carburetor on the "seven"

Disassembly and cleaning of the assembly
Tools for disassembling the carburetor will need the same as for dismantling. We perform the procedure in the following order:
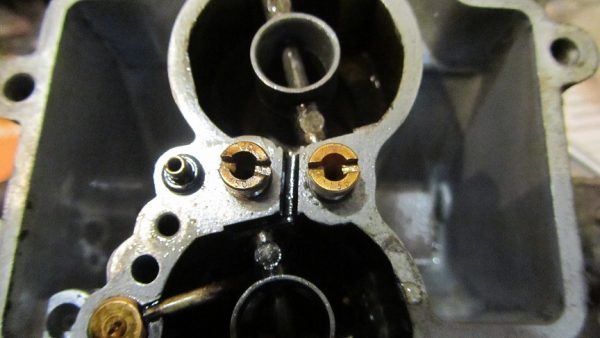
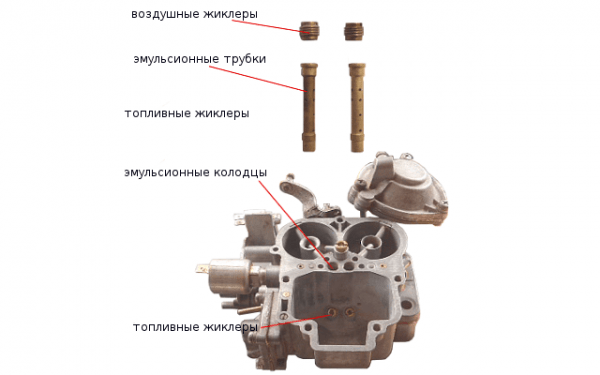
- We put the product on a clean surface, unscrew the fasteners of the top cover and remove it.The top cover of the carburetor is fixed with five screws.
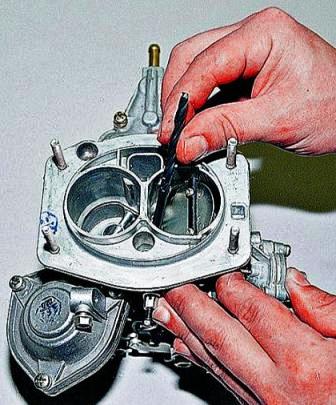
- We unscrew the jets and take out the emulsion tubes.After removing the top cover, unscrew the jets and take out the emulsion tubes
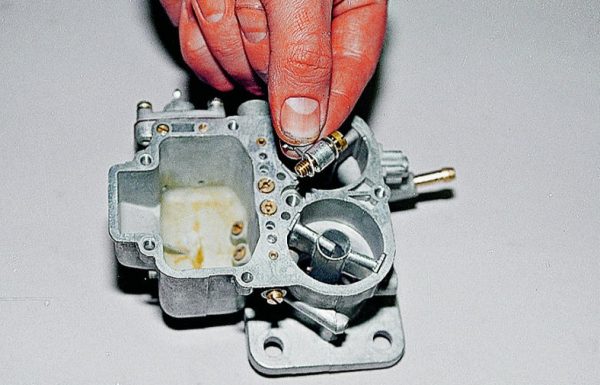
- We unscrew the accelerator atomizer and take it out by prying it with a screwdriver.Unscrew the accelerator pump atomizer and pry it with a screwdriver
- There is a seal under the valve, we also dismantle it.
- With pliers we get the diffusers of both chambers.We take out the diffusers of both chambers with pliers or knock them out with a screwdriver handle
- Unscrew and remove the accelerator screw.Unscrew and remove the accelerator pump screw
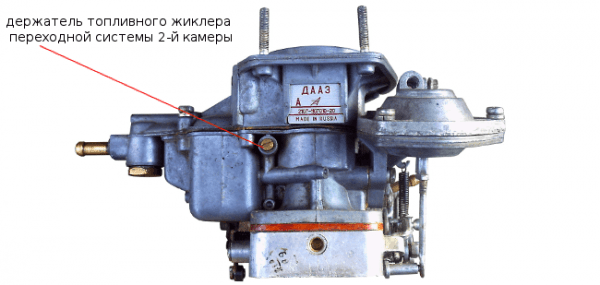
- We turn out the holder of the fuel jet of the transitional system, and then remove the jet from it.To remove the fuel jet of the transition system of the second chamber, it is necessary to unscrew the holder
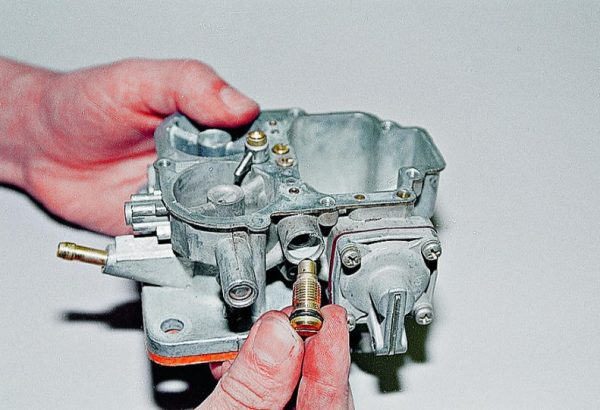
- On the other side of the device, we unscrew the body of the fuel jet XX and remove the jet itself.On the reverse side of the carburetor, unscrew the holder and take out the fuel jet XX
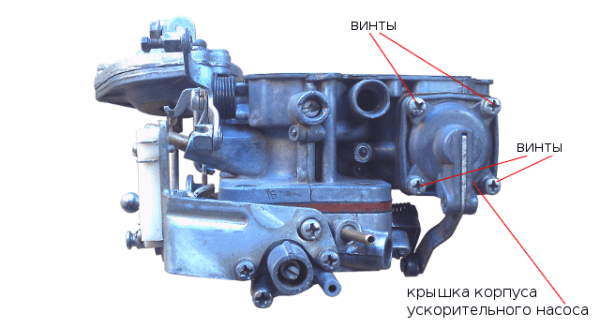
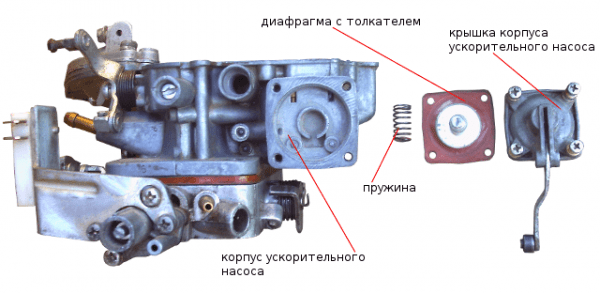
- We unscrew the fasteners of the accelerator cover.Using a Phillips screwdriver, unscrew the 4 screws securing the accelerator pump cover
- We dismantle the cover, the diaphragm with the pusher and the spring.Having unscrewed the fasteners, remove the cover, the diaphragm with the pusher and the spring
- We remove the return spring from the pneumatic drive lever and the thrust lock, after which we remove it from the DZ drive lever.We remove the return spring from the pneumatic drive lever and the thrust clamp
- We unscrew the fasteners of the pneumatic actuator and remove it.
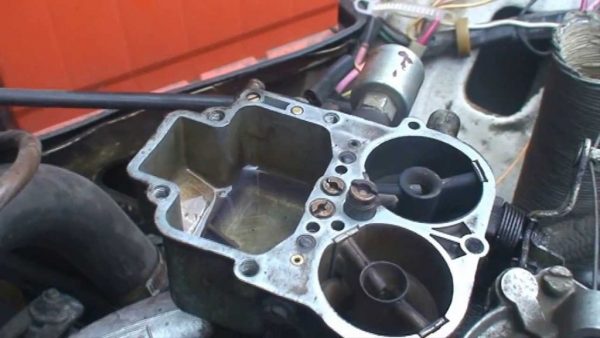
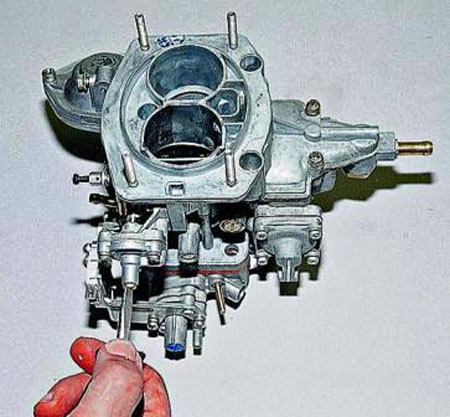
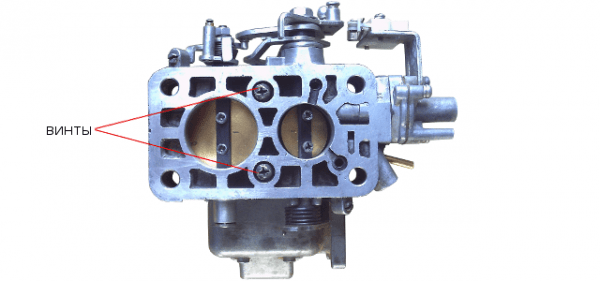
- We separate the two parts of the assembly, for which we unscrew the corresponding mount.The lower part of the carburetor is attached to the middle with two screws, unscrew them
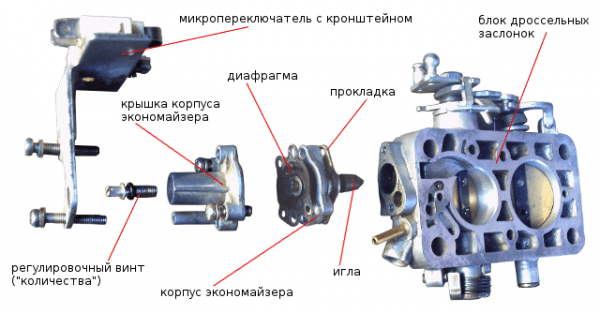
- We remove the economizer and the EPHX microswitch, after which we unscrew the adjusting screws for the quality and quantity of the mixture.We remove the economizer and the EPHX microswitch, after which we unscrew the adjusting screws for the quality and quantity of the mixture
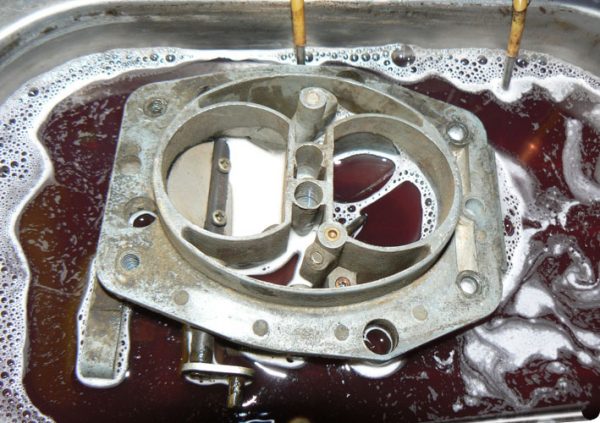
- We lower the body of the assembly into a container of suitable size with kerosene.After disassembling the carburetor, wash its body and parts in kerosene
- We check the integrity of all components and, if visible flaws are found, we replace them.
- We also soak the jets in kerosene or acetone, blow them and the seats in the carburetor with a compressor.


It is not recommended to clean the jets with metal objects (wire, awl, etc.), as the through hole can be damaged.
Table: calibration data for DAAZ 2107 jets
| Carburetor designation | Fuel main system | Air main system | Fuel idle | Air idle | Accelerator pump jet | |||||
| I little | II kam. | I little | II kam. | I little | II kam. | I little | II kam. | warm | bypass | |
| 2107-1107010; 2107 – 1107010 – 20 | 112 | 150 | 150 | 150 | 50 | 60 | 170 | 70 | 40 | 40 |
| 2107 – 1107010 – 10 | 125 | 150 | 190 | 150 | 50 | 60 | 170 | 70 | 40 | 40 |
To clean the float chamber from contamination, you need to use a medical pear. With its help, they collect the remaining fuel and debris at the bottom. The use of rags is not recommended, as the villi can get into the jets and clog them.
Carburetor cleaning without disassembly
The most common way to remove contaminants inside the product involves disassembling it in parts, which not every motorist can do. There is also a simpler option for cleaning the assembly without disassembly using special aerosols. The most popular are ABRO and Mannol.
Washing is carried out as follows:
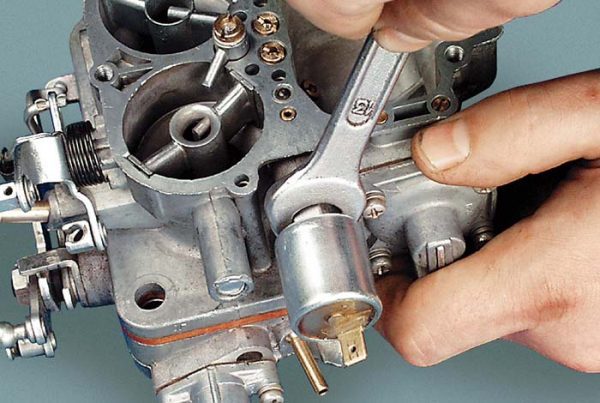
- On a muffled and cooled motor, dismantle the air filter housing and unscrew the solenoid valve.We turn off the solenoid valve XX with a key of 13
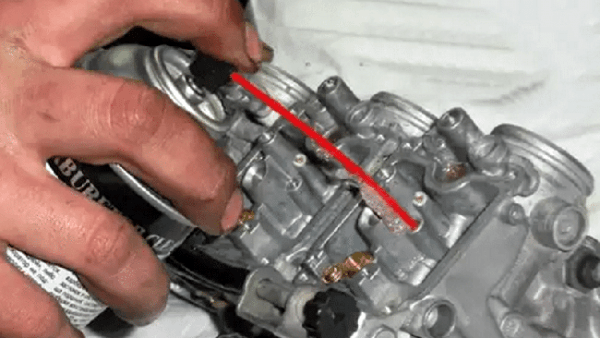
- We put the tube that comes with the kit on the can and process the jet channels, both chambers, dampers and all visible parts of the carburetor.The aerosol liquid is applied to each hole on the body of the device
- After applying, wait about 10 minutes. During this time, the fluid will eat away dirt and deposits.
- We start the engine, as a result of which the remaining contaminants are removed.
- If the performance of the carburetor is not fully restored, you can repeat the cleaning procedure again.
Before proceeding with the repair or adjustment of the carburetor, you need to be sure that the problem is in it. In addition, the assembly must be periodically inspected and cleaned of contaminants that form both outside and inside the mechanism, which will help step-by-step instructions.

