
Appointment, adjustment, repair and replacement of valves of the VAZ 2101 engine with your own hands
Content
VAZ 2101 is the first model produced by the Volga Automobile Plant in early 1970. The Fiat 124, well-established in Europe, was taken as the basis for its development. The first VAZ 2101 were equipped with 1.2 and 1.3 liter carburetor engines, the valve mechanism of which periodically needed to be adjusted.
Purpose and arrangement of the valve mechanism VAZ 2101
The operation of an internal combustion engine is impossible without a gas distribution mechanism (timing), which ensures the timely filling of the cylinders with a fuel-air mixture and removes its combustion products. To do this, each cylinder has two valves, the first of which is for the intake of the mixture, and the second for the exhaust gases. Valves are controlled by camshaft cams.
The camshaft is driven by the crankshaft through a chain or belt drive. Thus, in the piston system, a time-distributed inlet and outlet of gases is ensured in compliance with the sequence of gas distribution phases. The rounded tips of the camshaft cams press on the rocker arms (levers, rockers), which, in turn, actuate the valve mechanism. Each valve is controlled by its own cam, opening and closing it in strict accordance with the valve timing. Valves are closed by means of springs.
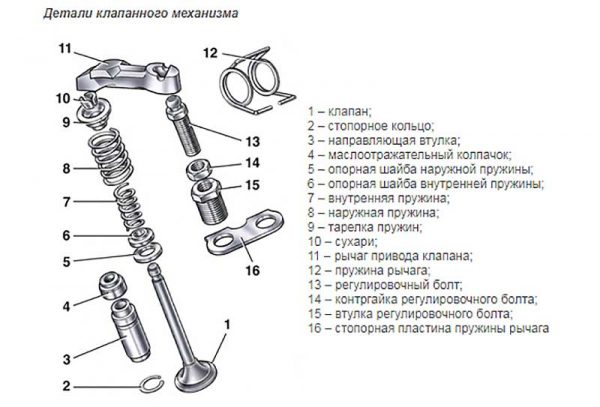
The valve consists of a rod (stem, neck) and a cap with a flat surface (plate, head) that closes the combustion chamber. The rod moves along the sleeve that guides its movement. The entire timing belt is lubricated with engine oil. To prevent grease from entering the combustion chambers, oil scraper caps are provided.
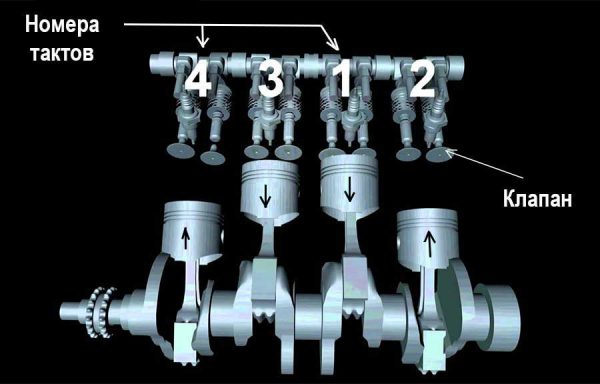
Each valve timing must strictly correspond to the position of the pistons in the cylinders. Therefore, the crankshaft and camshaft are rigidly connected through the drive, and the first shaft rotates exactly twice as fast as the second. The full working cycle of the engine consists of four phases (strokes):
- Inlet. Moving down in the cylinder, the piston creates a vacuum above itself. At the same time, the intake valve opens and the fuel-air mixture (FA) enters the combustion chamber at low pressure. When the piston reaches bottom dead center (BDC), the intake valve begins to close. During this stroke, the crankshaft rotates 180°.
- Compression. Having reached BDC, the piston changes direction of movement. Rising, it compresses fuel assemblies and creates high pressure in the cylinder (8.5–11 atm in gasoline and 15–16 atm in diesel engines). The inlet and outlet valves are closed. As a result, the piston reaches top dead center (TDC). For two cycles, the crankshaft made one revolution, that is, turned 360 °.
- Working move. From the spark, the fuel assembly is ignited, and under the pressure of the resulting gas, the piston is directed to the BDC. During this phase, the valves are also closed. Since the beginning of the working cycle, the crankshaft has rotated 540°.
- Release. Having passed the BDC, the piston begins to move upward, compressing the gaseous combustion products of the fuel assemblies. This opens the exhaust valve, and under the pressure of the piston gases are removed from the combustion chamber. For four cycles, the crankshaft made two revolutions (turned 720 °).
The gear ratio between the crankshaft and the camshaft is 2:1. Therefore, during the working cycle, the camshaft makes one complete revolution.
The timing of modern engines differ in the following parameters:
- the upper or lower location of the gas distribution shaft;
- the number of camshafts - one (SOHC) or two (DOHC) shafts;
- the number of valves in one cylinder (from 2 to 5);
- type of drive from the crankshaft to the camshaft (toothed belt, chain or gear).
The first carburetor engine of the VAZ models, produced from 1970 to 1980, has four cylinders with a total volume of 1.2 liters, a power of 60 liters. With. and is a classic in-line four-stroke power unit. Its valve train consists of eight valves (two for each cylinder). Unpretentiousness and reliability in work allows him to use AI-76 gasoline.
Video: gas distribution mechanism operation

Gas distribution mechanism VAZ 2101
The gas distribution mechanism of the VAZ 2101 is driven by the crankshaft, and the camshaft is responsible for the operation of the valves.
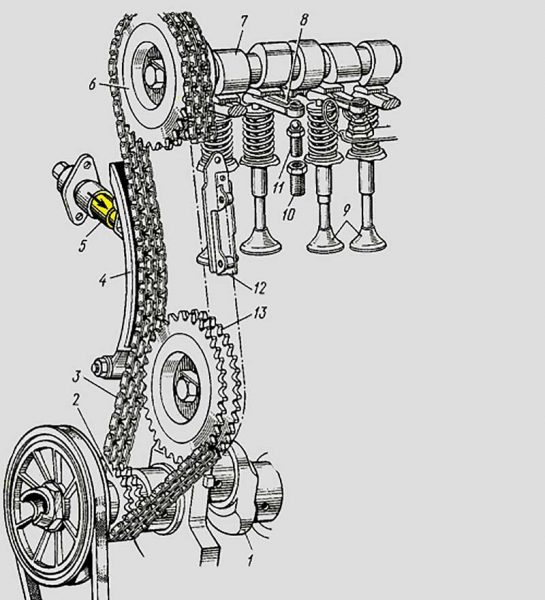
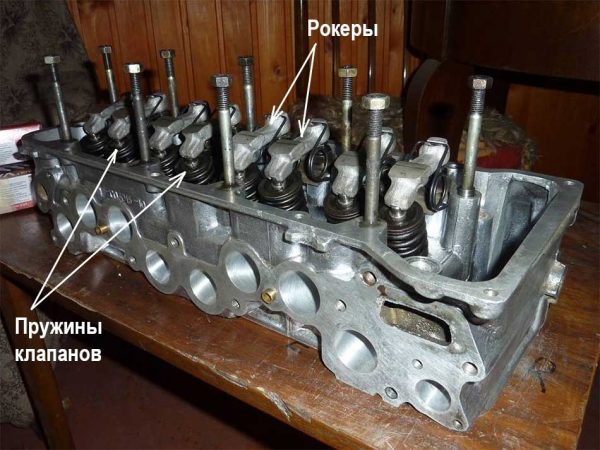
The torque from the engine crankshaft (1) through the drive sprocket (2), chain (3) and driven sprocket (6) is transmitted to the camshaft (7) located in the cylinder head (cylinder head). The camshaft lobes act periodically on the actuator arms or rockers (8) to move the valves (9). Thermal clearances of valves are set by adjusting bolts (11) located in bushings (10). Reliable operation of the chain drive is ensured by the bushing (4) and the adjusting unit (5), the tensioner, as well as the damper (12).
The working cycles in the cylinders of the VAZ 2101 engine have a certain sequence.
The main malfunctions of the timing VAZ 2101
According to statistics, every fifth engine malfunction occurs in the gas distribution mechanism. Sometimes different malfunctions have similar symptoms, so a lot of time is spent on diagnosis and repair. The following are the most common causes of timing failure.
- Incorrectly set thermal gap between rockers (levers, rocker arms) and camshaft cams. This results in incomplete opening or closing of the valves. During operation, the valve mechanism heats up, the metal expands, and the valve stems elongate. If the thermal gap is set incorrectly, the engine will be difficult to start and will begin to lose power, there will be pops from the muffler and a knock in the area of \uXNUMXb\uXNUMXbthe motor. This malfunction is eliminated by adjusting the clearance or replacing the valves and camshaft if they are worn.
- Worn valve stem seals, valve stems or guide bushings. The consequence of this will be an increase in engine oil consumption and the appearance of smoke from the exhaust pipe during idling or regassing. The malfunction is eliminated by replacing the caps, valves and repairing the cylinder head.
- Failure of the camshaft drive as a result of a loose or broken chain, breakage of the tensioner or chain damper, wear of sprockets. As a result, the valve timing will be violated, the valves will freeze, and the engine will stall. It will require a major overhaul with the replacement of all failed parts.
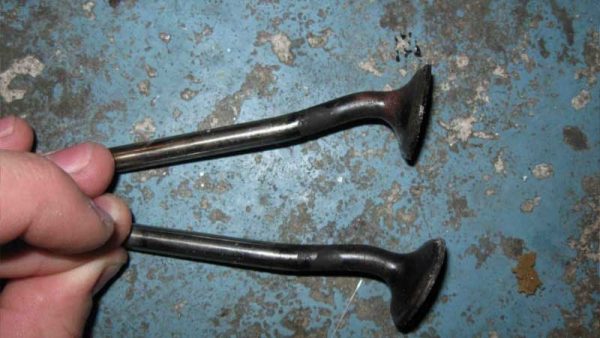
 Valves can be bent as a result of slipping or breakage of the timing chain
 - Broken or worn valve springs. The valves will not close completely and will start knocking, the valve timing will be disturbed. In this case, the springs must be replaced.
- Incomplete closing of the valves due to burning of the working chamfers of the valve plates, the formation of deposits from deposits of low-quality engine oil and fuel. The consequences will be similar to those described in paragraph 1 - repair and replacement of valves will be required.
- Wear of bearings and camshaft cams. As a result, the valve timing will be violated, the power and throttle response of the engine will decrease, a knock will appear in the timing, and it will become impossible to adjust the thermal clearance of the valves. The problem is solved by replacing worn-out elements.
After eliminating any of the malfunctions of the VAZ 2101 engine, it will be necessary to adjust the gap between the rockers and camshaft cams.
Video: the effect of valve clearance on timing operation

Dismantling and repair of the cylinder head VAZ 2101
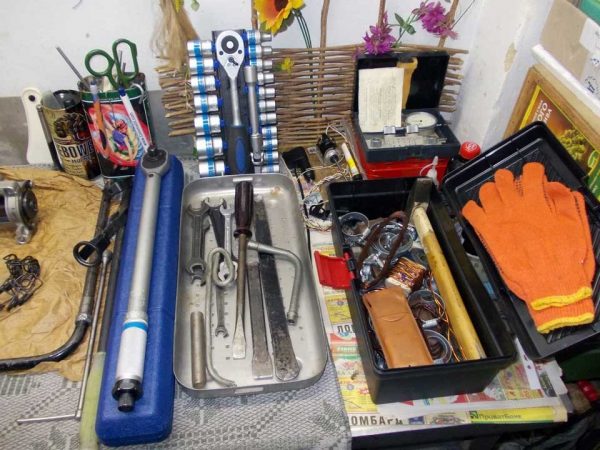
To replace the valve mechanisms and guide bushings, it will be necessary to dismantle the cylinder head. This operation is quite time-consuming and painstaking, requiring certain locksmith skills. To do this, you will need the following tools:
- a set of wrenches (required the presence of heads for 8, 10, 13, 17, 19);
- slotted and Phillips screwdrivers;
- pliers;
- mandrels for pressing and pressing guide bushings;
- tool A.60311/R for extracting valve springs (raskuharivatel);
- puller and mandrel for oil seals;
- torque wrench.
Before starting the dismantling of the cylinder head, it is necessary:
- Drain antifreeze from engine cooling system.
- Remove the air filter and carburetor, having previously disconnected all pipes and hoses.
- Disconnect the wires, unscrew the spark plugs and the antifreeze temperature sensor.
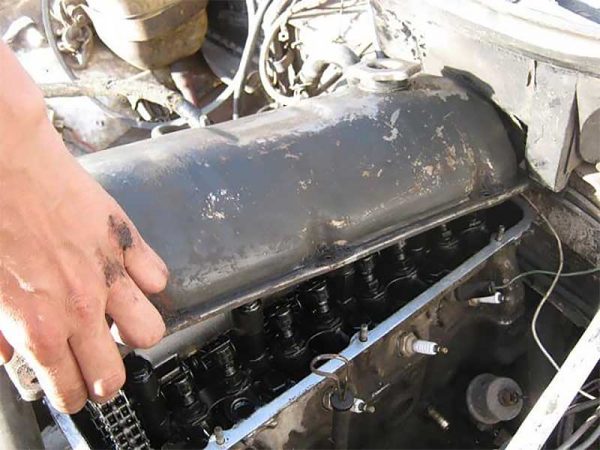
- Having unscrewed the fastening nuts with a wrench for 10, remove the valve cover along with the old gasket.You will need a 10mm wrench to remove the valve cover.
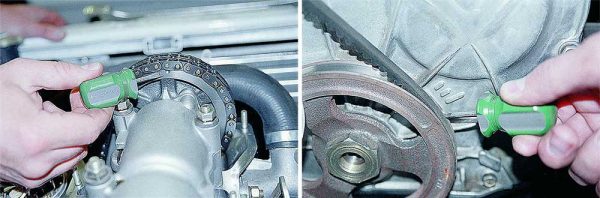
- Align the alignment marks of the crankshaft and camshaft. In this case, the pistons of the first and fourth cylinders will move to the highest point.Before removing the cylinder head, it is necessary to combine the alignment marks of the crankshaft and camshaft (on the left - the camshaft sprocket, on the right - the crankshaft pulley)
- Loosen the chain tensioner, remove the thrust washer and camshaft sprocket. You cannot remove the chain from the sprocket, you need to fasten them with wire.
- Remove the camshaft together with the bearing housing.
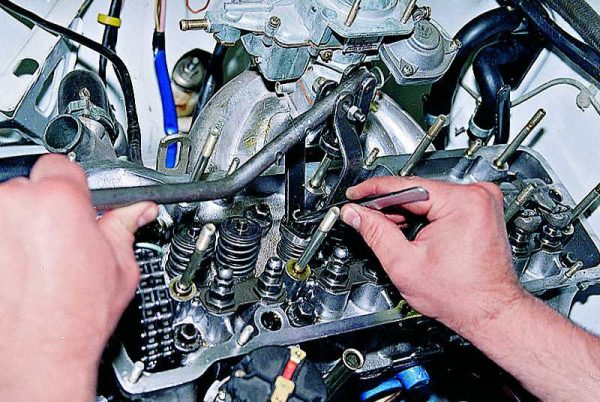
- Pull off the adjusting bolts, remove from the springs and remove all rockers.
Replacing valve springs and valve stem seals
Support bearings, camshaft, springs and valve stem seals can be replaced without removing the cylinder head. To do this, you will need a tool for extracting (drying out) the valve springs. First, the indicated elements are replaced on the valves of the first and fourth cylinders, which are at TDC. Then the crankshaft is rotated by a crooked starter by 180о, and the operation is repeated for the valves of the second and third cylinders. All actions are performed in a strictly defined sequence.
- A bar of soft metal with a diameter of about 8 mm is inserted into the candle hole between the piston and the valve. You can use tin solder, copper, bronze, brass, in extreme cases - a Phillips screwdriver.A soft metal bar or Phillips screwdriver is inserted into the spark plug hole between the piston and the valve.
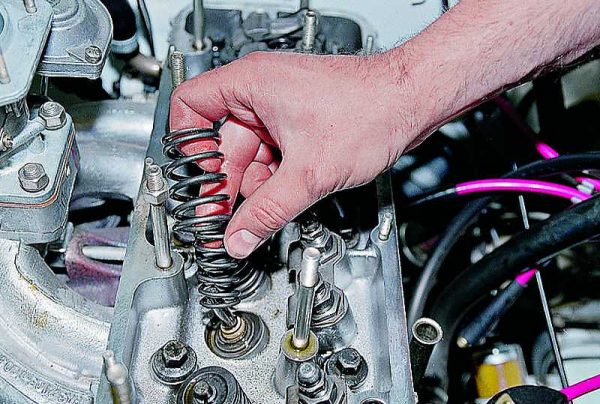
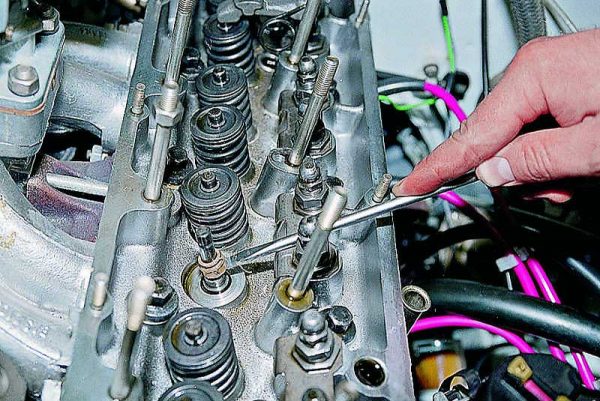
- A nut is screwed onto the camshaft bearing housing stud. Under it, the grip of the device for extracting crackers (device A.60311 / R) is started, which locks the spring and its plate.The nut on the stud acts as a support, creating a lever for the cracker
- The spring is pressed with a cracker, and the locking crackers are removed with tweezers or a magnetized rod.Instead of tweezers, it is better to use a magnetized rod to extract crackers - in this case, they will not be lost
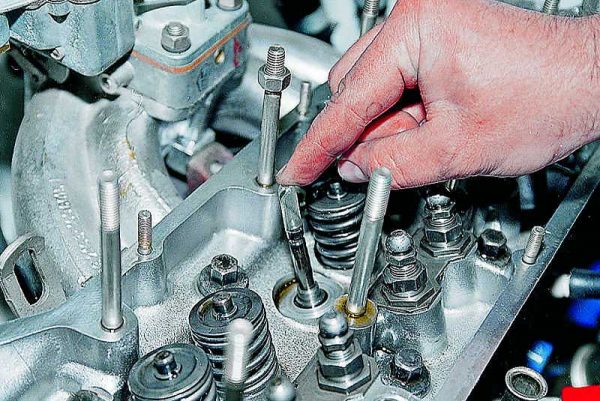
- The plate is removed, then the outer and inner springs.The springs are pressed from above by a plate fixed with two crackers
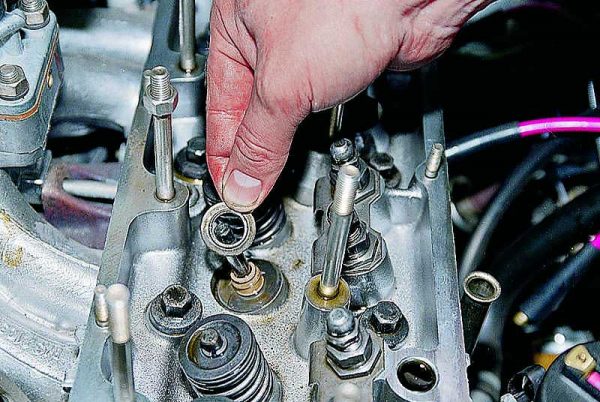
- The upper and lower support washers located under the springs are removed.To remove the oil scraper cap, you need to remove the support washers
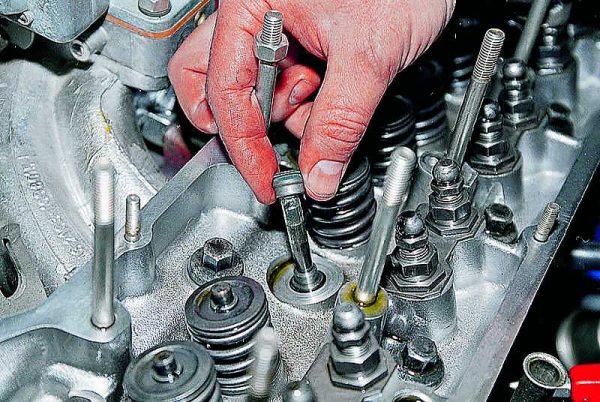
- With a slotted screwdriver, carefully pry off and remove the oil scraper cap.Pry off the cap with a screwdriver very carefully so as not to damage the edge of the valve sleeve
- A protective plastic sleeve is put on the valve stem (supplied with new caps).The sleeve protects the oil scraper cap from damage during its installation.
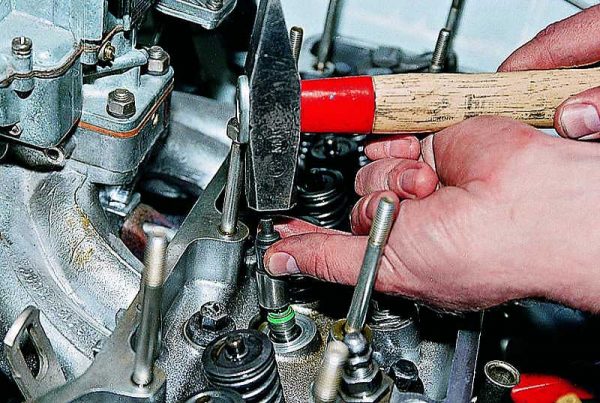
- An oil deflector cap is put on the bushing and moved to the rod.The working edge of the cap must be lubricated with machine oil before installation.
- The plastic sleeve is removed with tweezers, and the cap is pressed onto the valve sleeve.In order not to damage the cap, a special mandrel is used when pressing it
If no other repair work is required, the timing assembly is carried out in the reverse order. After that, it is necessary to adjust the thermal clearance of the valves.
Replacing and lapping valves, installing new guide bushings
If the valve heads are burnt out, or a coating of impurities in the oil and fuel has formed on them, preventing a snug fit to the saddles, the valves must be replaced. This will require the dismantling of the cylinder head, that is, it will be necessary to complete all the points of the above algorithm before installing new valve stem seals on the valve necks. The caps and springs themselves can be installed on the removed cylinder head after replacing and lapping the valves. The work is carried out in the following order.
- The hoses are disconnected from the carburetor, inlet pipe and outlet pipe of the cylinder head cooling jacket.
- The starter guard and the exhaust pipe of the mufflers are disconnected from the exhaust manifold.
- Disconnect the oil pressure sensor.
- The bolts securing the cylinder head to the cylinder block are torn off, and then turned away with a crank and ratchet. The cylinder head is removed.
- If the valve mechanisms have not been disassembled, they are removed in accordance with the instructions above (see "Replacing valve springs and valve stem seals").To replace valves and bushings, you need to disassemble the valve mechanisms
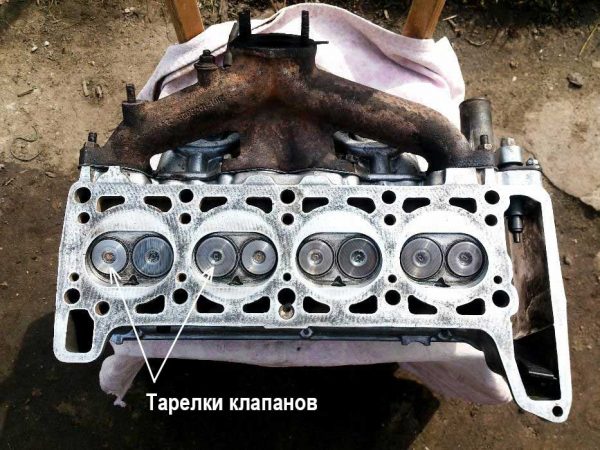
- The cylinder head is turned over so that the side adjacent to the cylinder block is on top. Old valves are removed from their guides.Old valves must be removed from their guides.
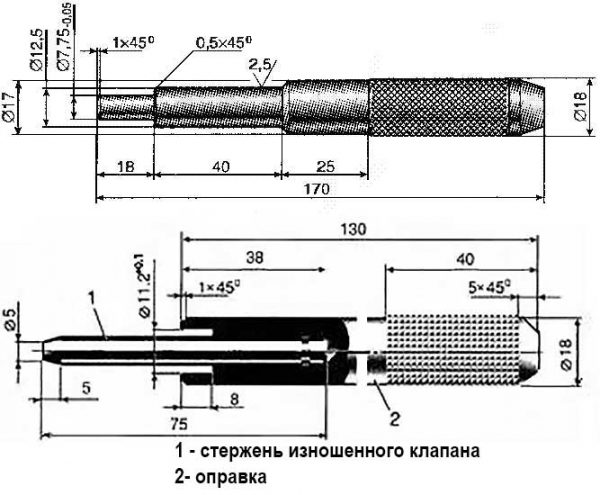
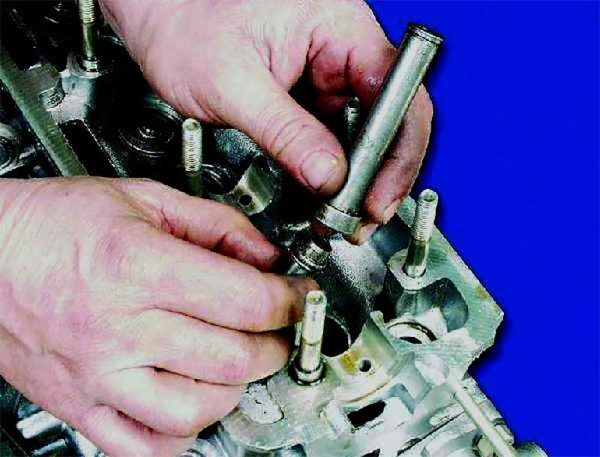
- New valves are inserted into the guides and checked for play. If it is necessary to replace the guide bushings, special tools are used.Mandrel for knocking out (top) and pressing (bottom) guide bushings
- The cylinder head heats up - you can on an electric stove. In order for the bushings to fit better into the sockets, they should be lubricated with engine oil.Installing new bushings will require a hammer and mandrel and engine oil
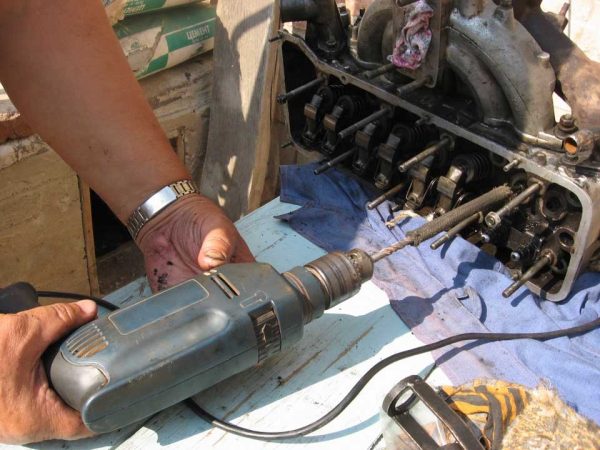
- New valves are lapped onto the cylinder head seats using special lapping paste and a drill. During rotation, the valve discs must be periodically pressed against the saddles with a wooden hammer handle. Each valve is rubbed for several minutes, then the paste is removed from its surface.Lapping is completed when the surface of the seat and valve at the point of contact becomes matte
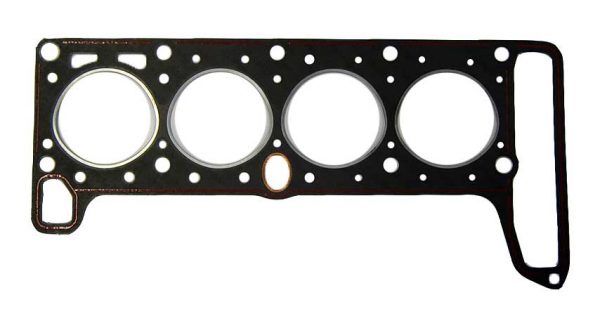
- Installation of valve mechanisms and assembly of the cylinder head is carried out in the reverse order. Before this, the surfaces of the head and cylinder block are carefully cleaned, lubricated with graphite grease, and a new gasket is put on the cylinder block studs.When installing the cylinder head on the cylinder block, the gasket must be changed to a new one.
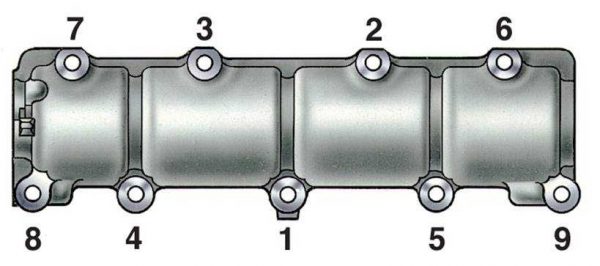
- When installing the head in the cylinder block, the bolts are tightened with a torque wrench in strict sequence and with a certain force. First, a force of 33.3–41.16 Nm is applied to all bolts. (3.4–4.2 kgf-m.), Then they are tightened with a force of 95.94–118.38 Nm. (9.79–12.08 kgf-m.).If you do not follow the order of tightening the bolts, you can damage the gasket and the surface of the cylinder head
- When installing the camshaft bearing housing, the nuts on the studs are also tightened in a certain sequence.If you do not follow the order of tightening the nuts of the camshaft bearing housing, you can warp the camshaft itself
- After installing the cylinder head and camshaft housing, the thermal clearance of the valves is adjusted.

Video: cylinder head repair VAZ 2101–07

Valve thermal clearance adjustment
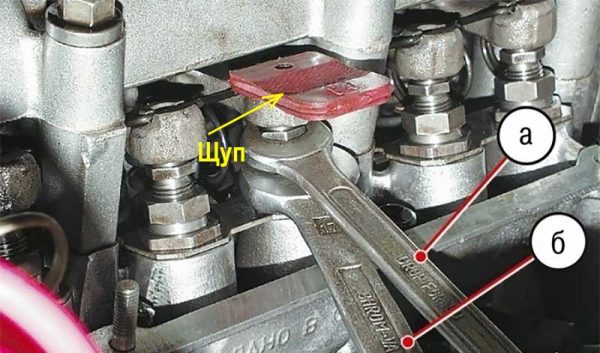
A design feature of the engines of classic VAZ models is that during operation the gap between the camshaft cam and the valve rocker-pusher changes. It is recommended to adjust this gap every 15 thousand kilometers. To work, you will need wrenches for 10, 13 and 17 and a probe 0.15 mm thick. The operation is simple, and even an inexperienced motorist can perform it. All actions are performed on a cold engine in the following order:
- According to the above instructions, the valve cover is removed (clause 4 of the section "Dismantling and repair of the VAZ 2101 cylinder head"), then the ignition distributor cover. The oil dipstick is removed.
- The marks of the crankshaft and camshaft are combined (clause 5 of the section "Dismantling and repair of the cylinder head VAZ 2101"). The piston of the fourth cylinder is set to the TDC position, while both valves are closed.
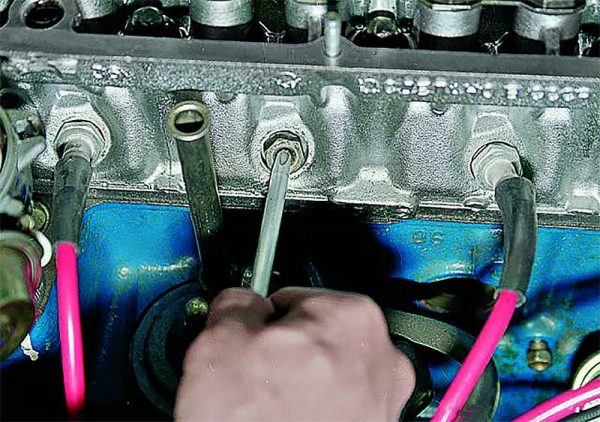
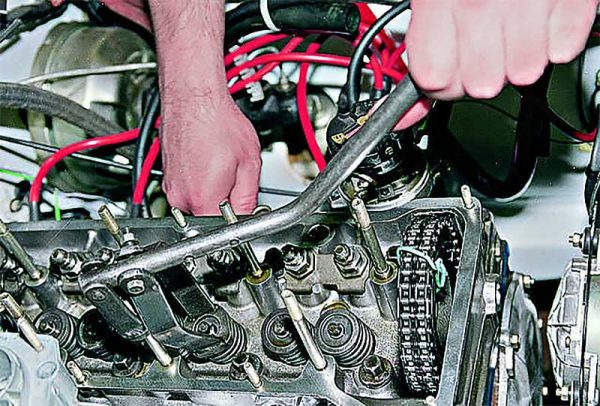
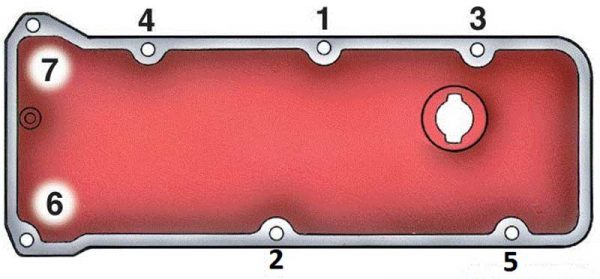
- A probe is inserted between the rocker and the camshaft cam of 8 and 6 valves, which should enter the slot with little difficulty and not move freely. The lock nut is loosened with a key of 17, and the gap is set with a key of 13. After that, the adjusting bolt is clamped with a locknut.When adjusting the gap with a key of 17, the lock nut is loosened, and the gap itself is set with a key of 13
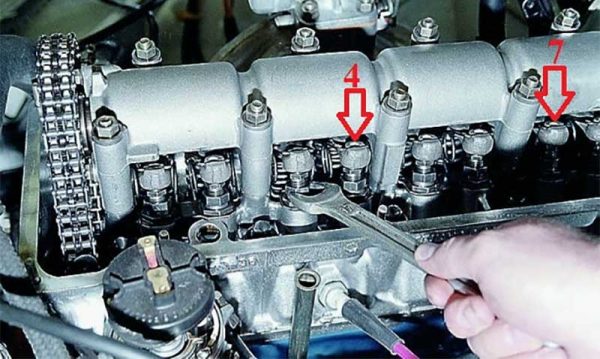
- The crankshaft is rotated by a crooked starter clockwise by 180 °. Valves 7 and 4 are adjusted in the same way.After turning the crankshaft 180 °, valves 7 and 4 are adjusted
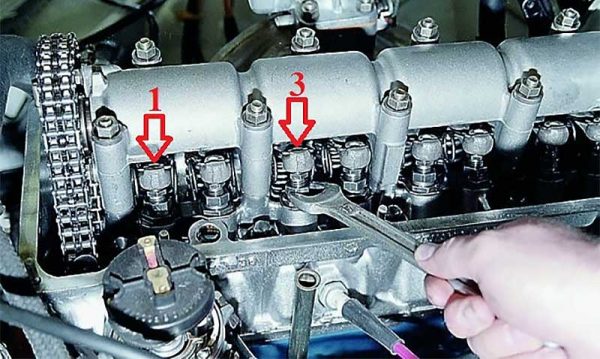
- The crankshaft is rotated 180° clockwise again and valves 1 and 3 are adjusted.If the feeler gauge does not fit into the gap between the cam and the rocker, loosen the locknut and adjusting bolt
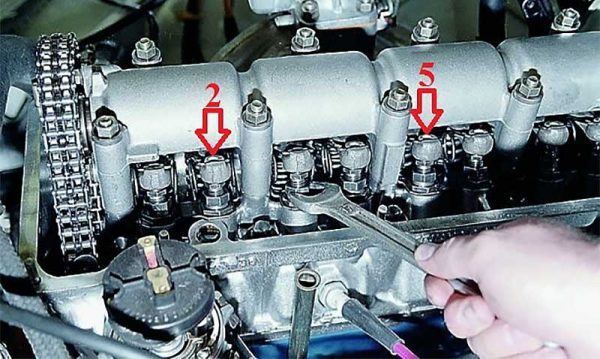
- The crankshaft is rotated 180 ° clockwise again and valves 2 and 5 are adjusted.After adjusting the valve clearances, start the engine and check its operation.
- All parts, including the valve cover, are installed in place.
Video: adjusting the valve clearance VAZ 2101

Valve lid
The valve cover closes and seals the timing, preventing camshaft grease, valves and other parts from leaking out. In addition, new engine oil is poured through its neck when replacing. Therefore, a sealing gasket is installed between the valve cover and the cylinder head, which is changed every time the valves are repaired or adjusted.
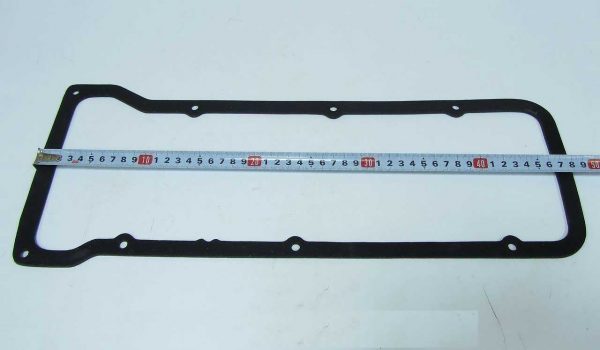
Before replacing it, carefully wipe the surfaces of the cylinder head and covers from engine oil residues. Then the gasket is put on the cylinder head studs and pressed against the cover. It is necessary that the gasket fits exactly into the grooves of the cover. After that, the fastening nuts are tightened in a strictly defined sequence.
Video: eliminating oil leaks from under the valve cover VAZ 2101-07

Replacing and repairing valves on a VAZ 2101 is a rather time-consuming job and requires certain skills. However, having a set of necessary tools available and consistently fulfilling the requirements of the instructions of specialists, it is possible to make it realistic even for an inexperienced motorist.

