Nissan Tiida heater not working
Content
Driving a cold car is unpleasant not only in sub-zero temperatures, so problems in the operation of a standard heater should always be addressed as they arise. If you don't follow this rule, one day you will come across a situation where the only way to get rid of foggy windows is to open the car windows. Agree, in winter such a reception is unacceptable. Therefore, you have to take the car to the service station or carry out diagnostics and repairs on your own, and it’s good if there are suitable conditions for this in the form of a heated garage.

In any case, the problems must be solved, and today we will talk about the malfunction of the Nissan Tiida stove and how to fix it yourself.
Let's start with the most obvious and common reason.
Air locks in CO
The lightness of the line through which the refrigerant circulates is as common as air blockage in the heating system of the house. It is true that methods for eliminating lightness vary depending on the style. The reason is simple: on a car, many nodes are located in places that are difficult to reach without partial disassembly, and the design features of these nodes are such that the Mayevsky crane cannot be put there.
However, any more or less experienced motorist knows that the procedure for getting rid of lightness is simple, but if the problem occurs again and again, then the causes of this phenomenon should be sought. Most often this is a depressurization of the cooling system. In this case, instead of draining the antifreeze, air is sucked in, and if this happens in a pretentious place, then during normal engine operation, this plug does not turn off. But putting the car on a slope with the front up and accelerating the power unit to a speed adjacent to the red line solves the problem. It is important to find the leak and fix the problem, but here there can be problems: it will be necessary to check all the components of the cooling system, which is a laborious task. You'll be lucky if stain stains can be detected with antifreeze stains.
Jamming of the thermostat
If you carefully read the forums devoted to problems with the operation of the stove, then the most common tips concern only the thermostat. In fact, this little device often breaks down, although this mainly concerns thermostats, which are already at the limit of their service life. That is, the failure is manifested as a result of natural wear and / or contamination of the device rod; at some point, it begins to clog, which leads to unpredictable operation of the cooling system, of which the heater is also a part. Eventually, the thermostat valve gets stuck in a random position, from fully closed to fully and permanently open. In all cases, the normal operation of the CH is interrupted. More precisely.
Please note that in this case, specific manifestations depend on the position in which the thermostat valve is stuck. If it is open, then the coolant will always circulate in a large circle, increasing the engine warm-up time to operating temperature by several times, and even longer in severe frost. If the valve is permanently closed, fluid will not flow to the main radiator, which will cause the engine to overheat quickly.
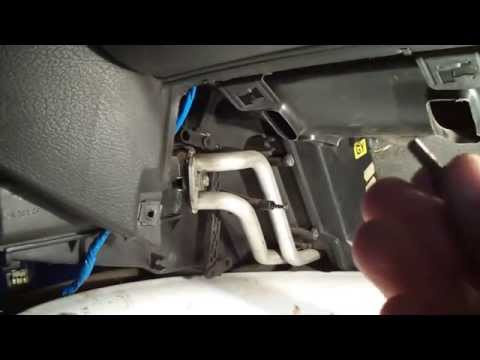
The process of removing the heater Nissan Tiida
Interestingly, this malfunction does not have any characteristic symptoms, but if the Nissan Tiida heater does not work well or does not work at all, you should start checking with the thermostat. This is done simply: we touch the branch that goes to the main radiator with our hand. It should be cold until the power unit warms up. If this condition is not met or the pipe remains cold even after the engine reaches operating temperature (Nissan Tiida 82 ° C), then we are dealing with a faulty thermostat. It is non-separable, cannot be repaired and requires replacement, which is carried out in the following order:
- drain antifreeze from the cooling system (through the drain hole in the main radiator);
- loosen the clamp on the outlet flange of the cooling radiator, disconnect the tube, do the same with its other end going to the thermostat cover;
- it remains to unscrew the two bolts with which the thermostat is attached to the engine, and first remove the cover, and then the thermostat itself.
As you can see, there are a minimum of operations, but you may have problems in the form of rusty clamps, and you will have to play around with disconnecting the pipes if this operation has been carried out for a long time.
Checking the performance of the thermostat can be done as follows: place the device in hot water, the temperature of which should be brought to 80-84 ° C (we control it with a thermometer). If the stem remains motionless with a further increase in temperature, it is defective and must be replaced. Please note that the full opening of the valve occurs at a temperature of approximately 95-97°C.
Many car enthusiasts advise buying a thermostat that operates at a temperature of 88 ° C; this does not threaten the engine with overheating, the time to reach performance will increase slightly, but it will noticeably warm up in the cabin.
Before installing a new thermostat, be sure to clean the seat, do not forget to change the sealing ring. After installing the device and connecting the pipes (it is also recommended to change the clamps), fill in antifreeze (you can use the old one if it is not very dirty) and pump the system to remove excess air.
Even if you are doing this procedure for the first time, most likely you will be able to complete it in a maximum of an hour.
Breakdown of the water pump
A drop in pump performance is a malfunction that primarily affects the operation of the CO of the power unit. So if you notice that the arrow of the temperature sensor has crawled above the norm, after checking the coolant level, you should complain about this particular node. Indirectly, the deterioration of the circulation of antifreeze will also affect the efficiency of the heater. As a rule, a water pump malfunction is a consequence of bearing wear, which is manifested by the appearance of characteristic sounds coming from under the hood. In the initial stages, these squeaks may not last long until the coolant warms up, but as the shaft gets bigger, they get longer and longer. If you do not take immediate action, there is a risk that the pump shaft will completely seize, and if this happens on the way, you will face huge expenses. Oh sure.
"Acoustic" symptoms are not always present, so experienced drivers use another proven technique - hold the pipe from the pump to the main radiator with their hands. When the pump is running, it should pulsate, vibrate. If fluid movement is not felt during such palpation, a faulty water pump is most likely to blame.
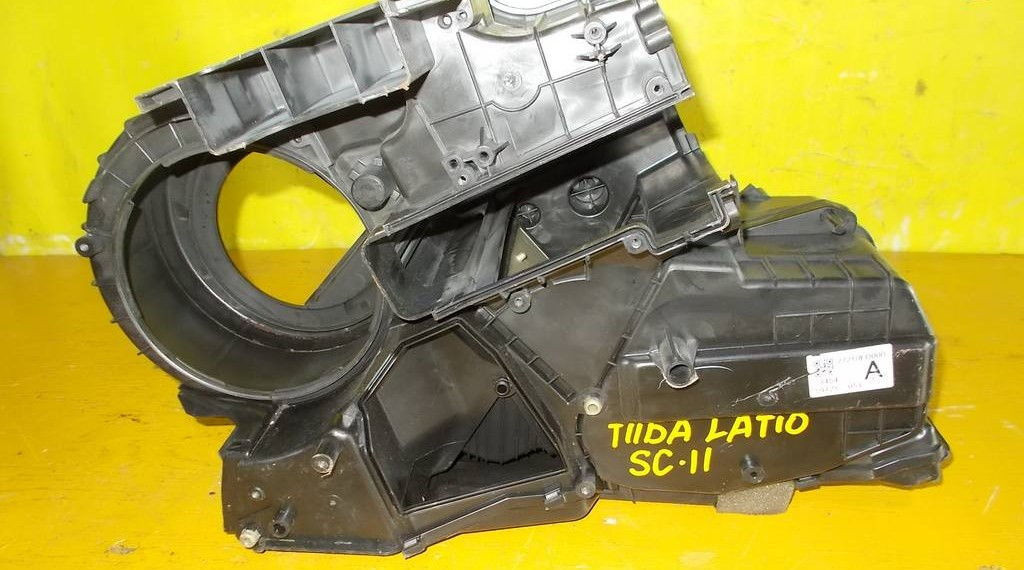
Furnace body
This assembly is also considered non-separable, therefore, to perform this procedure, it must be replaced with a new one, we need the following tool: 10/13 wrenches, preferably socket, pliers, Phillips / flat screwdrivers, a coolant drain pan (with a capacity of 10 liters or more), stock of rags.
Let's start replacing the pump:
- drain the coolant through the drain plug on the cooling radiator;
- dismantle the drive belt of the generator and other auxiliary units;
- we unscrew the screws that fasten the pump flange to the pulley, carefully securing the latter so that it does not turn (any suitable long and fairly thin metal object will do);
- remove the drive pulley from the pump;
- we unscrew the screws that secure the water pump to the motor housing (access to one of them is difficult, so we are trying to be clever);
- disassemble the pump;
- do not forget to remove the sealing gum, and also clean the saddle from dirt and gasket residues;
- install a new pump (usually it comes with a rubber seal, if the latter is missing, we buy it separately);
- all other procedures are performed in reverse order;
- after laying the drive belt, we tighten it according to the operating instructions;
- fill in antifreeze (it can be old if it is in good condition), we carry out the procedure to eliminate the brightening of the line.
In principle, the only difficulty is to remove the drive belt and adjust its tension during assembly. Otherwise, everything is quite simple and trivial.
Radiator leak/clogging
So far, we have considered malfunctions that are not directly related to the heating system. Now it's time to consider the problems associated with the operation of the heating unit, which includes a heat exchanger and a Nissan Tiida stove motor.
Let's start with the stove radiator, which, in general, appears on the negative side mainly on old cars - it does not have components subject to mechanical wear. However, the appearance of leaks and severe clogging of the channels of this unit are characteristic phenomena, especially with improper maintenance and operation of the machine. The problem is that access to the stove is very difficult here, so disassembling the radiator is associated with a large amount of work, most of which falls on disassembling the torpedo.
The reasons for radiator clogging are natural: even when it is filled with perfectly purified coolant, due to a violation of the tightness of the cooling system (liquid leakage is not necessary), various mechanical contaminants inevitably get into the antifreeze over time, which settle on the inner walls of the radiator. This leads to a narrowing of the free pore space and a decrease in the performance of the heat exchanger, as well as a deterioration in its heat transfer. As a result, the stove heats up worse and worse.
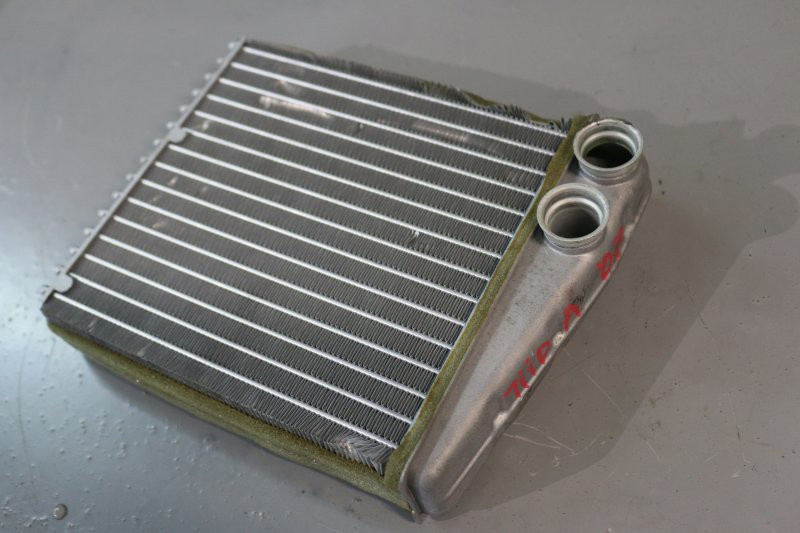
Radiator heating Nissan Tiida
It is believed that the average resource of the furnace radiator is 100-150 thousand kilometers. The use of low-quality coolant, and even more so filling with water in the summer instead of antifreeze, can significantly speed up the process of radiator clogging. Filling with water is generally not desirable, since it is a catalyst for oxidative processes in relation to the metal parts of the cooling system (antifreeze has additives that negate oxidative processes). The formation of leaks in radiators in most cases is a consequence of the use of water: although aluminum is more resistant to corrosion, it also rusts.
Diagnosis of a clogged radiator and its leakage is carried out in the same way as on other cars. There are no single reliable symptoms, but a combination of several may indicate the presence of these problems. This is a progressive deterioration of the heater over time, the appearance of an antifreeze smell in the cabin, frequent, causeless and prolonged fogging of the windows, and a decrease in the coolant level.
In case of such malfunctions, the furnace radiator must be replaced, which we will talk about now, after which we will mention the possibility of carrying out restoration work - flushing and soldering the heat exchanger.
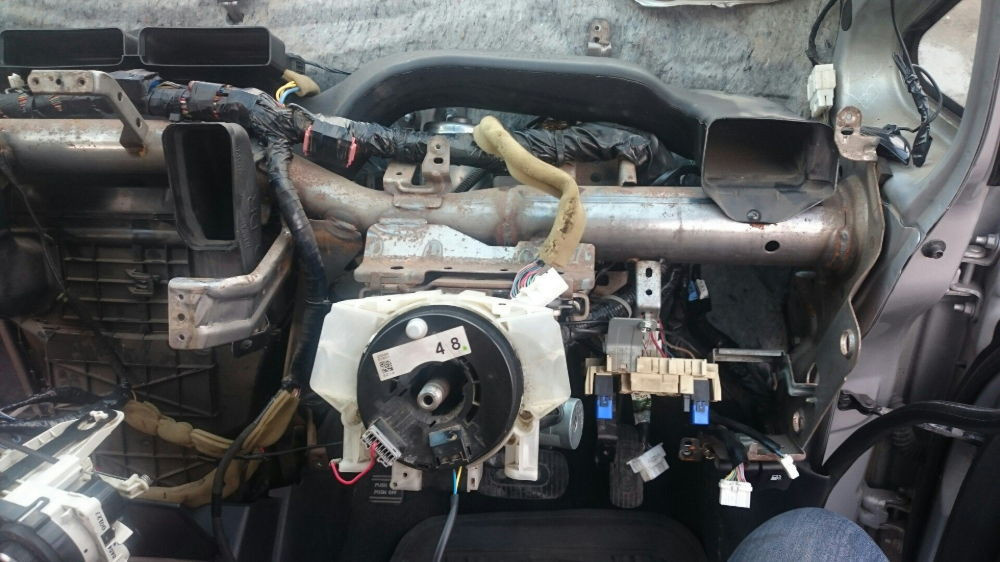
We must say right away that the “correct” disassembly of the stove requires complete disassembly of the torpedo. The detailed description of this procedure is no less tedious than the disassembly itself. But even after removing the front trim of the passenger compartment, it will not be easy to remove the radiator, since you will have to drain the freon from the car's air conditioner, and this, as you understand, will only increase the headache. It is unlikely that you will be able to charge the air conditioning system with refrigerant yourself.
The most interesting thing is that the heater block is physically located near the accelerator pedal, but the design here is such that it is impossible to do without dismantling the entire front panel.
As it turned out, there is a much less time-consuming option that allows you to complete the entire procedure in a few hours and not stretch the pleasure for 2-7 days with the risk of losing something, forgetting something during reassembly. True, for this you will have to make cuts in the metal fittings, which will allow you to simply bend it and pull out the radiator without any problems. In this case, it is enough to remove the plastic molding at the driver's feet and do the same with the floor molding, and also only in the area adjacent to the engine compartment. The window that opens will be enough to disconnect the pipes from the heat exchanger and perform other minor work.
A visual inspection of the radiator is a necessary next step. It is possible that your external condition is unsatisfactory and the problem of reduced performance is due to an internal obstacle. Many car owners in such cases are in no hurry to go to the store for a new stove, but try to wash it. On the net, you can find many statements that such a procedure does not always give the expected effect, but the number of positive reviews is also high. That is, you have to do everything at your own peril and risk. If the dismantling procedure was carried out with the complete removal of the torpedo, then we do not recommend experimenting with cleaning the radiator cells; if they clog again after a few months or even a year, you are unlikely to take up the disassembly of the stove with pleasure. But with a simplified disassembly procedure, flushing makes sense.
Detergent can be purchased at any auto shop. You will also need a brush with a soft bristle, in extreme cases, you can use a brush.
Rheostat furnace
The washing process itself cannot be called complicated, but its duration depends on the specific results and your diligence. The cleaning procedure must be started from the outside of the heat exchanger, where a considerable amount of dirt also accumulates, preventing normal heat exchange with air. If it is not possible to clean the surface of the radiator with warm water and a rag (towel), you should use a brush and any household dishwashing detergent.
Internal cleaning is more difficult. Here you will have to use a compressor, a large-capacity tank, as well as two long hoses, which are connected on one side to the radiator fittings, and on the other side are lowered into a container with a functional cleaning solution and to the outlet of the bomb. Then the pump turns on and begins to push the liquid through the radiator. It is necessary to leave for 30-60 minutes, then rinse the stove with water and pour the special agent back into the container. Such iterations continue until a relatively clean liquid comes out of the radiator. Finally, blow out the cells with compressed air.
Please note that in principle it is possible to flush the stove radiator without removing it, but in this case the cleaning solution must be poured into the system through the expansion tank, much more fluid will be required, it will also take a lot of time, and the end result will be noticeably worse.
Finally, we note that the Nissan Tiida radiator cells are made of aluminum; This metal is much cheaper than copper, which is why it is used in most modern cars. Its main drawback is its almost zero maintainability. In case of direct damage, aluminum can be welded, but with the use of expensive equipment, due to which the cost of such repairs in most cases exceeds the price of a new radiator. So, welding a radiator is possible only if you have the opportunity to do it cheaply, and this is a matter of chance.
Heater fan malfunctions
And now we come to one of the most difficult breakdowns to diagnose. The fact is that if the stove fan stops working on your Nissan Tiida, which pumps heated air from the radiator into the passenger compartment, then the reasons why a device consisting of only a few elements (impeller, electric motor and additional resistance) look strange.
But there is nothing extraordinary in this, since the fan motor drive is electric, which means that a significant part of the reasons for the failure of the device can be related to the power supply of the engine.
Of course, it’s nice that it’s easy to determine what exactly the fan is causing the cold in the cabin; in all previous cases, we have dealt with problems that do not allow heating the air to the required temperatures. If the fan malfunctions, the air will heat up correctly, but there will be problems with its supply to the deflectors. So a drop in the power of the air flow, up to the almost complete cessation of blowing, only indicates that for some reason the fan impeller is not working properly.
heater motor nissan tiida
The first thing to check if the Nissan Tiida stove fan is blown is the fuse. You need to look at the block located under the steering wheel. Two 15-amp fuses are responsible for the operation of the heater fan, they are located at the bottom of the left row of the block. If one of them is burned out, replace it with a whole one and check the operation of the heating element. If the situation repeats immediately or after a short period of time, then it is clear that the failure of the fuse is not associated with an accidental power surge, but with the presence of a short circuit in the power circuit of the stove motor. You will have to work hard to localize this malfunction, and without the skills of handling the tester, this work cannot be done.
If the Nissan Tiida stove fuses are intact, you can proceed to disassemble the engine:
- disconnect the negative terminal of the battery;
- we release the glove compartment from the contents, unscrew the eight screws located inside the glove compartment, pull it out and put it aside;
- we move the front seats completely back and take a comfortable position on the floor, we approach the dashboard (convenience, of course, is very doubtful, but all the rest of the work will have to be done in this position);
- to access the fan, it is necessary to disassemble the block-box, on which there is a sticker with AT symbols, fastened with 8 screws;
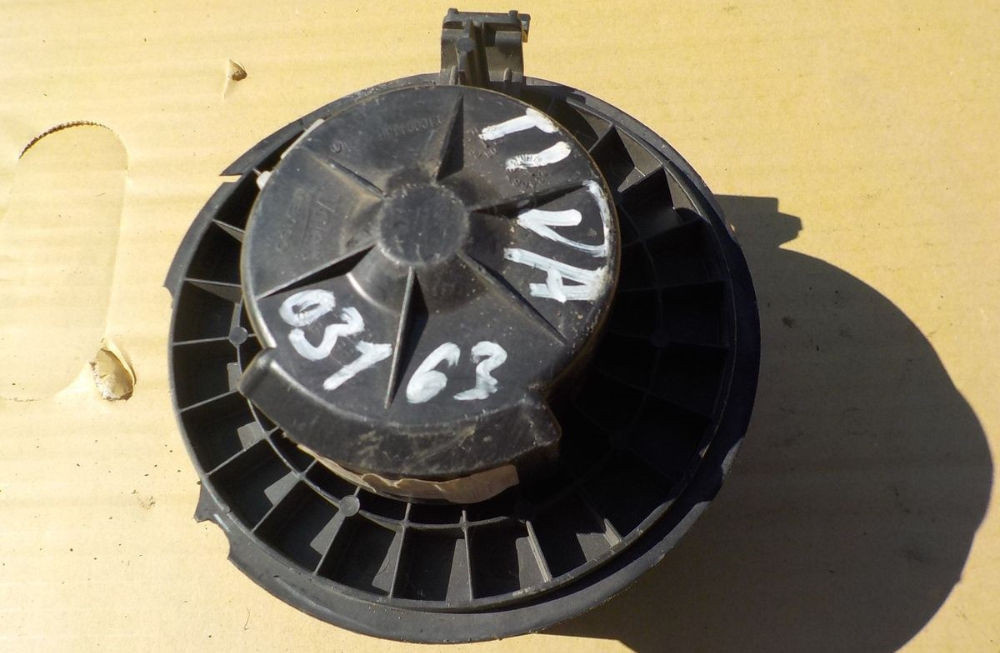
- access to the fan assembly. First of all, disconnect the motor power connector with the red and yellow wire;
- we bend the motor lock located in the region of two hours, after which we turn the motor clockwise by 15-20 degrees and pull it towards ourselves.
Now you can check the performance of the motor by connecting it directly to the battery. If it turns out that the engine and impeller are spinning, it can be assumed that the Nissan Tiida heater resistor has blown. Disassembling it is not at all easy, unlike removing the fan. We will need a complete set of tools: flat and Phillips screwdrivers, a 12 socket wrench, a flashlight, a 12 head with a ratchet and an extension cord of 20-30 cm.
The procedure itself:
- we start, as usual, by disconnecting the negative terminal of the battery;
- again we occupy the lower position and proceed to dismantle the plastic lining near the accelerator pedal (attached with a clip);
- disconnect the brake pedal connector and then do the same for the accelerator pedal. The connectors are fastened with a latch, which is pressed in with a flat screwdriver. There is not enough space, the lighting is bad, you have to figure it out. It may not work the first time. To keep the cable out of the way, remove the clip that secures it to the clamp;
- unscrew the four screws that hold the pedal block. Here, too, you will have to sweat, including because of the terrible lack of free space. One of the screws will have to be unscrewed with an extension head, but anyone can do this;
- to disassemble the pedal, you must first remove the locking pin, after which you can remove the lock, and then the pedal itself;
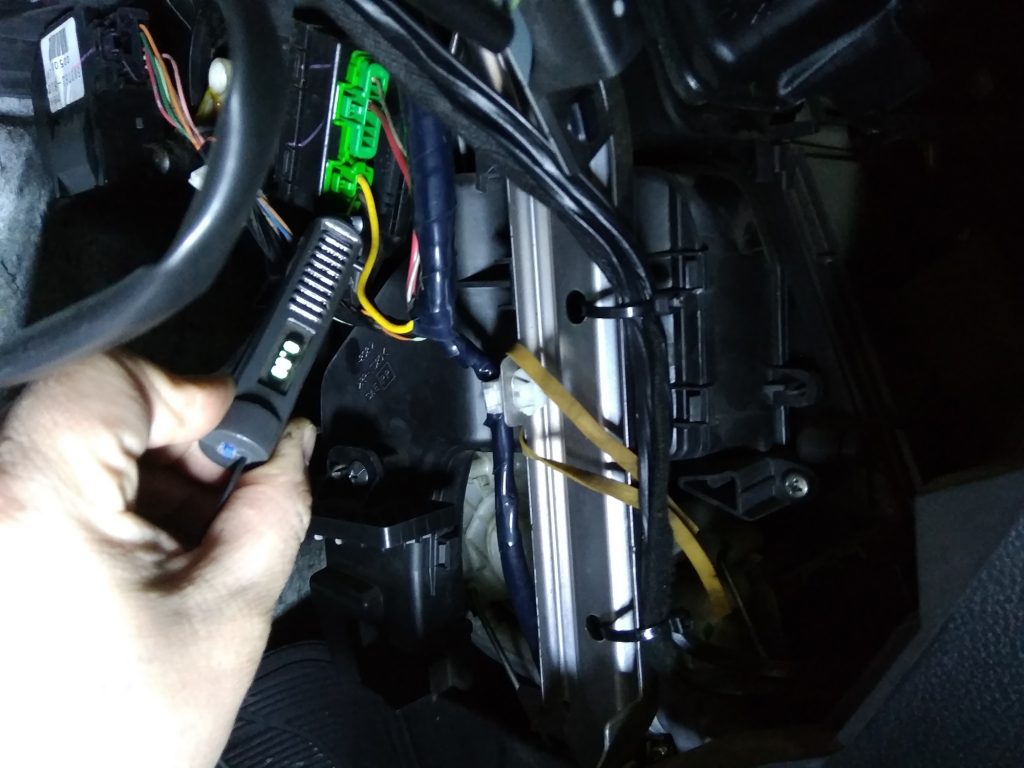
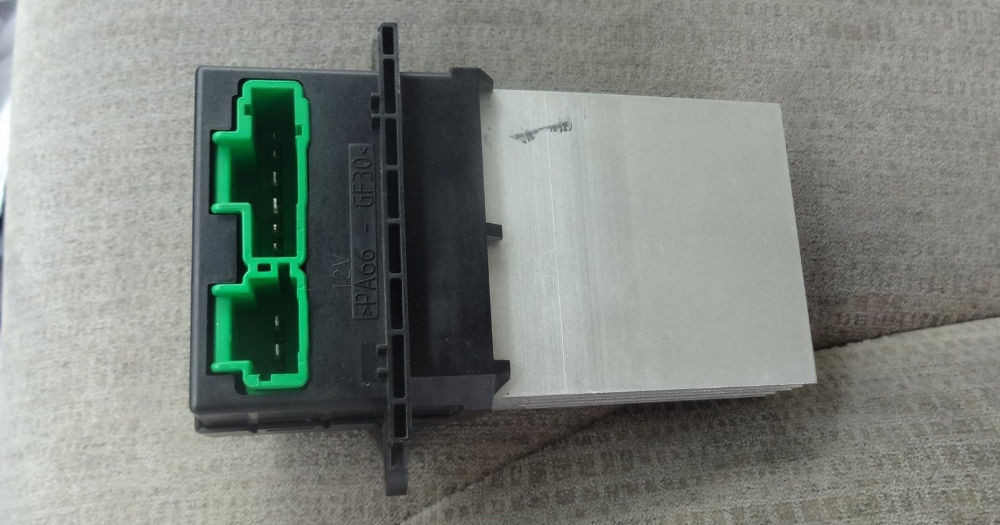
- now you can see the green chips that are connected to our resistor (also called rheostat and motor speed controller). Detach them;
- unscrew the two screws and remove the resistor.
It is advisable to do this work together - it is too inconvenient to work on the pedals, hands and other parts of the body quickly become numb.

Heater Fan Nissan Tiida
The resistor itself, if it burned out, will have to be looked for, and if it is probably somewhere in a big city, then it is possible that a malfunction awaits you in a small one. And then the work will have to be reduced for an indefinite time until a valuable part is received (the cost of the Nissan Tiida stove resistor is about 1000 rubles).
Assembly is usually not faster.
Catalog number for motor range 502725-3500, resistor 27150-ED070A.
If all of the above checks are unsuccessful, you will need to check all wiring for breaks or poor contacts. And here you can not do without a measuring device. It is likely that the contact has oxidized somewhere, sometimes it happens that some connector does not make contact - it is disassembled and the contacts are pressed, or they are changed.
Clogged cabin filter
It is generally accepted that if the air from the deflectors does not enter the Nissan Tiida interior, then the stove fan does not work. In fact, the culprit of this malfunction is different: the cabin filter, which is a consumable element and even according to the manufacturer's recommendations, quickly clogs; it should be changed every 10 thousand kilometers. With regard to domestic operating conditions, this period can be safely halved. However, the need for an urgent replacement of the SF is determined not by the mileage figures, but by real symptoms indicating its critical contamination. This, in addition to a noticeable deterioration in the power of the air flow, the appearance of an unpleasant smell in the cabin.
Replacing the SF with a Nissan Tiida is a relatively simple procedure that does not require repair experience. The only tool you need is a Phillips screwdriver.
Cabin filter replacement algorithm:
- we release the glove box from the contents and disassemble it by unscrewing a number of self-tapping screws located inside it along the perimeter;
- as soon as you remove the glove compartment, access will open to a decorative plastic cover, under which there is a filter element. In principle, it can be accessed without disassembling the glove box, but you will have to keep it in the half-open position all the time, which is very inconvenient. And tightening a few screws is a matter of five minutes, even for a woman who has never held a wrench in her hands;
- remove the cover secured with clamps. You can pull it out with any suitable object: the same screwdriver, pliers or a knife;
- having removed the cover, we see the end of the cabin filter, remove it, but carefully so as not to carry debris around the cabin;
- install a new filter (it is advisable to clean the hole with a vacuum cleaner before that); Put the lid and glove box back in place.
The average motorist takes about 20 minutes to complete this operation.
As you can see, finding the reasons for the poor performance of the standard Nissan Tiida heater is not an easy task, as it requires knowledge of the symptoms of the inoperability of individual components of the car's cooling / heating system. The most difficult operation can be called the replacement of the heater radiator; even for those who do this procedure repeatedly, it takes at least one working day. At the same time, changing the cabin filter is extremely simple and fast. We wish our readers that all of the above problems prevent them, and if the problem persists, we hope that this material will help you avoid many mistakes.