Fuses and relay Daewoo Matiz
Content
City car Daewoo Matiz was produced in several generations and with various modifications in 1997, 1998, 1999, 2000, 2001, 2002, 2003, 2004, 2005, 2006, 2007, 2008, 2009, 2010, 2011, 2012, 2013, 2014 g mainly with small engines of 2015 and 0,8 liters. In this material you will find a description of the Daewoo Matiz fuse and relay boxes, their location, diagrams and photos. Let's single out the fuse responsible for the cigarette lighter and answer the most frequently asked questions.
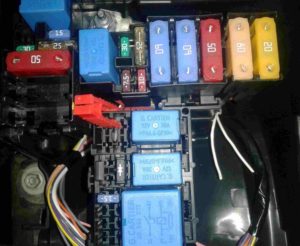
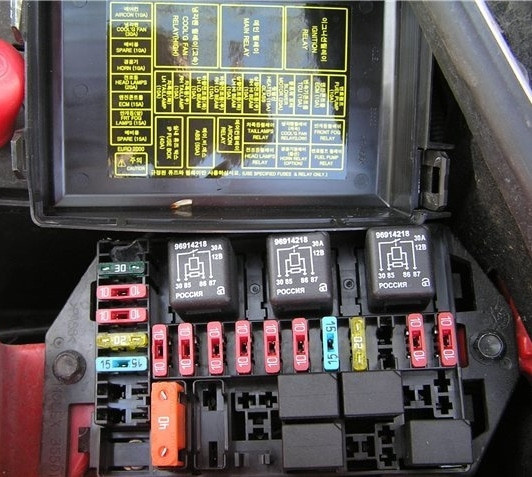
Block under the hood
It is located on the left side under a protective cover.
On the reverse side of which the current block diagram will be applied.
scheme
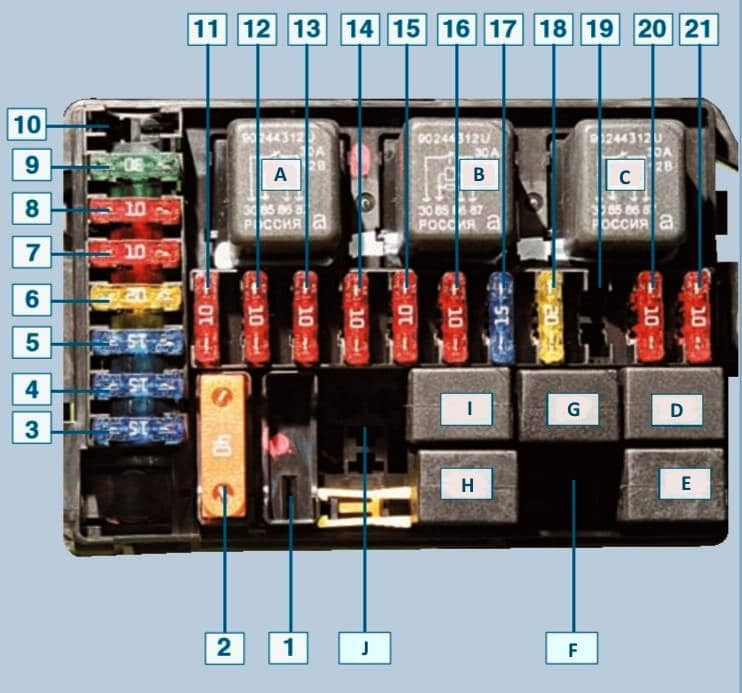
Description of fuses
1 (50A) — ABS.
2 (40 A) - constant power supply to devices with the ignition off.
3 (10 A) - fuel pump.
If the fuel pump does not work when the ignition is turned on (no sound of its operation is heard), check relay E, this fuse and the voltage on it. If there is voltage at the fuse, go to the fuel pump and check if voltage is applied to it when the ignition is turned on. If so, then the fuel pump most likely needs to be replaced with a new one. When installing a new one, also change the filter in the pump module. If there is no voltage at the pump, the problem is most likely in the wiring of the fuel pump or in the circuit breaker (for example, an installed alarm). Cables can fray under the seats, bunch up, or have poor connections/bends.
4 (10 A) - ECU power supply, fuel pump relay winding, ABS unit, generator winding at startup, ignition coil output B, speed sensor.
5 (10 A) - reserve.
6 (20 A) - stove fan.
If the stove has stopped working, check this fuse, the fan motor with 12 volts, as well as the control knob and the cable going to the heating tap. If the stove cools down, this wire located on the driver's side near the center console under the dashboard may fly off. If the heater speed is not adjustable, also check relay C under the hood. It could also be an airlock problem.
To bleed air from the system, go uphill, open the expansion tank cap and turn on the gas. On a hot engine, be careful when opening the reservoir cap. It could also be a clogged heater core or air intake pipes.
7 (15 A) - heated rear window.
If the heating stops working, check the fuse, as well as the contacts in the plug. In case of poor contact, you can bend the terminals.
In many models, due to the lack of a relay in the rear window heating circuit, the power button has a large current load, which often fails. Check your contacts and if it is no longer fixed in the pressed position, replace it with a new button. You can access it by removing the dashboard trim or taking out the radio. It is best to put a relay, thus discharging the button. On some models under the hood, relay C is installed on this button, check it.
Also check the threads of the heating elements for cracks, cracks in the thread can be repaired with a special metal-containing adhesive. It can also be in the terminals along the edges of the glass, in poor contact with the ground, and in the wiring from the rear window to the button.
8 (10 A) - right headlight, high beam.
9 (10 A) - left headlight, high beam.
If your high beam stops burning when you turn on this mode, check these fuses, the F18 fuse, the contacts in their sockets, the bulbs in the headlights (one or two may burn out at the same time), relay H in the engine compartment and its contacts, the steering column switch and its contacts . The contact in the switch connector is often lost, disconnect it and check the condition of the contacts, clean and bend if necessary. Also check the wires coming out of the headlights for breaks, short circuits and damage to the insulation. The minus sign on the relay contact H may also disappear due to oxidation or wear of the track on the mounting block.
To replace the lamp in the headlight, disconnect its connector with wires, remove the rubber cover (ante) from the side of the engine compartment, press the “antennas” of the lamp retainer and remove it. When installing a new lamp, do not touch the glass part of the lamp with your hands; when turned on, handprints darken. Two-filament lamps are installed in the headlights, one dipped and one high beam lamp each; for dimensions, separate smaller lamps are installed in the headlights.
F10 (10 A) - right headlight, low beam.
F11 (10 A) - left headlight, low beam.
Same as high beam except F18.
12 (10 A) - right side, lamp dimensions.
13 (10A) - Left side, marker lights, license plate light.
If you have lost your parking light, check these fuses and relay I and their contacts. Check the serviceability of the lamps in the headlights, connector contacts and wiring.
14 (10 A) - air conditioning compressor clutch (if any).
If your air conditioner does not work, and when you turn it on, the clutch does not turn, check this fuse and relay J, as well as the power button and its contacts, wiring. The movement of the working clutch should be heard by the characteristic sound when the air conditioner is turned on. If the clutch works, but cold air does not flow, the system most likely needs to be filled with freon.
Do not forget that in winter it is necessary to periodically turn on the air conditioner in a warm place - a box or a car wash - so that the seals are lubricated and remain in good condition after the winter.
15 (30 A) - radiator cooling fan.
If your radiator fan has stopped rotating, check relays A, B, G, this fuse and its contacts. The fan is connected through a thermal switch, which is installed on the radiator, 2 wires are connected to it. Take them out and short them, with the ignition on, the fan should work. If it works in this position, the thermal switch is most likely defective, replace it.
If the fan does not work, there is a wiring problem or the fan motor is faulty. The engine can be tested by applying voltage directly from the battery to it. Also check the coolant level, temperature sensor and thermostat.
16 (10 A) - reserve.
17 (10 A) - sound signal.
If there is no sound when you press the horn button on the steering wheel, check this fuse and relay F, their contacts. The sign is located on the left wing, on the driver's side, to access it, you need to remove the left wing, the sign is located behind the fog lamp. For convenience, you may need to remove the left front wheel. Ring the corresponding wires to it, if there is voltage on them, then the signal itself is most likely faulty, disassemble or replace it. If there is no voltage, the problem is in the wiring, steering contacts or ignition switch.
18 (20 A) - headlight relay power, high beam switch.
For problems with high beam, see information about F8, F9.
19 (15 A) - constant power supply to the computer, relay winding of the air conditioning compressor clutch, winding of the main relay, windings of two radiator fan relays, camshaft position and oxygen concentration sensors, exhaust gas recirculation valves and an adsorber, injectors, fuel pump relay power.
If you experience problems with the listed devices, also check the main relay B.
20 (15 A) - fog lights.
If your fog lights stop working, check relay D under the hood, this fuse and its contacts, as well as the headlight bulbs themselves, their connectors, wiring and the power button.
21 (15 A) - reserve.
Relay assignment
A - high-speed radiator cooling fan.
See F15.
B is the main relay.
Responsible for the circuits of the electronic control unit (ECU), air conditioning clutch, cooling system fan (radiator), camshaft position and oxygen concentration sensors, recirculation valves and exhaust gas canister, injectors.
In case of problems with the listed devices, also check fuse F19.
C - stove speed switch, button for turning on the heated rear window.
For problems with the stove, see F6.
For heating problems, see F7.
D - fog lights.
See F20.
E - fuel pump.
See F3.
F - sound signal.
See F17.
G - low speed radiator cooling fan.
See F15.
H - headlight.
I - lamp dimensions, dashboard lighting.
J - A/C compressor clutch (if equipped).
Block in the cabin
Located under the instrument panel on the driver's side.
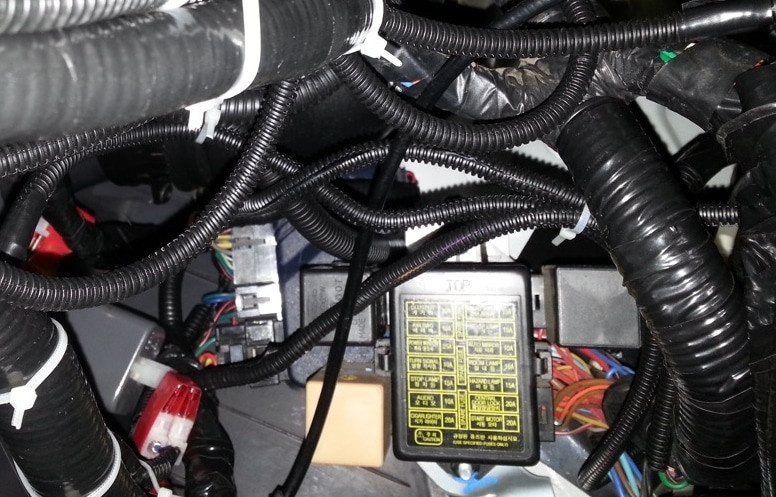
Photo - scheme
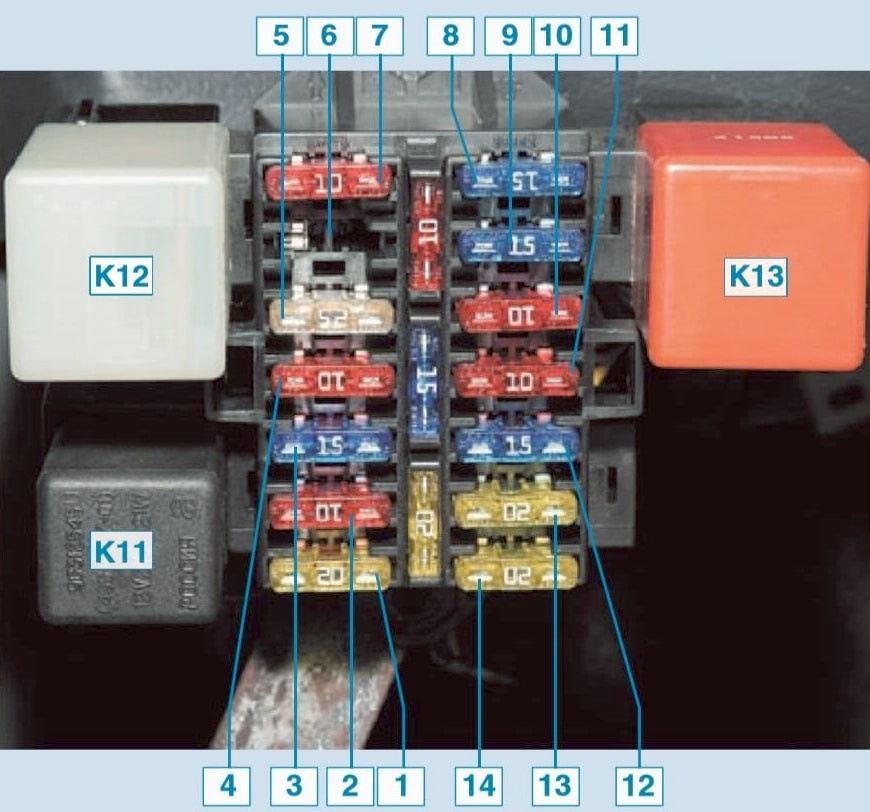
Fuse designation
1 (10 A) - dashboard, sensors and control lamps, immobilizer, clock, alarm.
If you have stopped showing the sensors on the dashboard and its backlight has disappeared, check the panel connector on its back side, it may have jumped or the contacts have oxidized. Also check the wires and connectors on the back of the mounting block for this fuse.
When the ignition is turned on, the immobilizer icon on the panel lights up; this means you are looking for a smart key. If the key is found successfully, the lamp goes out and you can start the car. To add a new key to the system, it is necessary to flash / train the ECU to work with the new key. If you do not understand the electrician, it is better to contact a car service. If the machine does not work, you can find and call a field electrician.
2 (10 A) - airbag (if any).
3 (25 A) - power windows.
If the door power window stops working, check the integrity of the wires in the bend when the door is opened (between the body and the door), the control button and its contacts. It could also be the power window mechanism. To get to it, remove the door trim. Check the serviceability of the motor by applying a voltage of 12 V to it, the absence of skew of the windows in the guides, the integrity of the gear and cable (if the window is of a cable type).
4 (10 A) - direction indicators, turn signals on the dashboard.
If your turn signals have stopped working, check the repeater relay B, it may click when turned on, but does not work. Replace with a new relay, also check the contacts in the fuse holders and check their condition. The relay on some models may not be located on the mounting block, but under the instrument panel on the driver's side. If it's not the relay / fuse, then most likely the steering column switch, check its contacts and wires.
5 (15 A) - brake lights.
If one of the brake lights does not work, check its lamp, contacts in the connector and wiring. The headlight must be removed to replace the bulbs. To do this, unscrew the 2 headlight brackets with a screwdriver from the side of the trunk, opening the back door and the headlight is removed, opening access to the lamps. If both brake lights are off, check the brake pedal switch, wiring, and bulbs. Cheap lamps can often burn out, replace them with more expensive ones.
If the contacts in the switch or wiring are closed, the brake lights may be on constantly without depressing the brake pedal. In this case, repair the short circuit.
There may also be an open or short circuit in the headlight wiring through the trunk.
6 (10A) — radius.
Standard Clarion radio. Usually the radio turns on only when the key is turned to position 1 or 2 (2 - ignition). If your radio does not turn on when you turn on the ignition, check this fuse and the contacts in its socket. Measure the voltage at the radio connector by disconnecting it.
If a voltage of 12 V is supplied and the connector contacts are working, then most likely the problem is inside the radio: the power switch is broken, the contact inside the board has disappeared, or one of its nodes has failed. If there is no voltage at the connector, check the wiring to the fuse, as well as the presence of voltage at the fuse.
7 (20 A) - cigarette lighter.
If the cigarette lighter stops working, check the fuse first. Due to the connection of different connectors of the device to the cigarette lighter at different angles, a short circuit of the contacts may occur, because of this the fuse blows. If you have an additional 12V outlet, plug your devices into it. Also check the wiring from the cigarette lighter to the fuse.
8 (15 A) - wipers.
If the wipers do not work in any position, check the fuse and contacts in its socket, relay A on the same mounting block, the steering column switch and its contacts. Apply 12 volts to the vacuum cleaner motor and see if it works. If it is damaged, replace it with a new one. Inspect the brushes, clean them or replace with new ones if you have poor contact. Also check the wires from the engine to the steering column switch, from the relay to ground, from the fuse to the relay, and from the fuse to the power supply.
If the wipers do not work only intermittently, then most likely it is a relay, poor ground contact with the body, or a motor malfunction.
Also check the wiper mechanism, trapezoid and tightness of the nuts holding the wipers.
9 (15 A) - rear window cleaner, front and rear window washer, reversing lamp.
If the windshield and rear window washers do not work, check the fluid level in the windshield washer reservoir. It is located on the right headlight at the bottom. To get to it, you will most likely need to remove the headlight. In order not to remove the headlight, you can try to crawl from below with the wheels out and the right fender liner removed. At the bottom of the tank there are 2 pumps, for the windshield and rear window.
Apply 12V voltage directly to one of the pumps, thus checking its serviceability. Another way to check is to swap the terminals of the two pumps. Maybe one of the pumps is working. If the pump is defective, replace it with a new one. If the washing machine stops working in the winter, make sure it is filled with antifreeze liquid, make sure that the channels of the system are not clogged and the liquid is not frozen, also check the nozzles through which liquid is delivered to the glass.
Another thing may be in the steering column switch, check the contact that is responsible for the operation of the washer.
If the rear washer does not work, but the front washer works and the pumps work, then most likely there is a break in the fluid supply line to the tailgate or its connections in the system. The rear washer hose connections are located on the front bumper, in the tailgate creases and on the inside of the tailgate. If the tube is torn near the tailgate, to replace it, it is necessary to remove the trunk lid and tailgate trim. Firstly, it is better to remove the corrugation between the door and the body, check the integrity of the tube in this place. Repair the broken tube by cutting off the problem area and reconnecting it, or replace it with a new one.
If your reversing light does not work, check the light and the contacts on the connector. If the lamp is intact, then most likely it is the reverse switch, which is screwed into the gearbox. It can be removed under the hood by removing the air filter. The reverse sensor is screwed into the gearbox from above. The sensor closes the contacts when reverse gear is engaged. If this fails, replace it with a new one.
10 (10 A) - electric side mirrors.
11 (10 A) - immobilizer, audio system, interior and trunk lighting, open door lighting on the dashboard.
For problems with the immobilizer, see F1.
If the interior lighting does not work, check this fuse, its contacts, as well as the lamp and its connector. To do this, remove the cover: remove the cover and unscrew the 2 screws. Check if there is voltage on the lamp. Also check the limit switches on the doors and their cables.
12 (15 A) - constant power supply of the alarm, hour.
13 (20 A) - central locking.
If other doors won't open when opening/closing the driver's door, the problem may be with the central locking unit located on the driver's door. To get to it, you need to remove the cover. Check connector, pins and wiring. If there are problems with closing / opening the driver's door, check the mechanism drive in the lock (with the housing removed). You need to move the lock bar and close/open contacts to control other door locks.
14 (20 A) - starter traction relay.
If the engine does not start and the starter does not turn, the battery may be dead, check its voltage. In this case, you can “turn it on” with another battery, charge a dead one or buy a new one. If the battery is charged, check the starter itself. To do this, put the gear lever in the neutral position and close the contacts on the starter solenoid relay, for example, with a screwdriver. If it does not turn, then most likely the starter, its bendix or retractor.
If you have an automatic transmission and the starter does not turn when you turn the key, try moving the lever to the P and N positions while trying to start. In this case, it is most likely the selector position sensor.
Also check the ignition switch, the contacts inside it and the wires of the group of contacts, perhaps due to poor contact when the key is turned, there is no voltage to the starter.
Fuse number 7 is responsible for the cigarette lighter.
Relay decoding
| K11 | Turn signal and alarm relay |
| K12 | Wiper relay |
| K13 | Fog lamp relay in rear lamp |
Additional Information
You can learn more about the location of the blocks in this video.