We figure out how to properly connect the car radio with our own hands
Content
Connecting the radio in the car is not a complicated process, but at first glance it may seem that this is not entirely true. The first step is to supply 12v power to it from the battery, the next step is to connect the speakers, check the connection and installation.
We understand that after these words there was no more clarity. But we examined each stage in detail in this article, and after studying it, we are sure that you will find all the answers to the questions of how to connect the radio in the car.
What can you face if the car radio is not connected correctly?
This is not to say that for the correct installation of the radio tape recorder, you do not need to have any skills at all. It is desirable to have at least initial experience in connecting electrical devices, but this is not a prerequisite, following the instructions, a person can perform the installation without any experience. To understand if everything was done correctly, it is worth following the operation of the radio tape recorder. A sign of error will be the presence of the following factors:
- The radio turns off when the volume is increased.
- When the ignition is turned off, the radio settings are lost.
- The radio tape recorder runs out of battery in the off state.
- The audio signal is noticeably distorted, especially when listening at high volumes.
In very rare situations, it is not the one who connected it, but the seller who sold the low-quality product is to blame. Of course, this option cannot be ruled out, but you will still need to double-check the connection diagram.
The size and types of car radio
Universal radio tape recorders have a standard size, it can be 1 - DIN (height 5 cm, width 18 cm) and 2 DIN. (height 10 cm, width 18 cm.) If you change the radio tape recorder from large to small (from 1 -DIN, to 2-DIN) you will need to buy a special pocket that will cover the missing din. By connection, these radio tape recorders all have the same connector, its name is ISO or it is also called the euro connector.
Regular radios are installed on cars from the factory, and have a non-standard size, in this case there are two options for installing the radio. The first is the simplest, you purchase the same head unit and install it, it fits in size and connects to standard connectors. But the cost of these radio tape recorders often has an inadequate price. And if you find a budget option, then with a 100% probability it will be China, which is not particularly famous for its sound quality and reliability.
The second option is to install the "Universal" radio for the place of the standard one, but for this you need an adapter frame, which is an adapter from the standard dimensions of the radio to the universal ones, i.e. 1 or 2-DIN. the frame serves as a decorative function, covering unnecessary openings.
If your 2 din radio has an LCD display, then you can connect a rear view camera to it, and we discussed in detail how to do this in the article “connecting a rear view camera”
A tip for TOYOTA owners. In most cars of this brand, the head unit has a size of 10 by 20 cm. In this case, you can search for "Spacers for Toyota radio tape recorders", they are 1 cm in size. And you can easily install a standard size radio tape recorder, i.e. 2 - DIN, to install 1 - DIN you still need to buy a pocket.
Connecting a radio tape recorder.
There are many cars, and each of them can use its own set of connectors for connecting such equipment. Basically, there are three options:
- Option one, the most favorable. You already have a chip in your car, to which everything is correctly connected, i.e. all speakers, power wires, antenna leads to this chip, and everything is connected correctly. This occurs but, unfortunately, very rarely. This suggests that you are lucky, you just connect your brand new radio tape recorder to this chip, and everything works for you.
- The necessary wires are routed and connected, while the socket on the radio is different from the car's plug.
- Power lead is missing or was not done correctly.
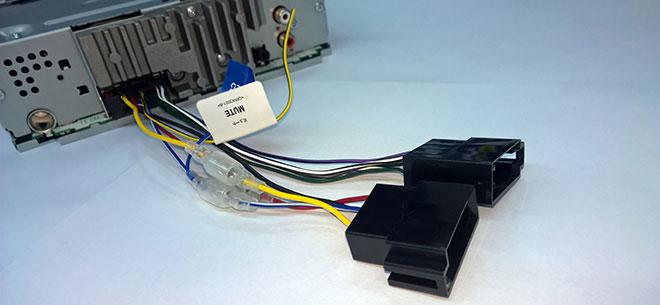
With the first paragraph, everything is clear. When the socket of the device does not match the connector, you will need to use an adapter. Despite the fact that these connectors are most often individual for each model, many companies practice supplying a separate ISO adapter. If there is no adapter either, or if its format is not suitable in this case, you can either purchase such an adapter or twist the wires yourself. Of course, the second step is longer, more complex and risky. Only technical centers with experience in such procedures are engaged in this, so before you connect the radio in the car in this way, you need to think it over very well.
If you want to do the twisting yourself, you need to check the correspondence of the wires on the radio tape recorder and the machine connector. Only if the colors match, you can disconnect the battery and disconnect the connector of the car and audio system.
How to connect a car radio and not get tangled in wires? It is recommended to bite off the rest after connecting the connector to the radio. All connections are soldered and insulated. If the wires do not match, they will need to be dialed with a tester or multimeter, as well as a 9-volt battery, you may still need to lay those wires that are not enough to connect. Ringing is necessary to determine the polarity of a pair of wires. When testing the loudspeaker, wires are connected to the battery, after which you need to look at the position of the diffuser - if it comes out, then the polarity is correct, if it is pulled in, you need to correct the polarity to the correct one. Thus, each wire is marked.
Decoding the color designation of wires
1. The minus of the battery is painted black, the wire is marked GND.
2. The battery plus is always yellow, indicated by the BAT marking.
3. The plus of the ignition switch is designated ACC and is red.
4. Left front speaker wires are white and marked FL. The minus has a stripe.
5. Right front speaker wires are grey, marked FR. The minus has a stripe.
6. Left rear speaker wires are green and marked RL. The minus has a stripe.
7. The right rear speaker wires are purple and labeled RR. The minus has a stripe.
I would also like to note that many people install a car radio at home, or in a garage from 220V, how to do this correctly can be read "here"
How to connect the car radio correctly?
First you need to purchase all the necessary wires. Wires must be pure oxygen-free copper and silicone-coated. The yellow and black wires are power wires, the section of these wires should be more than 2.5mm. For acoustic wires and aac (red), wires with a cross section of 1.2mm are suitable. and more. Try to avoid a large number of twists, the ideal option is where there will be none at all, because. twists add extra resistance and this negatively affects the sound quality and volume.
Connection diagram for radio and speakers
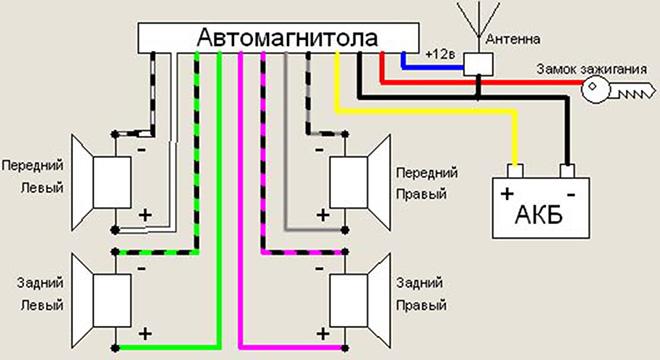
All radios have a black wire for the negative of the battery, yellow for the positive of the battery and red for the positive of the ignition switch. The connection diagram of the car radio is as follows - first, it is better to connect the yellow and black wires, moreover, to the battery, which will allow you to get high-quality sound.
Be sure to install a fuse at a distance of 40 cm. The fuse must correspond to a minimum value of 10 A. The red wire is connected to the circuit that is powered after turning the ACC key. By connecting the red and yellow wires together to the positive of the battery, the radio will not be affected by the ignition, but the battery will be discharged faster. Powerful radios have four pairs of wires, each of which has its own marking. When connecting the radio to the car, the polarity may be erroneously determined - nothing bad will happen here, unlike grounding to minus to ground. Speakers have either two terminals, basically the speaker connection scheme is as follows: a wide terminal is a plus, and a narrow terminal is a minus.
If you want to replace not only the radio, but also the acoustics, we advise you to read the article "what you need to know when choosing car acoustics"
Video how to connect a car radio

Conclusion
It is recommended that you listen to the radio before the final installation of the radio with your own hands. Snap the device all the way in only when the radio is working properly.
And finally, do you want to help the project? Subscribe to our Facebook community.