Valve adjustment VAZ 2114
Content
Today, any modern car, except for electric ones, has an internal combustion engine with a gas distribution mechanism. Many parameters depend on the correct operation of this system. And these include fuel consumption, engine acceleration, environmental performance and other equally important indicators. The normal operation of the gas distribution mechanism is ensured by the correct adjustment of the gaps between the valve and its pusher.
If the gap is too large, the camshaft cam will hit the thrust plate hard, and all this will lead to serious damage to the engine components and mechanisms. Also, the valve will not open fully when needed, thereby blocking the movement of the exhaust or air-fuel mixture, but depending on the type of valve. Inlet - is responsible for the supply of fuel, exhaust - for exhaust gases sent to the exhaust manifold.

The principle of operation of the valve train
On the contrary, if the valve is tightly clamped, mechanical damage to engine parts will be less than if the gap is too large. But the work of the engine itself will be much worse. It is for the correct operation of the engine that it is necessary to carefully adjust the valves on VAZ cars. This procedure is carried out in several ways. The first is that the pusher moves under the influence of the nut on the stem. The second is the selection of spacers of the desired thickness. The third is automatic, regulated by engine oil pressure on hydraulic lifters.
We expose the gap on the VAZ 2114
In our case, on a VAZ 2114 car, this procedure is carried out in the second way, using gaskets and a special tool.
First of all, you need to understand that the correct adjustment on the VAZ 2114 can only be carried out at an ambient temperature of 20 degrees Celsius, when the metal is at rest and is not subject to thermal expansion as in a hot engine.
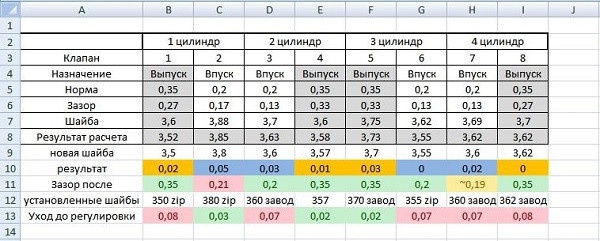
Secondly, for each specific car there is a table of clearance sizes with raised camshaft cams.
For the fourteenth model, the following dimensions are used:
- For intake valves: 0,2 mm with a reading error of 0,05 mm;
- For exhaust valves: 0,35 mm with a reading error of 0,05 mm.
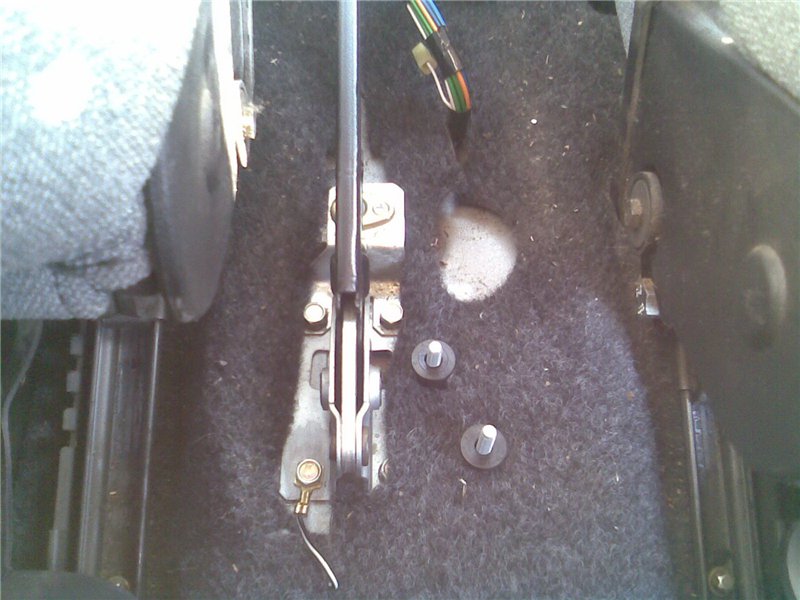
Before adjusting, cool the engine compartment, you can use a conventional fan. After that, we remove the valve cover, pipes, locking clamps, the side protective casing of the timing belt. After unscrewing the nut that holds the accelerator pedal cable, carefully disconnect it. Remove the air filter housing assembly for ease of operation. Before dismantling, be sure to place wedges under the wheels and turn on the neutral gear. The parking brake must also be activated.
Required Tools
Tools required for work:
- 1. Socket and open-end wrenches;
- 2. A device for lowering valve plates - it costs a little more than a hundred rubles;
- 3. A set of specialized probes for measuring clearances in the mechanism;
- 4. Micrometer for determining the thickness of the gasket;
- 5. Adjusting washers: Thickness from 3 to 4,5 mm. They are supplied to the market in increments of 0,05 mm. That is, you can find washers with a size of 3,05mm, 3,1mm, and so on up to 4,5mm. (The disc costs about twenty rubles).
Adjustment process
Check if the marks on the timing gears and on the cylinder head cover of the VAZ 2115 match. The same marks should match on the crankshaft pulley and the oil pump cover. Next, unscrew the spark plugs to relieve pressure in the cylinder block.
Under the valve cover during reassembly, place a new gasket treated with sealant in the grooves.
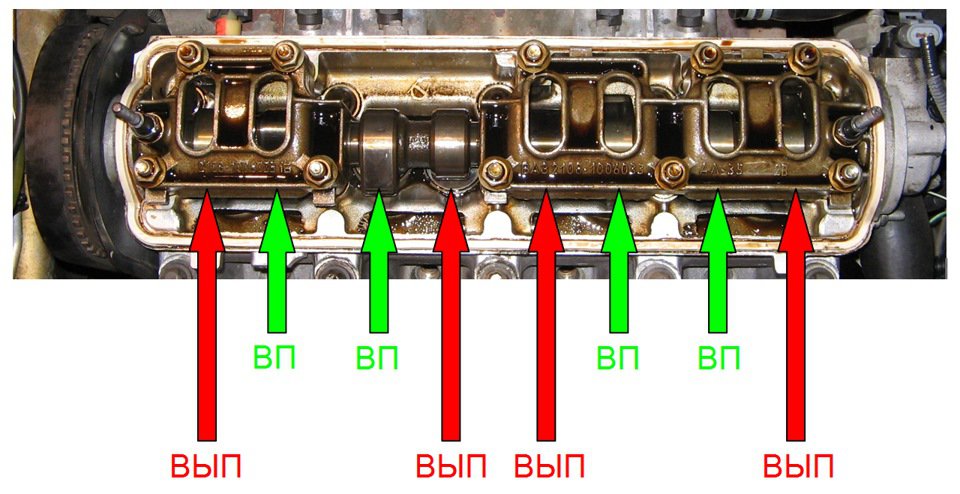
The order of the valves VAZ 2114
When adjusting, pay attention to which valve is inlet and which is outlet, the order is as follows:
5 - release and 2 - input; 8 - output and 6 - input; 4 is the output and 7 is the input.
Moving from the camshaft pulley, we measure the gaps between the pusher and the camshaft. In places where the gap is normal, everything remains unchanged. In the place where the probe of the appropriate size is easily inserted into the groove, we press the plate with a device for lowering the pusher, and insert the flag to fix the pusher. Then, using special tweezers, we take out the adjusting washer and look at its mark. If necessary, measure the thickness with a micrometer. Next, we select a thicker washer, put it in place and first check the gap with the desired probe.
Valve clearances
If it does not fit, then we take a thinner tube, and so on until the tube fits. From the difference between the nominal size and the size of the probe, which fits easily, we calculate the desired thickness of the bar. We repeat the procedure until the probe begins to be inserted with a slight pinch.
If none of the probes fit, the valve is overstretched! According to the previous operation, remove the adjusting washer and change to a smaller one.