Repair of the body and units of the VAZ 2106
Content
The beginning of the production of the VAZ "six" falls on 1976. Cars of those years, and even more recent years, even with proper and timely maintenance, require periodic repairs. Depending on the conditions and intensity of operation, it may be necessary to repair both the body and individual components or assemblies. Many works can be done independently, having a certain list of tools and an understanding of what needs to be done and in what sequence. Therefore, at various stages of the repair of the VAZ 2106, it is worth dwelling in more detail.
The need to repair the VAZ 2106
The beginning of the production of the VAZ "six" falls on 1976. Cars of those years, and even more recent years, even with proper and timely maintenance, require periodic repairs. Depending on the conditions and intensity of operation, it may be necessary to repair both the body and individual components or assemblies. Many works can be done independently, having a certain list of tools and an understanding of what needs to be done and in what sequence. Therefore, at various stages of the repair of the VAZ 2106, it is worth dwelling in more detail.
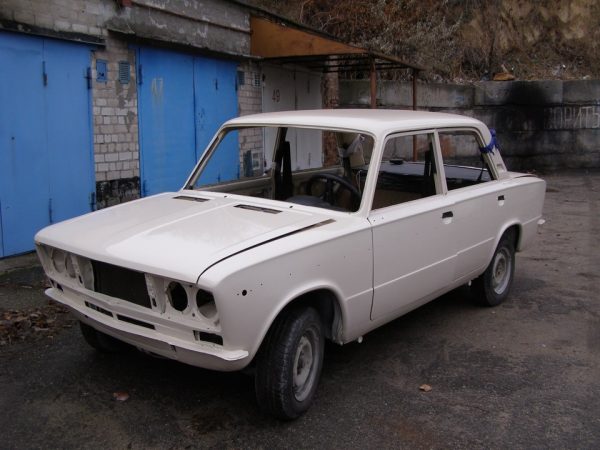
Body repair
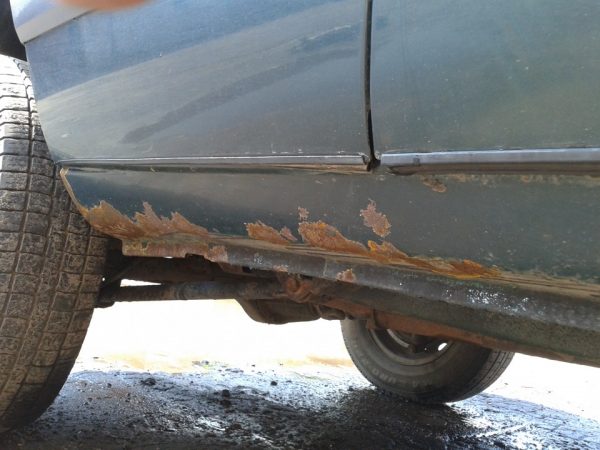
The body of the "Lada" is one of the "sick" places of these cars. Body elements are constantly exposed to aggressive environments (chemicals used to treat roads in winter, stones, sand, dirt, etc.). All this leads to the fact that no matter how high-quality the previous repair was, after a while, centers of corrosion begin to appear on the body, which rot through if nothing is done. The presence of rust not only worsens the appearance of the car, but in case of serious damage, it also reduces the strength of the body, which can adversely affect the accident. Most often on the "six" and other "classics" such body elements as fenders, sills, doors are repaired. The floor and spars are less often changed or repaired.
Wing repair
Repair of front or rear fenders may involve various actions, which depend on the degree of damage to the body element. If “saffron milk mushrooms” appeared on the surface, i.e. the paint was slightly swollen and rust appeared, then in this case you can get by with the usual cleaning of the damaged area with sandpaper, leveling with putty, applying a primer and paint. But in most cases, the owners of the Zhiguli do not pay much attention to such trifles and start repairing when the wings are already thoroughly rotten. This happens, as a rule, in the lower part, and in order to avoid a complete replacement of the wing, special repair inserts can be installed. For this procedure, you will need the following list of tools and equipment:
- grinder (angle grinder);
- cutting, cleaning wheels, brush;
- drill with a drill 6 mm;
- semi-automatic welding;
- a hammer;
- sharp and thin chisel;
- sandpaper P80;
- anti-silicone;
- epoxy primer;
- rust converter.
Repair consider the example of the left rear wing.
We carry out the work in the following order:
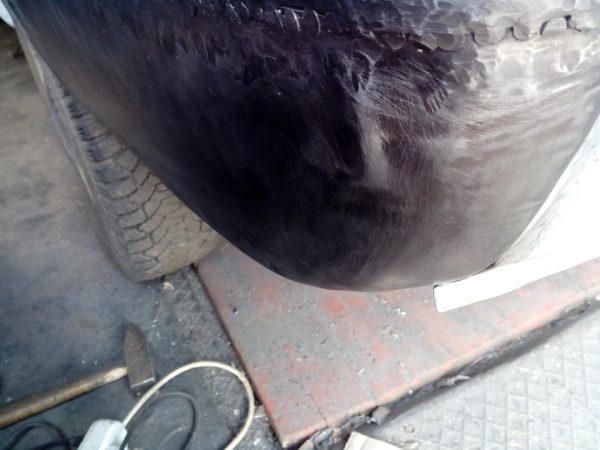
- With a grinder with a cutting wheel, we cut off the rotten section of the wing, having previously tried on the repair insert.
 We cut off the damaged metal with a grinder
 - With the same circle and brush, we clean the junction with the apron, the arch, as well as the junction with the spare wheel floor. We drill out the points left over from welding.
- Using a chisel and hammer, knock down the remaining metal.
- We customize the repair insert, cutting off excess metal. When everything is clearly in place, we drill holes in the new element at the points where the old welding was previously drilled. We clean future welding places from soil, paint, etc. We put the repair insert in its place and weld it.We weld the repair insert of the wing with a semi-automatic machine
- We clean the weld points.We clean the welded points with a special circle
- We process the welds with a brush for the grinder, while simultaneously removing the transport soil. After that, we grind the seam and the entire repair element with sandpaper with a P80 grit, making risks. This is necessary to improve adhesion to the ground.On the repair insert, we make risks with sandpaper
- We clean the surface of dust, degrease the entire part.
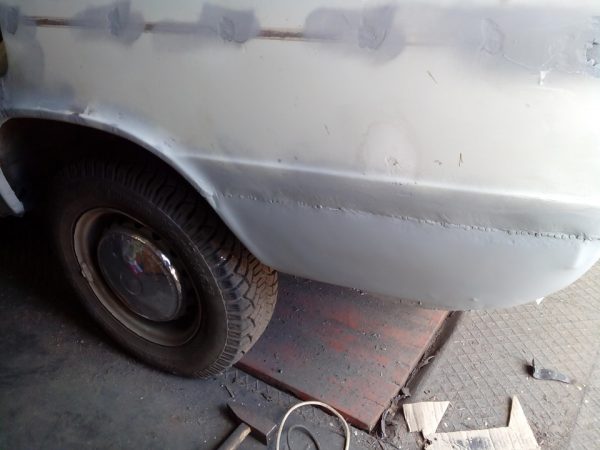
- Apply primer to the treated surface.We cover the prepared metal with a layer of primer, which will prevent corrosion.
- If required, then in the same way we change the repair insert of the front part of the wing.We change the front part of the wing in the same way as the rear
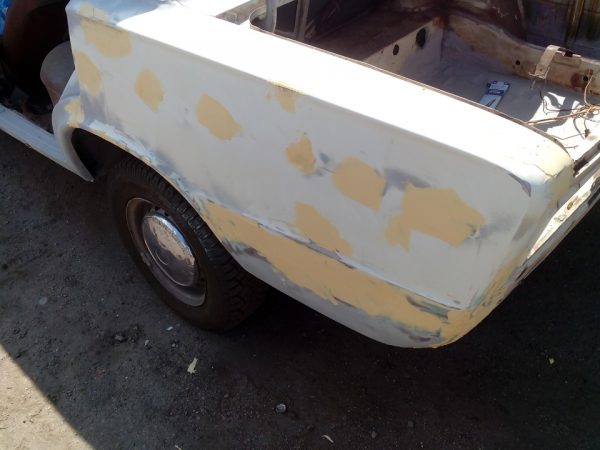
- We prepare the body element for painting by applying putty, stripping and priming.After welding, we prepare the body for painting


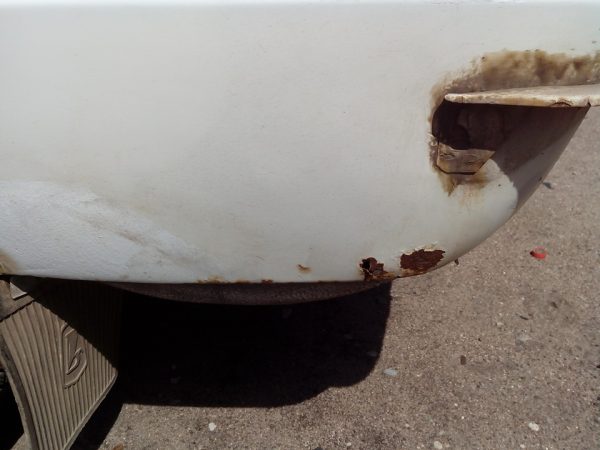
Repair of thresholds
If thresholds began to rot on the VAZ 2106, then this happens, as a rule, not at one point, but throughout the entire element. In this case, it is more logical to completely replace the threshold, and not to put patches. Tools for such work will need the same as for the repair of wings, and the process itself, although similar to that described above, is still worth dwelling on the main points:
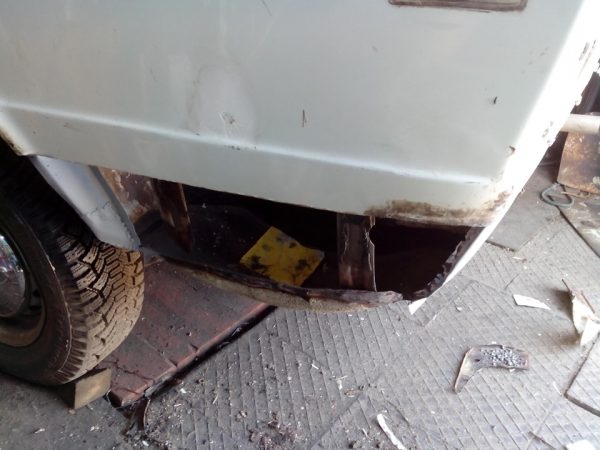
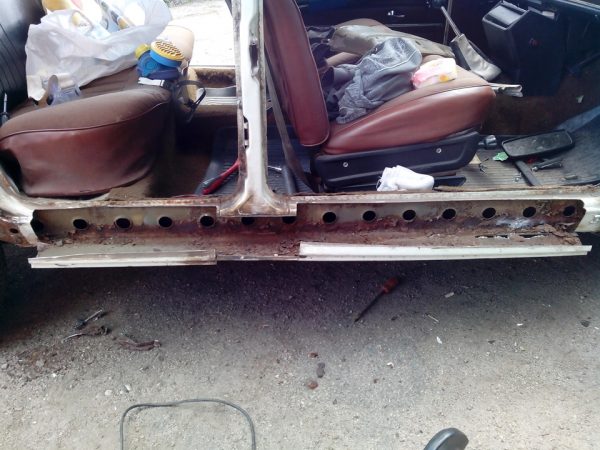
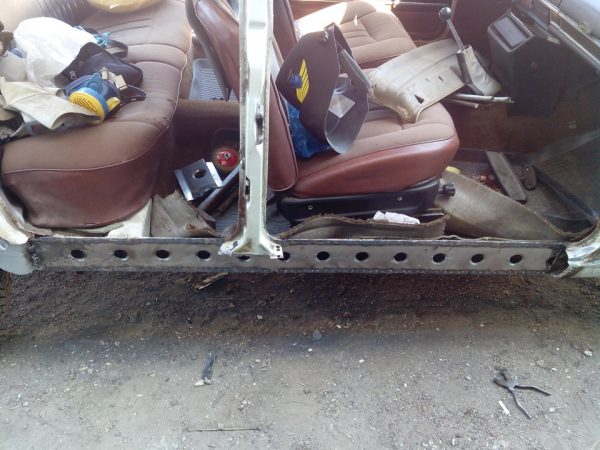
- We cut off the old threshold with a grinder.We cut the rotten threshold with a grinder
- We remove the amplifier located inside the threshold, since in most cases it also rots.
- We clean everything inside with a circular brush for the grinder and cover the surface with soil.We cover the inner surface of the threshold with a primer
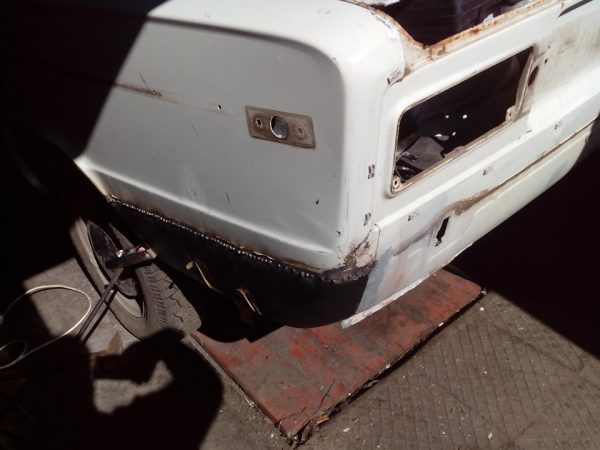
- We adjust the size of the new amplifier, drill holes in it and process it with a primer on the inside, after which we weld it in place.We weld a new threshold amplifier
- We lightly clean the welded points and cover with a layer of soil from the outside.
- For the correct installation of the threshold, we hang the doors.
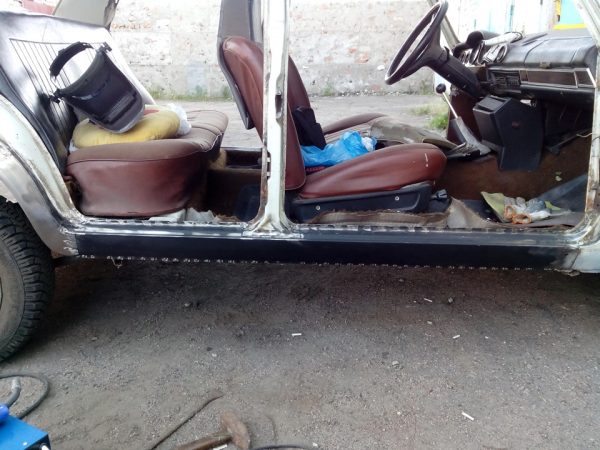
- We drill holes for welding in the new threshold, set the body element along the gaps between the doors, and then weld the part.We weld a new threshold into place by semi-automatic welding
- After welding, we clean and prepare the element for painting.
Video: replacing the threshold on the "classic"

Floor repair
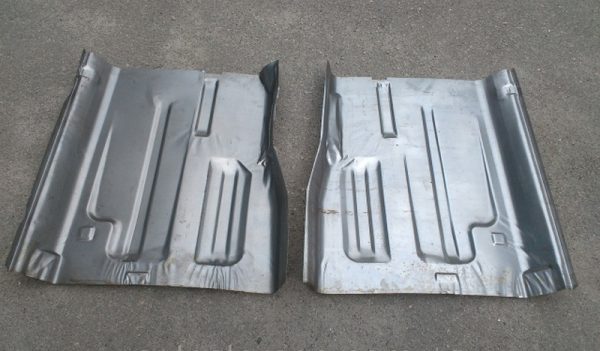
Floor restoration also consists of noisy and dirty work, namely cutting, stripping and welding metal. With minor damage to the bottom, you can resort to partial repairs, cutting out rotten areas and welding on pieces of new metal. If the damage to the floor is significant, then ready-made repair elements should be used.
From additional materials and tools you will need:
- seam sealant;
- bituminous mastic;
- wide brush.
The sequence of actions is similar to the body repair described above, but has some features:
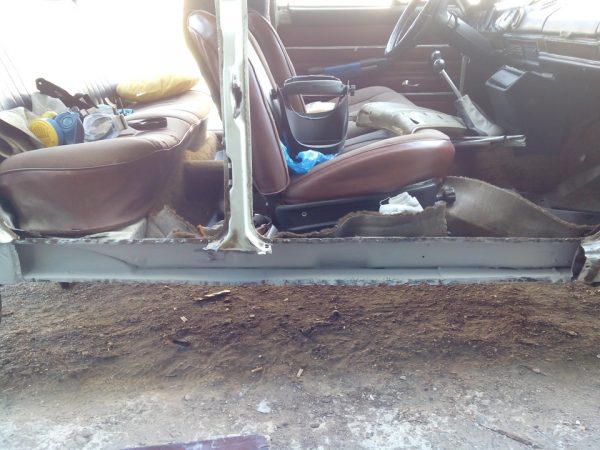
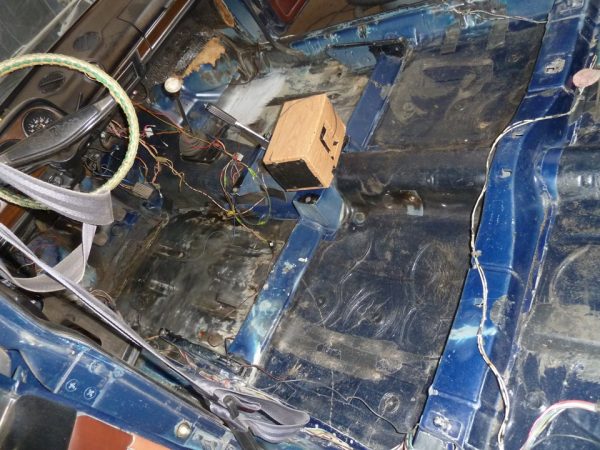
- We completely disassemble the interior (remove chairs, soundproofing, etc.).For body work in the cabin, it is necessary to remove the seats, noise insulation and other coatings.
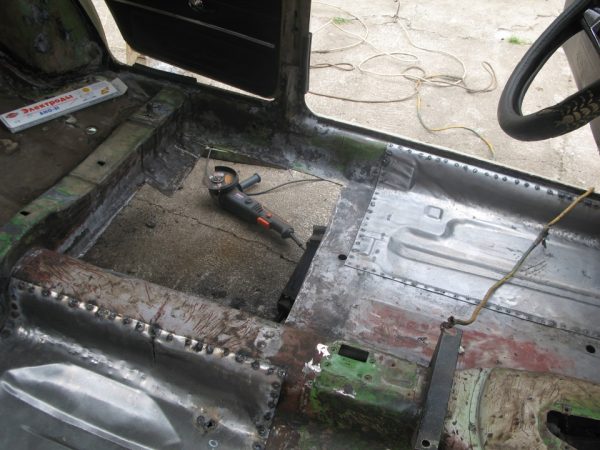
- We cut out the damaged areas of the floor with a grinder.We cut out rotten sections of the floor with a grinder
- From the prepared metal (a new sheet of metal or old body elements, for example, a wing or a door), we cut out patches of the right size with a grinder with a small margin.
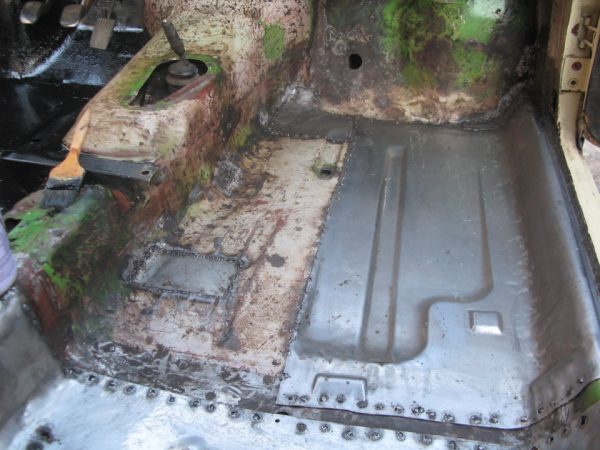
- We clean the patch from old paint, if necessary, adjust it in place with a hammer and weld it with semi-automatic welding.We weld the resulting holes with repair inserts or patches
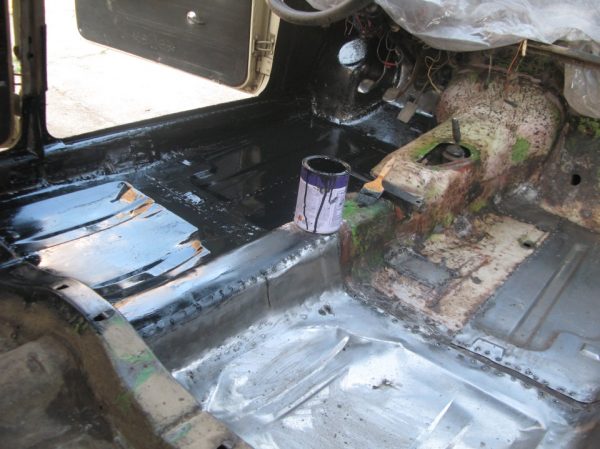
- After welding, we cover the floor with soil, treat the seams with a seam sealant, and after it dries, we cover the patch with mastic or other material on both sides according to the instructions.We cover the repaired floor with bituminous mastic
- When the mastic dries, we lay the soundproofing and assemble the interior.
Engine repair
Its correct operation, developed power, consumption of fuels and lubricants directly depend on the state of the power unit. The following symptoms indicate that there are problems with the engine:
- gray smoke from the exhaust pipe;
- increased oil or fuel consumption;
- low compression in one of the cylinders;
- knocking during engine operation;
- decrease in power.
Possible malfunctions can be caused by the following factors:
- high loads;
- untimely oil change;
- the use of low quality lubricants;
- overheating of the engine.
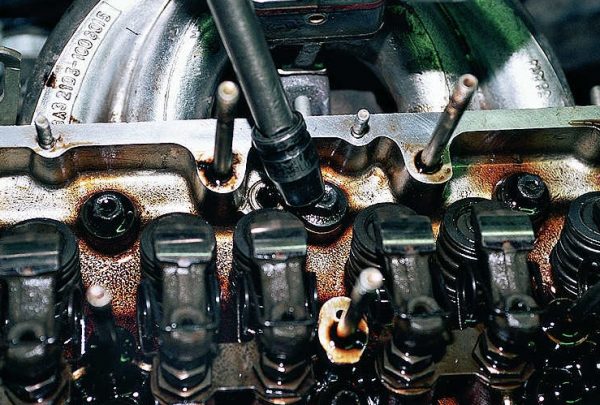
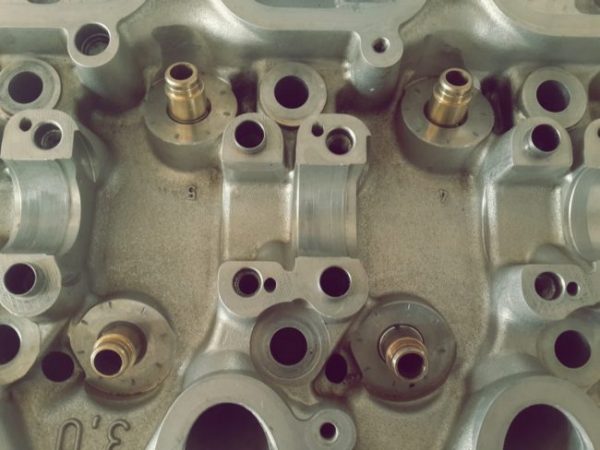
Cylinder head repair
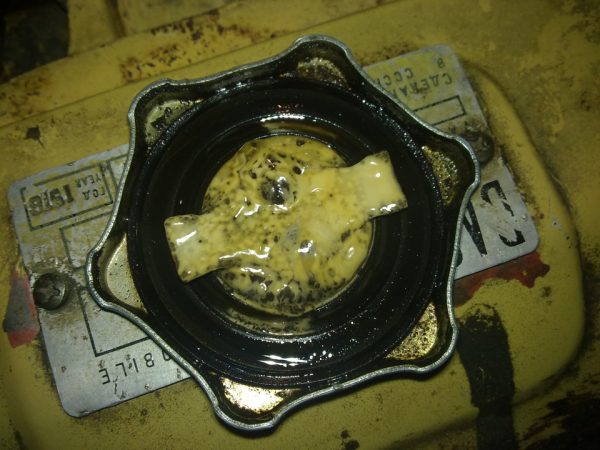
The need to repair the block head or dismantle this mechanism may arise for various reasons. One of the most common is damage to the gasket between the head and the block. This leads to the fact that the coolant enters the combustion chamber or into the oil. In the first case, white smoke will come out of the exhaust, and in the second, when checking the oil level on the dipstick, an emulsion will be visible - a gray creamy substance.
In addition to a damaged gasket, cylinder head valves, their seats (saddle) can sometimes burn out, valve stem seals wear out, or the chain stretches. Almost all repairs to the head of the block involve the removal of this assembly from the engine, with the exception of replacing the camshaft or valve seals. Therefore, we will consider how and in what sequence to repair the cylinder head. To work, you need to prepare a certain list of tools:
- a wrench with an extension;
- ratchet handles;
- a hammer;
- heads 10, 13 and 19;
- torque wrench for tightening.
The set of tools may differ depending on the repair work being carried out.
Removing and repairing the mechanism consists of the following steps:
- We unscrew the plugs and drain the coolant from the system.
- We dismantle the air filter, carburetor, valve cover, and also unscrew the fastening of both manifolds, after which we remove the exhaust manifold along with the exhaust pipe to the side.
- We unscrew the bolt and remove the camshaft gear, and then the shaft itself from the block head.We unscrew the fasteners and remove the camshaft from the block head
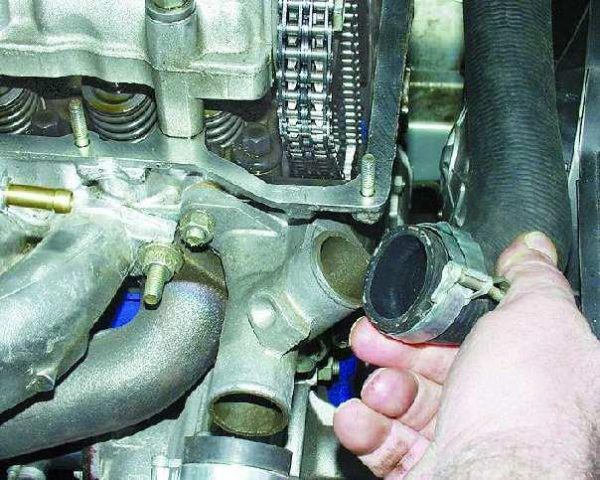
- We loosen the clamps and tighten the pipes that go to the heater, thermostat and main radiator.We remove the pipes going to the radiator and thermostat
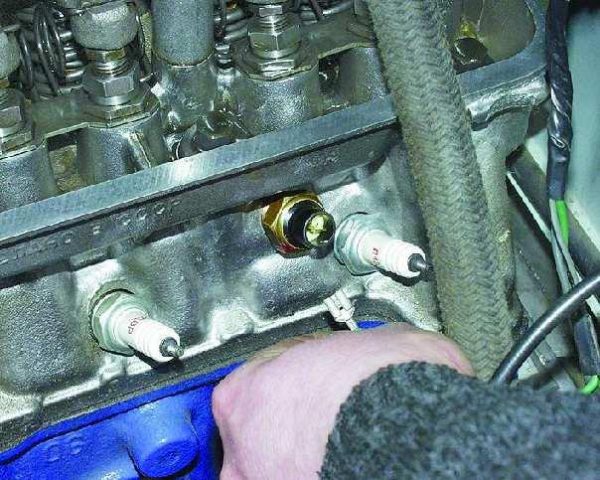
- Remove the terminal from the temperature sensor.Remove the terminal from the temperature sensor
- With a collar and heads for 13 and 19, we unscrew the cylinder head mount to the block.We turn off the fastening of the head of the block with a wrench with a head
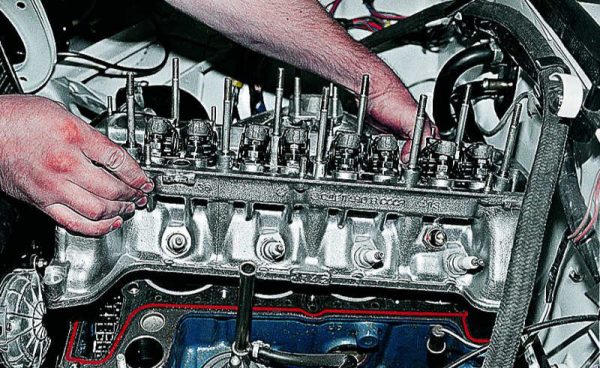
- Remove the block head from the engine.Unscrewing the fasteners, remove the cylinder head from the cylinder block
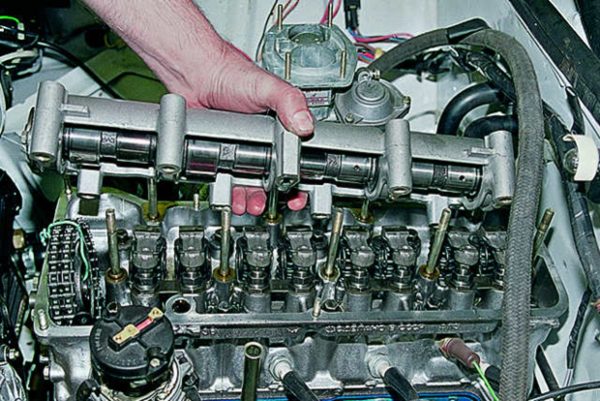
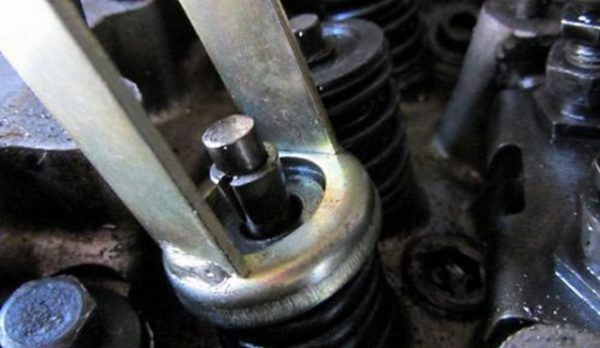
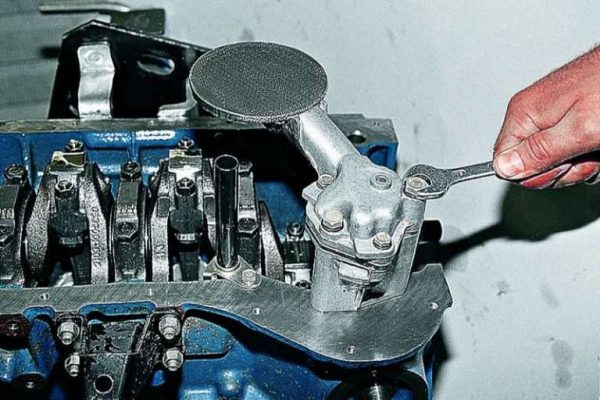
- If there is burnout of the valves, then first we remove the rockers with springs, and then dry the valves.Compress the springs with a dryer and remove the crackers
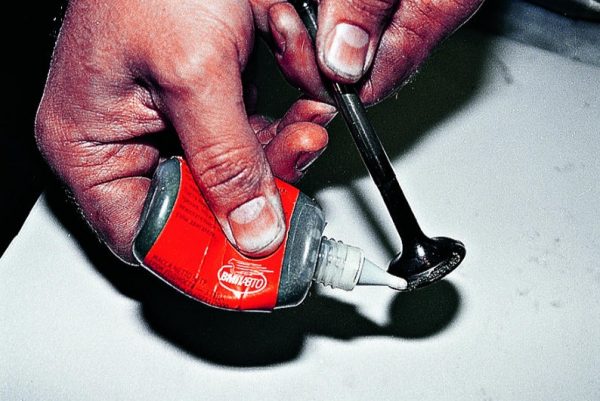
- We dismantle the valves and inspect their working surfaces. We replace burnt-out elements with new ones, rubbing them with diamond paste.Abrasive paste is applied to the lapping surface
- If the valve bushings and seals are worn out, as evidenced by blue smoke from the exhaust pipe and the transverse stroke of the valve stem, we replace these parts. Oil seals are changed using a special puller, and bushings are changed by knocking out old and pressing in new elements.The new bushing is inserted into the seat and pressed in with a hammer and mandrel.
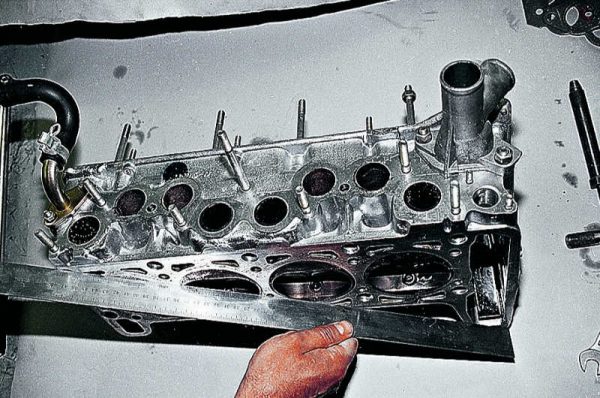
- If the engine overheated, then we check the cylinder head plane with a special ruler: you may have to grind the surface.Use a metal ruler to check the flatness of the head
- After carrying out the repair work, we assemble and install the head in place in the reverse order, not forgetting to set the marks of the gas distribution mechanism and ignition.
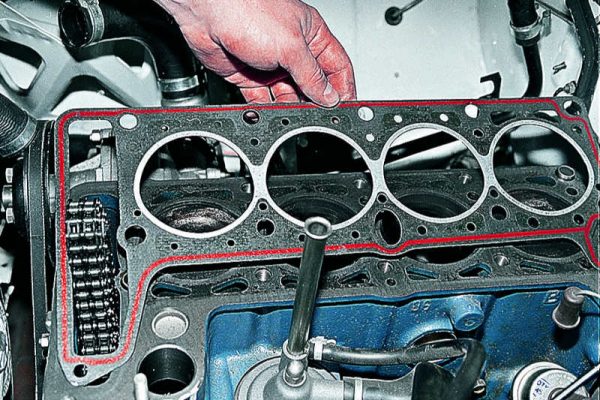
For any repair that involves removing the head from the engine, the cylinder head gasket must be replaced.
Replacing the piston group
The piston elements of the power unit "six" constantly work with high temperature and mechanical loads. It is not surprising that they also fail over time: both the cylinders themselves and the pistons with rings wear out. As a result, disassembly of the motor and replacement of failed parts is required. The main signs indicating a malfunction of the piston group are:
- strong smoke from the crankcase ventilation hose;
- the presence of oil in the air filter housing;
- increased oil consumption;
- excessive soot on spark plugs;
- increased fuel consumption;
- triplet motor;
- blue smoke from the exhaust pipe.
Sometimes the engine can triple, which occurs when there is a malfunction or a complete failure of one of the cylinders.
With any of the above signs, you should think about repairing the power unit. Delaying this procedure will only worsen the condition of the internals, leading to higher costs. For disassembly, troubleshooting and repair of the VAZ 2106 engine, it is necessary to prepare the following tools:
- set of open-end wrenches and heads;
- crank;
- a hammer;
- torque wrench;
- internal gauge;
- crimp for piston installation;
- probe for measuring gaps;
- rags.
The piston group changes in the following sequence:
- We dismantle the cylinder head.
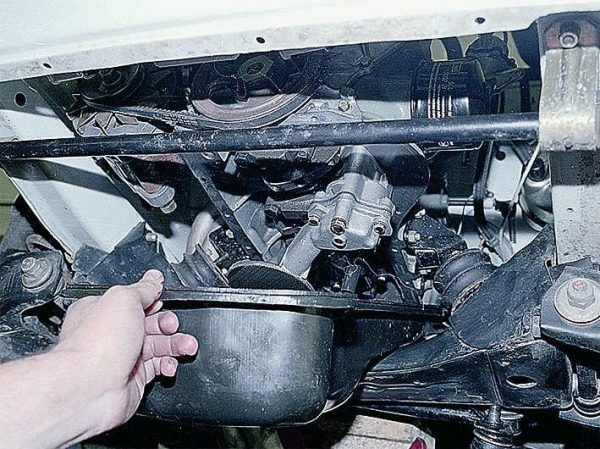
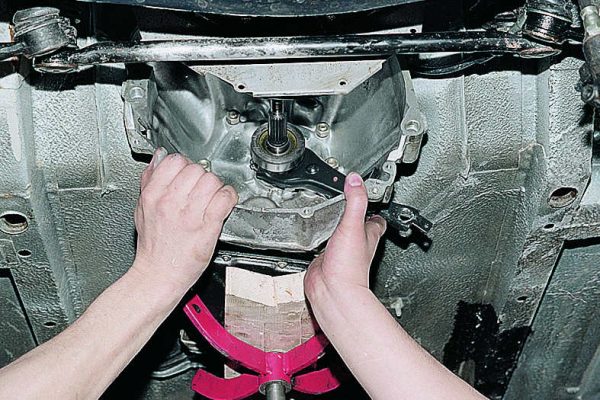
- We remove the cover of the pallet, having previously dismantled the crankcase protection.Remove the crankcase and engine pan
- We unscrew the fasteners of the oil pump.When replacing the piston group, the oil pump mount is loosened
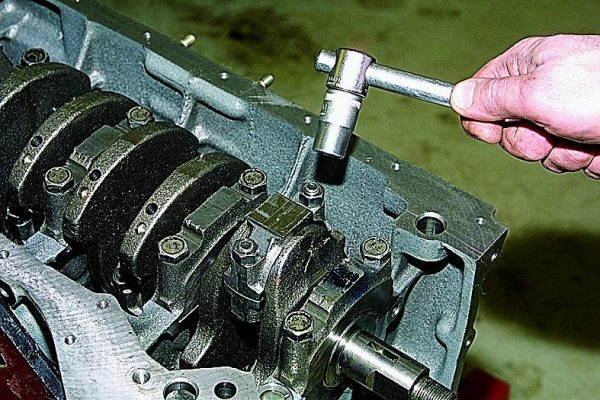
- We unscrew the fastening of the connecting rods and take out the latter together with the pistons from the cylinders.Connecting rods are attached to the crankshaft with special covers
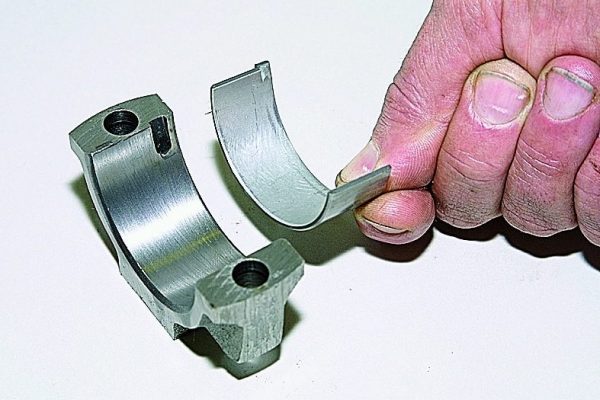
- We remove the old liners and connecting rod fingers, separating the connecting rods and pistons.Liners are installed in the connecting rod caps and the connecting rods themselves
Using a caliper, we measure the cylinders at different points:
- stepping back 15 mm from the top of the cylinder;
- 45 mm from the top edge of the cylinder;
- 80 mm from the upper limit.
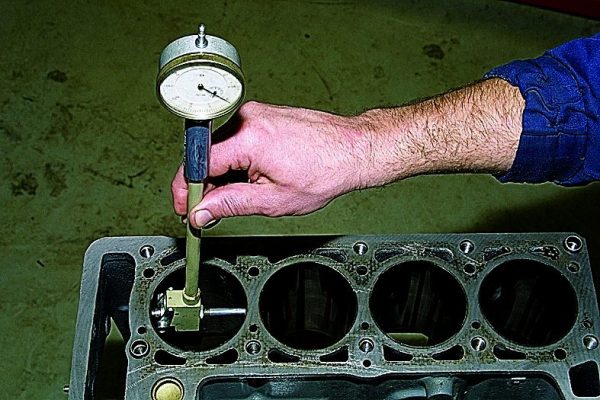
According to the measurements obtained, it is necessary to compile a table by which it will be possible to evaluate the taper and ovality of the cylinders. These values should not differ by more than 0,02 mm. Otherwise, the engine block will have to be completely disassembled and bored. We measure the piston diameter in a plane perpendicular to the axis of the pin, stepping back 52,4 mm from the bottom of the piston element.
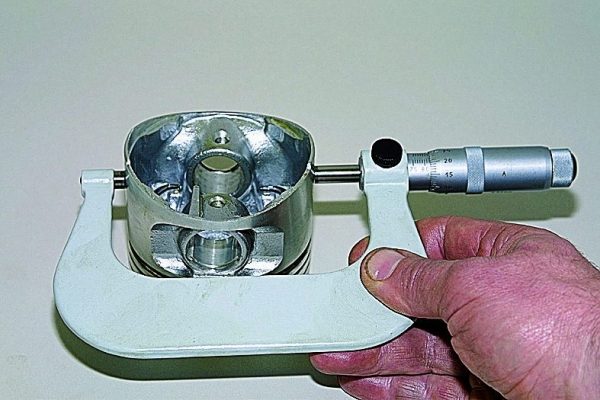
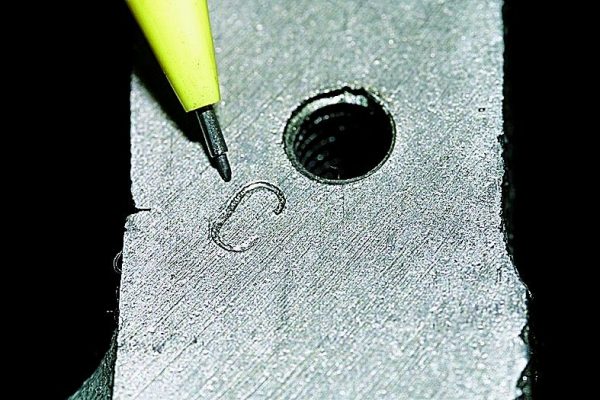
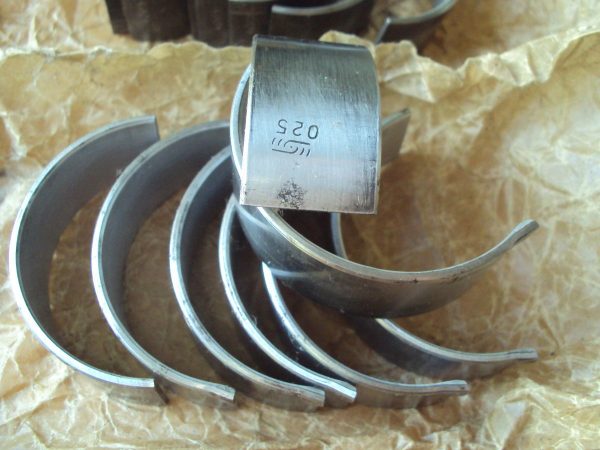
Based on the results, the clearance between the piston and the cylinder is determined. It should not exceed 0,06–0,08 mm. The maximum allowable clearance for the VAZ 2106 engine is considered to be 0,15 mm. New pistons must be selected in the same class as the cylinders. The cylinder diameter class is determined by the letter marked on the mounting plane of the oil pan.
If there are signs that the piston rings did not work (lay down) or they are completely broken, we change them to new ones according to the size of the pistons. We assemble the piston group as follows:
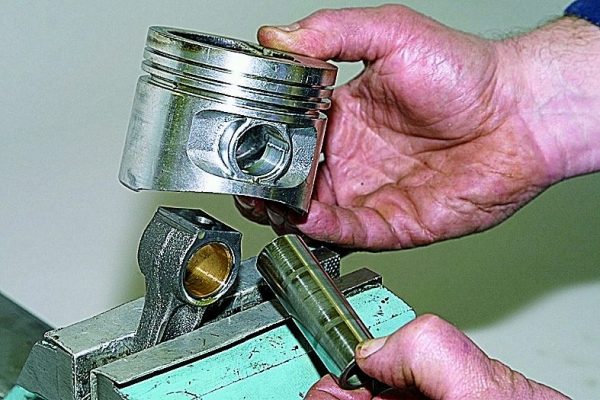
- We install the finger and connect the connecting rod and piston, after lubricating it with engine oil, after which we put the retaining ring in place.A special pin is used to connect the connecting rod to the piston.
- We put rings on the piston (two compression and one oil scraper).The pistons are equipped with three rings - two compression and one oil scraper.
- If there is a large wear on the liners, we change them to new ones of the same dimension, which is indicated on the reverse side of the old elements.The back of the inserts are marked
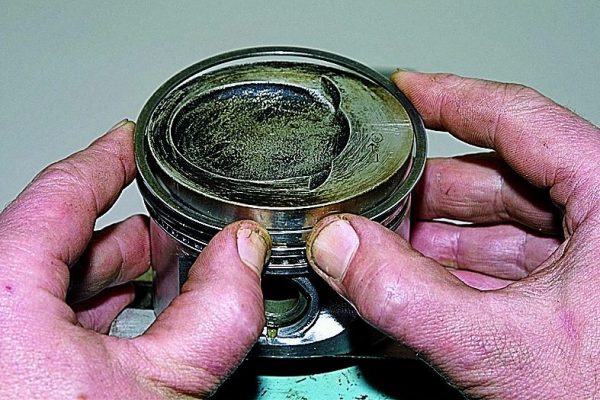
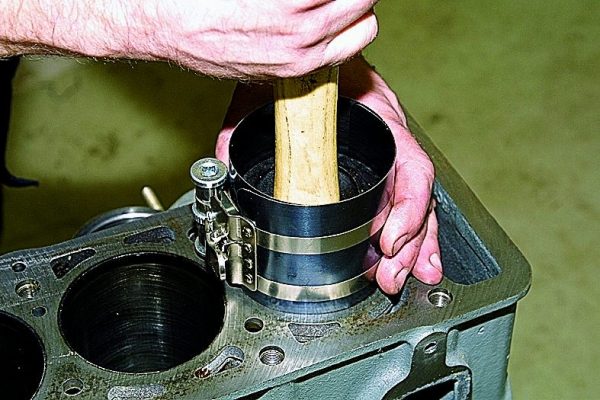
- We compress the rings with a special clamp and install the pistons in the cylinders.We compress the piston rings with a special clamp and mount the element in the cylinder
- We fix the connecting rod caps and check the ease of rotation of the crankshaft.
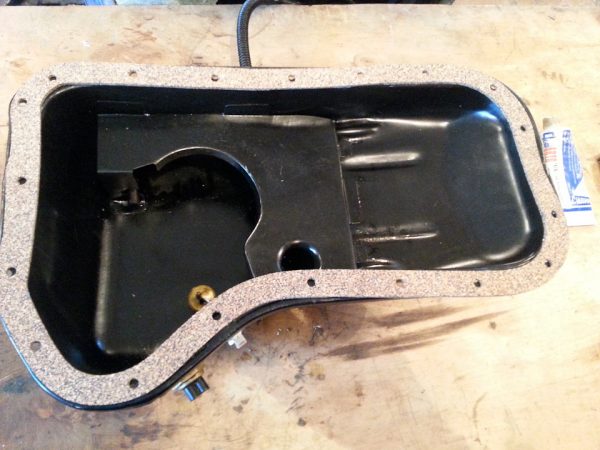
- Change the pan cover gasket and install the pan itself.If the pan cover was removed, then it is advisable to replace the gasket with a new one.
- We mount the cylinder head, put the valve cover.
- We fill in engine oil, start the engine and check its operation at idle.
Video: replacing the piston on the "classic"

Gearbox repair
The VAZ "six" was equipped with two versions of mechanical gearboxes - four- and five-speed. Both units are interchangeable. The VAZ 2106 gearbox is simple and at the same time reliable, which allows the owners of this car to carry out repairs on their own in case of a malfunction. The main faults in the gearbox are:
- oil leak;
- knocking out one of the gears;
- difficult gear shifting;
- extraneous sounds during operation.
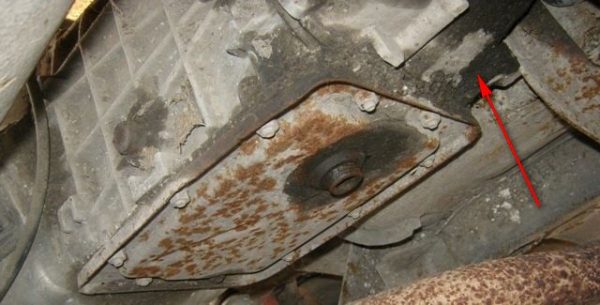
Table: the main malfunctions of the VAZ 2106 gearbox and how to fix them
| Cause of failure | elimination method |
| The presence of noise in the gearbox (may disappear if you depress the clutch pedal) | |
| Lack of oil in the crankcase | Check the level and add oil. Check for oil leaks, clean or replace breather |
| Worn bearings or gears | Replace damaged or worn items |
| There is no noise, but the speeds turn on with difficulty | |
| The shift lever is damaged, the spherical washer, the screw for limiting the travel of the gearshift lever are worn out, the lever is bent | Replace damaged parts |
| Wedge hinge lever | Replace the worn element, lubricate the hinge with the recommended lubricant |
| Crackers jam, dirt in the nests of the fork rods | Replace Parts |
| Difficulty moving the clutch on the hub | Clean splines, remove burrs |
| Forks deformed | Replace with new ones |
| Clutch won't disengage | Troubleshoot clutch |
| Between third and fourth gear, there is no way to lock the shift lever in neutral | |
| Retracting spring broken | Replace the spring or reinstall if it has come off |
| Spontaneous disengagement of gears | |
| Loss of elasticity of retainers, wear of balls or stem sockets | Replace Parts |
| Worn synchronizer rings | Replace Parts |
| Worn clutch teeth or synchronizer ring | Replace damaged parts |
| Synchronizer spring broken | Install new spring |
| Noise, crackle or squeal is heard when shifting gears | |
| Incomplete clutch release | Troubleshoot clutch |
| Insufficient oil level in the crankcase | Check for oil leakage, add oil, clean or replace the breather |
| Worn gear teeth | Replace Parts |
| Worn synchronizer ring of one gear or another | Replace worn ring |
| The presence of shaft play | Tighten bearing mounts, replace worn ones |
| Oil leak | |
| Worn cuffs | Replace worn items. Clean or replace breather |
| Wear of shafts and nicks in the places where the cuffs are installed | Clean with fine grit sandpaper. Replace cuffs. In case of severe wear, replace parts |
| Clogged breather (high oil pressure) | Clean or replace breather |
| Weak fastening of the crankcase cover, worn gaskets | Tighten fasteners or replace gaskets |
| Oil drain or fill plugs not fully tightened | Tighten plugs |
Repair of the gearbox is carried out after its dismantling from the car and is carried out using standard tools (a set of keys and heads, a screwdriver, a hammer, a wrench).
Video: VAZ 2106 gearbox repair

Rear axle repair
The "six" rear axle is a fairly reliable unit. Malfunctions with it occur with high mileage, prolonged heavy load and untimely maintenance. The main node problems that owners of this model face are:
- oil leak;
- hum under load and without it;
- extraneous noises, knocks, rattles.
Oil from the gearbox or stocking of the rear axle mainly begins to leak due to wear of the shank or axle shaft seals, which need to be replaced. The gearbox seal is changed using the following tools:
- key on 13;
- flat screwdriver;
- head 24;
- torque wrench.
The cuff replacement procedure is as follows:
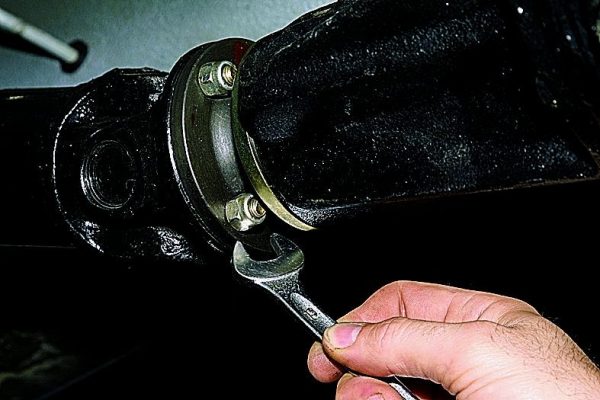
- We unscrew the cardan mount to the rear axle flange and move the shaft to the side.The cardan is attached to the rear axle gearbox with four bolts and nuts.
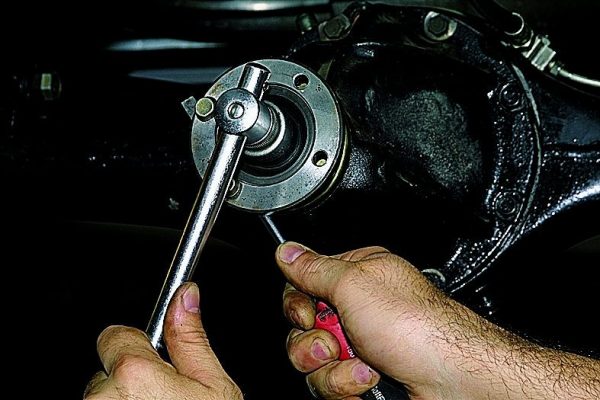
- Unscrew the shank nut and remove the flange.Using a 24 head, unscrew the nut securing the gearbox flange
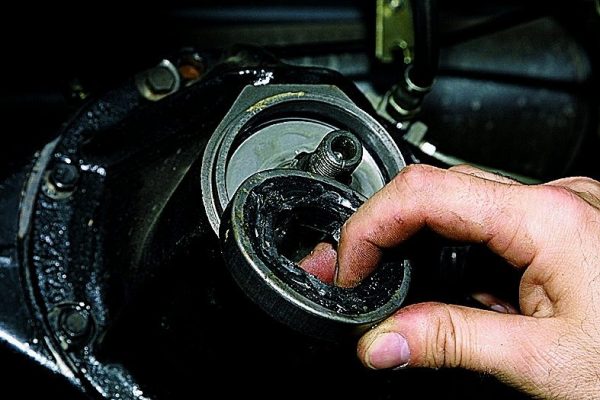
- Using a screwdriver, pry off and dismantle the old oil seal.Pry off the old seal with a flathead screwdriver.
- Install a new seal in its place.
- We put the flange in place and tighten it with a moment of 12–26 kgf.m.
If there is a leak in the axle shaft seal, then to replace it, it is necessary to dismantle the axle shaft itself. The replacement process is not difficult. To eliminate other malfunctions in the gearbox, you will need to dismantle the mechanism from the car and completely disassemble it for troubleshooting.
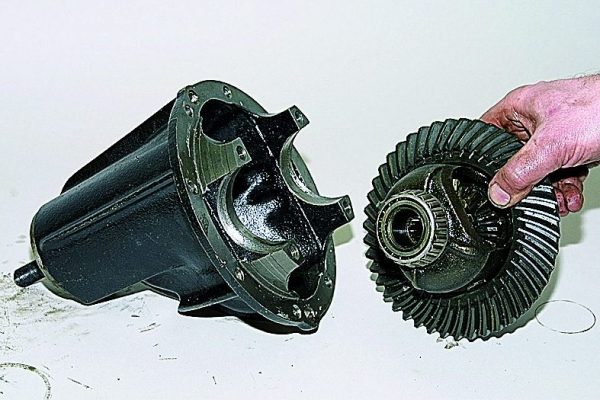
Only in this way it is possible to identify which element is out of order and needs to be replaced. In most cases, hum and other extraneous sounds appear when the gears of the main pair are worn out, as well as the gears of the axle shafts, planet gears, gearbox bearings or axle shafts.
If the rear axle gearbox has been disassembled, after replacing the damaged elements, it is imperative to perform the correct adjustment of the mechanism, namely, to set the gaps between the gears and the bearing preload.
Overhaul of VAZ 2106
Under the overhaul of the "Lada" of the sixth model or any other car, it is customary to understand the complete disassembly of the units or the body in order to eliminate certain malfunctions. If we are talking about body repair, then during its implementation any defects (corrosion, dents, etc.) are completely eliminated, followed by preparation of the car for anti-corrosion treatment and painting.
With a complete repair of any unit, in most cases, gaskets, lip seals, bearings, gears (if they have a large output) and other elements are replaced. If this is an engine, then during the overhaul, the crankshaft, cylinders are bored, the camshaft, the piston group are changed. In the case of the rear axle, the main pair of the gearbox or the differential box assembly is replaced, as well as the bearings and axle shaft seals. In the event of a gearbox breakdown, the gears and synchronizer rings of a particular gear are replaced, and the primary and secondary shafts are also sometimes changed.
VAZ 2106 is an easy-to-maintain car. Almost every owner of this car can repair the body or any mechanism with their own hands, and this does not require special and expensive tools, with the exception of a welding machine and any measuring instruments. However, they can also be borrowed from friends. If you have certain skills in car repair, then restoring the performance of personal vehicles will not be difficult.

