
DIY VAZ 2106 starter repair
Content
Starter - a device designed to start the engine. Its failure can cause a lot of trouble for the car owner. However, diagnosing a malfunction and independently repairing the VAZ 2106 starter is quite simple.
The device and technical characteristics of the starter VAZ 2106
On the VAZ 2106, the manufacturer installed two interchangeable types of starters - ST-221 and 35.3708. They differ slightly from each other in design and technical parameters.
Technical characteristics of starters VAZ 2106
Until the mid-80s of the last century, the manufacturer installed the ST-221 starter on all classic VAZ cars. Then the starting device was replaced by model 35.3708, which differed from its predecessor in the design of the collector and the fastening of the cover to the body. Its technical characteristics have also changed somewhat.
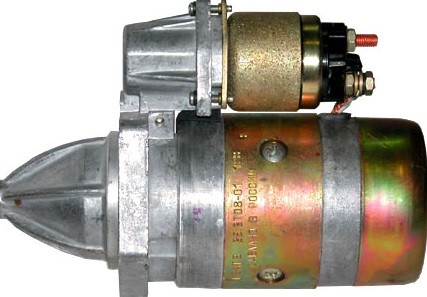
Table: main parameters of starters VAZ 2106
| Starter type | ST-221 | 35.3708 |
| Rated power, kW | 1,3 | 1,3 |
| Current consumption at idle, A | 35 | 60 |
| Consumed current in the state of braking, A | 500 | 550 |
| Consumed current at rated power, A | 260 | 290 |
Starter device VAZ 2106
Starter 35.3708 consists of the following elements:
- stator (case with excitation windings);
- rotor (drive shaft);
- front cover (drive side);
- back cover (on the collector side);
- traction electromagnetic relay.
Both covers and the starter housing are connected by two bolts. The four-pole stator has four windings, three of which are connected to the rotor winding in series, and the fourth in parallel.
The rotor consists of:
- drive shaft;
- core windings;
- brush collector.
Two ceramic-metal bushings pressed into the front and rear covers act as shaft bearings. To reduce friction, these bushings are impregnated with special oil.
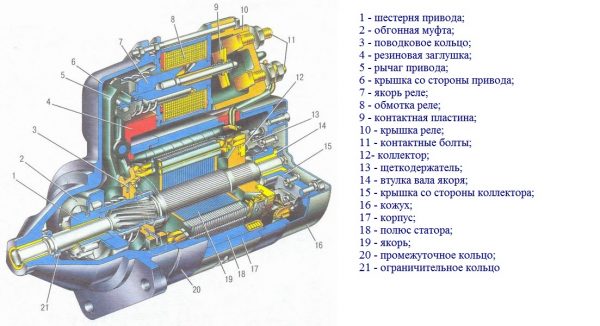
A drive is installed in the front cover of the starter, consisting of a gear and a freewheel. The latter transmits torque from the shaft to the flywheel when the engine is started, that is, it connects and disconnects the shaft and the flywheel crown.
The traction relay is also located on the front cover. It consists of:
- housing;
- core;
- windings;
- contact bolts through which power is supplied.
When voltage is applied to the starter, the core is retracted under the action of a magnetic field and moves the lever, which, in turn, moves the shaft with the drive gear until it engages with the flywheel crown. This closes the contact bolts of the starter, supplying current to the stator windings.
Video: the principle of operation of the starter VAZ 2106

Reduction starter
Despite the low power, the regular starter VAZ 2106 does its job quite well. However, it is often changed to a gear analog, which differs from the classic one in the presence of a gearbox, which significantly increases the power of the device. This allows you to start the engine even with a discharged battery. Thus, a geared starter for classic VAZ models manufactured by Atek TM (Belarus) has a rated power of 1,74 kW and is capable of spinning the crankshaft up to 135 rpm (usually 40–60 rpm is enough to start the power unit). This device works even when the battery is discharged up to 40%.
Video: gear starter VAZ 2106

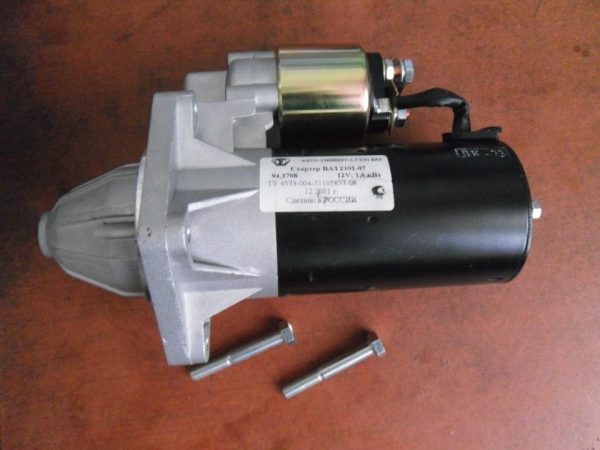
Choosing a starter for VAZ 2106
The device for mounting the starter of classic VAZ models does not allow you to install a starting device on the VAZ 2106 from another domestic car or foreign car. The adaptation of such starters is very labor-intensive and expensive (the exception is the starter from the VAZ 2121 Niva). Therefore, it is better and easier to purchase a new starting device. A stock starter for a VAZ 2106 costs 1600–1800 rubles, and a gear starter costs 500 rubles more.
Of the manufacturers, it is recommended to give preference to well-established brands:
- Electromash (Kherson, Ukraine);
- KZATE (Samara, Russia);
- "Atek" (Vitebsk, Belarus).
Diagnostics of malfunctions of the VAZ 2106 starter
All starter malfunctions can be divided into two groups:
- electrical (failure of conductive elements);
- mechanical (wear of drive parts).
For correct diagnostics of the starter, the car owner needs to know the symptoms corresponding to a particular malfunction.
Signs of a malfunctioning starter
The main symptoms of a starter failure include:
- when the ignition key is turned, the starter and the traction relay show no signs of life;
- the traction relay emits frequent clicks;
- the traction relay is activated at startup, but the rotor rotates too slowly;
- when the ignition key is turned, a crackling sound is heard from the starter side;
- there is a hum from the starter when starting.
Common starter problems
Each symptom of a malfunction has its own causes.
When starting, the starter and the traction relay do not work
The reasons for the starter not responding to turning the ignition key may be:
- complete or almost complete discharge of the battery;
- oxidation of battery contacts;
- lack of contacts between the battery terminals and the tips of the power wires;
- lack of contact between the tip of the wire and the output "50" on the traction relay;
- malfunction of the ignition contact group;
- breakage of the control wire from the ignition switch to the traction relay.
In such a situation, first of all, you need to check the battery with a multimeter - the voltage at its terminals should not be lower than 11 V. Otherwise, you should charge the battery and continue the diagnosis.
Then check the condition of the battery terminals and the reliability of their contact with the tips of the power wires. In the event of poor contact, the battery terminals quickly oxidize, and the battery power becomes insufficient to start the starter. The same thing happens with pin 50 on the traction relay. If traces of oxidation are found, the tips are disconnected from the battery, which are cleaned along with the battery terminals and terminal 50.
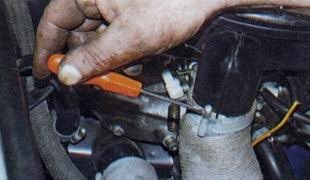
Checking the contact group of the ignition switch and the integrity of the control wire is carried out by closing the plug of this wire and output B of the traction relay. Power in this case begins to be supplied directly to the starter. To carry out such a diagnosis, you need to have some experience. The check is carried out as follows:
- The car is put in neutral and parking brake.
- The ignition is switched on.
- A long screwdriver closes the plug of the control wire and output B of the traction relay.
- If the starter works, the lock or wire is faulty.
Frequent clicks of the traction relay
Frequent clicks when starting the engine indicate multiple activation of the traction relay. This can occur when there is a strong voltage drop in the starter circuit due to a discharge of the battery or poor contact between the tips of the power wires. In this case:
- measure battery voltage;
- check the status of contacts;
- check the reliability of electrical connections in the starter circuit.
Sometimes the cause of this situation may be a short circuit or an open in the holding winding of the traction relay. This can be determined only after dismantling the starter and disassembling the relay.
Slow rotor rotation
Slow rotation of the rotor is a consequence of insufficient power supply to the starter. The reason for this may be:
- deep discharge of the battery;
- oxidation of battery terminals;
- weak tightening of the tips of the power wires;
- burning of the lamellas of the brush collector;
- sticking or wear of brushes;
- shorting the brush holder of the positive brush to ground;
- breakage (short circuit) of the stator or rotor windings.
Here, as in previous cases, the condition of the battery and contacts is checked first. If the malfunction could not be identified, the starter will need to be removed and disassembled. Without this, it will not be possible to determine the burning of the collector, problems with brushes, brush holder or windings.
Crack in starter at startup
The cause of the crackling in the starter when turning the ignition key can be:
- overrunning clutch malfunction;
- drive gear wear.
In both cases, the starter will need to be removed.
Starter hum on startup
The most likely causes of a starter hum and slow rotation of its shaft are:
- wear of the rotor bushings;
- loosening of the starter mountings;
- incorrect installation of the starter.
The hum indicates a misalignment of the rotor shaft and its short circuit to ground.
Repair of the starter VAZ 2106
Most of the malfunctions of the VAZ 2106 starter can be fixed on your own - all the elements necessary for this are on sale. Therefore, when the symptoms described above appear, you should not immediately change the starter to a new one.
Removing the starter
To remove the starter VAZ 2106 you will need:
- a wrench on 10;
- socket wrench or head 10 with extension;
- a wrench on 13;
- Phillips screwdriver.
The dismantling of the starter itself is carried out in the following order:
- Using a Phillips screwdriver, unscrew the clamp screw on the air intake hose. Remove the hose from the air filter nozzle and move it to the side.
 The hose is attached to the nozzle of the air filter housing with a worm clamp.
 - Using a 13 key for 2–3 turns, first loosen the lower and then the upper air intake nut.To remove the air intake, unscrew the two nuts
- We remove the air intake.
- Using a 10 wrench, unscrew the two nuts securing the heat-insulating shield.The heat shield in the engine compartment is fastened with two nuts
- From the bottom of the car with a socket wrench or a 10 head with an extension, unscrew the lower nut securing the shield to the engine mount.From below, the heat-insulating shield rests on one nut
- Remove the heat shield.
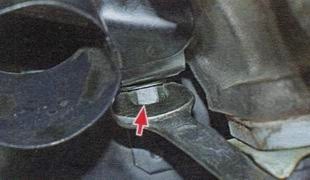
- From the bottom of the car with a 13 key, we unscrew the bolt of the lower mounting of the starter.The lower starter mounting bolt is unscrewed with a 13 wrench
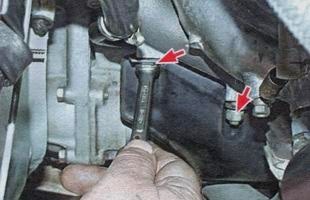
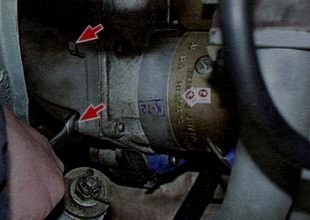
- In the engine compartment with a key of 13, we unscrew the two bolts of the top mounting of the starter.The starter is attached to the top with two bolts.
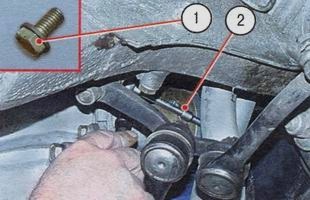
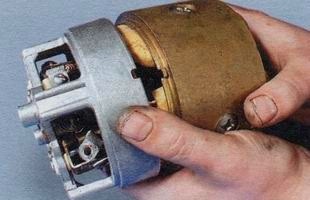
- Holding the starter housing with both hands, we move it forward, thereby providing access to the tips of the wires connected to the traction relay.To provide access to the tips of the wires, the starter must be moved forward.
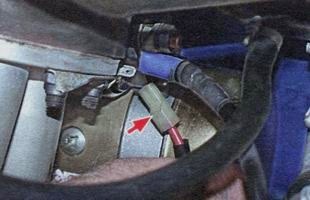
- Remove the control wire connector on the traction relay by hand.The control wire is connected to the traction relay through the connector
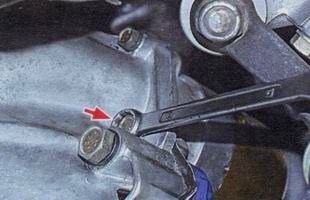
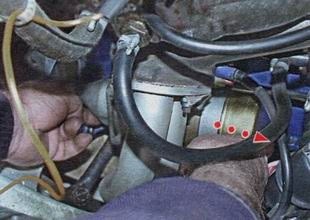
- Using a 13 key, we unscrew the nut securing the power wire to the upper terminal of the traction relay.To disconnect the power wire, unscrew the nut with a 13 wrench.
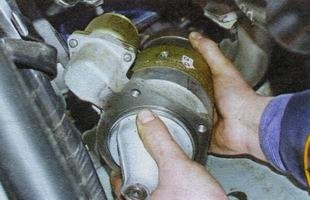
- Grasping the starter housing with both hands, lift it up and remove it from the engine.To remove the starter from the engine, you need to slightly lift it

Video: dismantling the starter VAZ 2106

Dismantling, troubleshooting and repair of the starter
For disassembly, troubleshooting and repair of the VAZ 2106 starter, you will need:
- key on 8;
- key on 10;
- key on 13;
- cross-blade screwdriver;
- slotted screwdriver;
- a hammer;
- passages;
- calipers;
- special mandrels for pressing starter bushings;
- ohmmeter.
The work is carried out in the following order:
- With a key of 13, we unscrew the nut that fastens the wire to the lower output of the traction relay.To disconnect the power wire from the starter, unscrew the nut
- We remove one spring and two flat washers from the output.
- Disconnect the starter wire from the relay output.
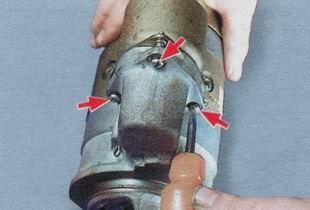
- Unscrew the three screws securing the traction relay to the starter cover with a slotted screwdriver.
- We remove the relay.To dismantle the traction relay, unscrew the three screws
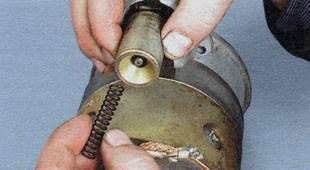
- Remove the spring from the relay armature.The spring is easily pulled out of the anchor by hand.
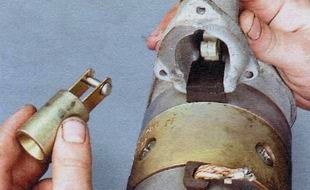
- Raising the anchor up, disengage it from the drive lever and disconnect it.To remove the anchor, it must be moved up
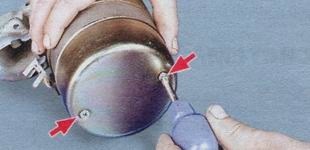
- Using a Phillips screwdriver, unscrew the two screws on the casing.
- Remove the cover.To remove the starter cover, unscrew the two screws
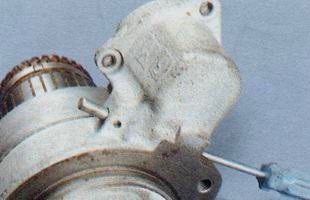
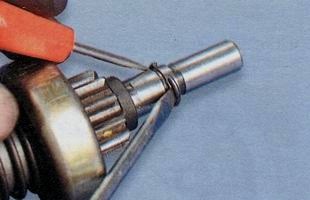
- Using a slotted screwdriver, remove the ring fixing the rotor shaft.You can use a slotted screwdriver to remove the retaining ring.
- Remove the rotor washer.
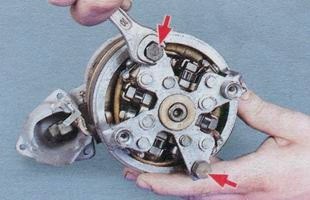
- With a 10 wrench, unscrew the coupling bolts.The main parts of the starter are connected with tie bolts.
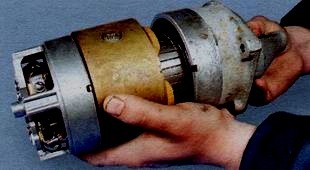
- Separate the starter cover from the housing.After unscrewing the tie bolts, the starter cover is easily detached from the housing
- Using a slotted screwdriver, unscrew the screws securing the windings.Winding fastening screws are unscrewed with a slotted screwdriver
- We remove the insulating tube from the housing.The insulating tube is pulled out of the starter housing by hand.
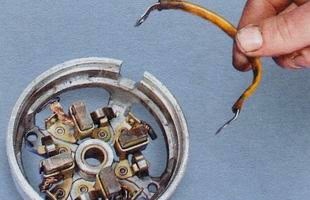
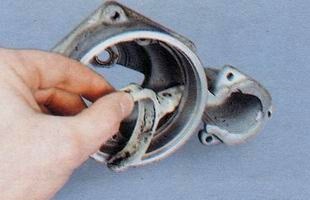
- Detach the back cover.The back cover of the starter can be easily detached from the body
- We take out the jumper from the brush holder.After unscrewing the screws securing the windings, the jumper is removed
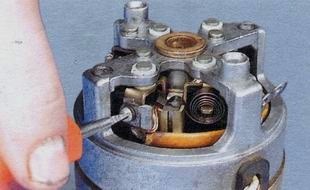
- Using a slotted screwdriver, remove the brushes and their springs.To remove the brushes and springs, you need to pry them with a screwdriver
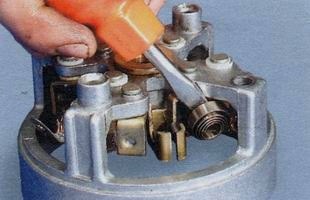
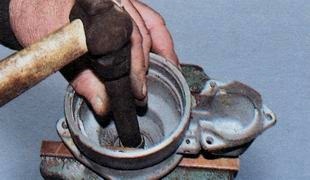
- Using a special mandrel, we press the bushing out of the rear cover of the starter. If there are signs of wear on the bushing, install a new one in its place and, using the same mandrel, press it in.Bushings are pressed out and pressed in using a special mandrel
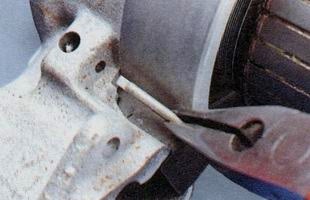
- Pliers remove the cotter pin of the starter drive lever.The pin of the starter drive lever is pulled out with the help of pliers
- Remove the lever axle.The axis of the drive lever is pushed out with a thin screwdriver
- Remove the plug.
- We disengage the lever arms.
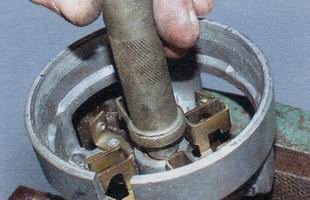
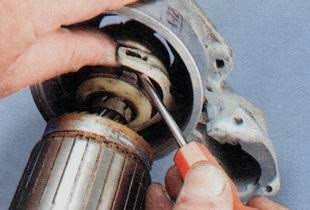
- We remove the rotor together with the clutch.To disconnect the rotor from the cover, you need to disengage the shoulders of the drive lever with a thin screwdriver
- Remove the drive lever from the front cover.Once the shaft has been disengaged, the drive lever can be easily pulled out of the front cover.
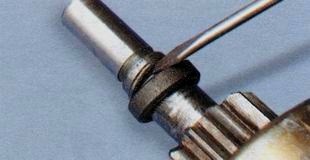
- Use a slotted screwdriver to move the washer on the rotor shaft.The washer on the rotor shaft is shifted with a slotted screwdriver
- Unclench and remove the fixing ring. Disconnect the clutch from the shaft.The retaining ring is unclenched with two screwdrivers
- Using a mandrel, press the front bushing out of the cover. We inspect it and, if signs of wear are found, install and press in a new bushing with a mandrel.The front cover sleeve is pressed in with a special mandrel
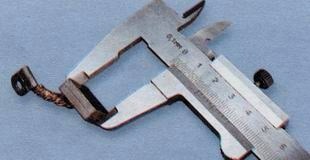
- We measure the height of each of the brushes (coals) with a caliper. If the height of any brush is less than 12 mm, change it to a new one.The height of the brushes must be at least 12 mm
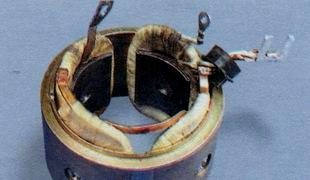
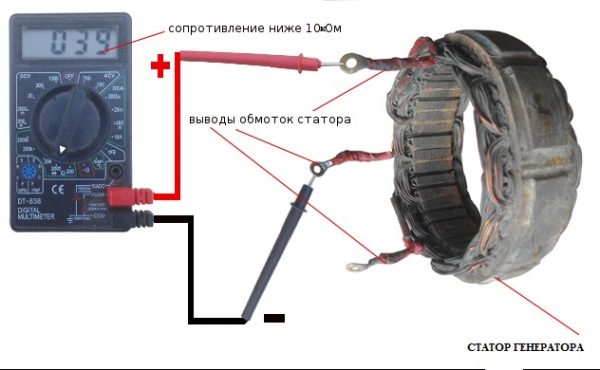
- We examine the stator windings. They should not have traces of burnout and mechanical damage.The stator windings must not have traces of burnout and mechanical damage.
- We check the integrity of the stator windings. To do this, we connect the first probe of the ohmmeter to the output of one of the windings, and the second to the case. The resistance should be about 10 kOhm. The procedure is repeated for each of the windings. If the resistance of at least one of the windings is less than specified, the stator should be replaced.The resistance of each of the stator windings must be at least 10 kOhm
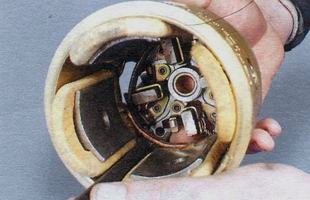
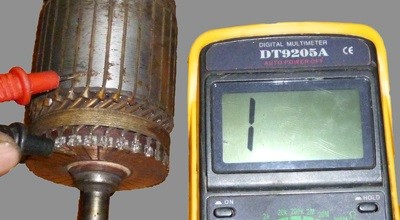
- Inspect the rotor manifold. All of its lamellas must be in place. If traces of burning, dirt, dust are found on the collector, we clean it with fine sandpaper. If lamellas fall out or traces of severe burning, the rotor is replaced with a new one.
- We check the integrity of the rotor winding. We connect one ohmmeter probe to the rotor core, the other to the collector. If the winding resistance is less than 10 kOhm, the rotor should be replaced with a new one.The resistance of the rotor winding must be at least 10 kOhm
- In the reverse order, we assemble the starter.


Video: disassembly and repair of the VAZ 2106 starter

Malfunctions and repair of the starter traction relay
The traction relay is located on the front cover of the starter and is designed for short-term engagement of the starting device shaft with the flywheel crown. It is it, and not the starter itself, that most often fails. In addition to the wiring and contact problems discussed above, the most common traction relay malfunctions are:
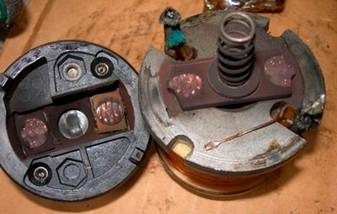
- burning of contact bolts (pyatakov);
- short circuit or open circuit in the winding;
- mechanical damage.Burning nickels is a fairly common malfunction of the traction relay.
The main sign of relay failure is the absence of a click when the key is turned in the ignition switch. It means that:
- the electromagnet did not work;
- relay contacts are not closed;
- No voltage is applied to the starter.
In such a situation, after checking the wiring and contacts, the relay should be removed from the starter and diagnosed. This is done as follows:
- Using a 13 key, unscrew the nuts securing the power wires to the relay contact bolts.
- Disconnect the control wire connector.
- Using a slotted screwdriver, unscrew the three screws securing the traction relay to the front cover.
- Disconnect the relay from the cover.
- We inspect the relay and, if mechanical damage or burnt contact bolts are found, we change it to a new one.
- In the absence of visible damage, we continue the test and connect the relay directly to the battery. To do this, we find two pieces of wire with a cross section of at least 5 mm2 and with their help we connect the output of the control wire to the minus of the battery, and the relay case to the plus. At the moment of connection, the relay core should retract. If this does not happen, the relay needs to be changed.
Video: checking the VAZ 2106 traction relay with a battery

Replacing the traction relay is quite simple. To do this, just install a new device in place of the old one and tighten the three screws that secure the relay to the front cover.
Thus, diagnostics, dismantling, disassembly and repair of the VAZ 2106 starter are not very difficult even for an inexperienced car owner. Carefully following the instructions of professionals will allow you to do this quickly and efficiently.

