We independently change the crankshaft oil seals on the VAZ 2106
A leaky oil seal on the engine does not bode well for the driver, as it means that the engine is rapidly losing lubrication and it is only a matter of time before it jams. This rule is true for all cars. It also applies to the VAZ 2106. The seals on the "six" have never been reliable. However, there is good news: it is quite possible to change them yourself. You just need to know how it's done.
What are seals for?
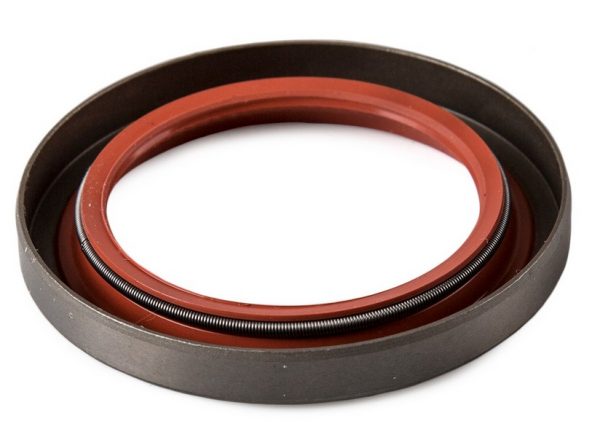
In short, the oil seal is a seal that prevents oil from flowing out of the engine. On early models of "sixes" oil seals looked like small rubber rings with a diameter of about 40 cm. And after a few years they became reinforced, since pure rubber does not differ in durability and quickly cracks. Oil seals are installed at the ends of the crankshaft, front and rear.
Even a slight displacement of the oil seal in the groove leads to a serious oil leak. And the leak, in turn, leads to the fact that the rubbing parts in the engine are no longer lubricated. The coefficient of friction of these parts increases dramatically and they begin to overheat, which in the end can lead to motor jamming. It is possible to restore a jammed motor only after a long and expensive overhaul (and even such a repair does not always help). So the oil seals on the crankshaft are extremely important details, so the driver should carefully monitor their condition.
About the service life of oil seals
The operating instructions for the VAZ 2106 say that the service life of crankshaft oil seals is at least three years. The problem is that this is not always the case. For three years, oil seals can work in conditions close to ideal. And there are simply no such conditions on domestic roads. If the driver drives mainly on dirt or poorly paved roads, and his driving style is very aggressive, then the oil seals will leak earlier - in a year and a half or two.
Signs and causes of oil seal wear
In fact, there is only one sign of wear on the crankshaft oil seals: a dirty engine. It's simple: if the oil began to flow out through a worn oil seal, it inevitably gets on the external rotating parts of the motor and scatters throughout the engine compartment. If the front “six” oil seal is worn out, then the resulting oil flows directly onto the crankshaft pulley, and the pulley sprays this lubricant over the radiator and everything that is next to the radiator.
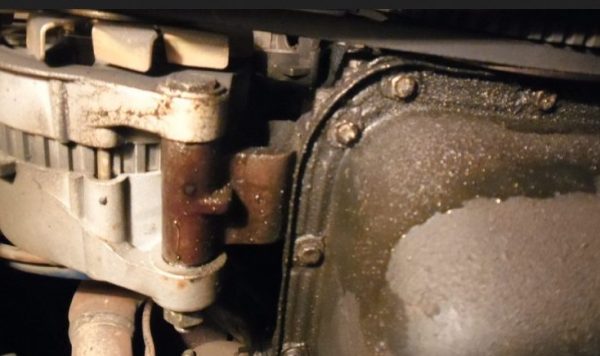
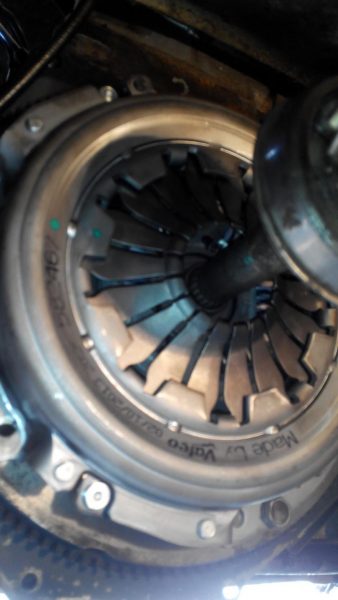
When the rear oil seal leaks, the clutch housing becomes dirty. Or rather, the clutch flywheel, which will be covered in engine oil. If the leak is very large, then the flywheel will not be limited. Oil will also get on the clutch disc. As a result, the clutch will begin to noticeably “slip”.
All of the above phenomena can occur for the following reasons:
- the seal has exhausted its resource. As mentioned above, oil seals on "sixes" rarely last more than two years;
- the tightness of the stuffing box was broken due to mechanical damage. This happens too. Sometimes sand gets on the crankshaft protruding from the engine. Then it can get into the stuffing box. After that, the sand begins to work as an abrasive material, rotating with the crankshaft and destroying the rubber from the inside;
- The seal was originally installed incorrectly. A misalignment of just a couple of millimeters can lead to a seal leak. So when installing this part in the groove, you must be very careful;
- the oil seal cracked due to overheating of the motor. Most often this happens in the summer, in the forty-degree heat. In such weather, the surface of the stuffing box can heat up so that it starts to smoke. And when it cools down, it will certainly be covered with a network of small cracks;
- long downtime machine. If the car is not used for a long time, the seals on it harden, then crack and begin to leak oil. This phenomenon is especially often observed in the cold season;
- poor seal quality. It's no secret that auto parts are often counterfeited. The seals also did not escape this fate. The main supplier of counterfeit oil seals to the domestic auto parts market is China. Fortunately, recognizing a fake is easy: it costs half as much. And its service life is half as long.
Replacing the crankshaft oil seals on the VAZ 2106
Let's figure out how to change the crankshaft oil seals on the "six". Let's start from the front.
Replacing the front oil seal
Before proceeding with the replacement, you should put the car on a viewing hole. And then without fail to check if the ventilation in the crankcase is clogged. The meaning of this preparatory operation is simple: if the ventilation is clogged, then the new oil seal will also not hold oil, because the pressure in the engine will become excessive and simply squeeze it out.
Required Tools
To perform the work, you will need a new front crankshaft oil seal (better than the original VAZ, the cost starts from 300 rubles), as well as the following tools:
- a set of spanners;
- a pair of mounting blades;
- flat screwdriver;
- a hammer;
- mandrel for pressing seals;
- beard.
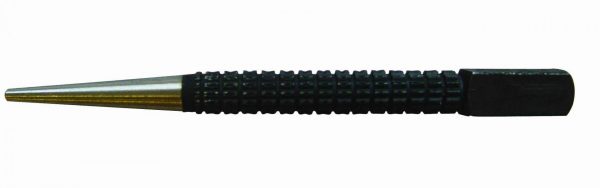
 A beard will be needed to knock out the old stuffing box from the seat
Sequence of operations
It should be said right away that there are two ways to replace the front oil seal: one requires less effort and more experience. The second method is more time consuming, but the probability of error is lower here. That is why we will focus on the second method, as the most suitable for a novice driver:
- The car is securely fixed in the pit with the help of a handbrake and shoes. After that, the hood opens and the camshaft cover is removed from the engine. It is this stage that experienced drivers usually skip. The problem is that if you do not remove the camshaft cover, then installing the oil seal will be very difficult, since there will be little room to work. And therefore, the probability of distortion of the stuffing box is very high.The camshaft cover is fastened with twelve bolts that must be unscrewed
- After removing the cover, the old stuffing box is knocked out with a hammer and a thin beard. It is only necessary to knock out the oil seal from the side of the inner surface of the camshaft cover. It's very hard to do it outside.A thin beard is ideal for knocking out an old oil seal
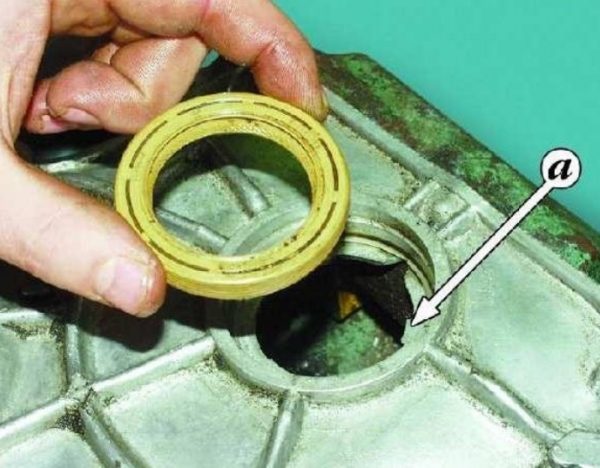
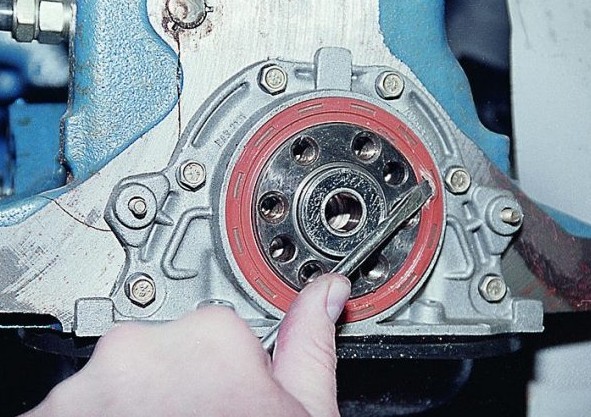
- The new crankshaft oil seal is liberally lubricated with engine oil. After that, it must be positioned so that the small marks on its outer edge coincide with the protrusion on the edge of the gland hole. It should also be noted here that the installation of a new oil seal is carried out only from the outside of the camshaft housing.The notch on the stuffing box must line up with the protrusion marked with the letter "A"
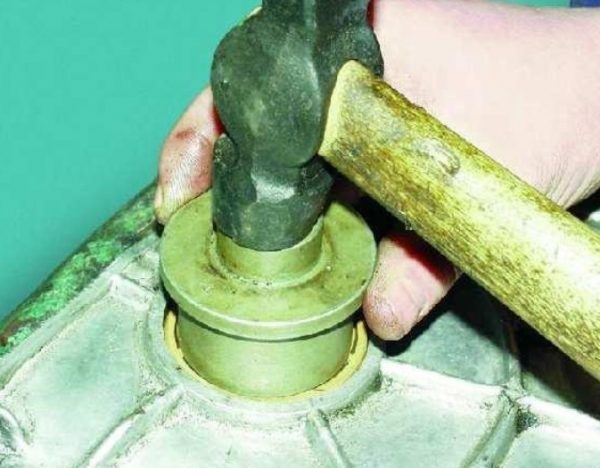
- After the oil seal is properly oriented, a special mandrel is installed on it, with the help of which it is pressed into the seat with hammer blows. In no case should you hit the mandrel too hard. If you overdo it, she will simply cut the gland. Usually three or four light strokes are sufficient.It is most convenient to press in a new oil seal using a special mandrel
- The cover with the oil seal pressed into it is installed back on the engine. After that, the motor of the machine starts and runs for half an hour. If during this time no new oil leaks were detected, the replacement of the front oil seal can be considered successful.

Video: change the front crankshaft oil seal on the "classic"

Rear oil seal replacement
Changing the front oil seal on a VAZ 2106 is quite simple; a novice driver should not have problems with this. But the rear oil seal will have to be pretty tricky, since getting to it is quite difficult. We will need the same set of tools for this work (with the exception of a new oil seal, which should be rear).
The seal is located at the rear of the motor. And to get access to it, you first have to remove the gearbox, then the clutch. And then you have to remove the flywheel.
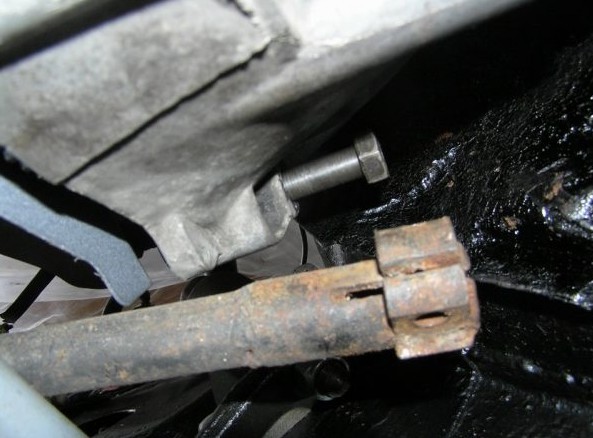
- We remove the cardan shaft. It is dismantled together with the bearing. All this is held on by four bolts with which it is attached to the gearbox.The cardan shaft and bearing are attached with four bolts
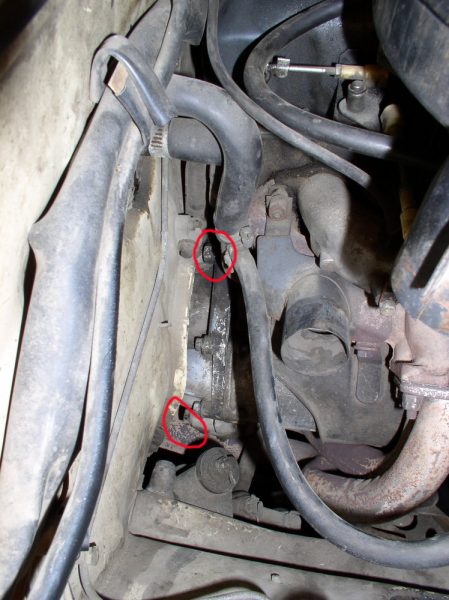
- We remove the starter and everything connected with it, since these parts will interfere with the removal of the gearbox. First you need to get rid of the speedometer cable, then remove the reverse wires and finally remove the clutch cylinder.You will have to get rid of the speedometer cable and the reverse wire, as they will interfere with the removal of the gearbox
- After removing the wires and the cylinder, dismantle the gearshift lever. Now you can lift the upholstery on the floor of the cabin. Under it there is a square cover covering a niche in the floor.
- Moving into the hole under the car, unscrew the 4 mounting bolts holding the gearbox on the motor housing.The gearbox is held on by four 17mm head bolts.
- Gently pull the gearbox towards you so that the input shaft is completely out of the hole in the clutch disc.The input shaft of the box must completely disengage from the clutch.
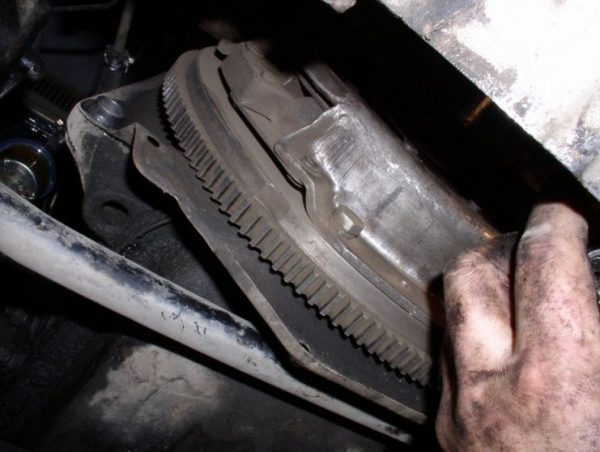
- Remove flywheel and clutch. To do this, you have to remove the basket, next to which are the discs and the clutch flywheel. To remove the basket fasteners, you should find a 17 mm bolt hole on the motor housing. Having screwed the bolt there, we use it as a support for the mounting blade. The blade is inserted between the teeth of the flywheel and does not allow it to rotate with the crankshaft.To remove the basket, you must first fix it with a mounting spatula
- Using a 17 mm open-end wrench, unscrew all the mounting bolts on the flywheel and remove it. And then remove the clutch itself.
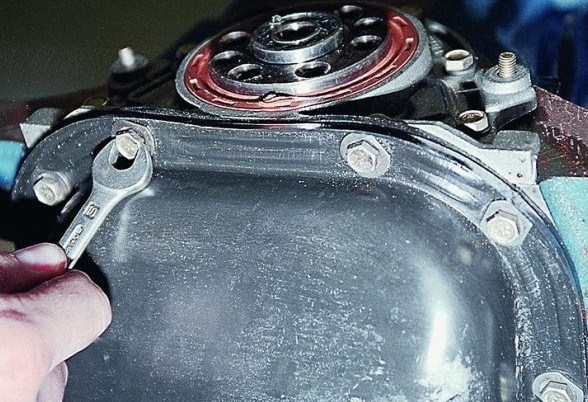
- We unscrew the fixing bolts on the oil seal crankcase cover (these are 10 mm bolts). Then unscrew the six 8 mm bolts with which the cover is attached to the cylinder block.The crankcase gland cover is attached to the engine with 10 and 8 mm bolts.
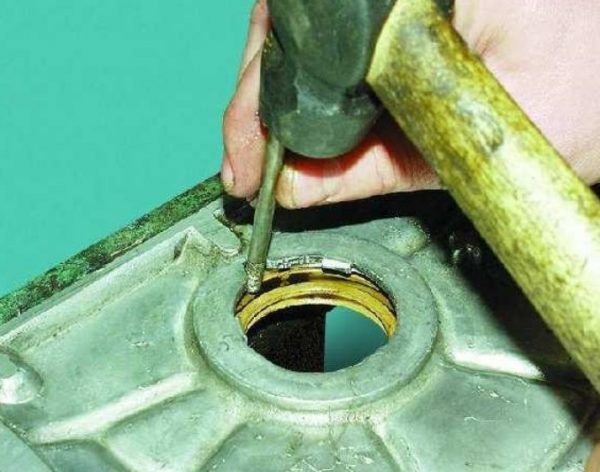
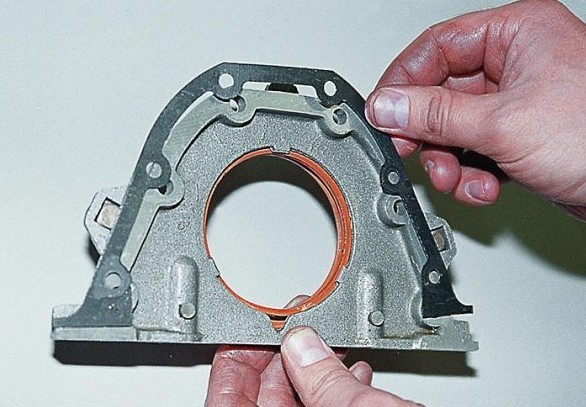
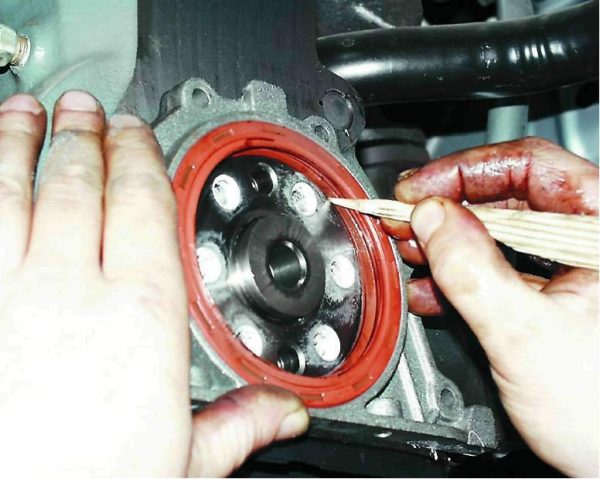
- Opens access to the cover with the stuffing box. Carefully pry it off with a flathead screwdriver and remove it. There is a thin gasket under the lid. When working with a screwdriver, care must be taken not to damage this gasket. And you need to remove it only together with the stuffing box cover.The back cover of the stuffing box must be removed only together with the gasket
- We press the old gland out of the groove using a mandrel (and if there is no mandrel, then you can use a regular screwdriver, because this gland will still have to be thrown away).The old oil seal can be removed with a flat screwdriver
- After removing the old oil seal, we carefully inspect its groove and clean it from the remnants of old rubber and dirt. We lubricate the new oil seal with engine oil and install it in place using a mandrel. After that, we assemble the clutch and gearbox in the reverse order of removal.The new oil seal is installed with a mandrel and then trimmed by hand

Video: changing the rear oil seal on the "classic"

Important nuances
Now there are three important points to note, without which this article would be incomplete:
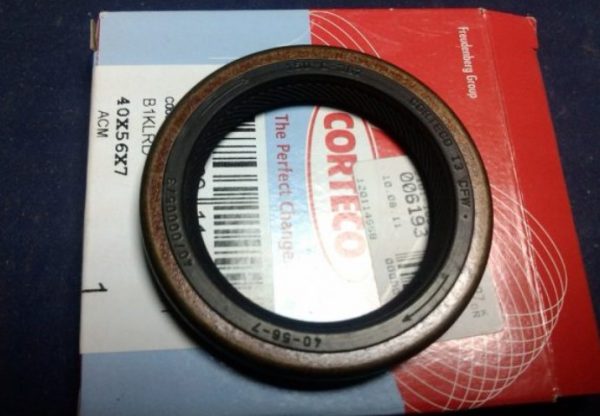
- seal sizes. When buying an oil seal in a parts store, be sure to tell the seller which oil seal you need: front or rear. Despite the external similarity, the sizes of these oil seals are different. The dimensions of the front gland are 55 * 41 * 8 mm (these are the outer and inner diameters and thickness of the product), and the rear - 88 * 69 * 10 mm;
- relatively recently, oil seals manufactured by Corteco have appeared on sale. They are in high demand among the owners of "sixes". The fact is that the material for their manufacture is fluororubber. Oil seals from it are distinguished by greater reliability and wear resistance. So if possible, it is better to purchase this particular part, despite the high price, which starts from 500 rubles;Corteco seals are made of FKM and are highly wear resistant
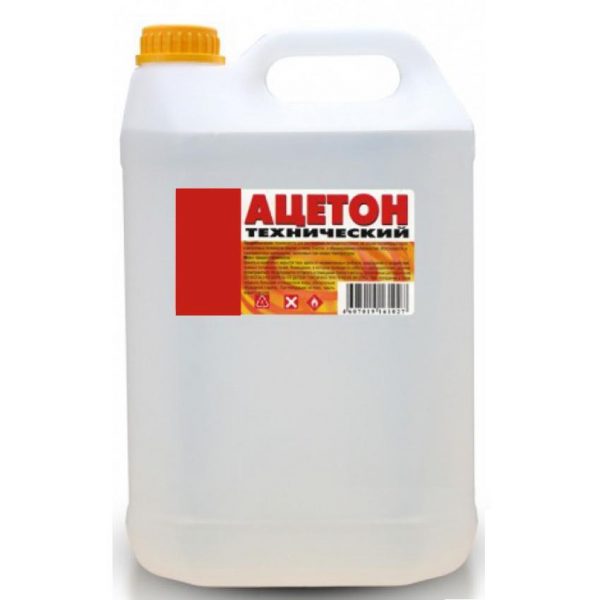
- the groove in which the gland will be installed must not only be thoroughly cleaned and wiped, but also degreased. This is best done with ordinary technical acetone. This simple operation is the best guarantee of high tightness of the stuffing box.It is best to degrease the oil seal installation site with commercial acetone.
A novice driver may well change the front crankshaft oil seal on his own. You will have to tinker with the rear oil seal a little longer, however, this task is quite possible. You just need to take your time and follow the above recommendations exactly.

