We independently change the brake drum on the VAZ 2107
Content
No one needs to explain how important reliable brakes are for a car. This applies to all cars, and the VAZ 2107 is no exception. Drum brakes were always installed on the rear wheels of the "seven". It is this drum system, due to its not very successful design, that gives the owners of the “sevens” a lot of problems. Fortunately, it is quite possible to replace such brakes yourself. Let's figure out how it's done.
How are the rear brakes on the VAZ 2107
The rear brakes of the "seven" consist of two important elements: the brake drum and the brake mechanism located in this drum. Let's consider each element in more detail.
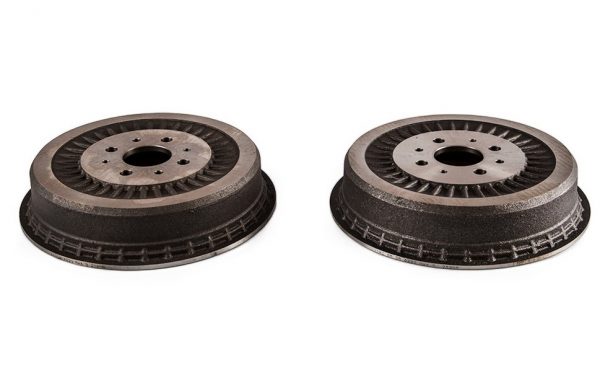
Brake drum
While driving, the brake drums attached to the rear wheels rotate with them. These are massive metal parts with holes for mounting studs located along the perimeter of the drum. These studs hold both the drums and the rear wheels of the VAZ 2107.
Here are the main dimensions of a standard "seven" brake drum:
- inner diameter — 250 mm;
- the maximum allowable diameter, taking into account the boring, is 252.2 mm;
- internal height of the drum - 57 mm;
- total drum height - 69 mm;
- mounting diameter - 58 mm;
- the number of mounting holes for the wheel - 4;
- the total number of mounting holes is 8.
Brake mechanism
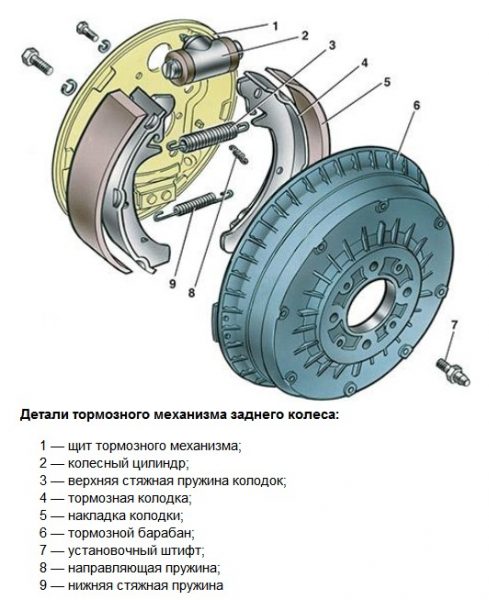
The braking mechanism of the "seven" is fixed on a special brake shield, and this shield, in turn, is securely bolted to the wheel hub. Here are the main elements of the VAZ 2107 brake mechanism:
- a pair of brake pads with pads made of a special material;
- double-sided brake cylinder (the word "two-sided" means that this cylinder has not one, but two pistons that extend from opposite ends of the device);
- two return springs;
- hand brake cable;
- hand brake lever.
The two pads in the rear brake mechanism are pulled together by return springs. Between these pads is a double-sided cylinder. The sequence of operation of the brake mechanism is as follows. The driver slams on the brakes. And the brake fluid begins to quickly flow from the main hydraulic cylinder to the double-sided cylinder in the drum. Double-sided pistons extend and press on the pads, which also begin to move apart and rest against the inner wall of the drum, securely fixing the device. When the driver removes the car from the "handbrake", the pressure of the brake fluid in the system drops sharply, and the pistons of the working cylinder move back into the body of the device. The return springs pull the pads back to their original position, releasing the drum and allowing the rear wheel to spin freely.
What are the drums
The brake drum is a critical part, and the requirements for it are extremely high. The most important parameters are the following:
- drum geometry accuracy;
- coefficient of friction of the inner wall;
- strength.
Another important parameter is the material from which the brake drum is made. This material can be either cast iron or an aluminum-based alloy. On the "sevens", depending on the year of manufacture of the machine, you can find both cast-iron and aluminum drums.
Cast iron drums for this car are considered optimal (on the early releases of the VAZ 2107, it was cast iron drums). Cast iron has the best combination of strength, reliability and high coefficient of friction. In addition, cast iron drums are affordable and easy to manufacture. Cast iron has only one drawback: increased fragility, which is very important when driving on our bumpy roads.
To solve this problem, the manufacturers of the VAZ 2107 took the next step: they began to put drums made of aluminum-based alloys on the later "sevens" (moreover, from alloys - this metal is very soft in its pure form). And to maintain a high coefficient of friction of the inner walls, cast-iron inserts began to be installed in aluminum drums. However, such a technical solution did not meet with understanding among motorists. To this day, many owners of the "sevens" consider cast-iron drums to be the best option, and not alloy ones.
Causes and signs of rear brake failure
The VAZ 2107 rear brake mechanism has one extremely unpleasant feature: it easily overheats. This is due to the design of this mechanism, which is very poorly ventilated. According to the manufacturers, the rear brakes of the “seven” can be guaranteed to go 60 thousand km without repair, while the front brakes can only go 30 thousand km. In practice, due to the above overheating, the rear brake mileage is slightly lower, about 50 thousand km. After that, the driver will inevitably have to face the following phenomena:
- pads in the brake mechanism wear out partially or completely, and wear can be observed both on one side and on both;
 The rear pads are worn almost to the ground.
 - seals in the working cylinder crack due to high temperature, as a result of which the tightness of the device is broken, which leads to leakage of brake fluid and a sharp drop in braking efficiency;
- the return springs in the brake mechanism are very rusty (in especially severe cases, one of them may break, which can lead to jamming of the rear wheel);
- the handbrake cable wears out. When the cable wears out, it stretches and begins to sag a lot. As a result, after putting the car on the “handbrake”, the brake pads put much less pressure on the drum wall, and the rear wheels are fixed very unreliably.
With all these points in mind, it is strongly recommended to check the rear brake mechanism every 20 thousand kilometers and, if necessary, carry out its prevention. Particular attention should be paid to the rear brakes when the following warning signs appear:
- when braking, a strong vibration of the car appears, which the driver feels literally with his whole body;
- after pressing the brakes, a strong creak occurs, which over time can turn into a deafening rattle;
- when driving, there is a strong “beating” of both the steering wheel and the brake pedal;
- braking efficiency has dropped significantly, and the braking distance has become much longer.
All these signs indicate that the brakes need urgent repair or serious maintenance. It is absolutely impossible to drive with such brakes.
cracked brake drum
Cracks are a real scourge of all brake drums, not only on "sevens", but also on many other machines with drum brakes. The vast majority of the warning signs listed above appear precisely after the cracking of the drum. This happens especially often with cast iron drums. The fact is that cast iron is an alloy of iron and carbon, in which carbon contains more than 2.14%. Carbon makes cast iron incredibly hard, but cast iron becomes brittle. If the driver does not have a cautious driving style and loves to ride potholes with the breeze, then the cracking of the brake drums is only a matter of time.
Another cause of drum cracking is the so-called metal fatigue. If a part is subjected to cyclic alternating loads for a long time, accompanied by an abrupt change in temperature (and the brake drum operates under such conditions), then sooner or later a fatigue microcrack appears in such a part. It is impossible to see it without an electron microscope. At some point, this crack propagates deep into the part, and the propagation goes at the speed of sound. As a result, a large crack appears, which is impossible not to notice. A cracked drum cannot be repaired. Firstly, special equipment and skills are required to weld cast iron in a garage, and secondly, the strength of such a drum after welding will be significantly reduced. So the car owner has only one option left: replace the cracked brake drum with a new one.
Wear of the inner walls of the drum
The wear of the inner walls of the drum is a natural process, the results of which are clearly visible after the car has passed the 60 thousand km announced above. Since the inner walls of the drum are periodically affected by the friction force created by the friction linings on the brake shoes, the inner diameter of the drum inevitably increases with time. In this case, the braking efficiency is reduced, because the brake pads are less pressed against the drum. The effects of natural wear are eliminated by regrooving the brake drum and then adjusting the brake mechanism to ensure proper fit of the pads to the inner walls.
Grooves on the inner surface of the drum
The appearance of grooves on the inner surface of the drum is another common problem that owners of the "sevens" often face. The fact is that the rear brakes on the "seven" are designed in such a way that dirt and small pebbles sometimes get into the drum, especially if the driver drives mainly on dirt roads. One or more pebbles may end up between the brake shoe and the inner wall of the drum. When the pad presses the pebble against the inner surface of the drum, it is deeply pressed into the friction lining on the brake shoe and remains there (friction lining material is quite soft). With each subsequent braking, stones stuck in the block scratch the inner wall of the drum.
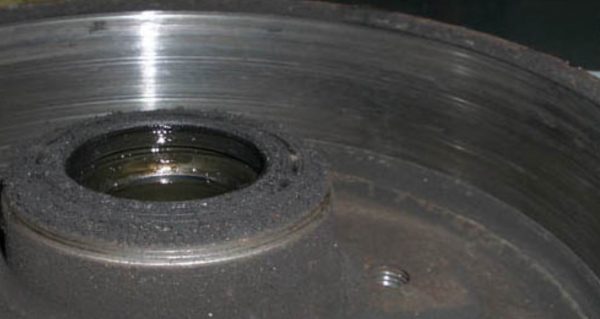
Over time, a minor scratch turns into a large furrow, which will not be so easy to get rid of. The way to solve this problem is determined by the depth of the grooves that have appeared. If the driver noticed them early, and their depth does not exceed one millimeter, then you can try to get rid of them by turning the drum. And if the depth of the grooves is two millimeters or more, then there is only one way out - replacing the brake drum.
About turning brake drums
As mentioned above, some defects that have arisen during the operation of the brake drums can be eliminated using the so-called groove. It should immediately be said that it is not possible to grind the drum on your own in a garage. Because for this, firstly, you need a lathe, and secondly, you need the skill to work on this machine, and the skill is serious. A novice driver can hardly boast of having a machine in his garage and the corresponding skills. Therefore, he has only one option: to seek help from a qualified turner.
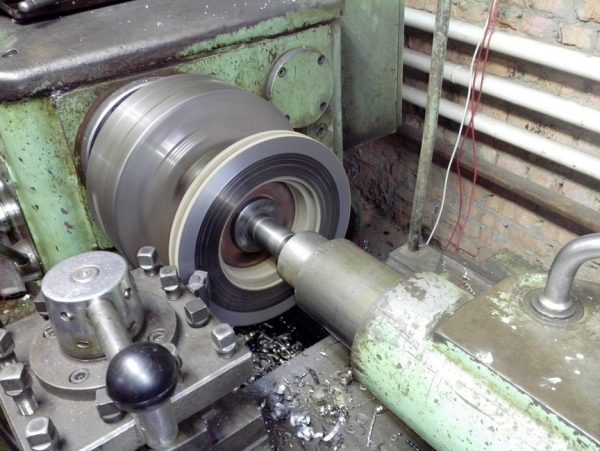
So what is a brake drum groove? It usually consists of three stages:
- preparatory stage. The turner removes about half a millimeter of metal from the inner walls of the drum. After that, the machine is turned off, and the drum is carefully inspected for internal defects. The preparatory stage allows you to determine the overall level of wear of the drum and the feasibility of further work. Sometimes, after the preparatory stage, it turns out that the groove is useless due to heavy wear, and the drum is easier to replace than to grind;
- main stage. If, after pre-treatment, it turned out that the drum was not worn out much, then the main stage of turning begins, during which the turner smoothes and grinds all small cracks and grooves. During this work, about 0.3 mm of metal will be removed from the inner walls of the drum;
- The final stage. At this stage, the sanded surface is polished with a special paste. This procedure eliminates even the smallest defects that are not visible to the naked eye, and the surface becomes perfectly smooth.
It should also be noted here that the groove will help get rid of internal defects on the drum, but it will be useless if the drum geometry is broken. For example, the drum warped due to impact or due to severe overheating. If the drum is cast iron, then it will have to be changed, since it is extremely difficult to straighten brittle cast iron with the help of plumbing tools. If the drum on the "seven" is light alloy, then you can try to straighten it. And only after that proceed to the groove.
Replacing the rear drum on a VAZ 2107
In the vast majority of cases, drum replacement is the only way out for the car owner. The exceptions are the situations listed above, when the problem can be fixed with a groove. But since far from all motorists have a familiar qualified turner, many prefer not to bother with restoring an obsolete part, but simply buy new drums and install them. To install we need the following things:
- new drum for VAZ 2107;
- set of spanner keys;
- coarse sandpaper;
- jack.
Replacement sequence
Before starting work, one of the rear wheels of the machine is jacked up and removed. Before starting this preparatory operation, make sure that the machine is securely fixed with wheel chocks.
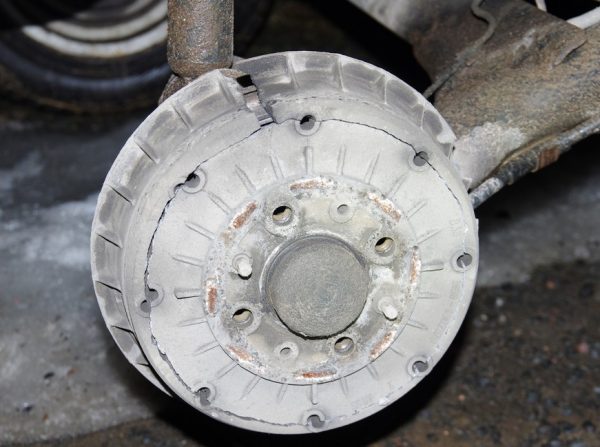
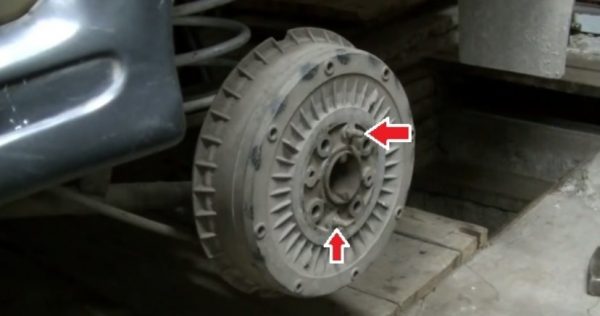
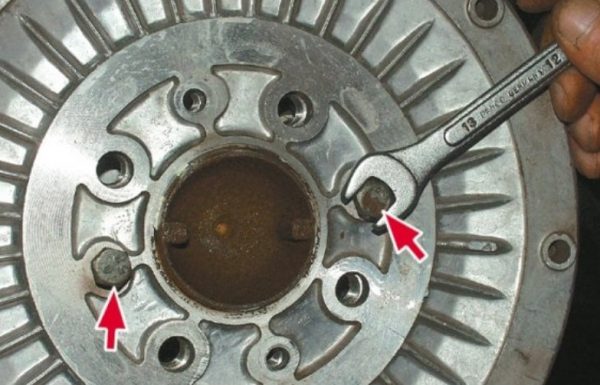
- After removing the wheel, access to the drum opens. It rests on the guide pins, which are marked with red arrows in the photo. The nuts on the studs are unscrewed. After that, the drum should be slightly pulled towards you, and it will come off the guides.The nuts on the guide studs are unscrewed with a 12 wrench
- It often happens that the drum does not come off the guides, no matter how hard the driver makes. If such a picture is observed, then you need to take a couple of bolts for 8, start screwing them into any pair of free holes on the drum body. As the bolts are screwed in, the drum will begin to move along the guides. And then it can be pulled off the guide pins by hand.It only takes a couple of 8 bolts to remove a stuck drum.
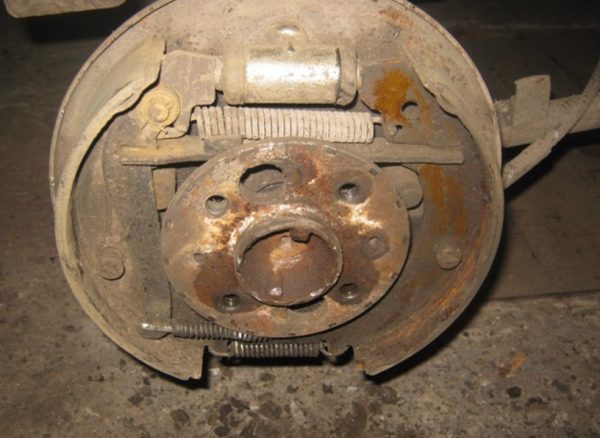
- After removing the drum, access to the flange on the axle shaft opens. If the brakes have not been changed for a long time, then this flange will be covered with a thick layer of rust and dirt. All this must be cleaned off the flange with coarse sandpaper.It is best to clean the flange with the largest sandpaper
- After complete cleaning, the flange should be lubricated with LSTs1. If it was not at hand, you can use the usual graphite grease.
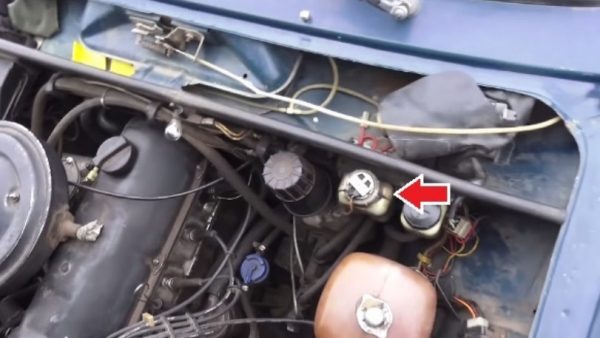
- Now you should open the hood of the car, find the reservoir with brake fluid and check its level. If the liquid level is maximum (it will be at the “Max” mark), then you need to unscrew the plug and pour about ten “cubes” of liquid from the tank. The most convenient way to do this is with a conventional medical syringe. This is done so that when the brake pads are sharply reduced, the brake fluid does not splash out of the reservoir.Drain some fluid from the brake reservoir
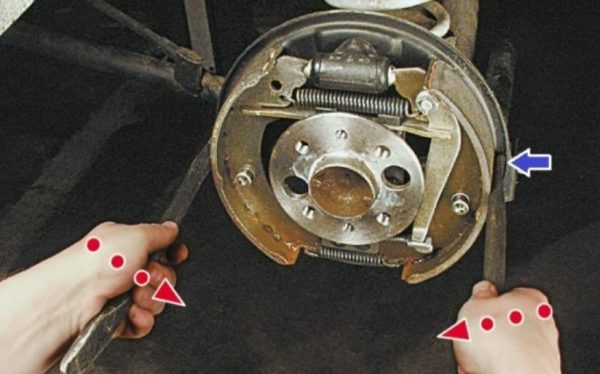
- Before installing a new drum, the brake pads must be brought together. This is done using two mounts. They must be installed as shown in the figure and firmly rest against the rear brake mounting plate. Then, using the mounts as levers, you should sharply move the pads towards each other.You will need a couple of pry bars to move the pads.
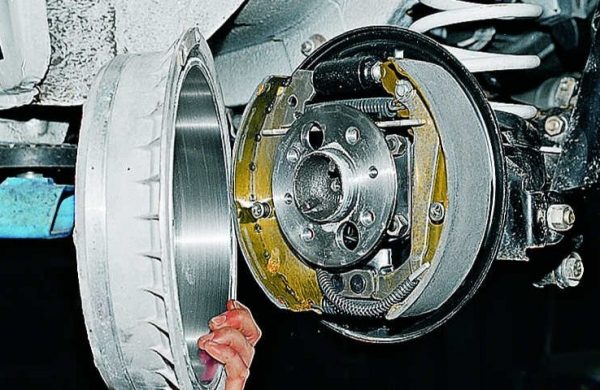
- Now everything is ready to install a new drum. It is put on the guide pins, after which the brake system is reassembled.After shifting the pads, a new drum is installed

Video: changing the rear drums on the "classic"

So, changing the brake drum on the "seven" is a simple task. It is within the power of even a novice motorist, who at least once held a mount and a wrench in his hands. Thus, the motorist will be able to save about 2 thousand rubles. This is how much it costs to replace the rear drums in a car service.

