Brake system VAZ 2101: design, signs of malfunctions and their elimination
Content
The serviceability of the brake system is the basis for the safety of the driver, passengers and other road users. On the VAZ 2101, the brakes are far from perfect, due to the design features of the system. Sometimes this leads to problems that it is better to know about in advance, which will allow timely troubleshooting and safe operation of the car.
Brake system VAZ 2101
In the equipment of any car there is a brake system and the VAZ "penny" is no exception. Its main purpose is to slow down or completely stop the vehicle at the right time. Since the brakes can fail for various reasons, the efficiency of their work and the condition of the constituent elements must be periodically monitored. Therefore, it is worth dwelling on the design of the braking system, malfunctions and their elimination in more detail.
Brake system construction
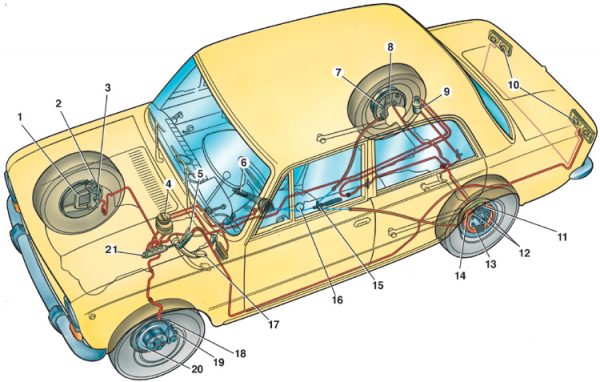
Brakes "Zhiguli" of the first model are made of working and parking systems. The first of them consists of the following elements:
- master brake cylinder (GTZ);
- working brake cylinders (RTC);
- hydraulic tank;
- hoses and pipes;
- pressure regulator;
- brake pedal;
- brake mechanisms (pads, drums, brake disc).
The parking brake (handbrake) is a mechanical system that acts on the rear pads. The handbrake is used when parking the car on a slope or on a descent, and sometimes when starting off on a hill. In extreme situations, when the main braking system has ceased to function, the handbrake will help stop the car.
Operating principle
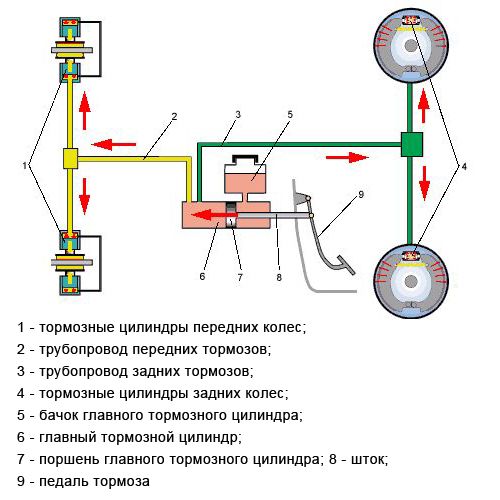
The principle of operation of the VAZ 2101 brake system is as follows:
- At the moment of impact on the brake pedal, the pistons in the GTZ move, which creates fluid pressure.
- The liquid rushes to the RTCs located near the wheels.
- Under the influence of liquid pressure, the RTC pistons are set in motion, the pads of the front and rear mechanisms begin to move, as a result of which the discs and drums slow down.
- Slowing the wheels leads to a general braking of the car.
- Braking stops after the pedal is depressed and the working fluid returns to the GTZ. This leads to a decrease in pressure in the system and loss of contact between the brake mechanisms.
Brake system malfunctions
VAZ 2101 is far from a new car and owners have to deal with malfunctions of certain systems and troubleshoot. The braking system is no exception.
Poor brake performance
A decrease in the efficiency of the braking system can be caused by the following reasons:
- violation of the tightness of the front or rear RTCs. In this case, it is necessary to inspect the hydraulic cylinders and replace the parts that have become unusable, clean the brake elements from contamination, pump the brakes;
- the presence of air in the system. The problem is solved by pumping the hydraulic drive system;
- lip seals in the GTZ have become unusable. Requires disassembly of the master cylinder and replacement of rubber rings, followed by pumping the system;
 If the GTZ sealing elements have become unusable, the cylinder will have to be completely disassembled for repair
 - damage to flexible pipes. It is necessary to find the damaged element and replace it.
Wheels do not fully disengage
Brake pads may not fully separate from drums or discs for a number of reasons:
- compensation hole in the GTZ is clogged. To eliminate the malfunction, it is necessary to clean the hole and bleed the system;
- lip seals in the GTZ are swollen due to oil or fuel getting into the liquid. In this case, it will be necessary to flush the brake system with brake fluid and replace damaged elements, followed by bleeding the brakes;
- seizes the piston element in the GTZ. You should check the performance of the cylinder and, if necessary, replace it, and then bleed the brakes.
Braking of one of the wheel mechanisms with the brake pedal depressed
Sometimes such a malfunction occurs when one of the wheels of the car spontaneously slows down. The reasons for this phenomenon may be as follows:
- The rear brake pad return spring has failed. It is necessary to inspect the mechanism and the elastic element;
- malfunction of the RTC due to piston seizure. This is possible when corrosion is formed inside the cylinder, which requires disassembly of the mechanism, cleaning and replacement of worn out parts. In case of significant damage, it is better to replace the cylinder completely;
- an increase in the size of the lip seals due to the ingress of fuel or lubricant into the working environment. It is necessary to replace the cuffs and flush the system;
- There is no clearance between brake pads and drum. The handbrake needs adjustment.
Skidding or pulling the car to the side while pressing the brake pedal
If the car skids when you press the brake pedal, then this indicates the following malfunctions:
- leakage of one of the RTCs. The cuffs need to be replaced and the system needs to be bled;Liquid leaks on the inside of the wheel indicate a violation of the tightness of the brake system.
- jamming of the piston element in the working cylinder. It is necessary to check the operability of the cylinder, eliminate malfunctions or replace the assembly part;
- a dent in the brake pipe, which led to the blocking of the incoming fluid. The tube needs to be inspected and subsequently repaired or replaced;
- The front wheels are set incorrectly. Angle adjustment required.
Squeal of brakes
There are times when the brakes squeak or squeal when applied to the brake pedal. This may appear for the following reasons:
- The brake disc has uneven wear or large runout. The disk needs to be ground, and if it is less than 9 mm thick, it needs to be replaced;
- oil or liquid getting on the friction elements of the brake pads. It is necessary to clean the pads from dirt and eliminate the cause of leakage of lubricant or liquid;
- excessive wear of the brake pads. Elements that have become unusable need to be replaced.
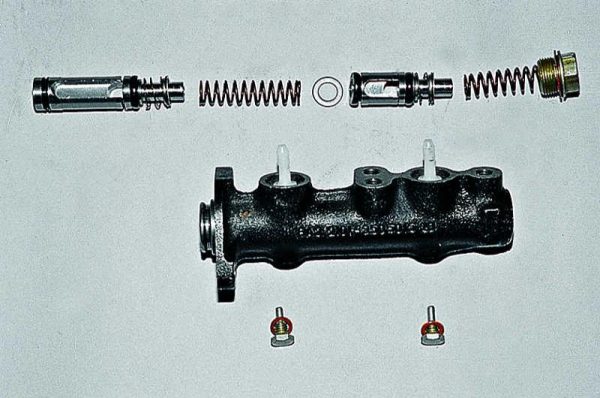
Brake master cylinder
The GTZ of the VAZ "penny" is a hydraulic type mechanism, consisting of two sections and designed for the operation of a system with two circuits.
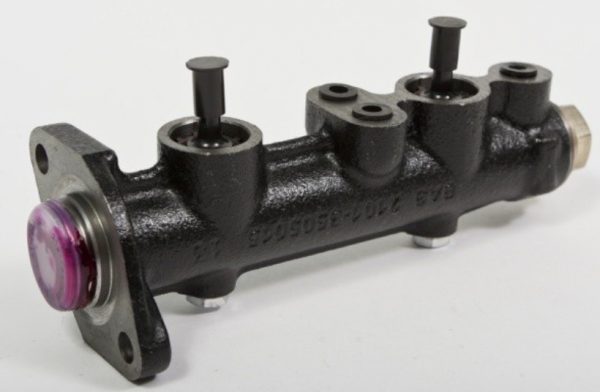
If problems arise with one of the circuits, the second, although not with such efficiency, will ensure the car stops. The GTZ is mounted to the pedal assembly bracket.
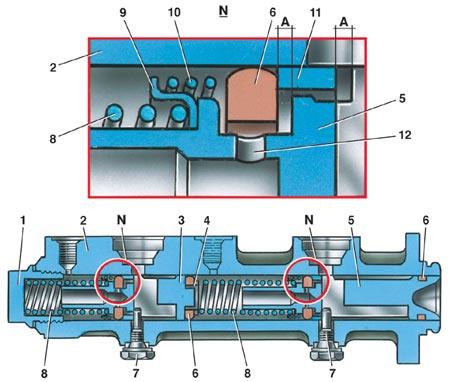
Pistons 3 and 5 are responsible for the performance of different circuits. The initial position of the piston elements is provided by springs 8, through which the pistons are pressed into the screws 7. The hydraulic cylinder is sealed by the corresponding cuffs 6. In the front part, the body is plugged with a plug 1.
The main malfunctions of the GTZ are the wear of the lip seals, the piston or the cylinder itself. If rubber products can be replaced with new ones from the repair kit, then in case of damage to the cylinder or piston, the device will have to be completely replaced. Since the product is located under the hood near the clutch master cylinder, its replacement does not cause any difficulties.
Video: replacing the GTC with a "classic"

Working brake cylinders
Due to the design differences between the front and rear axle brakes, each mechanism should be considered separately.
front brakes
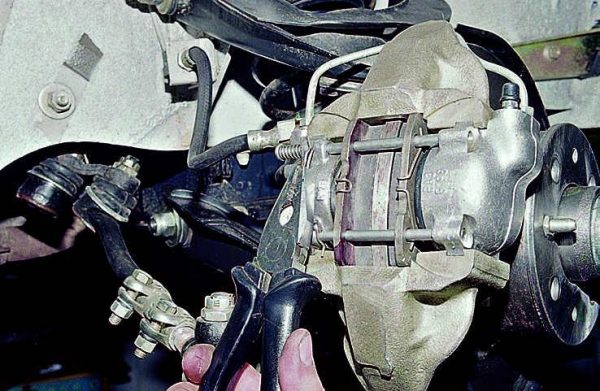
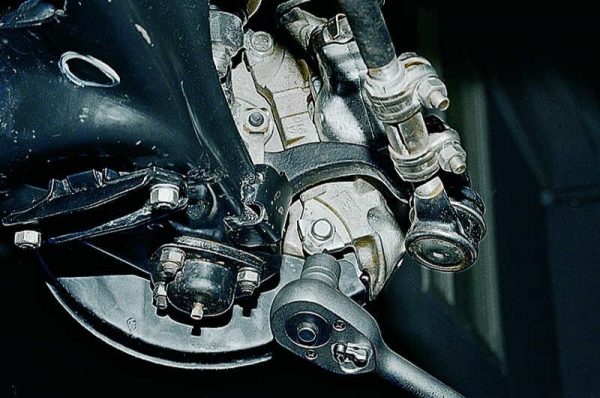
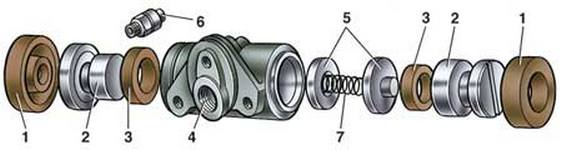
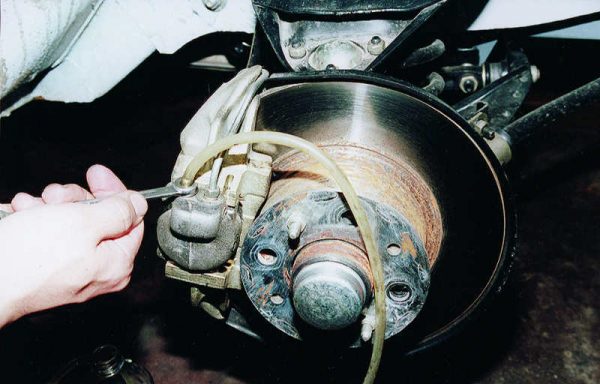
On the VAZ 2101, disc type brakes are used in front. The caliper is fastened to the bracket 11 by means of a bolted connection 9. The bracket is fixed to the trunnion flange 10 together with the protective element 13 and the rotary lever.
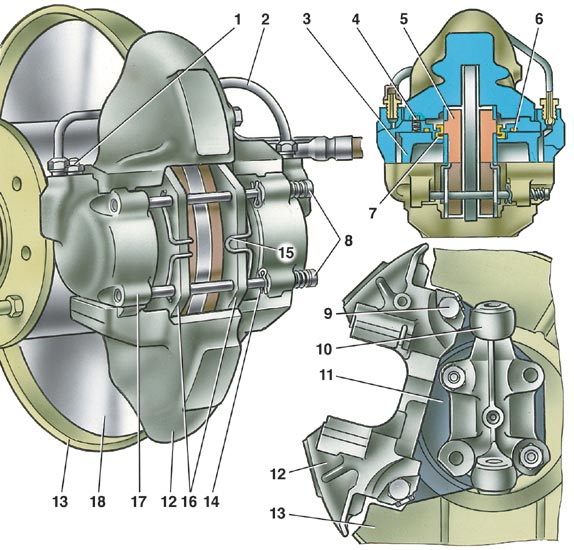
The caliper has slots for the brake disc 18 and pads 16, as well as seats in which two cylinders 17 are fixed. To fix them in relation to the caliper, the hydraulic cylinder itself has a locking element 4, which enters the groove of the caliper. Pistons 3 are installed in the hydraulic cylinders, for sealing which cuffs 6 are used, located in the cylinder groove. To prevent dirt from entering the cylinder, it is protected from the outside with a rubber element. Both cylinders are connected to each other by a tube 2, through which the simultaneous pressing of the brake pads on both sides of the disc is ensured. In the external hydraulic cylinder there is a fitting 1 through which air is removed from the system, and working fluid is supplied to the internal through the same element. When the pedal is pressed, the piston element 3 presses on the pads 16. The latter are fixed with fingers 8 and pressed by elastic elements 15. The rods in the cylinder are held by cotter pins 14. The brake disc is attached to the hub with two pins.
Hydraulic cylinder repair
In case of problems with the RTC of the front end, the mechanism is dismantled and a new one is installed or repairs are made by replacing the lip seals. To remove the cylinder, you will need the following tools:
- flat blade screwdriver;
- a hammer;
- pliers;
- pincers;
- jack;
- set of open-end wrenches;
- wrench for unscrewing the brake pipes.
The repair procedure is carried out in the following order:
- Let's jack up the front of the car on the side where the hydraulic cylinders are supposed to be replaced, and dismantle the wheel.
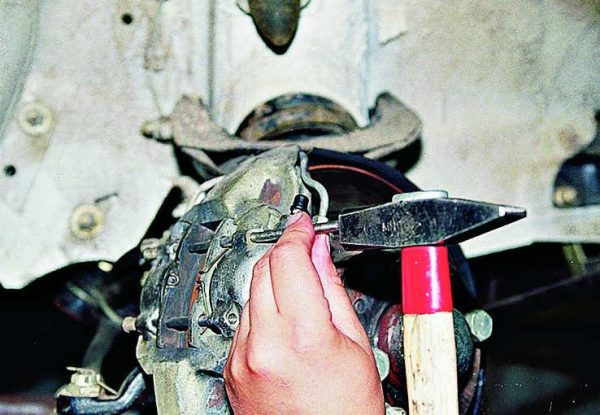
- Using pliers, remove the cotter pins that secure the guide rods of the pads.Using pliers, remove the cotter pin from the guide rods
- We knock out the rods with a suitable guide.By hammer blows on the guide, we knock out the rods
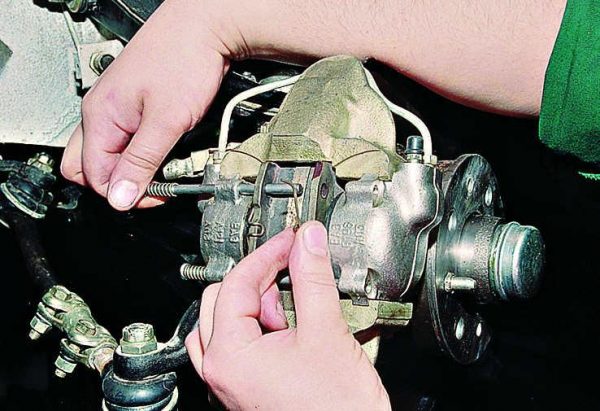
- We take out the fingers together with the elastic elements.We take out the fingers with springs from the holes
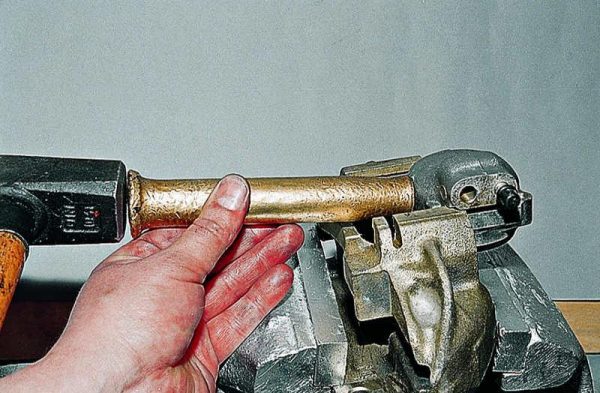
- By means of pincers we press the pistons of the hydraulic cylinder.Press the piston with pliers or improvised means
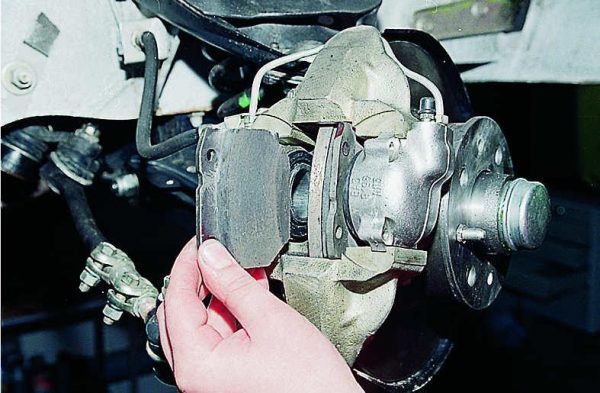
- Take out the brake pads.Remove the pads from the seats in the caliper
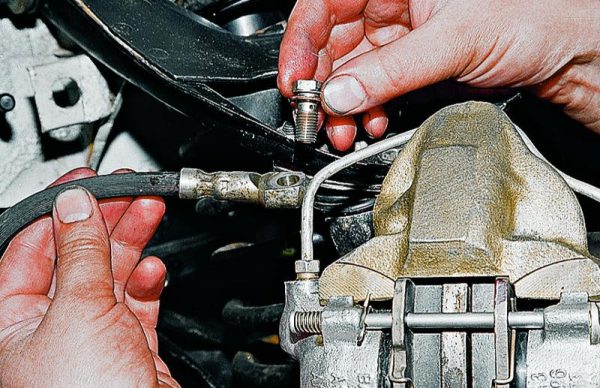
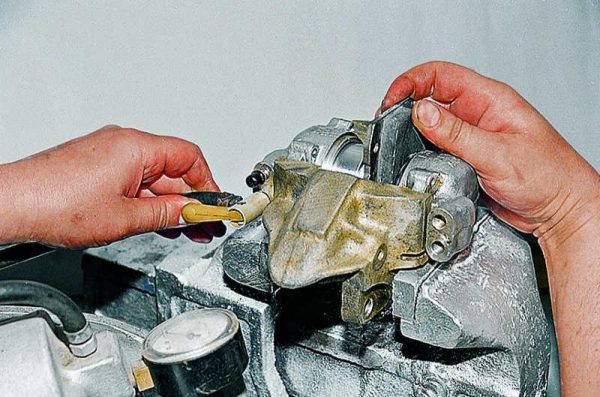
- We turn off the flexible pipe from the caliper.Unscrew and remove the flexible hose
- Using a chisel, we bend the locking elements of the fasteners.Bend the locking plates with a hammer and chisel
- We unscrew the caliper mount and dismantle it.We unscrew the fasteners of the caliper and remove it
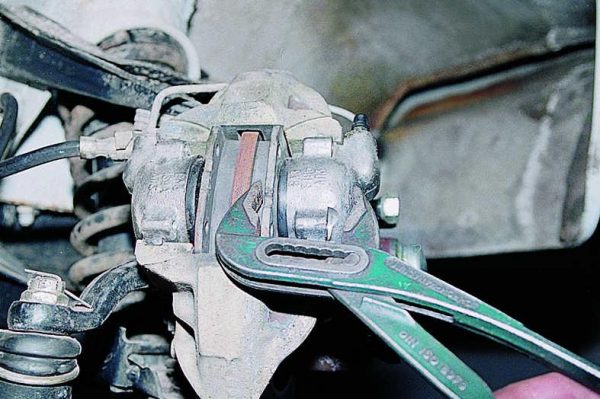
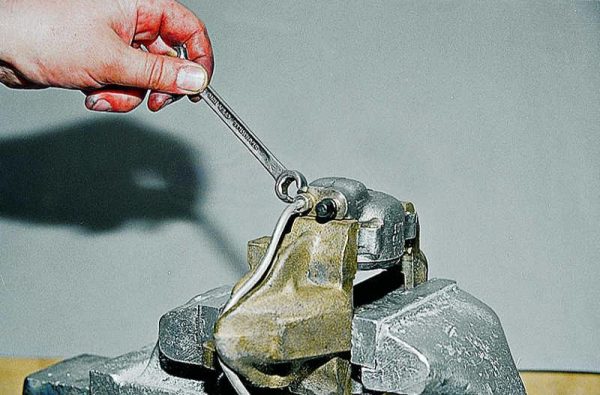
- We unscrew the fittings of the tube connecting the working cylinders, and then remove the tube itself.Unscrew the tube connecting the cylinders with a special key
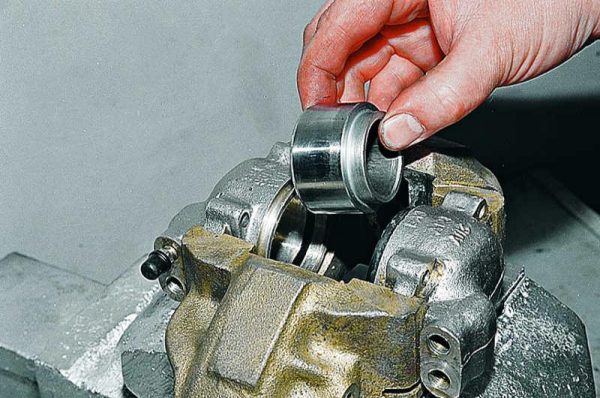
- We hook with a screwdriver and pull off the anther.Pry off the boot with a screwdriver and remove it
- We connect the compressor to the fitting and by supplying compressed air we squeeze the piston elements out of the cylinders.Connecting the compressor, squeeze the pistons out of the cylinders
- We remove the piston element.Removing the pistons from the cylinders
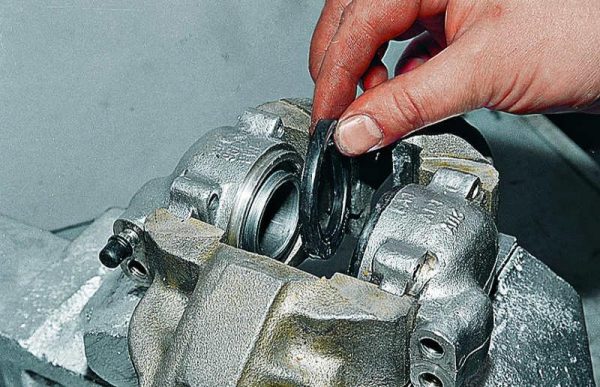
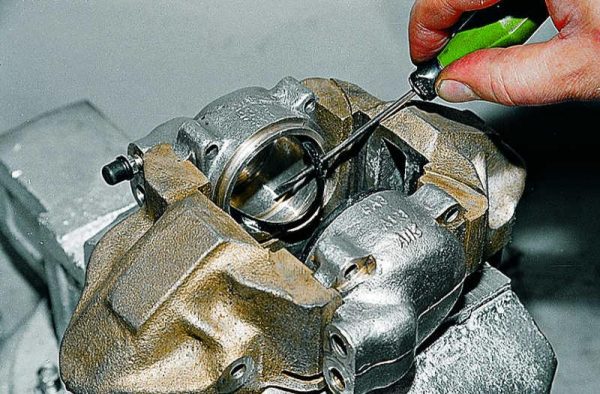
- We take out the lip seal. On the working surface of the piston and cylinder there should be no signs of great wear and other damage.Pry off the sealing ring with a screwdriver
- To install the repair kit, we insert a new seal, apply brake fluid to the piston and cylinder. We assemble the device in the reverse order.
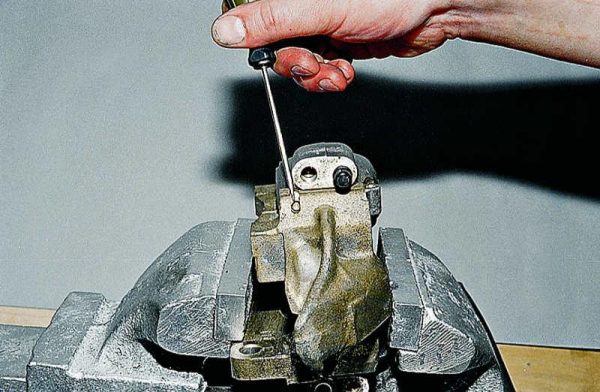
- If the cylinder needs to be replaced, press the locking element with a screwdriver.Using a screwdriver, press on the latch
- With a suitable guide, we knock out the RTC from the caliper.We knock out the cylinder from the caliper using the adapter
- We install in the reverse order.

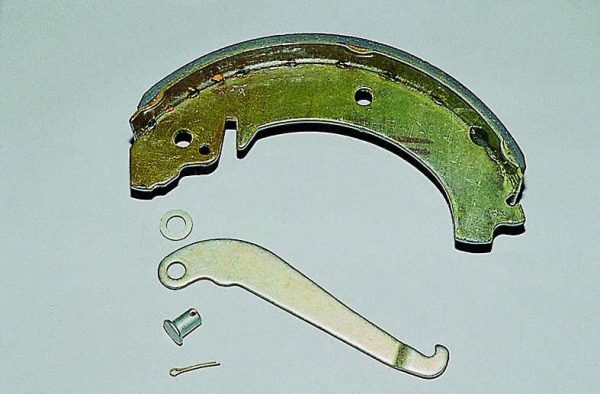
Pad replacement
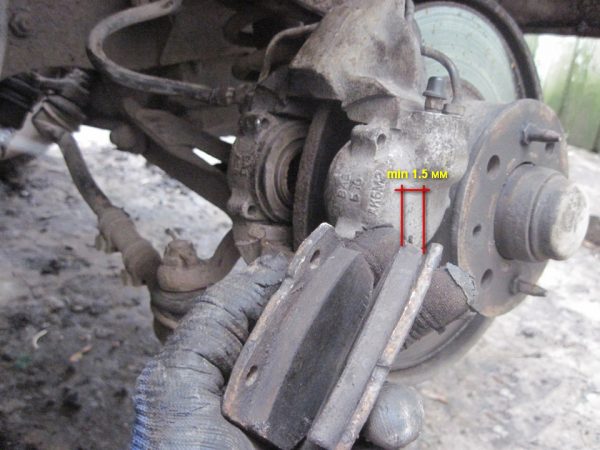
If the repair procedure is reduced only to replacing the pads, then we perform steps 1–6 to replace the RTC and mount new brake elements with preliminary application of Litol-24 lubricant to the guides. The front pads need to be replaced as soon as the friction lining reaches a thickness of 1,5 mm.
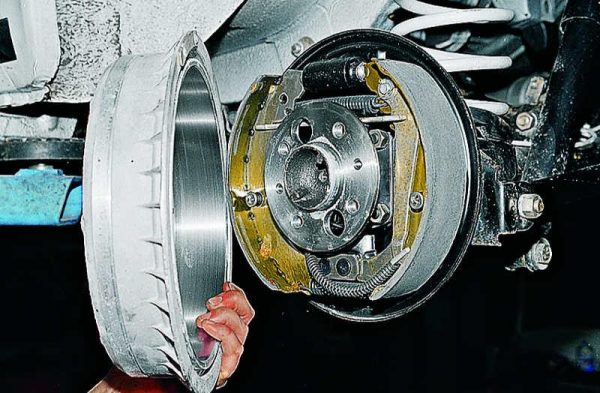
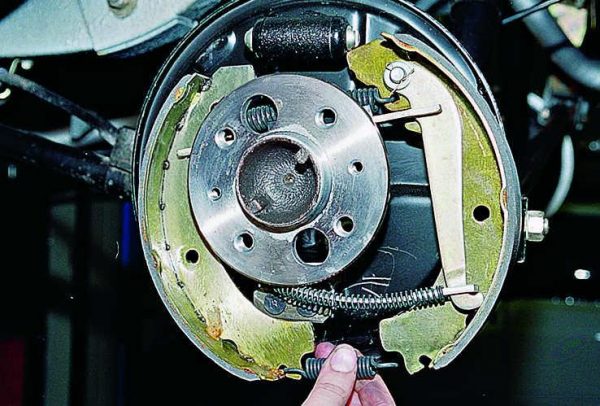
Rear brakes
Rear axle brakes "penny" drum type. The details of the mechanism are fixed on a special shield, which is fixed to the end part of the rear beam. Details are installed at the bottom of the shield, one of which serves as a supporting element for the lower part of the brake pads.
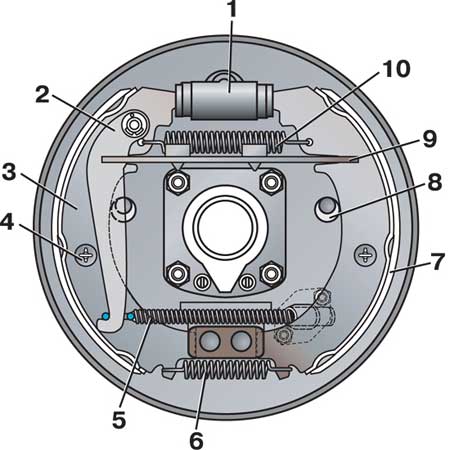
In order to be able to adjust the distance between the drum and the shoes, eccentrics 8 are used, against which the shoes rest under the influence of elastic elements 5 and 10.
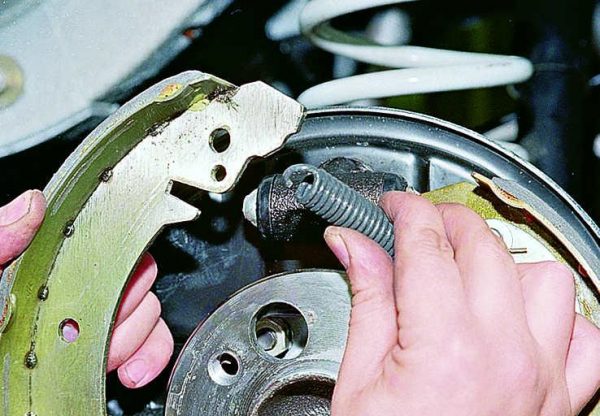
The RTC consists of a housing and two pistons 2, expanded by an elastic element 7. By means of the same spring, lip seals 3 are pressed against the end part of the pistons.
Structurally, the pistons are made in such a way that on the outside there are special stops for the upper ends of the brake pads. The tightness of the cylinders is ensured by the protective element 1. The pumping of the device is ensured through the fitting 6.
Replacing the cylinder
To replace the rear RTCs, you will need the following tools:
- a set of keys;
- wrench for unscrewing the brake pipes;
- screwdriver;
- a hammer.
The operation consists of the following steps:
- Raise the rear of the car and remove the wheel.
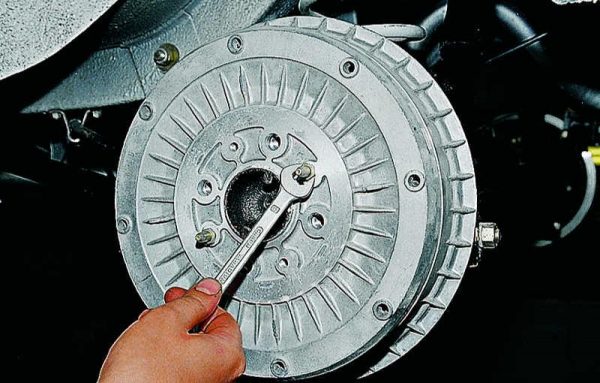
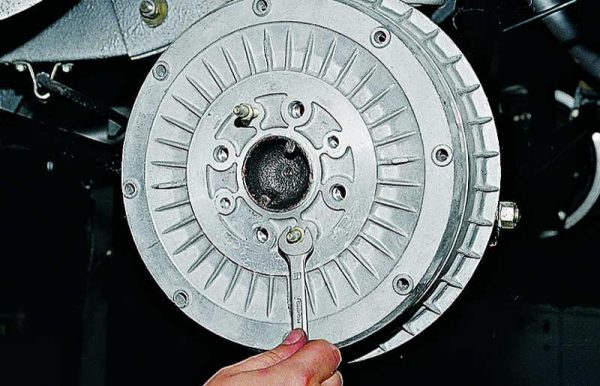
- Loosen the guide pins.There are guide pins on the brake drum, unscrew them
- We place the pins in the corresponding holes of the drum, twist them and shift the part from the axle shaft flange.We place pins in special holes and tear off the drum from the axle shaft flange
- Dismantle the drum.Removing the brake drum
- Using a screwdriver, we tighten the brake pads from the support, moving them down.Using a screwdriver, tighten the brake pads
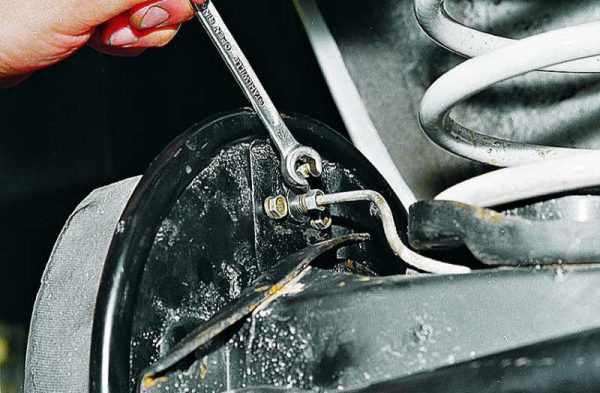
- Loosen the brake pipe fitting with a wrench.Unscrew the fitting with a special key
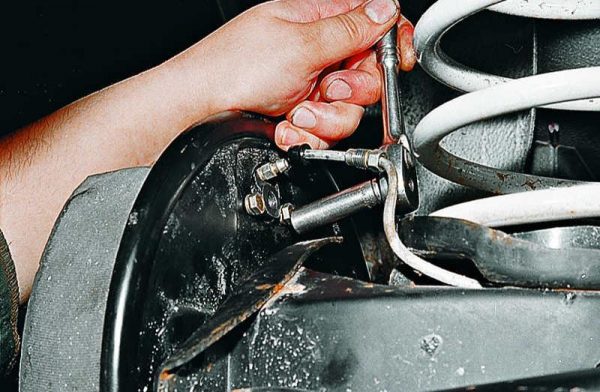
- We unscrew the fasteners of the hydraulic cylinder to the brake shield.The slave cylinder is attached to the brake shield
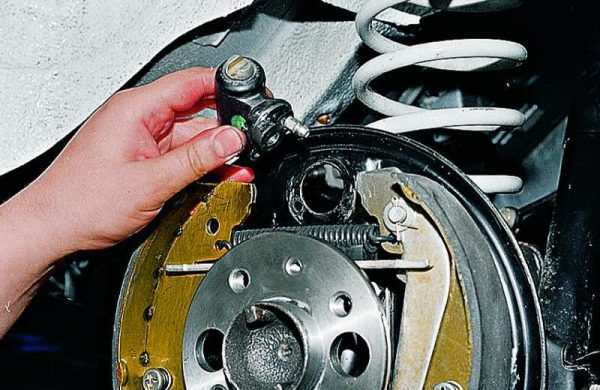
- Remove the cylinder.Unscrew the mount, remove the cylinder
- If repair is supposed, we take out the pistons from the hydraulic cylinder with pliers and change the sealing elements.
- We assemble the device and mount it in the reverse order.
Hydraulic cylinders are rarely repaired, since replacing seals briefly prolongs the mechanism's performance. Therefore, in case of RTC malfunctions, it is better to install a new part.
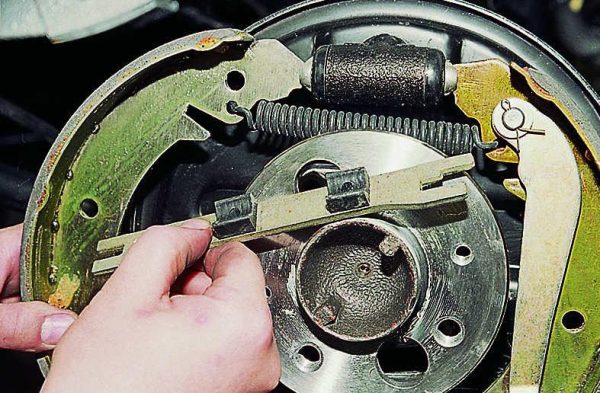
Pad replacement
The rear brake pads must be replaced when the friction material reaches the same thickness as the front brake elements. To replace, you will need pliers and a screwdriver. The procedure is carried out in the following sequence:
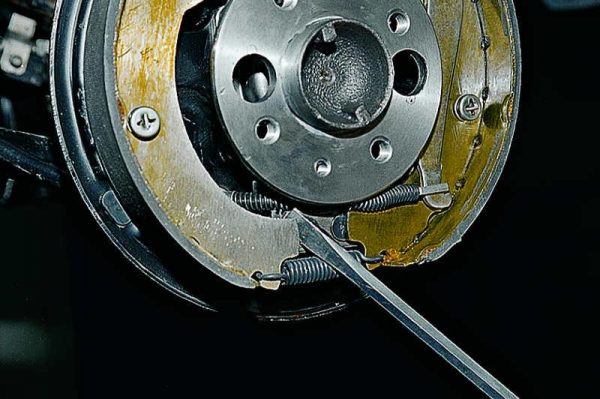
- We press and turn the cups that hold the pads. We remove the cups together with the spring.Pads are held by cups and springs
- Using a screwdriver, remove the lower part of the pads from the support.We pull the bottom of the pads from the support
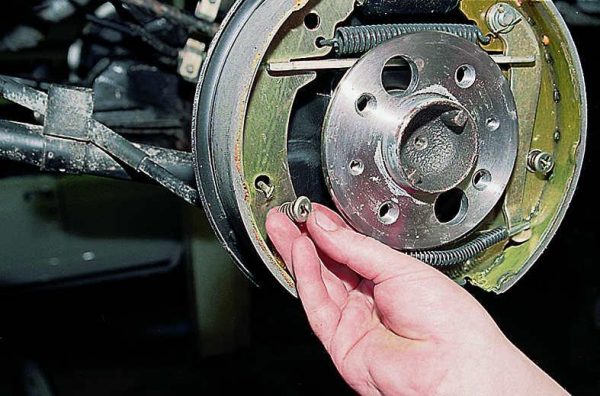
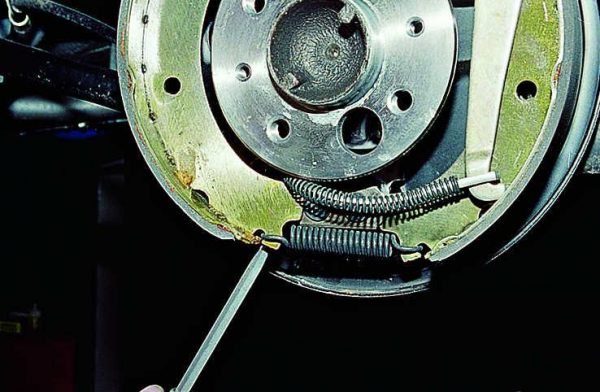
- Remove the lower spring.Remove the lower spring holding the pads
- We remove the block to the side, take out the spacer bar.We take out the spacer bar installed between the pads
- We tighten the upper elastic element.We take out the upper spring from the holes in the pads.
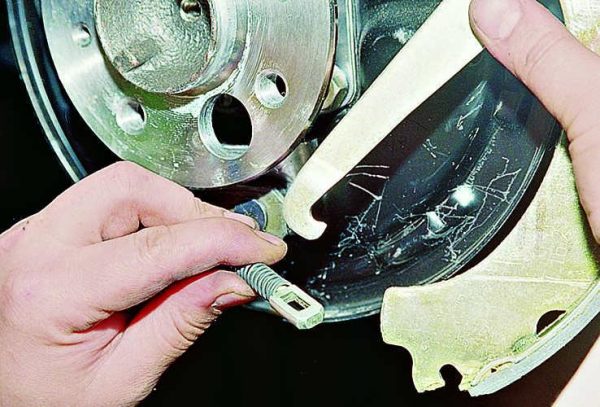
- We take out the handbrake lever from the tip of the cable.Remove the handbrake lever from the end of the cable.
- Pliers remove the cotter pin from the finger.Pull pin out of finger
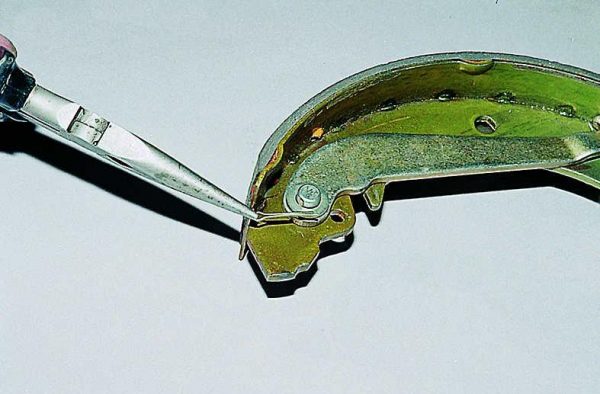
- We dismantle the handbrake parts from the brake element.Remove the parking brake parts from the block
- We assemble the mechanism in the reverse order of dismantling, after loosening the handbrake control cable.
Pressure regulator
The rear brakes are equipped with a regulating element, through which the pressure in the brake drive is adjusted when the machine load changes. The essence of the regulator's operation is to automatically stop the supply of fluid to the working hydraulic cylinders, which helps to reduce the likelihood of rear axle skidding during braking.
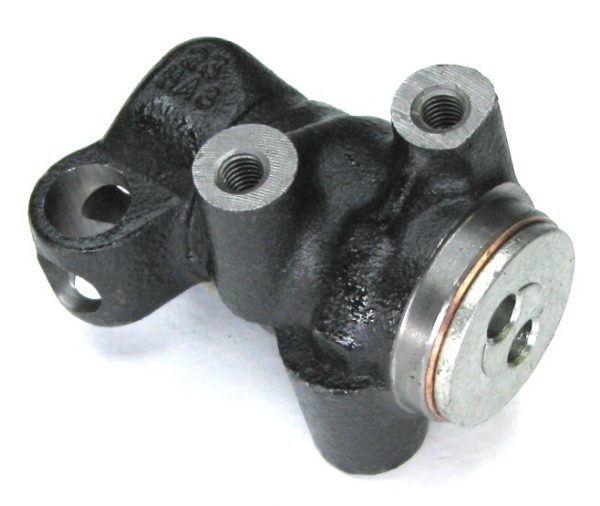
The correctness of the mechanism is easy to check. To do this, perform the following steps:
- We clean the part from dirt and remove the anther.
- The partner presses on the brake pedal, creating a force of 70–80 kgf. At this time, the second person controls the movement of the protruding part of the piston.
- When the piston element is moved by 0,5–0,9 mm, the regulator is considered to be in good condition. If this is not the case, the device must be replaced.
Video: setting the brake pressure regulator on the Zhiguli

Many car owners of the classic Zhiguli remove the pressure regulator from their car. The main reason is the souring of the piston, as a result of which the liquid is not supplied to the RTC of the rear axle, and the pedal becomes sluggish after braking.
Tubes and Hoses
Brake pipes and hoses of the VAZ "penny" braking system are used both front and rear. Their purpose is to connect the GTZ and RTC to each other and supply brake fluid to them. Sometimes the connecting elements become unusable, especially for hoses, due to the aging of rubber.
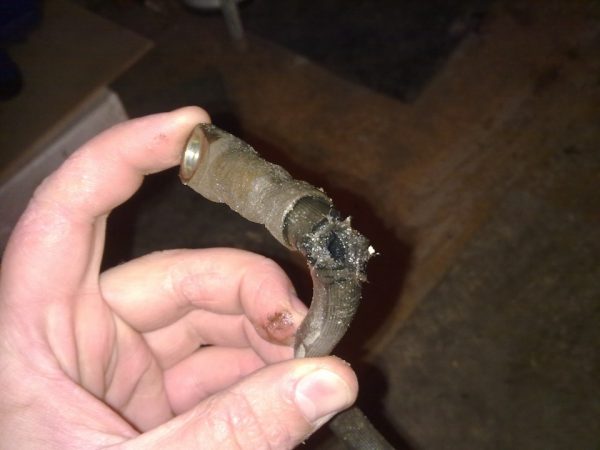
The parts in question are fastened by means of a threaded connection. There is no difficulty in replacing them. It is only required to unscrew the fasteners on both sides, dismantle the worn element and install a new one in its place.
Video: replacing brake pipes and hose on the "classic"

Brake pedal
The main control of the VAZ 2101 braking system is the brake pedal, located in the cabin under the steering column between the clutch and accelerator pedals. Through the pedal, the muscular effect is transmitted from the driver's legs to the GTZ. If the brake pedal is adjusted correctly, the free play will be 4-6 cm. When you click on it and pass the specified distance, the vehicle starts to slow down smoothly.

Bleeding the brakes VAZ 2101
If the GTZ or RTC was repaired or these mechanisms were replaced, then the car's brake system needs to be pumped. The procedure involves the removal of air from the circuits of the system for its efficient operation. To bleed the brakes, you need to prepare:
- key 8 (10) mm;
- silicone transparent tube according to the diameter of the fitting;
- capacity;
- brake fluid.
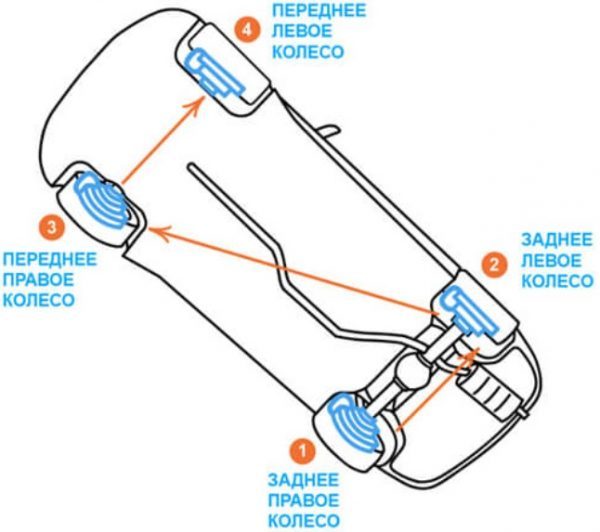
For VAZ 2101 and other "classics" brake fluid DOT-3, DOT-4 is suitable. Since the volume of fluid in the brake system of the car in question is 0,66 liters, a capacity of 1 liter will be enough. Bleeding the brakes is best done with an assistant. We start the procedure with the right rear wheel. The sequence of actions is as follows:
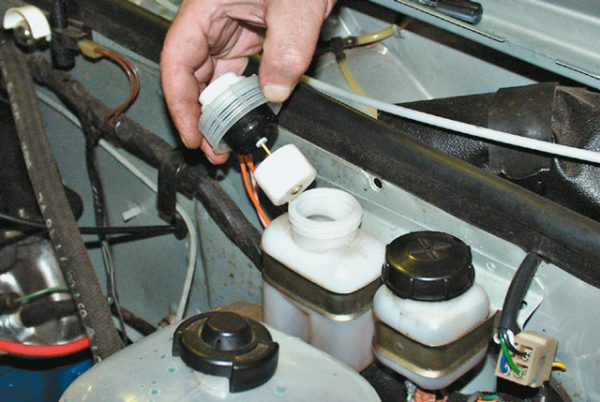
- Open the hood and unscrew the cap of the GTZ expansion tank.To top up the brake fluid, unscrew the plug
- We check the fluid level according to the marks, if necessary, top up to the MAX mark.
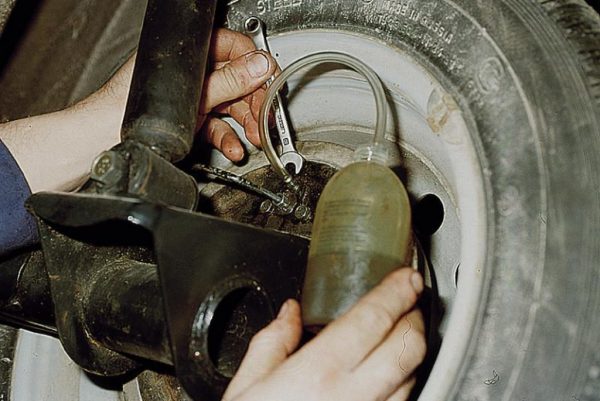
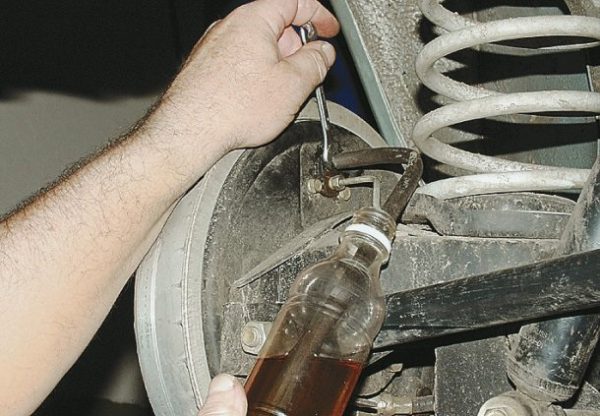
- We remove the protective cap from the fitting of the rear right wheel and put a tube on it, the other end of which we lower into the prepared container.To bleed the rear brake cylinder, we put a tube and a wrench on the fitting
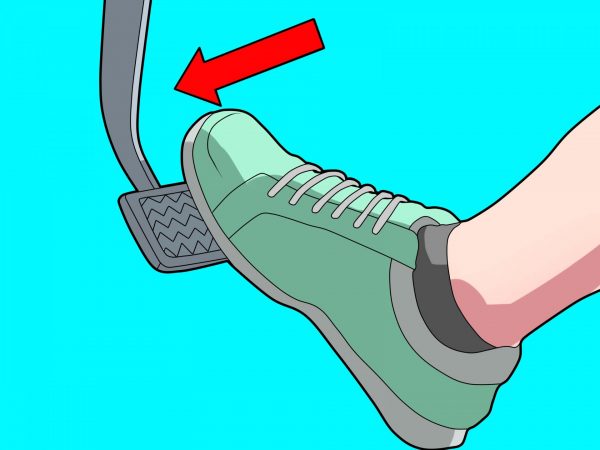
- The partner sits in the driver's seat and presses the brake pedal 5-8 times, and when pressed for the last time, squeezes it all the way and fixes it in this position.The partner presses the brake pedal several times
- At this time, you loosen the fitting with a key by 8 or 10, depending on the dimension, and liquid with air bubbles will begin to flow from the tube.To bleed the brakes, unscrew the fitting and drain the liquid with air into the container
- When the flow of liquid stops, we wrap the fitting.
- We repeat steps 4–6 until a clean liquid without air flows out of the fitting. In the process of pumping, do not forget to control the level of liquid in the expansion tank, topping it up as necessary.
- At the end of the procedure, securely tighten the fitting and put on a protective cap.
- We repeat similar actions with the rest of the wheel cylinders in the sequence indicated in the image.The brake system must be pumped in a certain sequence.
- We pump the front cylinders according to the same principle, after removing the wheels.The front cylinder is pumped in the same way as the rear
- When pumping is completed, press the brake pedal and check its progress. If the pedal is too soft or the position is lower than usual, we check the tightness of all connections of the brake system.
Video: bleeding the brakes on the Zhiguli

Any problems associated with the vehicle's braking system need to be addressed immediately. Diagnostics and repair work of "penny" brakes do not require special knowledge and skills, as well as special tools. You can check the system and troubleshoot using a standard set of wrenches, screwdrivers and a hammer. The main thing is to get acquainted with the sequence of actions and follow them in the repair process.

