Installation of the front beam Maz
Content
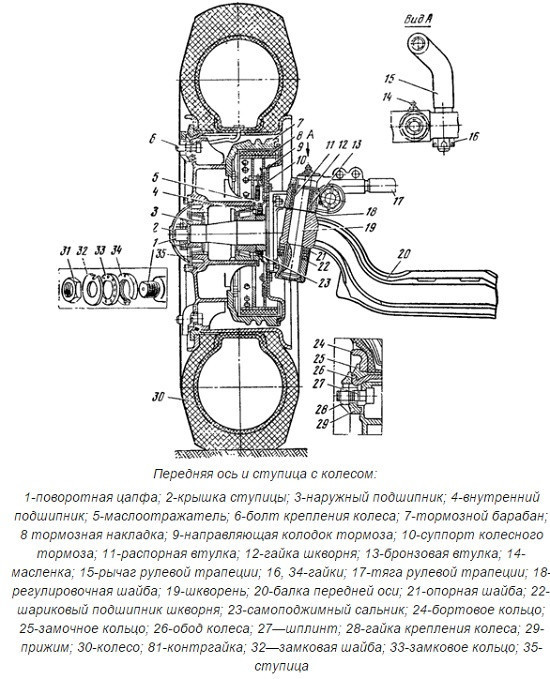
MAZ front beam device
The axle of a truck has a complex structure. One of the main details is the MAZ front beam. The spare part is made of strong 40 steel by stamping.
The stiffness index is HB 285. The unit has a special platform for holding the springs. There is also section I.
The ends of the euro beam on the MAZ are raised. There are small cylindrical thickenings at the level of the front rings. Holes are made at the ends.
The part is connected to the trunnions with the help of pivots. Parts are hardened to HRC 63 for increased wear resistance. There is a nut on one end of the kingpin to eliminate the gap. There is a lock washer.
The MAZ front beam on Zubrenka is supported by a bearing. Thanks to this connection, bronze bushings take up the horizontal load on the bogie.
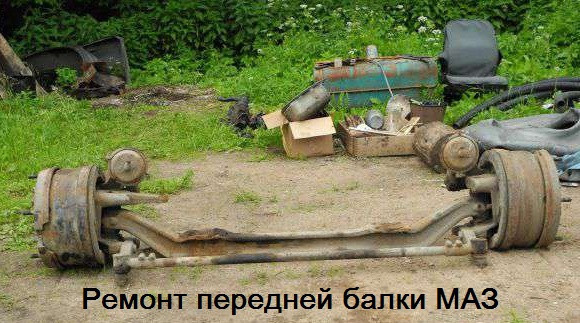
How to quickly repair a MAZ beam
Despite the solid construction, the part sometimes fails. Therefore, we recommend that you periodically inspect the condition of the front axle. Due to fatigue stresses, the surface of the part is destroyed.
Repair of the MAZ front beam is necessary when:
- Cracks;
- Curvature;
- Oblomakh;
- Target development;
- Spasm.
In addition, the replacement of the part is carried out with excessive wear. In what cases is it necessary to buy a MAZ front beam:
- With extraneous sounds while driving;
- If the car pulls in one direction;
- With an increase in wheel roll.
Only crooked and bent parts are subject to repair. In case of chips and other significant damage, a new part is installed.
The presence of cracks in the front beam of the MAZ in Zubrenok is checked by visual inspection. Use a magnetic flaw detector. In the presence of large cracks, the replaced part is rejected.
A special stand is required to test for twisting and bending. The MAZ front beam device is inspected in a cooled state. Align the angle of inclination of the axle under the pivots. By processing the ends, the holes are protected to a size of less than 9,2 cm.
To repair the MAZ eurobeam and eliminate wear, spherical surfaces are welded. Put on a metal cape. Then the overlap is milled. Keep all required dimensions.
The holes for the pivots of the front beam on the MAZ are checked with a cone gauge. Worn nests are restored with special repair bushings.
See also: installing a second DVD drive
The holes are first countersinked and then reamed. After repair, all steering angles are adjusted, as well as convergence.
If you decide to buy a beam at MAZ and replace the part, contact specialized car services. Professional equipment is required to install the front axle parts. Only experienced craftsmen will be able to carry out high-quality repairs.
If you need new spare parts, it is easy to choose and buy a beam for MAZ on our website:
- Front axle;
- Back support;
- Side railings;
- Cabin bases.
We will help you find the right part for your car. We recommend that you contact a company consultant to purchase the part.
Front axle MAZ
Structurally, the front axles and steering rods of all modifications of MAZ vehicles are made in the same way. There are some differences only in the design of the front axles of all-wheel drive vehicles.
When servicing the front axle and steering rods on a rear-wheel drive vehicle, you must:
- pay attention to the degree of tightening of the kingpin taper connection and the condition of the thrust bearing. When the bearing is worn, the gap between the upper eye of the kingpin and the beam increases, which should not exceed 0,4 mm. If necessary, metal gaskets should be installed;
- pay attention to the degree of wear of the king pin and spindle bushings. Worn bronze trunnion bushings are replaced with new ones;
- regularly check the fastening of the bolts of the ball bearings of the longitudinal and transverse beams, the fastening of the steering levers to the pivot bolts. When inspecting the parts of the ball bearings, it is necessary to check the springs for cracks and cracks. Pins with dents, cracks and cracked springs should be replaced with new ones;
- Regularly check that the front wheels are correctly positioned as the angles may change due to wear and deformation of the parts.
The self-orientation angle of the wheels is controlled by measuring the distances B and H (Fig. 47), respectively, from the top and bottom of the rims from any vertical or vertical plane. The difference between these distances at the correct angle of inclination should be between 7 and 11 mm.
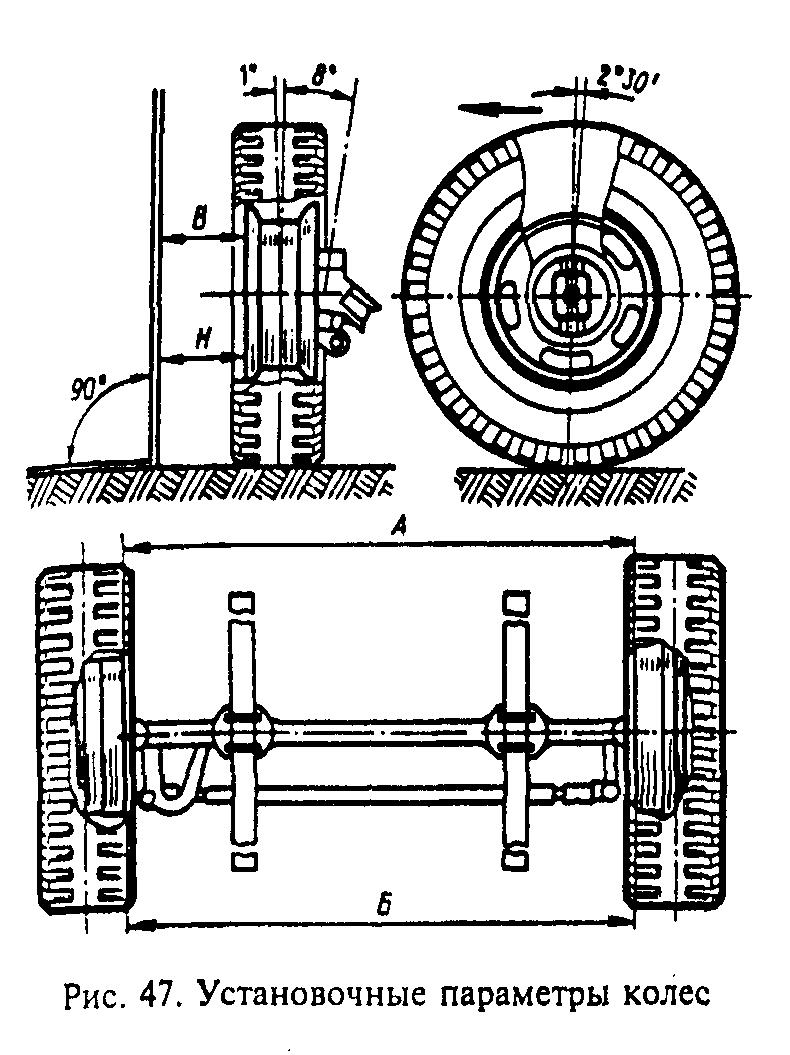
Control and adjustment of convergence in the horizontal plane is carried out when the front wheels of the car are set to a straight-line movement. In this case, the distance B between the ends of the brake drums in the horizontal plane at the rear should be 3-5 mm more than the distance A at the front (see Fig. 47).
See also: Installation of the cross in Orthodoxy
It is recommended to adjust the wheel alignment in the following order:
- put the wheels in a position corresponding to the movement in a straight line;
- loosen the bolts at both ends of the tie rod;
- turning the connecting rod (screwing it at the end with a large convergence and tightening it with insufficient), change its length so that the amount of convergence of the wheel is normal;
- tighten the pressure bolts on both tips.
After adjusting the toe, it is always necessary to check the steering angles of the wheels and adjust the position of both bolts (rods) that limit the rotation of the wheel.
The steering angle of the left wheel to the left and the right wheel to the right must be 36°. Adjustment of the angles of rotation of the wheels is carried out by changing the length of the thrust screws that limit the rotation of the wheels. The push pins screw into the bosses on the steering knuckle arms. When the bolt is removed from the lever, the angle of rotation of the wheel decreases and vice versa.
When adjusting the ball joints of the longitudinal steering rod, the adjusting nut 5 (Fig. 48) is screwed up to the stop with a torque of 120-160 N * m (12-16 kgf * m), and then unscrewed by 1 / 8-1 / 12 turns. Cap b is fastened by turning it 120° from its original position, and the edge of the cap is bent into the slot of the tip to the lock nut 5.
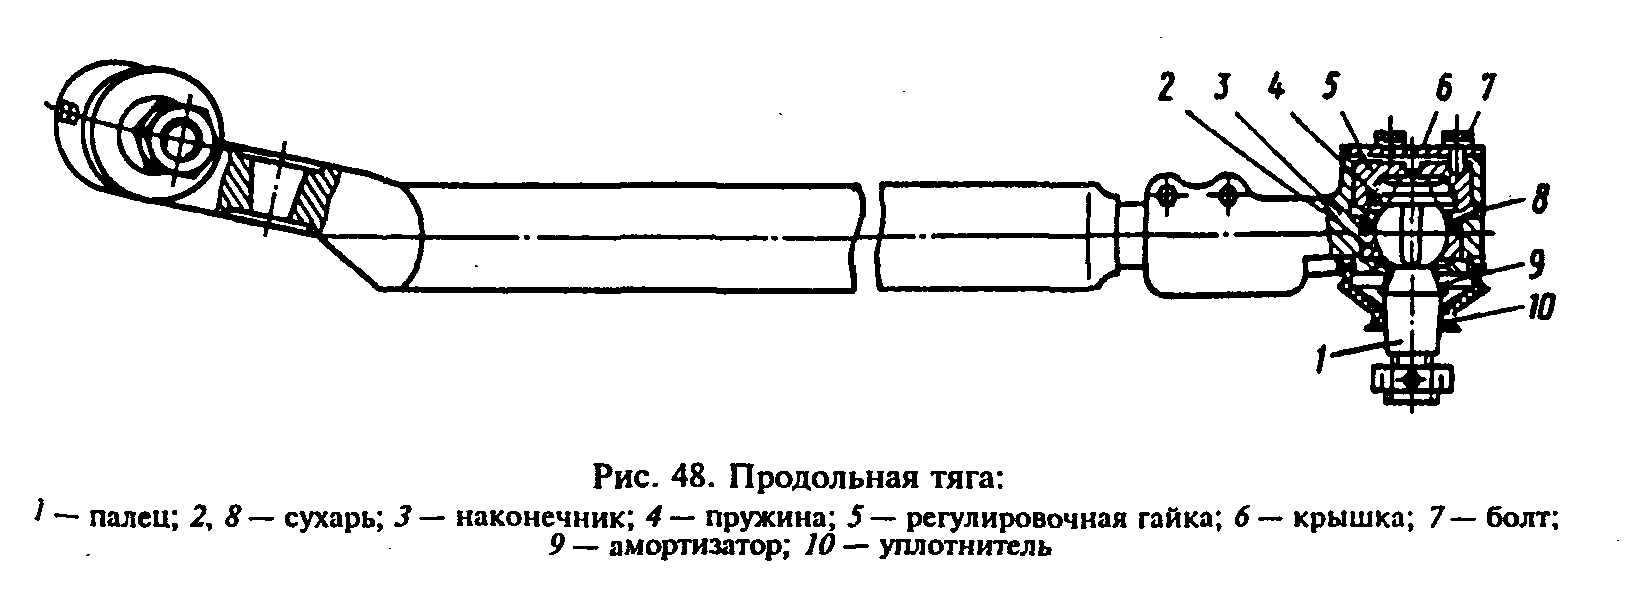
Cover 6 must be rotated by 120° with each adjustment of the ball joint, having previously straightened the deformed part of the cover.
Tie rod ends and power steering cylinder fit the same.
source
MAZ-54331: Replacing wedge-mounted rear hubs with euro hubs
In the process, I somehow got hold of a rear axle on euro hubs at a reasonable price. The only thing that did not suit me was that the gearbox was 13 to 25, and I had 15 to 24.
The change to Eurohubs was necessary due to the need to change the rubber on the rear axle, as wear was already limited and there was no desire to re-contact the cam.
After considering the current situation, I decided to switch to Eurohubs and tubeless at the same time. Having a bridge on euro hubs, it was foolish not to use it and buy tubeless discs for washers.
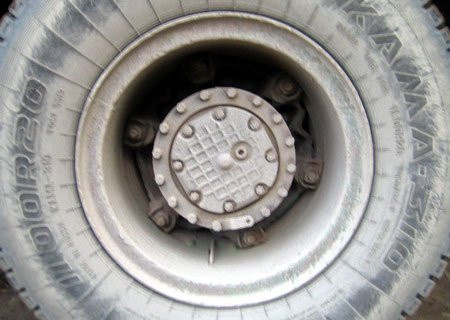
There were two options for action: the first was to wind the entire bridge and change the gearbox; the second is to simply replace the hub assembly. The second option I liked more, so I settled on it. I got to work and unscrewed the wheels, and then the covers of the side boxes of the stellites.
See also: Installing zabbix agent on ubuntu server
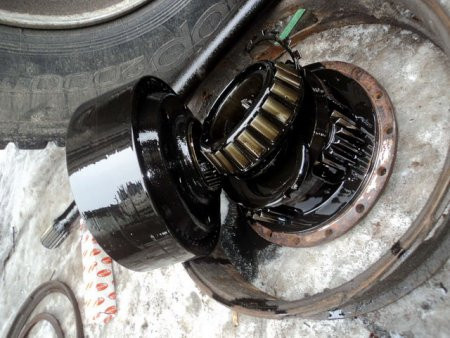
Then I unscrewed the nuts on the stockings and took out the sun gear with the bearing and the entire hub.
This operation did not cause any problems and everything went quite well.
The next step was to bend the ends of the lock washers and unscrew the 30 screws that secure the stockings to the bridge.
Here it should be clarified that MAZs with euro hubs on board have completely different stockings, hubs and brake drums. Only the satellites with bearings, the shaft gear in the gearbox and the sun gear without a hub are the same.
Having removed the stockings and replaced them with others, it's time to install the Eurohubs and mount the final drives. I mounted the sides, also installed the brake drums (they are placed in only one position) and installed the wheels. Everything, retrofitting done, it's time to get to work.
On the purchased used tubeless tires with discs 315/80 - 22,5 went for a whole year. Impressions from the operation are only positive. There is no need to follow the tightening of the wheels as in the blocks, tighten 2-3 times and you can drive safely.
Although the tires were not new, they carried up to 37 tons. It should be noted that it does not matter at all whether the car is empty or loaded - the rubber practically does not heat up at any load and speed. In any case, tubeless with CMK (Center Metal Bead) is much stronger than ID-304 rubber (16 and 18 layers).
Later, he switched the MAZ-93866 lorry to tubeless, so he even mixed tires 315/80-22,5 and our 111AM. However, when using our camera, I did not notice any difference in tread height and wheel wear.
At first glance, replacing wedge hubs with eurohubs is quite a costly task, but in the process of work, I came to the conclusion that the operation of a tubeless system is generally cheaper than a tube one due to lower labor intensity.