Device, principle of operation, repair and replacement of the VAZ 2106 tachometer
Content
- Tachometer VAZ 2106
- Tachometer malfunctions
- Checking the correct operation of the tachometer
- Tachometer sensor
Such a device as a tachometer does not affect either the operation of the engine or the driving performance of the car, but without it the dashboard of a modern car will be inferior. In this article, we will consider why it is needed, how it works, what malfunctions it has, and how to deal with them without the help of specialists.
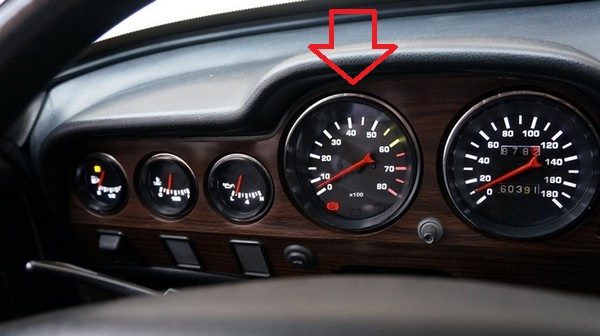
Tachometer VAZ 2106
The first car from the Zhiguli family equipped with a tachometer was the VAZ 2103. Neither the "penny" nor the "two" had such a device, but they drove without problems and still drive without it. Why did the designers need to install it on the panel?
The purpose of the tachometer
The tachometer is used to measure the speed of the crankshaft. In fact, it is a rev counter, showing their number to the driver by deflecting the scale arrow at a certain angle. With its help, the person sitting behind the wheel sees the mode in which the power unit of the car is operating, and also whether there is an extra load on it. Based on the information received, it is easier for the driver to select the correct gear. In addition, the tachometer is indispensable when setting up the carburetor. It is his indicators that are taken into account when adjusting the idle speed and the quality of the fuel mixture.
More about the VAZ 2106 speedometer: https://bumper.guru/klassicheskie-modeli-vaz/elektrooborudovanie/panel-priborov/spidometr-vaz-2106.html
What tachometer is installed on the VAZ 2106
The "Sixes" were equipped with the same tachometer as the "troikas". It was the TX-193 model. Accuracy, reliability and superb sporty design have made it a benchmark in automotive instrumentation. It is not surprising that today many car owners install these tachometers as additional devices. Moreover, they are equipped with motorcycle and even boat engines. As for the Zhiguli, the device can be installed without modifications on such VAZ models as 2103, 21032, 2121.
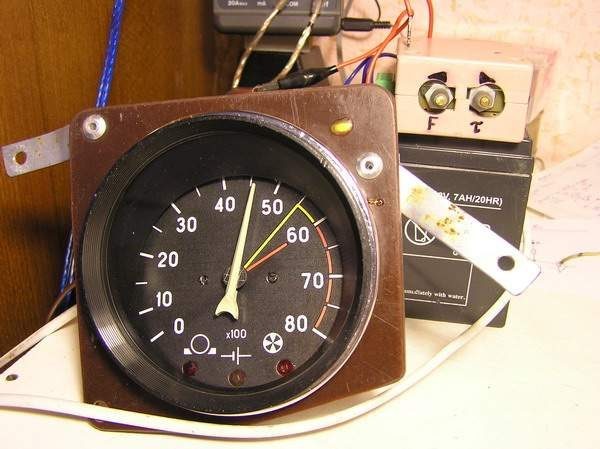
Table: main technical characteristics of the TX-193 tachometer
| Characterization | Index |
| Catalogue number | 2103 – 3815010 – 01 |
| Landing diameter, mm | 100 |
| Mass, g | 357 |
| Range of indications, rpm | 0 – 8000 |
| Measurement range, rpm | 1000 – 8000 |
| Operating voltage, V | 12 |
TX-193 is on sale today. The cost of a new device, depending on the manufacturer, varies between 890-1200 rubles. A used tachometer of this model will cost half as much.
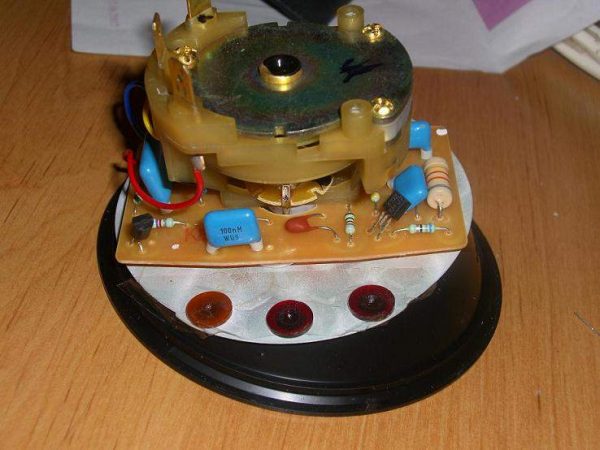
The device and principle of operation of the TX-193 tachometer
The "six" tachometer consists of:
- plastic cylindrical body with glass holder;
- a scale divided into zones of safe and dangerous modes;
- backlight lamps;
- milliammeter, on the shaft of which the arrow is fixed;
- electronic printed circuit board.
The design of the TX-193 tachometer is electromechanical. The principle of its operation is based on measuring the number of electric current pulses in the primary (low-voltage) circuit of the car's ignition system. In the VAZ 2106 engine, for one revolution of the distributor shaft, corresponding to two rotations of the crankshaft, the contacts in the breaker close and open exactly four times. These pulses are taken by the device from the final output of the primary winding of the ignition coil. Passing through the details of the electronic board, their shape is converted from sinusoidal to rectangular, having a constant amplitude. From the board, the current enters the winding of the milliammeter, where, depending on the pulse repetition rate, it increases or decreases. The arrow of the device reacts precisely to these changes. The greater the current, the more the arrow deviates to the right and vice versa.
Wiring diagram for the VAZ 2106 tachometer
Given that the VAZ 2106 was produced with both carburetor and injection engines, they had different tachometer connections. Let's consider both options.
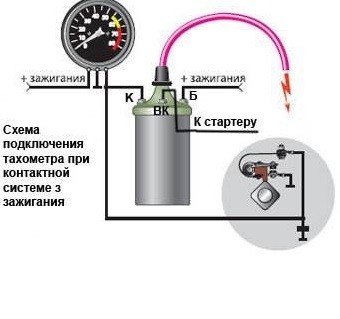
Connecting a tachometer in a carburetor VAZ 2106
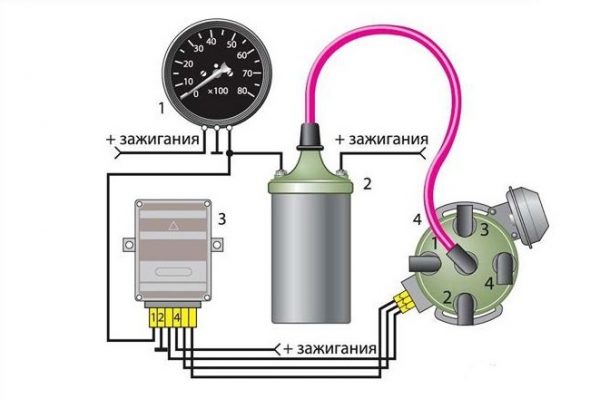
The electrical circuit of the carburetor "six" revolution counter is quite simple. The device itself has three main connection wires:
- to the positive terminal of the battery through the contact group of the ignition switch (red);
- to the "mass" of the machine (white wire with a black stripe);
- to terminal "K" on the ignition coil connected to the breaker (brown).
 The tachometer has three main connections: to the ignition switch, to the ignition coil and to the vehicle's ground.
More about the device of the VAZ 2106 carburetor: https://bumper.guru/klassicheskie-modeli-vaz/toplivnaya-sistema/karbyurator-vaz-2106.html
There are also additional wires. They serve for:
- supply voltage to the backlight lamp (white);
- connections to the battery charge indicator relay (black);
- contact with the oil pressure sensor instrument (gray with black stripe).
The wires can be connected either using a block or separately, depending on the year of manufacture of the device and its manufacturer.
In carburetor “sixes” with non-contact ignition, the tachometer connection scheme is similar, except that the “K” output of the coil is connected not to the breaker, but to contact “1” of the switch.
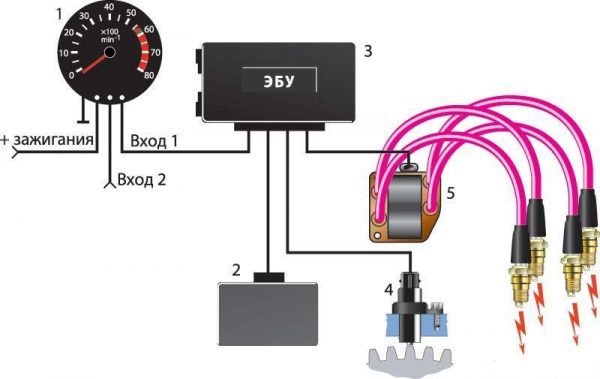
Connecting a tachometer in injection VAZ 2106
In the VAZ 2106, equipped with engines with distributed injection, the connection scheme is somewhat different. There is no breaker, no switch, no ignition coil. The device receives already fully processed data from the electronic engine control unit (ECU). The latter, in turn, reads information about the number of revolutions of the crankshaft from a special sensor. Here, the tachometer is connected to the power circuit through the ignition switch, vehicle ground, ECU and crankshaft position sensor.
Tachometer malfunctions
Despite the fact that the TX-193 tachometer is considered quite reliable, it also has malfunctions. Their signs are:
- lack of response of the arrow to a change in the number of engine revolutions;
- chaotic movement of the arrow up and down, regardless of the engine operating mode;
- clear underestimation or overestimation.
Find out about the causes of a VAZ 2106 engine malfunction: https://bumper.guru/klassicheskie-modeli-vaz/poleznoe/ne-zavoditsya-vaz-2106.html
What kind of breakdowns are indicated by the listed signs?
The arrow does not respond to the measurement of the number of revolutions
Usually, the lack of reaction of the arrow is associated with a breakdown of the contact in the connectors of the main wires of its connection, or damage to the circuit wiring. The first step is to:
- Inspect the fastening of the conductor in brown insulation to the terminal "K" on the ignition coil. If bad contact, traces of oxidation, wire or terminal burnout are detected, eliminate the problem by stripping problem areas, treating them with an anti-corrosion liquid, tightening the fastening nut.
- Check the reliability of the connection of the black-and-white wire with the "mass" of the car. If contact is broken, strip the wire and the surface to which it is attached.
- Using a tester, determine if voltage is supplied to the red wire when the ignition is on. If there is no voltage, check the serviceability of fuse F-9, which is responsible for the continuity of the instrument panel circuit, as well as the condition of the ignition switch contacts.
- Disassemble the instrument panel and check the connections of the contacts in the tachometer wiring harness block. "Ring" with the tester all the wires going to the device.
Video: tachometer needle does not respond to engine speed

The tachometer needle jumps randomly
The jumps of the TX-193 arrow in most cases are also a symptom of malfunctions associated with its electrical circuit. The reasons for this behavior of the device can be:
- lack of good contact at the negative terminal of the battery;
- oxidation or burning of the brown wire on the ignition coil;
- burning or wear of the contacts of the ignition distributor cover, or the slider;
- wear of the distributor shaft bearing;
- short circuit of the red wire supplying the device to the vehicle ground;
- malfunction of the crankshaft position sensor (for injection engines).
A similar problem is solved by stripping the contacts, replacing the ignition distributor cover, slider, support bearing, restoring the integrity of the insulation of the supply wire of the device, replacing the crankshaft sensor.
Video: tachometer needle jumps

The tachometer underestimates or overestimates the readings
If the device frankly lies, then the problem most likely lies in the ignition system. In other words, he shows correctly, that's just the number of pulses created by the interrupter per revolution of the distributor shaft is more or less than four. If the tachometer readings are incorrect, there is usually a deterioration in engine performance. At the same time, revolutions can float, misfires periodically appear, which is accompanied by engine tripping, white or gray exhaust.
The fault in this case should be sought in the breaker, or rather, in its contact group or capacitor. To fix such a problem, you must:
- Disassemble the ignition distributor.
- Check the condition of the breaker contacts.
- Clean up contacts.
- Adjust the gaps between the contacts.
- Check the health of the capacitor installed in the breaker.
- Check the crankshaft position sensor. In case of failure, replace it.
However, the reason may be in the tachometer itself. There are malfunctions associated with the details of the electronic board, as well as with the winding of the milliammeter. Here, knowledge in electronics is indispensable.
Incompatibility of the TX-193 tachometer with a non-contact ignition system
Older models of TX-193 brand devices are designed exclusively for contact ignition systems. All owners of the "sixes", who independently converted their cars to a contactless system, then faced problems with the operation of the tachometer. It's all about the different form of electrical impulses coming to the device from the interrupter (in the contact system) and the switch (in the non-contact system). The easiest way to solve this problem is to install a capacitor through the same brown wire coming from the breaker. But here it is required by experience to choose the right capacity. Otherwise, the tachometer will lie. So, if you have no desire to engage in such experiments, just buy a device for a contactless ignition system.
Video: solving the problem of TX-193 incompatibility with a contactless ignition system

Checking the correct operation of the tachometer
In the conditions of a car service, the correctness of the tachometer readings is checked on a special stand that simulates the ignition system. The stand design includes a power supply distributor and a counter of its shaft revolutions. The table below shows the calculated values of the distributor rotor speed and the corresponding tachometer readings.
Table: Calculated data for checking the tachometer
| The number of revolutions of the distributor shaft, rpm | Correct tachometer readings, rpm |
| 450 – 550 Feet | 1000 |
| 870 – 1050 Feet | 2000 |
| 1350 – 1550 Feet | 3000 |
| 1800 – 2050 Feet | 4000 |
| 2300 – 2500 Feet | 5000 |
| 2900 – 3000 Feet | 6000 |
| 3300 – 3500 Feet | 7000 |
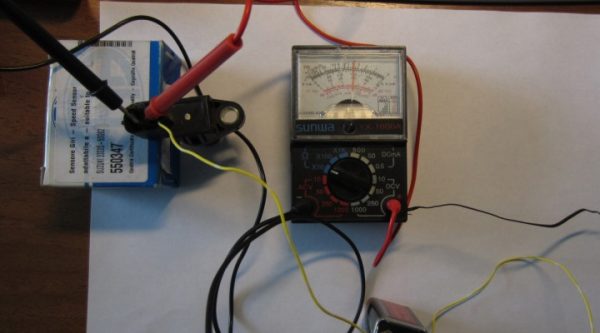
You can independently check how lying the device is by connecting an autotester to it in parallel, the functionality of which includes a tachometer. It is necessary to turn it on in the desired mode, connect the positive probe to the "K" terminal on the ignition coil, and the second to the "mass" of the car. Then we look at the readings of both devices and draw conclusions. Instead of the autotester, you can use a known-good TX-193 tachometer. It is also connected in parallel with the tested one.
Tachometer sensor
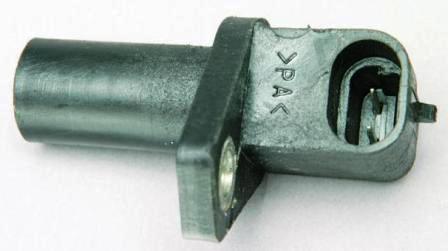
Separately, it is worth considering such an element of the tachometer circuit as its sensor, or rather, the crankshaft position sensor (DPKV). This device serves not only to count the revolutions of the crankshaft, but also to determine its position at a certain moment, which is necessary for the electronic control unit to ensure the correct operation of the power unit.
What is a crankshaft position sensor
DPKV is an electromagnetic device, the principle of which is based on the phenomenon of induction. When a metal object passes near the sensor core, an electrical impulse is generated in it, which is transmitted to the electronic engine control unit. The role of such an object in the power unit of the "six" is played by the gear of the crankshaft. It is on her teeth that the sensor responds.
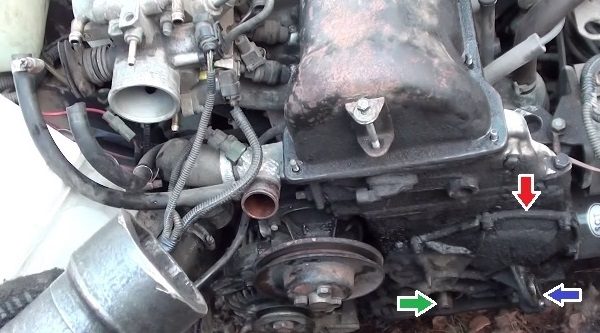
Where is the crankshaft position sensor located
DPKV on the VAZ 2106 is fixed in a hole on a special tide of the camshaft drive cover in the lower part of the engine next to the crankshaft gear. The wiring harness going to it can help determine its location. The sensor itself is enclosed in a black plastic case. It is attached to the cover of the timing gear drive with a single screw.
How to check the DPKV for performance
In order to determine if the sensor is working, there are two methods. For this we need:
- a wrench on 10;
- screwdriver with a cross-shaped bit;
- multimeter.
The verification process consists of the following steps:
- Using a 10 key, loosen the negative terminal on the battery. We take it off.
- Raise the hood, find the crankshaft position sensor.
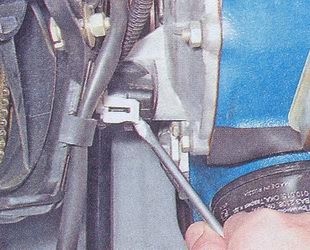
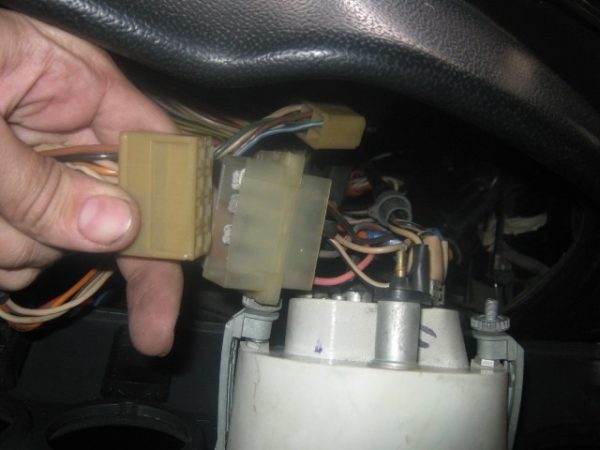
- Disconnect the connector from it.The connector can be disconnected by hand or with a screwdriver
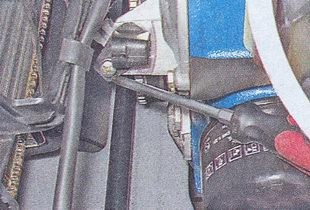
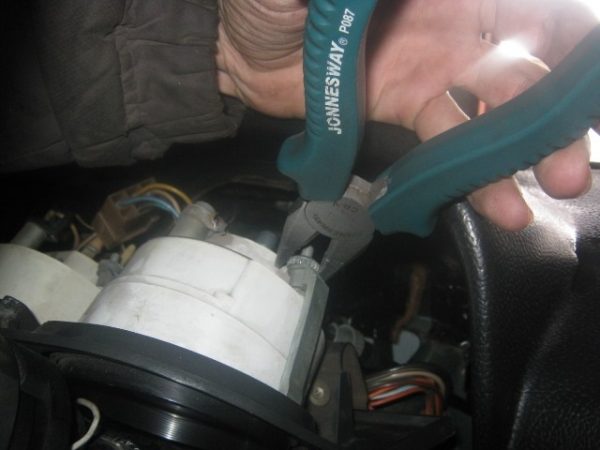
- Unscrew the screw securing the device with a screwdriver.To disconnect the DPKV, you need to unscrew one screw
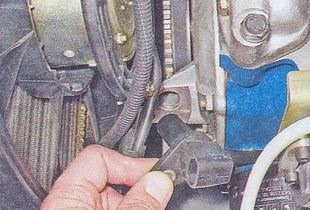
- We remove the sensor.The sensor can be easily removed from the mounting hole
- We turn on the multimeter in voltmeter mode with a measurement limit of 0–10 V.
- We connect its probes to the sensor terminals.
- With a vigorous movement, we carry a screwdriver blade near the end end of the device. At this moment, a voltage jump of up to 0,5 V should be observed on the device screen.When a metal object approaches the sensor core, a small voltage spike should be observed.
- We switch the multimeter to the ohmmeter mode with a measurement limit of 0–2 KΩ.
- We connect the probes of the device to the terminals of the sensor.
- The resistance of the sensor winding should be in the range of 500–750 ohms.Winding resistance should be 500-750 ohms
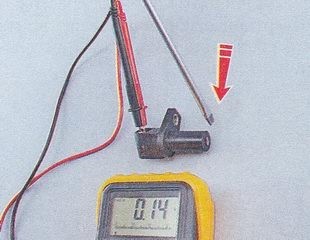
If the meter readings differ from those specified, the sensor is defective and must be replaced. The device is replaced in accordance with paragraphs. 1-5 of the above instructions, only in reverse order.
Replacing the tachometer VAZ 2106
If a malfunction of the tachometer itself is detected, it is hardly worth trying to repair it with your own hands. Even if he earns, it is not a fact that his testimony will be correct. It is much easier to buy and install a new device. To replace the VAZ 2106 tachometer, you will need:
- flat blade screwdriver;
- passages;
- pencil, felt-tip pen or marker.
To replace the tachometer, you must:
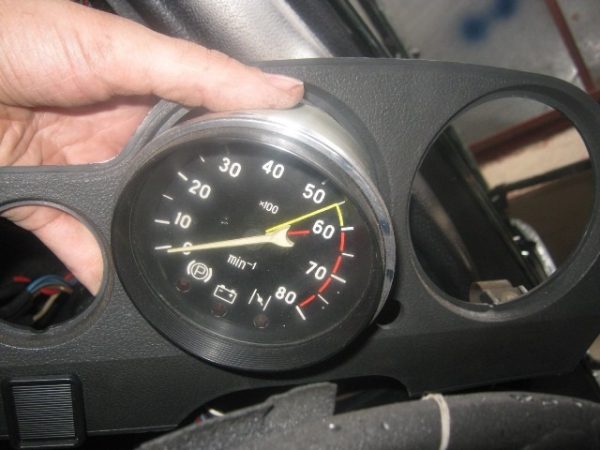
- Remove the instrument panel trim by prying it with a screwdriver.To remove the lining, you need to pry it with a screwdriver.
- Move the panel aside.
- Disconnect the wiring harness block from the device, as well as the connectors for additional wires, having previously marked their location with a marker or pencil.Before disconnecting the wires, it is recommended to mark their location.
- Unscrew the nuts securing the tachometer to the panel with your hands, or with the help of pliers.Nuts can be unscrewed by hand or with pliers
- Remove the device from the cover.To remove the device from the cover, it must be pushed from the back side.
- Install a new tachometer, secure it with nuts.
- Connect and mount the panel in reverse order.

As you can see, the tachometer is not such a tricky device. There is nothing complicated either in its design or in the connection diagram. So if there are problems with it, you can easily deal with them without outside help.

