We set the ignition on the VAZ 2101
On carbureted engines, imbalance and ignition failures are often observed. How does it manifest itself? For example, if you are driving in fourth gear and want to add more speed, then not very pleasant sounds begin to be heard from under the hood. This is due to the fact that early detonation of the fuel occurs, that is, the candles spark before the fuel mixes with air in the intake manifold.
If you do not pay attention to this problem in a timely manner, then other unpleasant consequences may follow:
- starting problems;
- shaking and vibration of the engine when trying to reduce speed or turn off the engine;
- "triple" of the engine, dips when operating at low speeds.
This problem is faced by drivers of domestic cars with carburetor engines - VAZ 2101-2107. There is a need to set the ignition - adjust the ignition timing so that the spark is supplied at the right time and there is no premature detonation of the air-fuel mixture.

Consider how the ignition timing is adjusted using the example of the VAZ 2101 Kopeyka engine.
There are several ways to set the correct ignition timing, and the easiest of them is to unscrew the bolt securing the distributor (ignition coil) and turn the coil body literally a few millimeters in the right direction:
- clockwise if the ignition is early;
- counterclockwise if later.
This is the easiest way, which is done by the “poke method”, that is, you turned the distributor a little - by one or two millimeters - turn on the ignition and try to start your “Penny”. If it starts normally, there are no vibrations and extraneous noise, then everything is in order. Also, there should be no shaking of the engine when trying to turn off the engine.
However, you need to remember that at speed the car can behave quite differently. Therefore, after tightening the coil mounting bolt, you need to check the correct adjustment somewhere on the road. Go to the track, pick up speed up to 40-50 km / h, try to step on the gas. If there are no detonations, then everything is fine, but if detonations and vibration are present, then again, you need to turn the distributor a little in the opposite direction - “late” the ignition.
It is worth saying that such problems can also appear with low-quality gasoline. In addition, this method is not the most accurate, since you literally have to “play” with the adjustments, ruining the starter and battery.
Another more reliable method of adjusting the ignition timing is light bulb adjustment. The sequence of actions is basically the same, you will also have to twist the “ratchet” a little - a figured bolt that holds the crankshaft pulley.
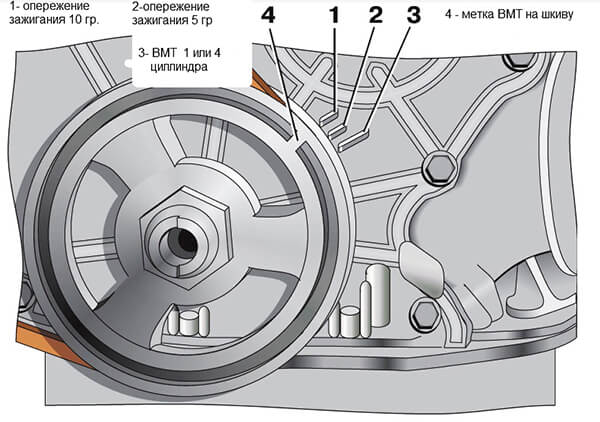
There is a mark on the crankshaft pulley that must be aligned with the marks on the timing cover, these marks indicate the ignition timing - 10, 5 and 0 degrees. First, set the mark on the pulley at 5 degrees. Then we connect the control light to the “ground”, and the positive wire to the contact under the distributor cover.
With the ignition on, turn the distributor housing until the light blinks, fix this moment by fixing the distributor in this position and screw the nut back by 13 to the mounting bolt.
In theory, as experienced mechanics say, this is the most reliable way. For control, you can also use a stroboscope or a stand with an oscilloscope.
Separately, it should be said that such adjustments are effective only in cases where the valve timing is set correctly, that is, the crankshaft and camshaft are installed in the correct positions. Also, before starting to adjust the ignition timing, it is worth checking the condition of the candles - whether there are deposits or scale on them. If there is, then everything is possible that the problems lie in the candles and they need to be replaced. In addition, the adjustment must be carried out on a warm engine, that is, let it cool down a bit and get to work. The breaker contact group is also responsible for ignition problems, so you need to check the condition of the contacts.
Loading…