Replacing the radiator of the VAZ 2109 stove
Content
The VAZ 2109 stove has a simple device and is very reliable, but it has its own service life. Its components are the engine, supercharger, radiator, air ducts and deflectors. The operation is controlled by a lever on the panel.

The most popular radiator malfunctions, hoses and pipes are often cracked, leaky or clogged, debris and dust get into the air channels, the control knob is also prone to various breakdowns. Depending on what problem has arisen, it is necessary to replace the VAZ 2109 stove, replacing at least individual parts - hoses, pipes, which can be done both with and without dismantling the panel.
Replacing the VAZ 2109 stove, a high panel, is quite feasible without removing the torpedo. In the case of a vehicle with a low panel, the steering wheel cover must be removed. Removing the panel will take longer (up to 8 hours), but the manual recommends this method. If the panel is not disassembled, the repair will take 1-2 hours.
What you need and when you need to replace the radiator
- the radiator is leaking, the cabin smells of coolant, streaks, streaks;
- the radiator grill is clogged with dust, leaves, insects, as a result, air does not pass through it, and it is impossible to clean them;
- scale, corrosion of the walls of the radiator pipes, aluminum radiators are especially susceptible to this;
- sealant, if used, can clog the system if it enters the coolant. In this case, the thin radiator tubes are damaged and clogged faster than others.
Before replacing the stove radiator with a VAZ 2109, it is necessary to check other elements of the system for antifreeze leaks, cracks, and air pockets. But it is still recommended to change the pipes along with the radiator.
Tools, materials
- screwdrivers - cross, slotted, fit better;
- keys and heads, better in the backlash, if not, then you can get by with a socket head No. 10 and a deep head, also No. 10;
- ratchet, extension;
- rubber gloves, dishes for antifreeze, and antifreeze itself is desirable;
- it is more convenient if the car can be driven into a viewing hole.
Before replacing the stove radiator with a VAZ 2109, it must be selected and purchased. For VAZ 2109, car dealerships offer 3 types of radiators, these are:
- Made from copper. Heavy, more expensive than usual (not much, the difference is about 700 rubles). They are highly reliable and have a long service life. Their main advantage is that they can be cleaned, restored, if a leak is detected, such a radiator can simply be soldered. The only drawback is that it heats up a little worse than aluminum, it heats up more slowly.
- A standard VAZ aluminum radiator is sold complete with pipes, clamps, the cost of a complete set is 1000 rubles. It heats up quickly, gives off heat well, in case of a malfunction it must be replaced, maintainability is zero.
- Non-original radiators can cost up to 500 rubles, their low quality is not justified by the low price, besides, due to less often stacked plates, they heat up worse.
After preparing all the tools, spare parts, materials, you can start repairing.
How to change the stove radiator for a VAZ 2109 step by step
On the VAZ 2109, the replacement of the stove radiator according to the instructions must be carried out with the front panel removed, standard or high. But if you replace the VAZ 2109 heater radiator, a high panel, then you can do it without dismantling the panel. It is only necessary to provide support for the panel after unscrewing and removing all fasteners. The usual registration support will suffice, or you will need an assistant. In addition, it is advisable to remove or fold the front seats.
Since it is possible to change the stove radiator for a VAZ 2109, a high panel, without removing the torpedo in 1-2 hours, then you need to use this:
- First of all, you need to drain the antifreeze (antifreeze). The most convenient way to do this is to put the car on a viewing hole. If there is no hole, use stands on wheels. The car is on the parking brake, the battery minus is disconnected. Hands must be protected with gloves.
- The cap is unscrewed from the radiator. Using a meter hose, the liquid is lowered into the prepared container.
- About 2 liters of antifreeze should be drained, then the liquid remaining in the system is drained. To drain it, a plug is located and screwed on the engine, then, as in the case of a radiator, a hose, antifreeze is discharged into a container for it. To unscrew the cover, a key No. 17 (box) will suffice.
- You can reach the pipes from the passenger compartment, loosen the clamps and drain the remnants of antifreeze. In this case, the pipes are removed from the radiator.
- The preparation is completed, but before removing the radiator from the VAZ 2109 stove, it is necessary to unscrew the screws securing the panel, as well as those located one - in the glove compartment, rear wall, the other - on the passenger side, next to the rear-view mirror.
- After unscrewing all the mounting bolts, the torpedo can be moved. Raise to the highest possible height, put the trunk, any support, about 7 cm thick, at the height of the hole. Move the panel carefully so as not to damage the cable ties.
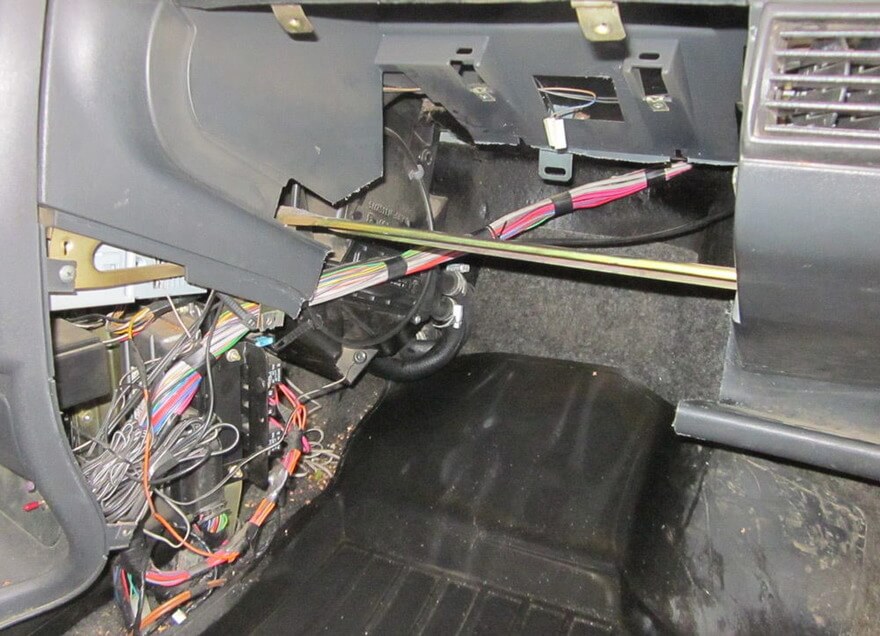
- The stove itself is located below, at the feet of the passenger. The front seats are retracted or retracted as much as possible. When the replacement of the heater, radiator VAZ 2109 is carried out together with the replacement of the tap, it is necessary to remove the plastic "sills" and lift and move the floor covering.
- Access to the heater mounts is open. These bolts must be unscrewed. When replacing the VAZ 2109 stove, the panel is high; you can get to the unit from the floor by removing only the radiator, or by completely dismantling the stove. By unscrewing the 3 screws securing the radiator, it can be removed.
- The stove and radiator are removed (individually or together), while freeing from the air ducts.
- If you just need to replace the heater radiator with a VAZ 2109, a high panel, then you can remove the pipes and pull out the radiator between the shelf (which some car owners often cut with a hacksaw for convenience) and the glove box.
- It is necessary to clean the seat under the radiator from dust, leaves.
- A sealing gum is glued onto the new radiator and installed.
- If necessary, replace the faucet, pipes, hoses.
- Access to the stove fan can be obtained through the engine compartment and removed separately, after disconnecting all the wires.
- If a complete replacement of the VAZ stove, a high panel together with a heater in the casing is required, the replacement is carried out in the same way. The heater housing is bolted to the body, 4 on the passenger side and 4 on the driver's side.
- After unscrewing the nuts, remove the unit by removing the air duct hoses and the stove damper cables, if they have not been disconnected before.
- Clean seat, replace hoses and tubes. The new oven can be installed in the same way as the old one was disassembled and assembled.
- The node is mounted in the reverse order.
- Upon completion, antifreeze is poured into the expansion tank to the maximum mark.
- Warm up the engine to idle, then add fluid to the reservoir again. Bleed the cooling system well to avoid clogging.
With this method, you can not even drain the antifreeze, but close the tap for the duration of the repair. A certain amount of antifreeze will flow out of the nozzles, their holes are closed with stoppers (from champagne, for example). But if the antifreeze needs to be replaced, it's best to replace it and remove the airlocks before they cause serious damage.
If there is time and a desire to do the job neatly, with all the amenities, the board can be disassembled. For this:
- The preparation is the same as in the case without removing the panel: install the car on a pit or stands, disconnect the battery and drain the antifreeze.
- The shock absorber rods and transmission cable are disconnected.
- It is also necessary to remove all heater controls, fan and knobs.
- The casing is removed, the wires are disconnected.
- Steering wheel, ignition lock, instruments are removed.
- The fixing bolts are unscrewed and the panel can be removed.
With a low front panel, all work is done in exactly the same way. There is only one difference, it is necessary to remove the steering column housing so that when the panel moves towards itself and to the side, it is not damaged. During these actions, it is also necessary to ensure that you do not break or damage the wiring going to the shield.