Replacing the radiator of the stove vaz 2112
Content
- Replacing the radiator of the interior heater VAZ 2110, 2111, 2112
- Replacing the radiator of the VAZ 2110 stove of a new and old model: prices and photos
- Replacing the stove radiator (heater) with video
- The main aspects of the heating system VAZ 2112 16 valves: how to change the radiator of the stove?
- Replacing the Radiator of the Stove Vaz 2112 New Sample
If during the cold season the air in the car slowly warms up, it is quite possible to think about a malfunction of the heater. Also, signs of problems will be the smell of antifreeze in the cabin, increased consumption of the antifreeze itself, smudges may appear under the heater radiator.
In such cases, we recommend buying a new radiator for the VAZ 2110, 2111, 2112 interior heater and replacing it yourself. Basic auto mechanic knowledge is not required. All you need is a Phillips screwdriver, a set of wrenches, your desire and time. Follow the instructions below.
Replacing the radiator of the interior heater VAZ 2110, 2111, 2112
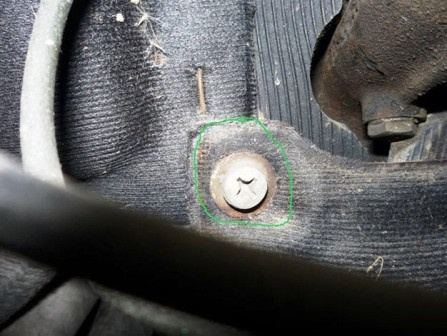
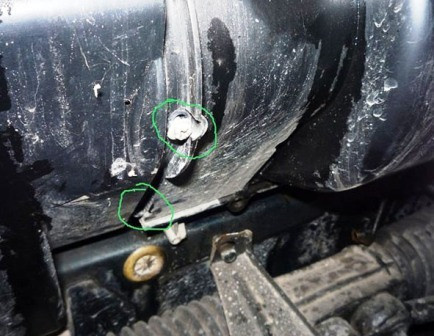
Drain the remaining antifreeze by unscrewing the screw

Disconnect the clamp and remove the tube
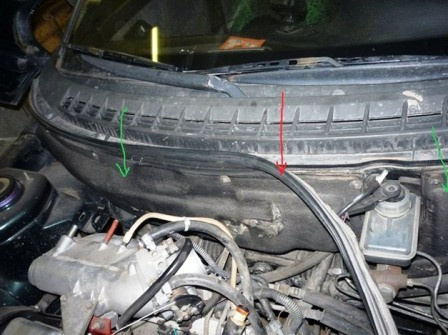
We remove the seal
Removing the soundproofing of the engine compartment
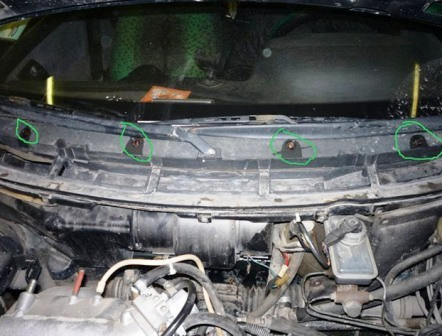
We unscrew all the screws and remove completely

Turn off the power of the indoor fan
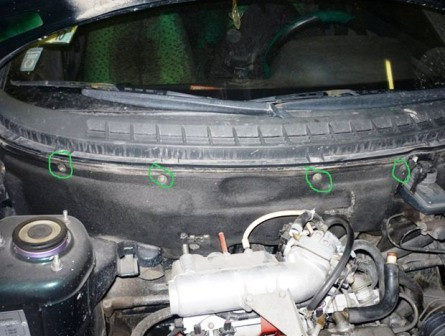
Remove the plastic cover
Remove the mounting clips and remove the front cover
Unscrew the cabin filter cover
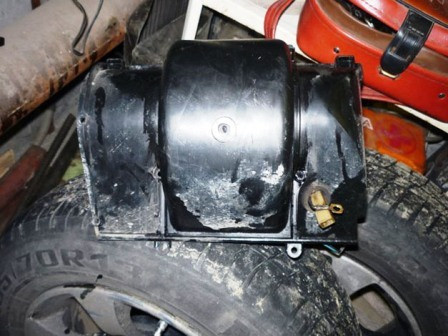
Removing the Fan Assembly
Unscrew and remove the cabin filter cover
Removing the heater radiator
We clean the vacant space, dry it, install a new interior heating radiator. We mount in the reverse order.
After this work, you will be amazed at how quickly and strongly the interior of the car heats up. The antifreeze leak will also disappear.
Do-it-yourself roof lining removal and replacement VAZ 2113, 2114, 2115
We advise you to see another way to replace the interior heater radiator with a VAZ 2110, 2111, 2112 in the video below.
Replacing the radiator of the VAZ 2110 stove of a new and old model: prices and photos
I own a VAZ 2110. It is clear that this is far from a foreign car, but my car suits me perfectly. Good dynamics, simple and convenient control, low fuel consumption. What else do you need for daily trips around the city?
A few years ago I ran into the problem of replacing the radiator of the VAZ 2110 stove. I noticed an antifreeze leak. As experts explained to me, the reasons for such a failure can be very different.
To eliminate such a nuisance, it is necessary to remove the engine protection. In a car service, I was advised not to suffer and be perplexed, but to immediately install a new device.
Having learned the price of replacing the stove radiator with a VAZ 2110, I decided to do it on my own. Together with the work, the workers wanted 3000 rubles. Maybe I haven't been there, but it seems like I've known the auto repair guys I picked up for a long time. They have no reason to cheat.
I'm good with cars, so I didn't spend money on car maintenance. I had a repair manual for this car. As a rule, each owner has such literature.
It contains only clear and detailed instructions, which even a beginner can easily understand.
However, I decided to share my practical experience. I will tell you in detail about all the nuances and features of such a repair.
What you need to know?
First of all, I want to make one point. To replace the heat exchanger, it is not necessary to remove the panel from the passenger compartment. All repairs are carried out exclusively under the hood. Now about the main thing. VAZ 2110 radiators can be:
- old-style, issued before September 2003;
- new designs produced after the expiration of the specified period.
Be sure to consider this point, as the replacement procedure in both cases will be different. In addition, this information will be useful to you when buying a heat exchanger. Before starting work, it is necessary to prepare all the materials and tools that will be required for replacement. What do you need:
- clamps in the amount of at least 4 pieces;
- sacral screwdriver;
- tweezers;
- quality radiator.
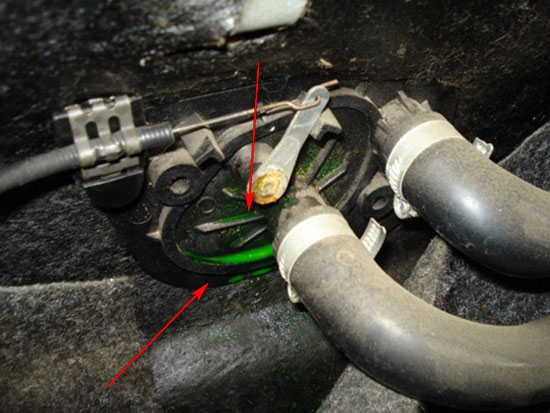
Before replacing, it is necessary to drain the antifreeze. Here are two options:
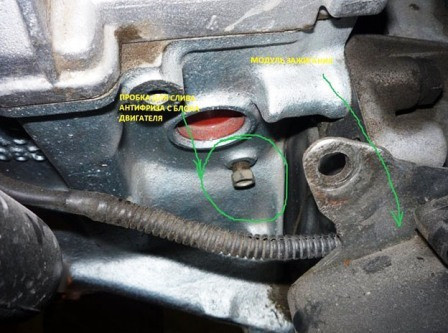
- Drain the antifreeze from the cylinder block. To do this, unscrew the plug of the expansion tank. As a result, the pressure will drop. Next, unscrew the drain plug. It is located behind the ignition block. Replace bucket and collect antifreeze. The total volume should be about four liters.
- You can drain the antifreeze using only the expansion tank. In this case, disconnect the hose from the stove. The volume of the drained liquid is usually equal to one liter.
Old sample
Now the most important thing. We are starting to replace the old-style VAZ 2110 stove radiator. It is important to clearly follow all the steps and not rush. Here is a detailed list of their actions.
- Remove the rubber seal and windshield.
- Loosen the screw on the cover. It is located under the master brake cylinder.
- Loosen the four screws at the top of the casing.
- Disconnect two collars from a plate on which hoses and wires are fixed.
- Disconnect the positive terminal and the negative wire of the fan from the body.
- Remove the two screws located on the left side of the cover. Move it forward a little. It is not necessary to completely remove the cover.
- Remove the windshield trim by removing the two nuts and five screws.
- Remove the vapor outlet from the expansion tank.
- Disconnect the windshield washer hose. Next, unscrew the four screws.
- After removing the wipers, remove the windshield trim.
- Remove the clips from the heatsink and fan shroud.
- Unscrew the front fan shroud.
- Also unscrew and remove the screws from the cabin filter housing.
- You can then remove the rear fan shroud.
- Now loosen the clamps.
- Disconnect the supply hoses and the damaged radiator.
- After repair, we collect all the elements in the reverse order.
New sample
When replacing the radiator of the VAZ 2110 stove of a new sample, it should be noted that it is attached to the car body due to:
- a screw located in the middle of the end of the windshield in its lower part;
- two nuts located on the exhaust manifold;
- nut, which is located on the left near the filter.
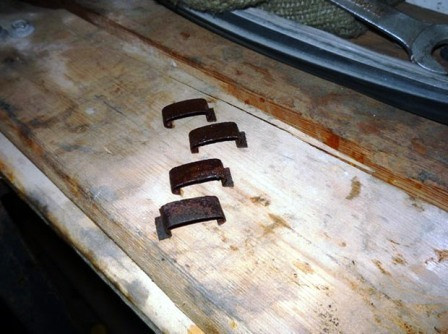
The new sample heat exchanger consists of two main blocks. Before installation, they must be separated by removing the left and right parts. After removing the right side, disconnect the steam outlet hose. In turn, the right side also consists of two blocks. They are connected to each other with brackets.
By removing them, you will separate the parts and gain access to the shock absorber. I recommend changing to a new one. This completes all the work.
There is nothing complicated in replacing the radiator. It is enough to strictly follow the procedure and not to rush. The whole process of disassembly and assembly when replacing the radiator of the VAZ 2110 stove can be seen in the photos and videos that I posted on this page. Do-it-yourself repair will help you not only save money, but also better understand the technical aspects of your iron "friend".

With age, domestic cars will require more care and attention. It's good that I figured it out in time, because I would have to spend as much money on a car service as the cost of a car. And this, as you know, is not profitable at all.
I am a fan of domestic cars and try to maintain the status of his iron favorite for a long time. As it turned out, in addition to the experience accumulated in the repair. If you have any questions, you can contact me through the comments and I will answer you as soon as possible. I want to find like-minded people, so don't forget to ask questions.
Replacing the stove radiator (heater) with video
The most time-consuming work associated with the interior heating system on VAZ 2110-2112 cars is the replacement of the stove radiator, well, or the heater, call it what you want. Of course, it is not so easy to carry out this repair on machines of the 10th family, and there is little pleasure in this, but everyone can do it. The main thing is patience and, of course, the availability of the right tool.
Necessary tool for heater radiator replacement
To cope with this problem as comfortably as possible and carry out repairs with minimal labor costs, it is advisable to have the following list of tools at hand:
- Large and small ratchet handles
- Head 13 deep and 10 similar
- Expansion
- Phillips screwdriver standard length
- Short screwdrivers: flat and Phillips
- Magnetic pen
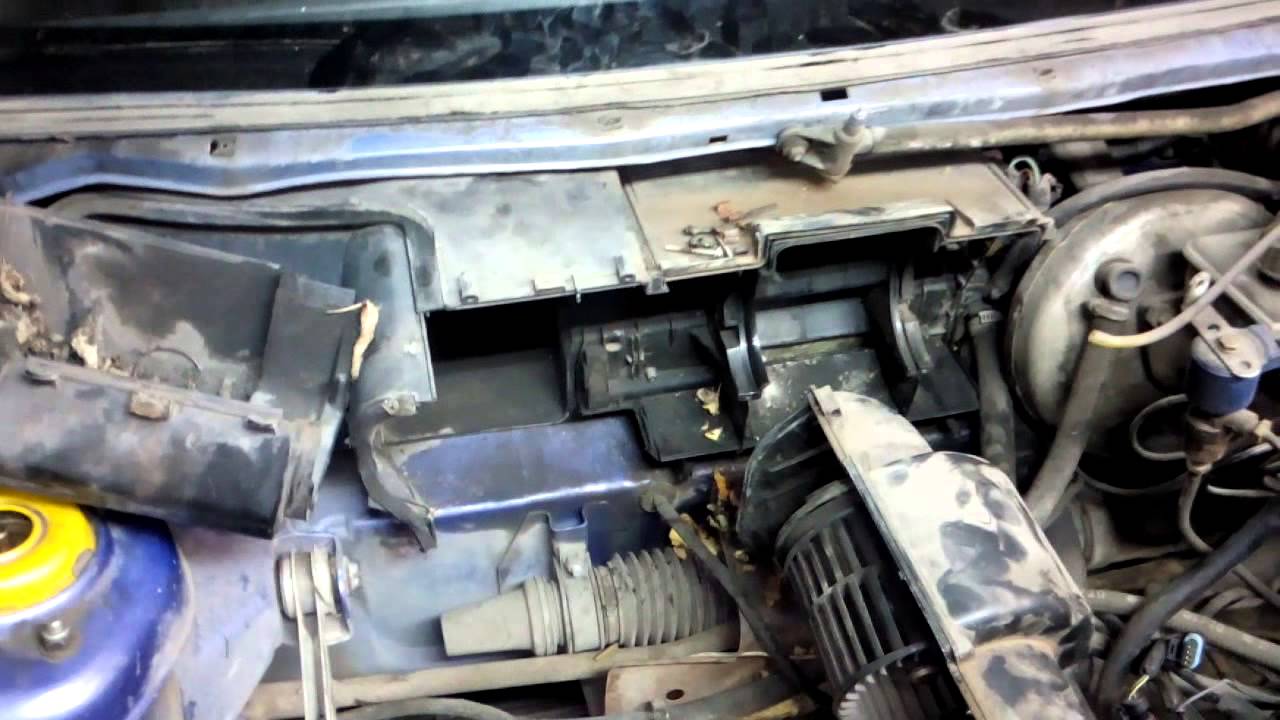
Since the stove radiator is located in a rather inaccessible place, you will first need to perform several preparatory steps, namely:
And only after that you can proceed directly to the execution of the process.
Video on replacing the stove radiator on the VAZ 2110, 2111 and 2112
Already in the style familiar to everyone, I first post my video review of the repair, and then I will give a few words about replacing this part.
Please note that for simplicity and convenience when carrying out this repair of the VAZ 2110, it is better to first unscrew the master brake cylinder, as well as the vacuum brake booster. And move all these parts a little to the side so that they do not interfere with the removal of the radiator from the stove.
Of course, you don’t need to unscrew the brake pipes, just unscrew the two nuts that hold the cylinder to vacuum, and then remove the entire assembly. As for the amplifier, there are 4 nuts on the passenger side under the steering shaft that need to be unscrewed. And after that, you can take this part a little to the side.
To maintain the tightness of the heating system, or rather your body, be sure to keep the foam sealing gasket in good condition, which is glued around the entire perimeter of the radiator.
Also, be sure to install clips, metal spring clips, especially at the bottom of the inner casing of the heater motor. If this is not done, the case may not fit properly and heat may be lost due to air circulation.
When installing a new heating radiator on a VAZ 2110-2112, make sure that the pipes that you put on the pipes are elastic and not damaged. Of course, some car owners resort to the help of a sealant in this case, but it is better to replace the nozzles with new ones. The clamps are tightened with screws with a force above average so that the antifreeze or antifreeze does not leak anywhere.
As a result, we install all the removed parts in the reverse order and rejoice at a working heating system. A new stove radiator for a VAZ 2110-2112 can be purchased at a price of 600-1000 rubles.
The main aspects of the heating system VAZ 2112 16 valves: how to change the radiator of the stove?
As you know, the purpose of the heating system is to provide a more comfortable ride. In frost, the operation of a car with a faulty stove will be almost impossible, since the heater simply will not be able to warm up the interior. What is a VAZ 2112 16 valve heating system, what malfunctions are typical and how to replace a radiator? See below for detailed instructions.
On VAZ 2112 cars, supply and exhaust ventilation is used. The air flow in this case enters through special holes that are located in the windshield linings.
The air itself can be forced in, under the action of the heater fan or arbitrarily. Air flows out of the passenger compartment through the gaps between the door panels, as well as through their ends.
Special valves are built into these holes that allow air to pass outside, and also delay its entry into the interior, which improves thermal insulation in the cabin.
- The radiator device serves to heat the air flow, this unit sets the required temperature, as a result of which the air is heated.
- The main elements of the heating system:
- The radiator itself. It is installed in a plastic case located horizontally under the control panel.
- The design itself includes two rows of aluminum hoses, on which two plastic tanks are installed. There are two fittings on the left tank: through one it drains, and through the second antifreeze enters the system.
- Dampers are used to control the amount of incoming air. If these elements are installed in extreme positions, the air flow will not enter the passenger compartment.
- Another feature - unlike other VAZ models, in 2112 there is no heater valve designed to shut off the antifreeze supply. Consequently, when the engines are running, a constant heating of the radiator device is ensured, which contributes to the rapid heating of the passenger compartment. Thanks to a significant reduction in joints, the tightness of the system is significantly increased.
Possible heater malfunctions and ways to eliminate them
What are the symptoms of a malfunction in the heating system:
- the consumption of antifreeze has increased, in the expansion tank there is a constantly reduced volume of liquid;
- the interior of the vehicle practically does not heat up;
- traces of antifreeze leaks began to appear under the bottom of the car;
- traces of fat began to appear on the inner sides of the glasses, the glasses sweat a lot;
- the smell of refrigerant in the car (the author of the video is the channel in Sandro's garage).
For what reasons does the VAZ 2112 stove not work:
- One of the most common problems is the failure of the radiator, there are two ways to solve the problem: repair the radiator device or replace it. Repair is relevant if the damage to the device is not serious and its case can be soldered. But often the repair does not go through, so the drive needs to be replaced.
- Failure of the gear motor, that is, the stove itself. As for troubleshooting, here you need to act on the malfunction. If possible, then of course you should try to repair the motor itself, but it is usually replaced.
- Without antifreeze. This problem is usually related to a leak. Leaks can come from the radiator assembly, thermostat, or damaged pipes. If the radiator and thermostat are intact, you should check the condition of the hoses and especially their connections. If the pipes are cracked and show signs of damage, they should be replaced.
- Thermostat failure. For this reason, even if the liquid is partially circulated through the system, the stove will not be able to heat the interior. When the thermostat fails, the device is usually replaced.
- The heater control unit does not work, in particular, we are talking about a module located in the center console. If the control model refuses to work, the stove simply will not be able to receive signals to turn on, turn off and change modes. If the problem lies precisely in the unit, it will need to be replaced, but often such malfunctions are associated with damage to the electrical circuit or poor contact between the device and the system.
Criteria for choosing a stove radiator
As for the choice, before buying, you need to find out which stove is installed in your car - old or new. Depending on this, a radiator device is selected (the author of the video is the MegaMaychem channel).
Instructions for replacing the heater radiator
Due to the fact that the “dvenashka” can be equipped with both an old and a new radiator block, the procedure for replacing the device may differ. We will consider each of the options separately.
So, how to replace the stove radiator in a new type of system:
- First you will need to turn off the ignition and disconnect the battery. Open the cap of the expansion tank, then place a tank with a capacity of about 4-5 liters under the drain hole and drain the coolant. If there is sediment in the antifreeze, it would be better to change the consumable.
- Next, unscrew the nuts and remove the wiper blades.
- Having done this, you need to remove the plastic trim, which is located under the windshield, it is fastened with two nuts and four self-tapping screws.
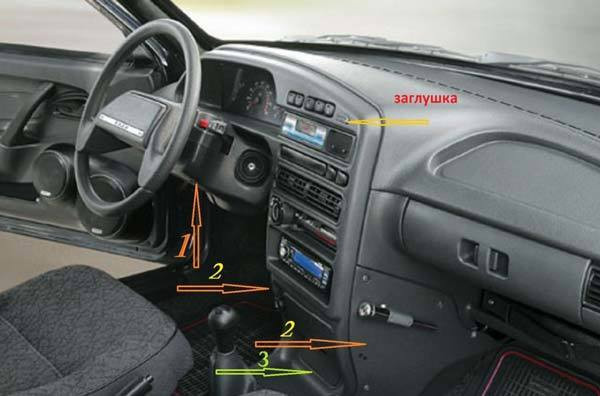
- To get to the heating device, you need to disassemble the steering wheel, unscrew the five screws, two nuts and one more screw that are located below, in the area of the steering rack, as well as in the middle of the steering wheel.
- To remove the heater, you will need to remove the cross member, if any. Of course, spacers may not be. You should also remove the air cleaner corrugation and throttle hoses from the radiator assembly.
- Next, disconnect the wiring from the heater terminals.
- After that, it is necessary to unscrew the two nuts from the steering rack, with which the heater is attached, as well as the nut that fixes the device to the body.
- Having done this, you need to unscrew three more screws, with the help of which the two halves of the heating element are connected. After that, you can remove and, by swinging, disconnect the right side of the heater from the left.
- The radiator assembly itself is in a disassembled half, it is fastened with three bolts. We remove this device and install a new one in its place, of course, a foam seal must also be installed. Then the operability of the fan is checked, if necessary, the device should also be changed. Before assembly, it is necessary to flush the pipes through which the coolant enters. Assembly is carried out in reverse order.
Photo gallery "Replacing the radiator"
- Drain the antifreeze from the system
- Disconnect the power cables.
- Remove the heater.
Regarding the replacement on older systems:
- In this case, you also need to drain the consumable, disassemble the jet, disconnect the throttles from the hoses and turn off the heating element.
- After that, the expansion tank is removed, into which the liquid is poured.
- Next, the brake booster is disassembled, for this, with a 17 key, unscrew the two nuts and carefully remove the brake master cylinder. In doing so, you will be as careful as possible so as not to damage the brake hoses. The vacuum booster hose must be removed.
- After that, in the passenger compartment, unscrew the four nuts from the brake pedal studs. The vacuum booster itself is disassembled along with the pedal.
- So, you were able to access the radiator device. You just need to unscrew the three screws that secure it, and then replace the device with a new one. Assembly is carried out in the reverse order, do not forget to fill in antifreeze.
Price issue
Depending on the manufacturer, as well as the version of the heater (old or new), the cost of the radiator may differ. New radiators will cost the buyer an average of 350-1400 rubles, in the secondary market you can find a working radiator for 300-500 rubles.
Replacing the Radiator of the Stove Vaz 2112 New Sample
Now you can pour antifreeze or antifreeze into the system. We warm up the engine until the stove fan turns on.
We check the temperature in the cabin under different heating modes, the operation of various electrical equipment and the dashboard.
If, after repair, the stove pipes remain cold when the heating is turned on, an air lock may have formed in the system hoses.
In many cases, the tightness of the clamps is checked first for accounting (software). You, they are the cause of the leaks.
And now what is actually happening, how is the replacement of the radiator of the VAZ-2112 stove 16 valve of different samples
Cooling system of the new sample
The sequence of his actions in this case is as follows:
- First, for safety reasons, disconnect the negative battery terminal. We drain the cooled antifreeze or antifreeze, after opening the expander cover. To drain the water, a container with a volume of 4-5 liters is useful
- Now, unscrewing the two nuts, remove the wipers from the car.
- Then we dismantle the released plastic protective pad under the windshield, which is fastened with 2 nuts and 4 screws.
- To access the stove, remove the steering wheel from the cart by unscrewing 5 screws, 1 screw and 4,5 nuts located at the bottom, in the center of the steering wheel, near the control rail.
- To remove the stove, remove the yellowed crossbar, if any, as well as the curved corrugation of the air filter.
- We take out the accelerators from the radiator pipes.
- Then we disconnect the stove from the terminals, our client still has electronic cables.
- On the control rail, unscrew the 3,2 nuts securing the stove, 1 nut securing the stove to the body.
- We twist 3 screws that connect the two halves of the stove.
- We take it out by turning the right side of the stove, moving it to the right earlier.
- The radiator in the removed half of the stove is fastened with 3 screws. We take it out and change it to a new one, not forgetting to put a foam pad. We check the operability of the fan, if necessary, repair it or change it to a new one.
- Before installing the assembly, it is better to rinse the antifreeze supply hoses under running water.
- Reassemble in the reverse order.
Old-style cooling system
Such heaters were installed on models 21120 of the first years of production. You can determine the modification of the system by its appearance by removing the steering wheel from the car.
To replace the radiator you need:
- Follow steps 1, 4-7 to remove the cooling system from a new sample.
- We disassemble the expansion tank of the cooling system.
- We remove the brake booster by unscrewing 2 nuts by 17 and carefully (without damaging the tubes of the brake system) we take the brake master cylinder to the side. Remove the vacuum booster tube.
- In the cabin, unscrew 4 nuts from the brake pedal studs and remove the booster from the car along with the pedal.
- Thus, we have access to the heater core, which is attached with three screws. We replace it and assemble the entire system in the reverse order.
Checking for correct installation
How to change the radiator of the VAZ-2112 stove 16 valves of various samples Signs that it is necessary to replace the radiator of the car's heating metering system:
- high consumption of antifreeze antifreeze (antifreeze or antifreeze) in the car cooling system (antifreeze or antifreeze);
- the heating inside the car does not work;
- traces of antifreeze leaks on the asphalt under the heater radiator, that is, leaks in the hoses supplying liquid to the stove;
- the smell of antifreeze in the cabin;
- oily coating on car windows, their fogging.