Chery Tigo clutch replacement
The Chinese car Chery Tigo is very popular. The model gained such success and fame due to its affordability, excellent quality, stylish design, as well as comfort and ease of use. Like any other car, Chery Tiggo can break down over time, so it will be useful for the owners of this vehicle to know how to repair and replace the internal elements of the car.
Today in the article we will look at how the Chery Tigo clutch is replaced, describe in detail the sequence of actions and give useful tips for high-quality and fast work. If you are also faced with a similar situation, we recommend that you read the instructions below.
Tools and preparatory work
Replacing the Chery Tigo clutch can take quite a bit of time, but you should not rush, it is important to carefully plan everything and prepare the tools with the workplace. To perform all the manipulations, you will need to prepare the workplace, empty the garage or start the car on the repair bridge. You will also need to purchase the following materials and tools:
- To replace the clutch, you will need to purchase a clutch disc and clutch basket, as well as a release bearing for Chery Tiggo.
- To perform all the manipulations, you will need to prepare a set of screwdrivers and keys.
- The car will need to be raised, so you will need a jack and wheel chocks.
- For convenience, you should take a rag for cleaning the internal parts of the car and a container for draining the oil.
This set is the minimum required for clutch replacement work on a Chery Tiggo. If necessary, you can prepare additional tools and materials that will help facilitate the process.
Replacing the clutch
If you have prepared the workplace and stocked up with all the necessary tools and materials, you can begin the process of doing the work. Chery Tigo clutch replacement will be carried out according to the following plan:
- The first step is to gain access to the gearbox, for this you need to remove the battery along with the air filter, support and terminals.
- In the vacated place, you will see the gear cables, they need to be unscrewed and set aside so that they do not interfere with further manipulations.
- After performing these manipulations, you can put the car on a jack. For additional stability, you can first raise the machine and then place support blocks under it.
- Remove both front wheels, and then disconnect the protection elements in front of the bumper. Substitute the jack under the subframe, unscrew all the bolts securing the subframe to the body and steering rack. Below you will see a longitudinal support, which is fixed at the front thanks to the body cross member, and at the rear is held between the subframe and the support bracket.
- To remove the longitudinal support together with the subframe, you must first unscrew all the fastening screws. There should be four of them, 2 in front and 2 in the back. After that, you will need to unscrew the transverse levers from the ball joints, this can only be done with a special scissor puller, which is quite difficult to find at home. In this regard, you can simply unscrew the fixing nuts and remove the bolts to separate the levers from the ball joints.
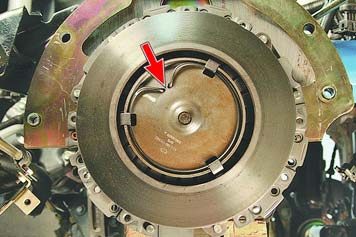
- Remove the ball bearings from the recesses of the levers, at the same time disconnect the longitudinal support together with the subframe and levers. At the final stage of preparation for replacement, it is necessary to unscrew the rear part of the gearbox bearing and drain the oil into a previously prepared container.
- Now you need to separate the gearbox from the engine. To do this, unscrew all mounting and fixing screws. By depriving all points of contact between the engine and gearbox, you can hang the engine with a winch. Before lifting the engine, it is worth taking a jack under the box so that it does not fall through. Between the jack and the gearbox, it is best to place a wooden block or a piece of rubber so as not to damage the elements of the mechanism.
- After disconnecting all the mounting bolts, we release the left gearbox support, we begin to smoothly swing the gearbox in a horizontal direction. This will allow you to finally disconnect the engine from the gearbox.
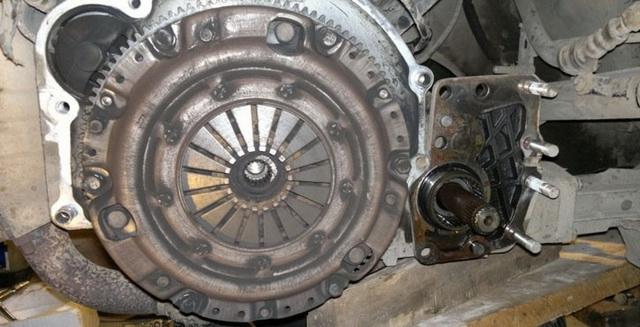
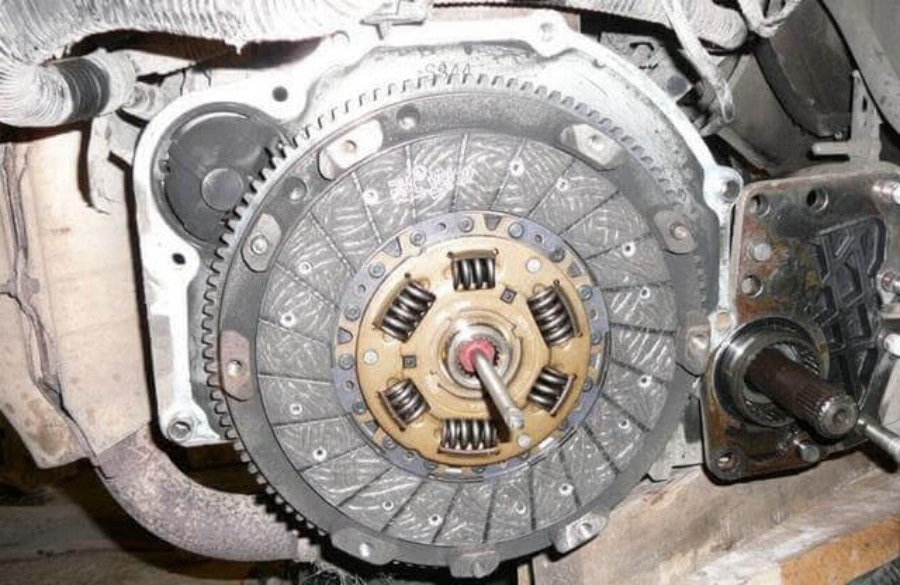
- You now have access to the clutch basket with disc and flywheel. Remove all fixing screws to remove the basket. In this case, it is worth holding the driven disk so that it does not fall out of the attachment point. Carefully inspect the exterior and evaluate the amount of damage, if there is time, you can clean the insides or replace parts.
- At the final stage, it is necessary to install the clutch basket that fixes the driven disk. The release bearing is also installed on the gearbox side. After that, it remains only to assemble the car in exactly the reverse order.
Following the instructions above, you can disassemble the car to get to the necessary parts, as well as replace the clutch at home with your own hands. If you doubt your abilities, we recommend that you contact the service center. Timely diagnosis of problems and troubleshooting of vehicle systems will extend the life of the car and reduce the cost of more expensive repairs in case of serious breakdowns.