Replacing wheel bearings on Chevrolet Niva
Content
The wheel bearings of the Chevrolet Niva are subjected to heavy loads during operation. Therefore, it is necessary to monitor its condition and change parts in time. Otherwise, the risk of collision due to a seized bearing increases.

Symptoms of a malfunction
Bearing wear manifests itself in the form of the following symptoms:
- Vibration of the front wheels, which can be given to the steering wheel or felt in the cabin.
- Knocking or creaking in the front of the car while driving;
- Heating of forward wheels in area of an axis.
With such manifestations, you need to check the condition of the wheel bearings. To do this, raise the car and shake the steering wheel in different directions. Play and unevenness in the bearing area indicate the need for replacement and adjustment. The malfunction can also manifest itself in the form of noise when the wheel rotates.
Separately, it is worth mentioning two problems that arise during the operation of the Chevrolet Niva:
1. The cubes are heating up. It is important to understand that when braking, the kinetic energy of the car is converted into heat. As a result, the brake discs and the hubs to which they are attached become very hot. Heating of the part during movement, and not during braking, indicates wear of this bearing or its incorrect adjustment.
The second option is typical for adjustable buckets. The adjusting nut must be tightened with a force of 2 kgf * m. If you tighten it too much, the tapered bearings will be too tight.
Its rotation will be difficult. Continued operation of the machine under these conditions will damage the bearings and seize the wheels.
2. The adjusting nut is unscrewed on the go. Sometimes this happens literally after 20-50 kilometers. The phenomenon is observed in three cases: the master forgot to tighten the nut, there was a misalignment between the bearing cages, or a gap appeared at the junction of the CV joint and the hub.
How to change the hub bearing on a Chevrolet Niva with your own hands?
To repair you will need:
- Powerful socket wrench for 30.
- Tie rod pin puller
- A mandrel for pressing out a bearing or a piece of pipe of a suitable diameter.
- A set of spanners or ratchet sockets.
- Globe key.
- A hammer.
- Round nose pliers.
- Jack.
- Anti-reverse stops.
- Vice.
- Install.
- Wrench.
- Wooden boards or blocks.
The replacement process is divided into five stages:
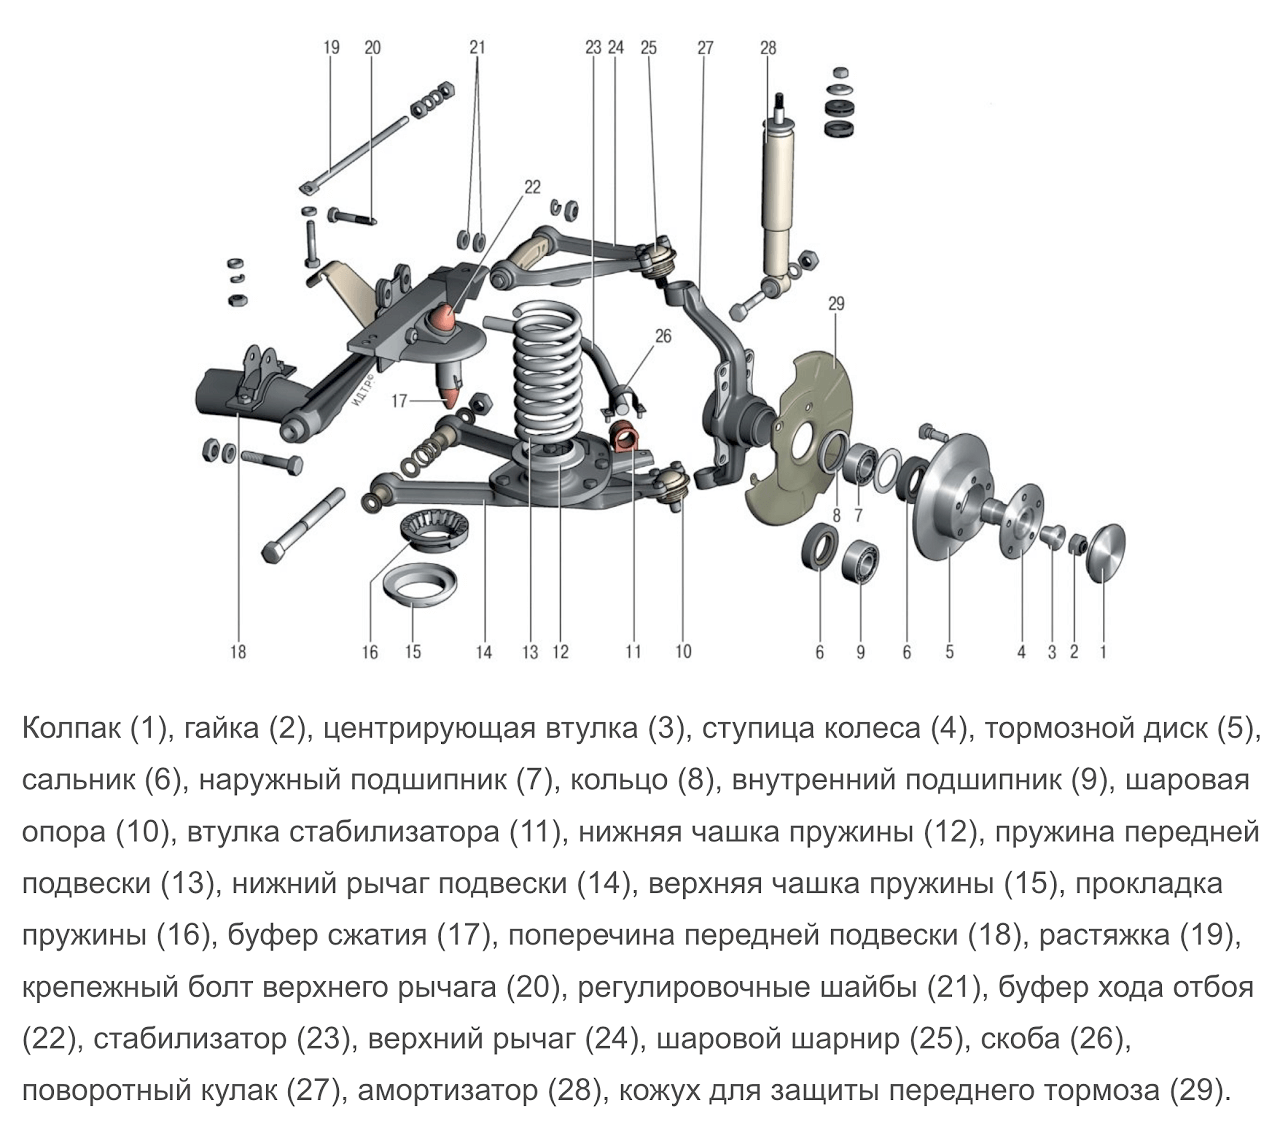
- Disconnect the assembly (brake disc, hub and steering knuckle) from the CV joint.
- Removing old bearings.
- Installation of new parts.
- Assemble the assembly and install it in place.
- Tighten the adjusting nut.
Work is performed on a flat surface. The presence of a viewing hole is not required.
To replace bearings, follow these steps:
Put the car on the platform and place wedges under the rear wheels.
Raise the wheel.
Loosen the wheel bolts.
Build an impromptu wheel stand under the frame spar, putting boards or timber on it, and lower the jack so that the car rests on it.
Raise the lower suspension arm while compressing the suspension spring.
Turn the steering wheel to the right or left (depending on which side you are switching from).
Unscrew and remove the bracket, caliper and brake pads.
Suspend the caliper so that it does not load the brake hose with its weight.
Turn the steering wheel in the opposite direction.
Remove the ABS sensor.
Loosen and loosen the nut on the tie rod.
Remove the pin with a puller.
Attention! Without a puller to remove the pin from the stem, you can disconnect it in another way. To do this, you will need to dismantle the steering arm from the steering knuckle.
Loosen the hub nut.
Remove the ball joint bolts.
Carefully remove the hub together with the steering knuckle, ball joints and brake disc.
Remove the protective screen from the caliper.
Remove the brake disc.
Unscrew the steering lever.
Hold the steering knuckle in a vice.
Remove the seals with a pry bar or a powerful screwdriver.
After replacing the mandrel, remove the outer races of the bearings.
Wipe and clean the seat.
Remove new bearings.
Press the outer rings into the hub using a mandrel or old parts.
Important: The clips are installed with a wide edge inside. Pressing can be facilitated by preheating the cube.
Apply lubricant to ⅔ of cage space.
Install raceway and inner ring.
Gently press on the new seal.
Repeat the bearing assembly operation on the other side of the hub.
Put the knot on the CV joint splines.
Tighten the hub nut.
Screw the ball and steering arm.
Install the protective cover and caliper bracket.
Tighten the screws holding the protective screen and lock.
We put the caliper with brake pads in place.
Raise the car.
- Install and secure the wheel.
- Tighten the hub nut by lightly tapping the wheel in the 6 and 12 o'clock directions.
Detailed video on replacing wheel bearings.
Wheel Bearing Adjustment Sheaves
To work, you need an indicator and a torque wrench.
To prepare for wheel bearing adjustment, the following operations must be carried out:
- Install the indicator by resting its leg against the hub next to the adjusting nut.
- Put ring wrenches on the studs and secure them with nuts.
- Rotate the sleeve and move it axially. (Screw keys are used as handles).
- Measure the amount of axial displacement (backlash) of the hub, focusing on the indicator readings.
- If the stroke exceeds 0,15 mm, adjust the clearance.
Important: during tightening, it is necessary to turn the hub in different directions.
- Loosen the nut and tighten again with a torque of 0,7 kgf * m.
- Loosen the tightness by turning the wrench 20-25 degrees counterclockwise.
- Check out the hub game.
- Make sure that the indicator values are correct (0,02-0,08 mm).
- Lock the nut by pushing its edge into the recess of the outer CV joint.
You can adjust the hub clearance without using a torque wrench. For this you need:
- Tighten the nut.
- Spin the wheel a few turns.
- Check clearance.
- Loosen or slightly tighten the nut if necessary.
- Continue until hub free play is between 0,02 and 0,08 mm.
- Lock the collar of the nut.
Video instructions for adjusting the wheel bearing.
The Chevy Niva can be equipped with non-adjustable IVECO bearings. To do this, you need to buy the appropriate hubs or remake the old ones. To modify you will need a template drilling machine. In addition to drilling the mounting hole, you will need to make spacer rings. Detailed drawings are available at the link.
Attention! Alteration makes sense only if you have turning skills and free access to the machine. Otherwise, it is easier and cheaper to buy ready-made hubs for non-adjustable bearings.
The rear wheel mounting scheme for the Chevrolet Niva is very different. However, bearings are also used there, which need to be replaced periodically. Change them together with axle shafts or separately. The second option is much cheaper, but requires good locksmith skills and a torch to heat the metal.