Replacing the fuel filter
The fuel filter is changed every 40 km, according to Honda's regulations. But since sometimes the fuel does not match either the octane number or the content, and rust floats in the gas tank with an incomprehensible liquid, the fuel filter needs to be changed more often. On a 000th and 6th generation Honda Civic, the job only takes 5-15 minutes with a few keys and a rag.
What causes a bad clogged fuel filter
Lean mixture (white plugs), loss of power, poor low rpm and idle, poor engine starting in winter are all major causes of fuel filter fouling, unless of course the vehicle is 20 years old and has other ailments such as fuel fouling. injectors or misfiring.
Filter Selection
For Honda engines, the filter catalog number is 16010-ST5-933, in principle, you can take any brand as a replacement, but mainly Bosch and the original Toyo Roki. The kit should have copper washers-gaskets. The information is relevant for engines D14A3, D14A4, D15Z6, B16A2, D15B and many others.
All work is best done in a warm room at 20 degrees. In addition to the fuel filter, you will need the following tools:
- head for 10 heads or cap,
- fixed key for 17 low handles
- heads WD40
- key for 19
- key for 14
- keys 12, 13 bifurcated
Split (improved) and wrenches with an open mouth. The slit is more suitable for accessories, as it has a large circumference area.
First, open the gas tank cap and remove the cap. This will slightly reduce the pressure in the system. Then, in the engine compartment fuse box, disconnect the No. 44 15 amp fuse Top Left (FI EM.
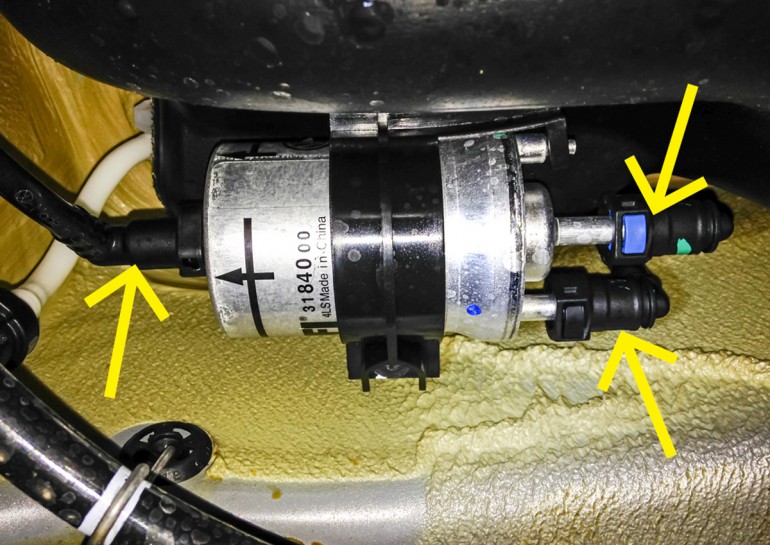
Reflection: In fact, it is the fuse that is responsible for powering the injectors, but to remove fuel from the system, it is necessary to turn off the fuel pump. We tried to start the engine a couple of times to get it to release fuel. The fuel filter is located on a metal "bracket" screwed to the body panel with 3 x 10 mm nuts.
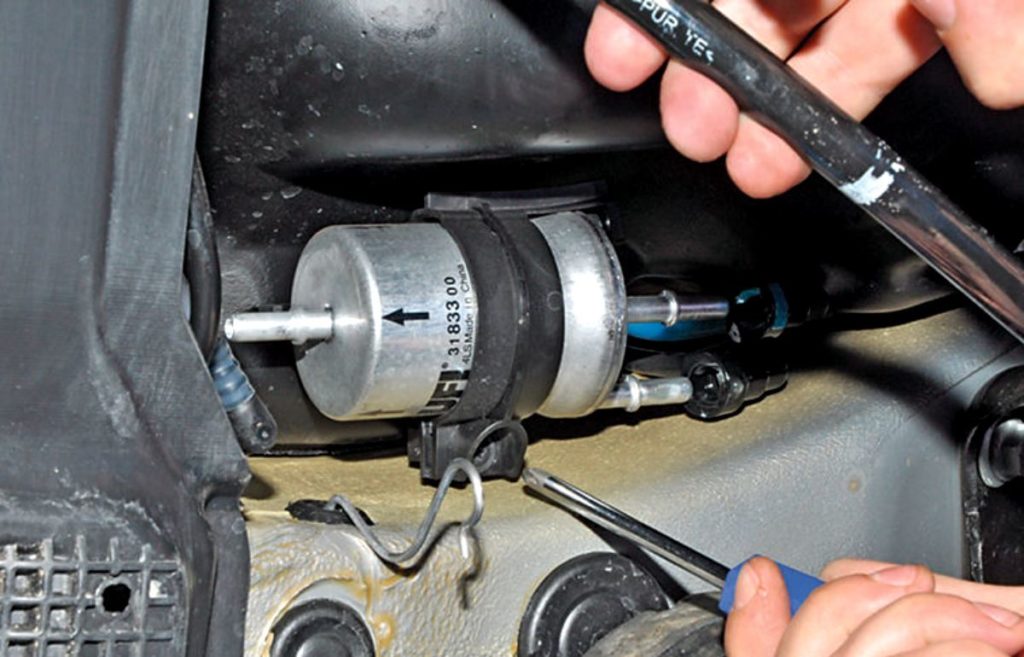
A fuel hose is attached to the top of the filter with a banjo bolt. From below - a copper tube fitting is screwed into the filter, it is better to process this part with WD40 and, having unlocked the bottom, unscrew the bolt. With a 19 key we fix the filter in the upper part, with a 17 key or a head we unscrew the screw that holds the hose. It is necessary to support the filter so as not to tear the fasteners out of the housing.
Next, you need to unscrew the fitting from below, holding the filter with a 17-14 wrench (depending on the filter model), and unscrew the fitting with a 12-13 wrench (the size depends on the state of the fitting). A split wrench is better than an open-end wrench, since it has more edges to grip, and such a wrench is simply necessary for unscrewing fittings when replacing a gasoline filter or fuel lines. Then, with a head of 10, we snap off the fuel filter holder, remove it from the "glass" and replace it with a new one. A new filter usually has plastic plugs, they are needed to transport the filter; throw it away It is important that if there were no copper washers in the kit, then you can and should buy new washers based on the old washers. Since copper is soft, it “shrinks” when mounting the filter, do not use the washers a second time. After installing the filter, turn the ignition on several times to pump fuel into the system and check for leaks. Don't forget to install the fuse first.