Replace the cylinder head gasket and reassemble the cylinder head and distribution
Content
All steps: seams, camshaft, distribution chain setup
Kawasaki ZX6R 636 Model 2002 Sports Car Restoration Saga: Episode 14
The cylinder head is finally rebuilt. We dismantled everything and cleaned the valves with Kaliamine. Everything seems to be flawless and favorable for the reassembly of the cylinder head.
All that is left is to remove the broken stud when removing the exhaust line and screw on the one that began to turn into a cylinder head.
"There is more than necessary." I should have suspected it would be too easy. And that was not the case at all. Cannot remove the pin. Heating? Niet. Degripant? Niht. Insistence. No no. With a pork tail? No better. Did nothing. Result? Winner Goujon from KO! Revenge for sweat and ideas to find.
The solution would probably be to cut the stud flush, knock and return the latched mesh. But I have no time! Therefore, I will seal the manifold very cleanly on the cylinder head with high temperature paste to avoid further leakage. A two-component blend that will never fail. In this case, a tested and approved solution.
Cleaning the piston
The pistons will also qualify for good cleaning. I check the condition of the shirts in the aisle to avoid taking the bonus jacket. RAS.
Well, I also took the opportunity to see the piston heads to clean them neatly and effectively and check the condition of the combustion chamber and its liner. Be careful not to drop anything into it, it could scratch the shirt or go into the lower engine ... Again, okay. I already like this 636 solved! On the go, I finish re-assembling after this marathon.
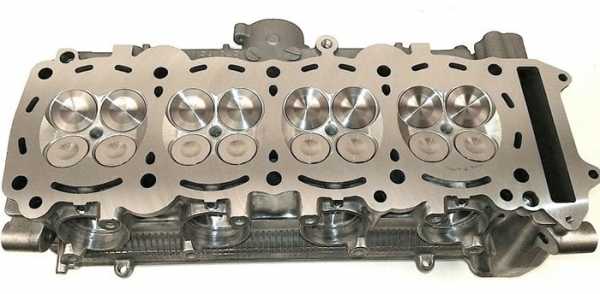
Cylinder head winding and gasket
At this point, you will have to assemble the cylinder head and install the cylinder head seal. A vital element for a motorcycle that ensures the correct circulation of fluids and the tightness of each compartment and, above all, avoids mixing. Especially fragile, it is resistant to thermal, chemical and, of course, mechanical stress. It took a long time to look for this famous cylinder head seal…. Rewind: I'll look back (with good advice) in an already published article.
Fortunately, the high-engine seals have arrived and everything seems to be in order again, literally and figuratively. Therefore, I prepare it in such a way that the connection plane, i.e. the flat surface under the cylinder head was as sharp as possible. The surfaces of the low engine and high engine in contact with the cylinder head seal are critical: they prepare the block for proper tightness.
Be careful, the cylinder head seal must be placed in the correct direction: you have no right to be wrong, and the seal must not be flattened or deformed incorrectly. For this, markers are available, including one that gives the upper surface of the connection. This famous cylinder head seal that I have run after so much avoids mixtures between the lubrication (oil) and cooling (fluid cooling) circuits. It also dries up the compression level of the engine. The pressure, at the moment, I have it! If I skip this, the engine might break at some point.
I position the junction, cut the cylinder head into rods somehow, and reconstruct the wire attached to the distribution circuit before collecting it through the body. Obviously, not everything is set up perfectly the first time around, but overall, things aren't going too badly. You see a lot. At least until the distribution sites are back in place. It took six hands (Alex, Cyril and me) and three heads to realize that a little WD40 was enough again to let this damn thing take place.
The distribution chain was ready to be pulled into your home. The thread on the foot, the screwdriver that I lock at the top of the cylinder head, I iron and replace. Finally, we replace her, Alex, Kirill and me. Cyril is nothing more than the soul of a garage with participation, but we'll come back to him.
Camshaft and belt winding
Then I put the camshafts in place. Attention, there are two different ones, so follow the markings: IN for indoor and EX for outdoor, that is, the direction in which the marker turns relative to the engine, and I put on the belt on the sprockets. Caling is a word. I change two tampons, an operation that took me crazy time due to the lack of the correct method and the happy shuya that is sometimes required for a beginner. Damn horse! Then I put the tensioner aside, which immediately presses the chain down, which is stretched. It is ready for future wear and adjustment checks.
Distribution chain timing
So now we are talking about the timing of the distribution chain. In a sense, I am syncing the low engine and the high engine. To do this, the pistons must be placed in the correct position by turning the movable crankshaft axis marker onto the fixed marker (after disassembling the housing to access it). This low point places the distribution, and then we check that we have the correct number of links between the two trees. I also check that the camshaft markers are well aligned with the top of the joint. And here I am glad: everything is perfect. Not a bunch of games. Nothing. The chain is perfectly in place, perfectly tense and in good condition. I have a smile. For good.
Now we have to cover this whole little world. The torque wrench is required and the method is immutable. These processes must be accompanied by letter and pattern: they best distribute the efforts over the fragile parts and the cylinder head gasket, avoiding the risk of misadaptation, misadjustment, in short, poor reassembly. I just keep the valves within the bilge range without going up the top of the cylinder head: the cylinder head cover and its seal. There will be a game with valves, and this will be the first for me again.
Remember
- Disassembling the cylinder head is the highlight of the revamp, but reassembly is the most difficult of the two.
- Reconstruction requires adjustment of distribution
- Leaving the pot lid open allows the valves to play in the process
- Any disassembled engine seal will have to be replaced with a new one.
- Any disassembled crankcase seals will have to be replaced with a new one.
Not to do
- Neglected game and distribution chain wear
- Reuse the already assembled cylinder head gasket
- Screw the cylinder head to feel and in the wrong order
Tools
- Key for socket and hex socket,
- torque wrench or torque adapter