How to check and independently repair a VAZ 2106 vacuum brake booster
Content
The vacuum brake booster (VUT) is one of the main components of the vehicle's braking system. Even the slightest breakdown can cause the entire system to fail and lead to serious consequences.
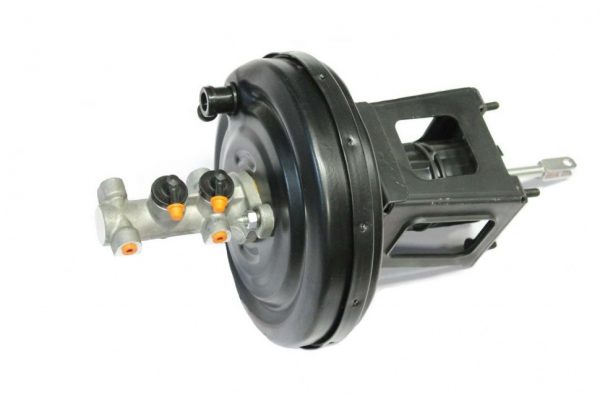
brake booster
Almost all modern cars are equipped with vacuum-type brake boosters. They have a fairly simple design, but at the same time they are very effective and quite reliable.
Purpose
VUT serves to transmit and increase the force from the pedal to the main brake cylinder (GTZ). In other words, it simplifies the actions of the driver at the time of braking. Without it, the driver would have to press the pedal with incredible force to make all the working cylinders of the system function simultaneously.
Устройство
The design of the VUT is made up of:
- case, which is a sealed metal container;
- check valve;
- plastic diaphragm with rubber cuff and return spring;
- pusher;
- pilot valve with stem and piston.
The diaphragm with a cuff is placed in the body of the device and divides it into two compartments: atmospheric and vacuum. The latter, through a one-way (return) valve, is connected to an air rarefaction source using a rubber hose. In the VAZ 2106, this source is the intake manifold pipe. It is there that during the operation of the power plant a vacuum is created, which is transmitted through the hose to the VUT.
The atmospheric compartment, depending on the position of the follower valve, can be connected both to the vacuum compartment and to the environment. The movement of the valve is carried out by a pusher, which is connected to the brake pedal.
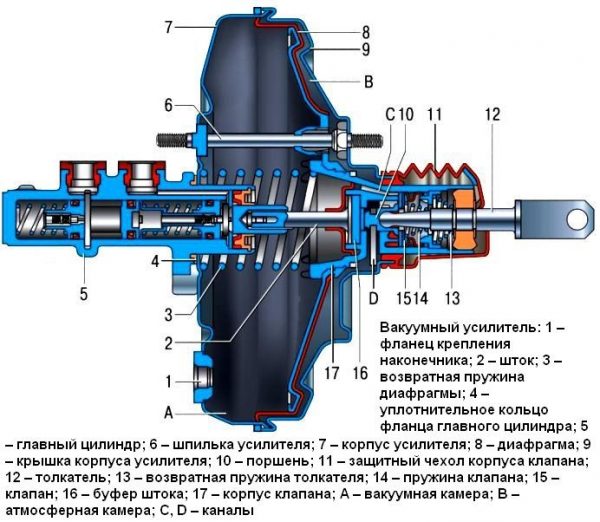
The diaphragm is connected to a rod which is provided to push the master cylinder piston. When it is shifted forward, the rod presses on the GTZ piston, due to which the fluid is compressed and pumped to the working brake cylinders.
The spring is designed to return the diaphragm to its initial position at the end of braking.
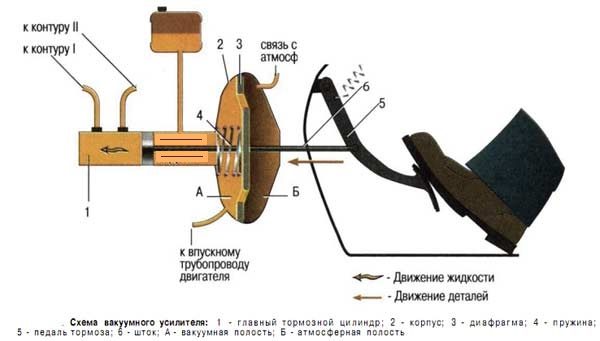
How it works
The functioning of the "vacuum tank" provides a pressure drop in its chambers. When the engine of the car is turned off, it is equal to atmospheric. When the power plant is running, the pressure in the chambers is also the same, but there is already a vacuum created by the movement of the motor pistons.
When the driver presses the pedal, his effort is transmitted to the follower valve through the pusher. Having shifted, it closes the channel that connects the compartments of the device. The subsequent stroke of the valve equalizes the pressure in the atmospheric compartment by opening the atmospheric passage. The pressure difference in the compartments causes the diaphragm to flex, compressing the return spring. In this case, the rod of the device presses the GTZ piston.
The force created by the "vacuum" can exceed the force of the driver by 3-5 times. Moreover, it is always directly proportional to the applied.
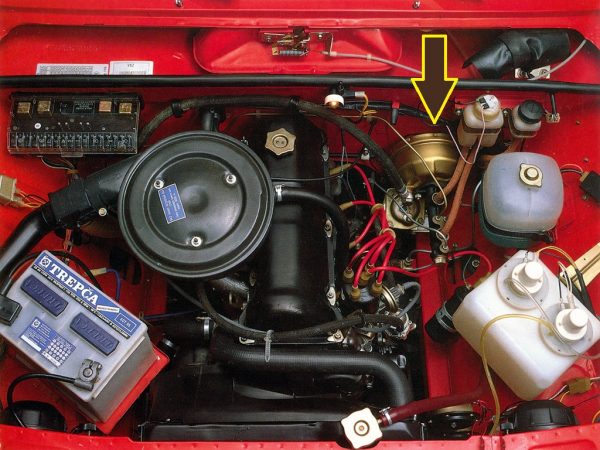
Location
VUT VAZ 2106 is installed in the engine compartment of the car on the left side of the engine shield. It is secured with four studs to the brake and clutch pedal bracket plate. The GTZ is fixed on the body of the "vacuum tank".
Common breakdowns of VUT VAZ 2106 and their signs
Since the vacuum type brake booster has a simple mechanical design, it rarely breaks down. But when this happens, it is better not to delay the repair, as driving with a faulty brake system is unsafe.
Breakdown
Most often, the "vacuum tank" becomes unusable due to:
- violation of the tightness of the hose connecting the inlet pipe of the manifold and VUT;
- passing check valve;
- rupture of the diaphragm cuff;
- incorrect stem protrusion adjustment.
Signs of a faulty VUT
Symptoms that the amplifier is broken may include:
- dips or too tight brake pedal travel;
- self-braking of the car;
- hissing from the side of the amplifier case;
- decrease in engine speed when braking.
Dips or difficult travel of the brake pedal
The brake pedal with the engine off and the working booster should be squeezed out with great effort, and after 5-7 presses, stop in the upper position. This indicates that the VUT is completely sealed and all valves, as well as the diaphragm, are in working condition. When you start the engine and press the pedal, it should move down with little effort. If, when the power unit is not working, it fails, and when it is not squeezed out, the amplifier is leaky, and, therefore, is faulty.
Spontaneous vehicle braking
When the VUT is depressurized, arbitrary braking of the machine can be observed. The brake pedal is in the upper position and is pressed with great effort. Similar symptoms also occur when the stem protrusion is incorrectly adjusted. It turns out that, due to its greater length, it constantly presses on the piston of the main brake cylinder, causing arbitrary braking.
Hiss
A hissing "vacuum" is evidence of a rupture of the diaphragm cuff or a malfunction of the check valve. In the event of a crack in the rubber cuff or its detachment from the plastic base, air from the atmospheric chamber seeps into the vacuum chamber. This causes the characteristic hissing sound. In this case, the braking efficiency is sharply reduced, and the pedal falls down.
Hissing also occurs when cracks form in the hose connecting the amplifier to the intake pipe of the manifold, as well as when the check valve fails, which is functionally designed to maintain a vacuum in the vacuum chamber.
Video: VUT hiss

Engine speed reduction
A malfunction of the vacuum booster, namely its depressurization, affects not only the efficiency of the brake system, but also the operation of the power plant. If there is air leakage in the system (through a hose, check valve or diaphragm), it will enter the intake manifold, depleting the air-fuel mixture. As a result, when you press the brake pedal, the engine may suddenly lose speed and even stall.
Video: why the engine stalls when braking

How to check a vacuum booster
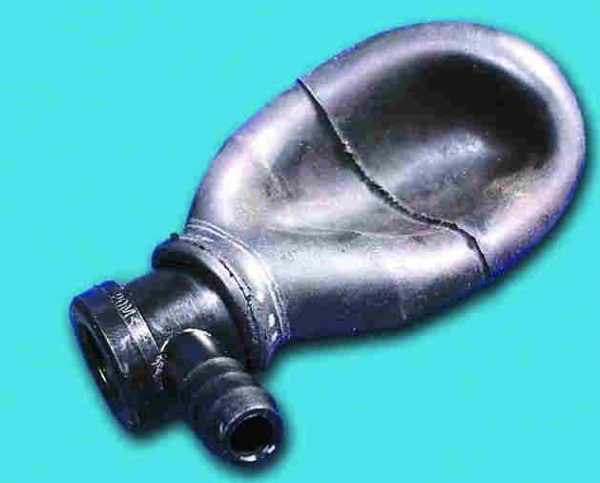
In case of manifestation of the symptoms listed above, the “vacuum cleaner” must be checked. You can determine the performance of the device without removing it from the car. For diagnostics, we need a rubber pear from a hydrometer and a screwdriver (slotted or Phillips, depending on the type of clamps).
We perform verification work in the following order:
- Turn on the parking brake.
- We sit in the passenger compartment and press the brake pedal 5-6 times without starting the engine. On the last press, leave the pedal in the middle of its course.
- We take our foot off the pedal, start the power plant. With a working “vacuum” the pedal will move a short distance down.
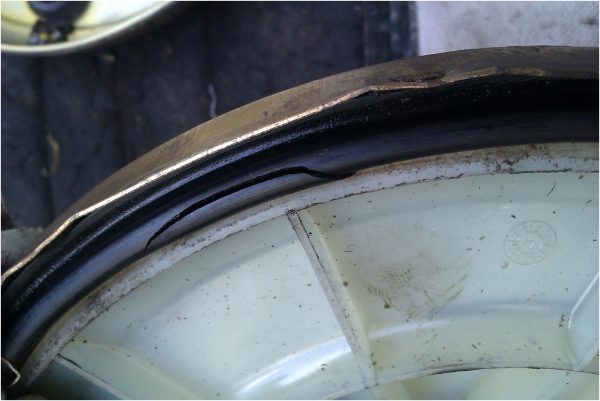
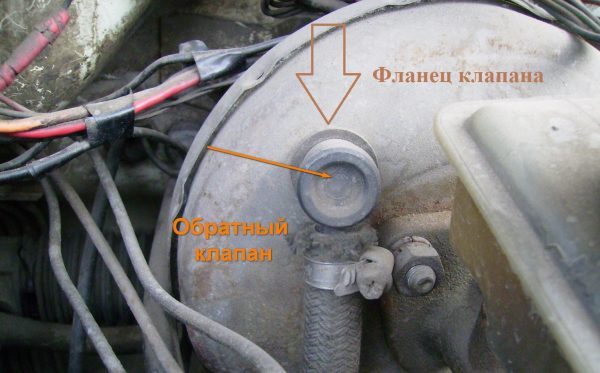
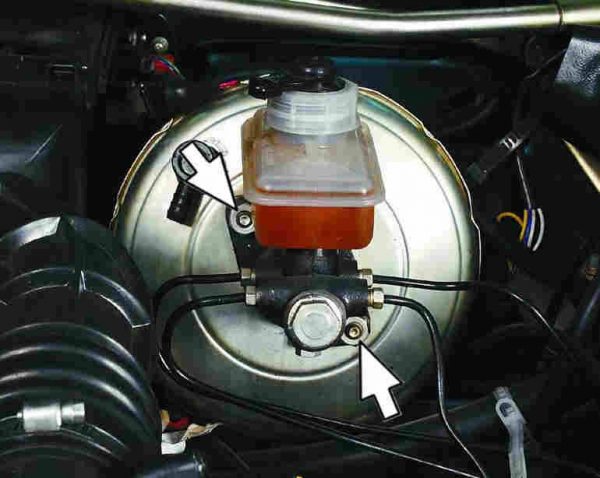
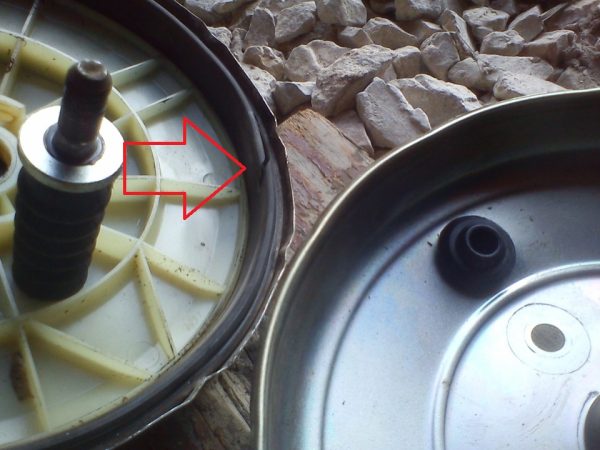
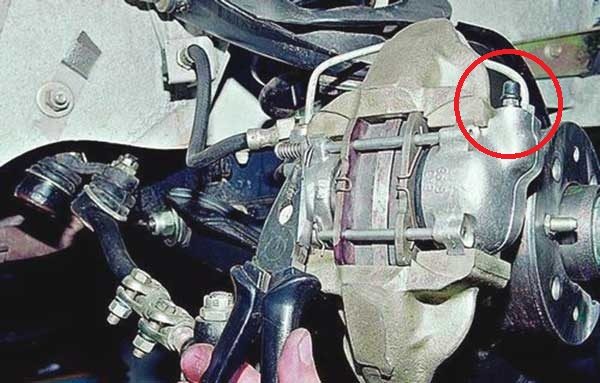
- If this does not happen, turn off the engine, go to the engine compartment. We find the amplifier housing there, inspect the check valve flange and the end of the connecting hose. If they have visible breaks or cracks, we are preparing to replace the damaged parts.
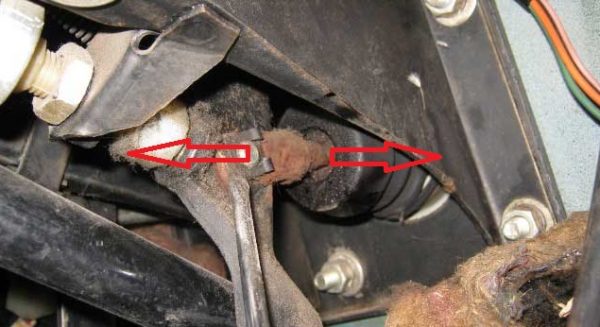
 Damage to the vacuum hose and check valve flange can cause VUT depressurization
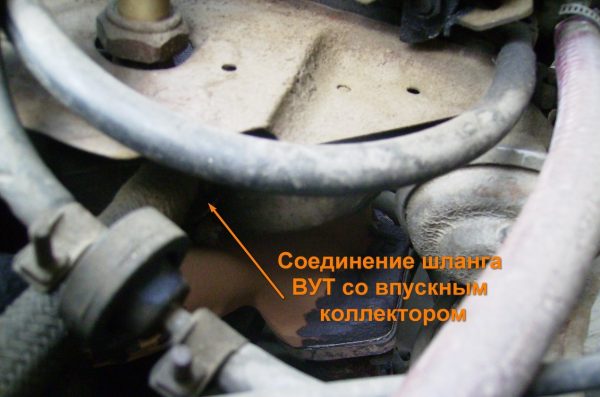
 - In the same way, we check the other end of the hose, as well as the reliability of its attachment to the inlet pipe fitting. Tighten the clamp if necessary.If the hose comes off the fitting freely, it is necessary to tighten the clamp
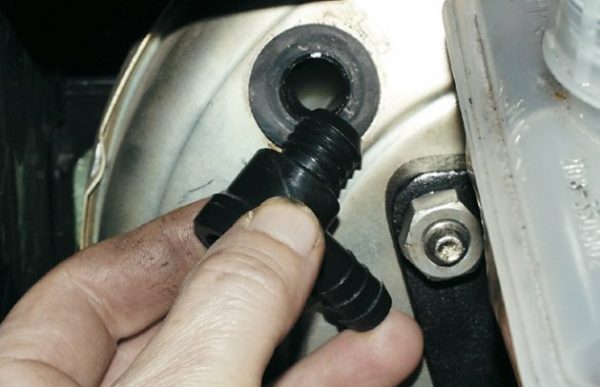
- Check the one way valve. To do this, carefully disconnect the hose from it.
- Remove the valve from the flange.To remove the valve from the flange, it must be pulled towards you, gently prying with a screwdriver
- We put the end of the pear on it and squeeze it. If the valve is working, the pear will remain in a compressed position. If it begins to fill with air, it means that the valve is leaking. In this case, it must be replaced.If the pear fills with air through the valve, then it is faulty
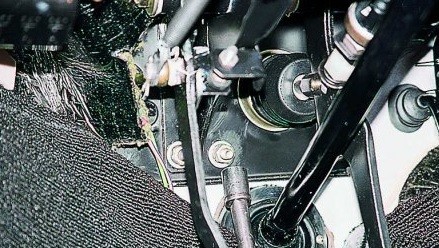
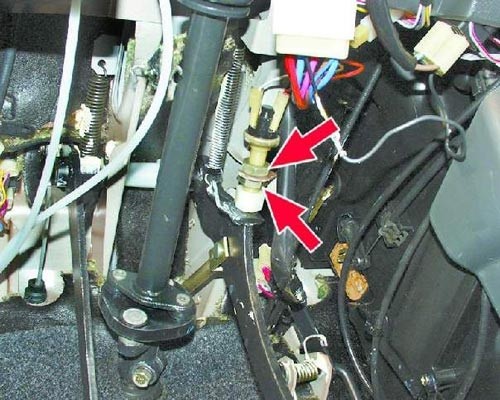
- If spontaneous braking of the car is detected, the seal of the follower valve shank should be checked. To do this, we go back to the salon, bend the rug in the area of the pedals, we find the back of the amplifier there. We examine the protective cap. If it is sucked, the amplifier is faulty.If the cap is stuck to the shank, the VUT is defective
- We move the cap all the way up and wrap it to gain access to the shank.If a hiss occurs during loosening of the shank, the VUT is depressurized
- We start the engine. We swing the shank in a horizontal direction in both directions, listening to the sounds that arise in this case. The appearance of a characteristic hiss indicates that excess air is being drawn into the vacuum booster housing.

Video: VUT check

Repair or replacement
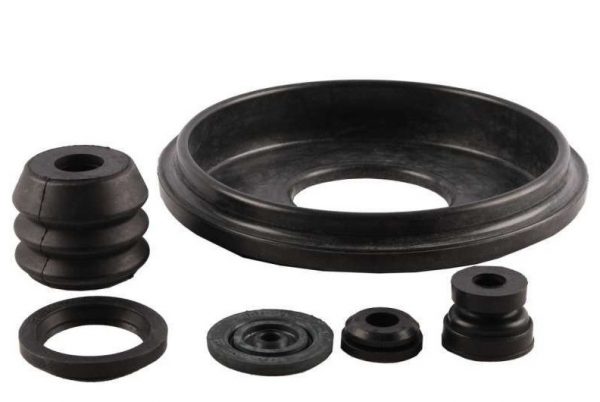
Having found a malfunction of the vacuum brake booster, you can go two ways: replace it with a new one or try to repair it. It should be noted here that a new VUT without a master brake cylinder will cost about 2000–2500 rubles. If you do not have the desire to spend so much money, and you are determined to repair the assembly yourself, purchase a repair kit for the old vacuum cleaner. It costs no more than 500 rubles and includes those parts that most often fail: a cuff, a shank cap, rubber gaskets, valve flanges, etc. Amplifier repair itself is not too difficult, but time-consuming. It provides for the removal of the device from the car, disassembly, troubleshooting, replacement of faulty elements, as well as adjustment.
Change the vacuum booster or repair, you choose. We will consider both processes, and start with the replacement.
Replacement of VUT with VAZ 2106
Required Tools:
- thin slotted screwdriver;
- spanner key for "13";
- socket wrench for "13".
Work order:
- We place the car on a flat surface, turn on the gear.
- In the cabin, we bend the carpet under the pedal bracket. We find there the junction of the brake pedal and the booster pusher.
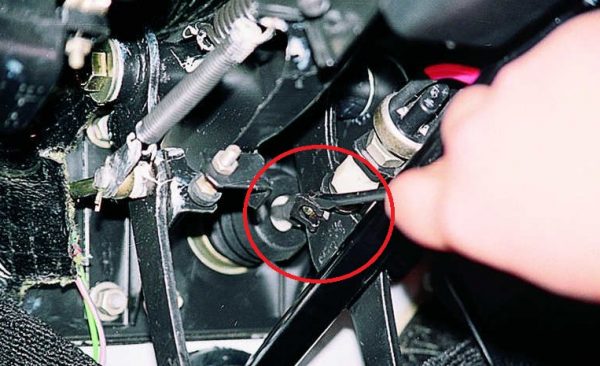
- Using a slotted screwdriver, remove the spring clip from the pedal mounting pin and pusher shank.The latch is easily removed with a screwdriver
- Using the key on "13", we unscrew the four nuts holding the amplifier housing.The nuts on the studs are unscrewed with a key to "13"
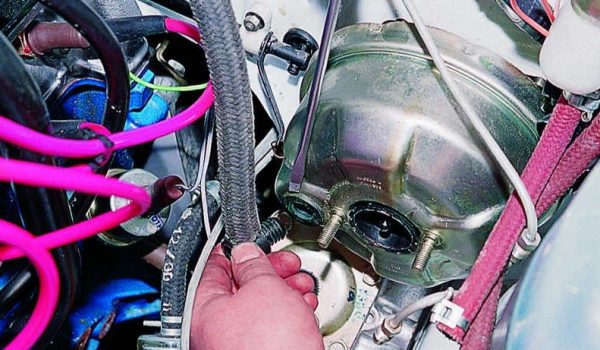
- We raise the hood. We find VUT in the engine compartment.
- With a socket wrench at “13”, we unscrew the two nuts on the studs of the main brake cylinder.
- Pulling the master cylinder forward, remove it from the amplifier housing. It is not necessary to unscrew the tubes from it. Just carefully take it aside and put it on any part of the body or engine.GTZ is attached to the amplifier housing with two nuts
- Using a thin slotted screwdriver, remove the check valve from the rubber flange in the "vacuum box" housing.You can use a slotted screwdriver to disconnect the valve.
- We remove the VUT from the car.
- We install a new amplifier and assemble in the reverse order.
After replacing the device, do not rush to install the main brake cylinder, since before that it is necessary to check and, if necessary, adjust the protrusion of the rod, which we will talk about after considering the VUT repair process.
Video: VUT replacement

Repair of the "vacuum truck" VAZ 2106
Tools:
- vice;
- slotted screwdriver;
- small hammer;
- passatizhi.
Algorithm of actions:
- We fix the vacuum booster in a vice in any convenient way, but only so as not to damage it.
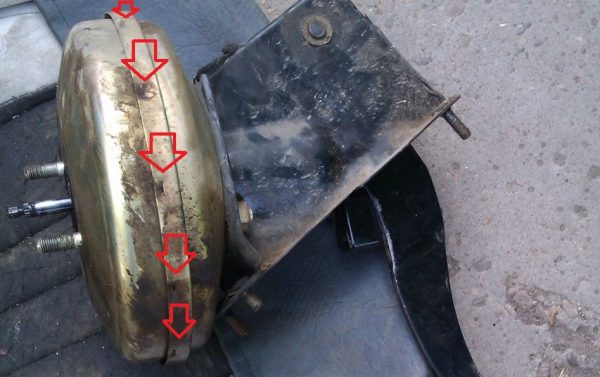
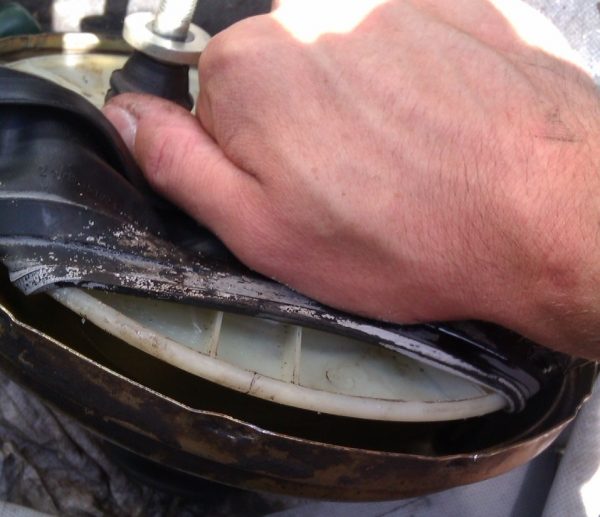
- Using a slotted screwdriver and pliers, we flare the halves of the device body.The arrows indicate the places of rolling
- Without disconnecting the halves of the body, we wind the nuts onto the studs of the master cylinder. This is necessary in order to protect yourself when disassembling the device. A very powerful return spring is installed inside the case. Having straightened out, it can fly out during disassembly.
- When the nuts are screwed on, carefully use a screwdriver to disconnect the housing.
- We unscrew the nuts on the studs.
- We take out the spring.
- We inspect the working elements of the amplifier. We are interested in the cuff, stud covers, the protective cap of the follower valve body, as well as the check valve flange.The arrow indicates the location of the cuff injury.
- We replace defective parts. We change the cuff in any case, since it is in most cases that it becomes the cause of the malfunction of the VUT.To remove the cuff, pry it off with a screwdriver and pull it strongly towards you.
- After replacement, we assemble the device.
- We roll the edges of the case with a screwdriver, pliers and a hammer.
Adjusting the free play of the brake pedal and protrusion of the booster rod
Before installing the brake master cylinder, it is mandatory to adjust the free play of the pedal and the protrusion of the VUT rod. This is necessary in order to remove excess play and accurately adjust the length of the rod to the GTZ piston.
Tools:
- the key to "19";
- passages;
- the key to "7";
- ruler or vernier caliper;
- marker.
Adjustment procedure:
- In the interior of the car, we install a ruler next to the brake pedal.
- With the engine off, press the pedal to the stop 2-3 times.
- Release the pedal, wait for it to return to its original position. Make a mark on the ruler with a marker.Free play is the distance from the top position to the position at which the pedal begins to be pressed with force.
- Once again we press the pedal, but not to the end, but until a noticeable resistance appears. Mark this position with a marker.
- Assess the free play of the pedal. It should be 3-5 mm.
- If the amplitude of the pedal movement does not correspond to the specified indicators, we increase or decrease it by rotating the brake light switch using the key to “19”.To change the free play of the pedal, turn the switch in one direction or another.
- We pass to the engine compartment.
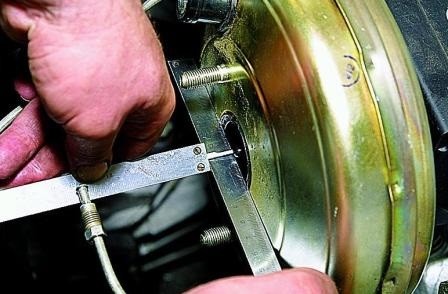
- Using a ruler, or rather a caliper, we measure the protrusion of the vacuum booster rod. It should be 1,05–1,25 mm.The stem should protrude 1,05–1,25 mm
- If the measurements showed a discrepancy between the protrusion and the specified indicators, we adjust the stem. To do this, we hold the rod itself with pliers, and turn its head in one direction or another with the key to “7”.The rod protrusion is adjusted by turning its head with a key to "7"
- At the end of the adjustment, install the GTZ.


Prorolling the system
After carrying out any work related to the replacement or repair of parts of the brake system, the brakes should be bled. This will remove air from the line and equalize the pressure.
Means and tools:
- jack and wheel wrench;
- the key to "8";
- rubber or silicone hose with a diameter of 6 mm;
- a small clean dry container (preferably transparent);
- brake fluid (for topping up).
In addition to all this, an assistant will definitely be required to pump the system.
Work order:
- We place the car on a horizontally flat surface. We release nuts of fastening of a forward right wheel.
- We raise the body of the car with a jack. We unscrew the nuts completely, dismantle the wheel.
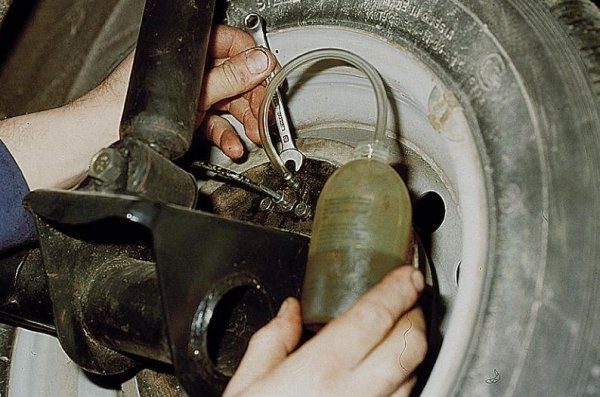
- Remove the cap from the fitting of the working brake cylinder.The bleeder valve is capped
- We put one end of the hose on the fitting. Insert the other end into the container.
- We give the command to the assistant to sit in the passenger compartment and squeeze the brake pedal 4-6 times, and then hold it in the depressed position.
- When the pedal is depressed after a series of pressures, with the key to “8” (in some modifications to “10”) we unscrew the fitting by three quarters of a turn. At this time, fluid will flow from the fitting into the hose and further into the container, and the brake pedal will drop. After the pedal rests on the floor, the fitting must be tightened and ask the assistant to release the pedal.Pumping must be continued until liquid without air flows from the hose
- We pump until brake fluid without air begins to flow from the system. Then you can tighten the fitting, put a cap on it and install the wheel in place.
- By analogy, we carry out pumping the brakes for the front left wheel.
- We pump the rear brakes in the same way: first the right, then the left.
- Upon completion of pumping, add brake fluid to the level in the tank and check the brakes on a section of the road with low traffic.
Video: pumping the brakes

At first glance, the process of replacing or repairing a brake booster may seem somewhat complicated. In fact, you just need to understand everything in detail, and you will not need the services of specialists.

