All about the vacuum brake booster VAZ 2107 - device, principle of operation and do-it-yourself replacement
Content
The vacuum booster of the VAZ 2107 brake system is considered a reliable unit, since it rarely fails. The first malfunctions of the element occur after 150-200 thousand kilometers. In the event of a malfunction, the problem is solved in two ways - a complete replacement or repair of the unit. Having studied the design and principle of operation of the amplifier, the masterful owner of the "seven" can implement both options on his own.
Purpose and location of the unit
The first classic Zhiguli models (VAZ 2101–2102), produced without amplifiers, were distinguished by a “tight” brake pedal. To stop the car abruptly, the motorist had to make a significant effort. In the 70s of the last century, the manufacturer began to equip cars with vacuum boosters (abbreviated as VUT), which significantly increase braking efficiency and facilitate the work of the driver.
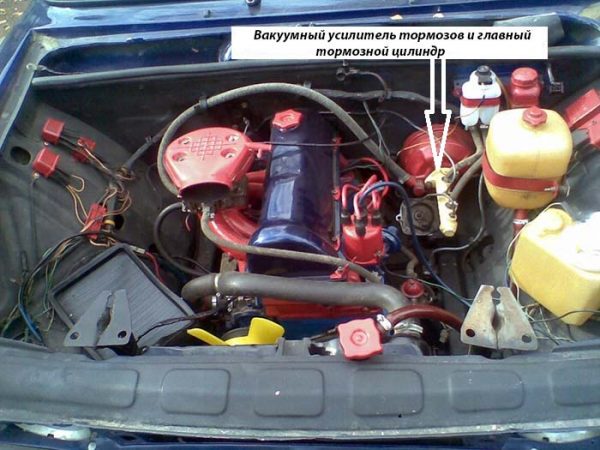
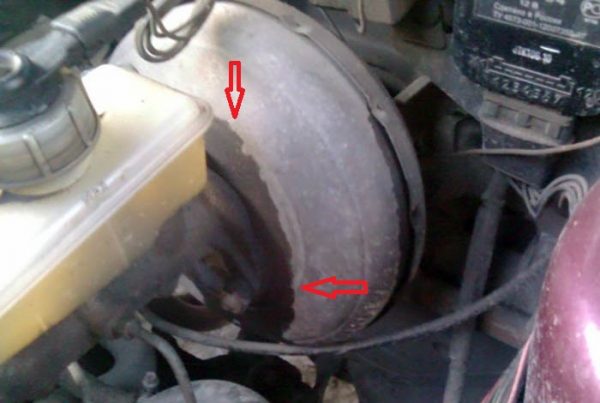
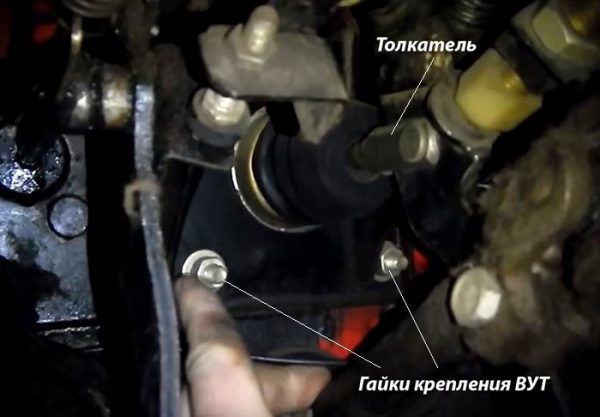
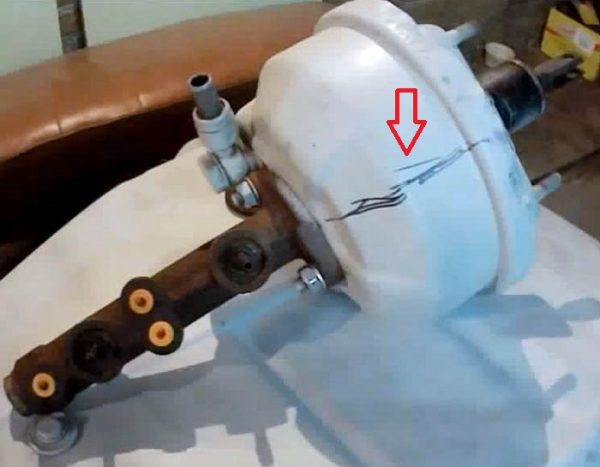
The unit in the form of a metal "barrel" is installed on the bulkhead between the engine compartment and the VAZ 2107 cabin, from the driver's seat. VUT attachment points:
- the body is screwed to the bulkhead with 4 M8 nuts;
- in front of the amplifier on 2 M8 studs, the main brake cylinder is attached;
- the pressure pusher of the element goes inside the passenger compartment and joins with the brake pedal lever.
The task of the booster is to help the driver press on the rod of the master brake cylinder using vacuum force. The latter is created using a vacuum taken from the engine through a special pipe.
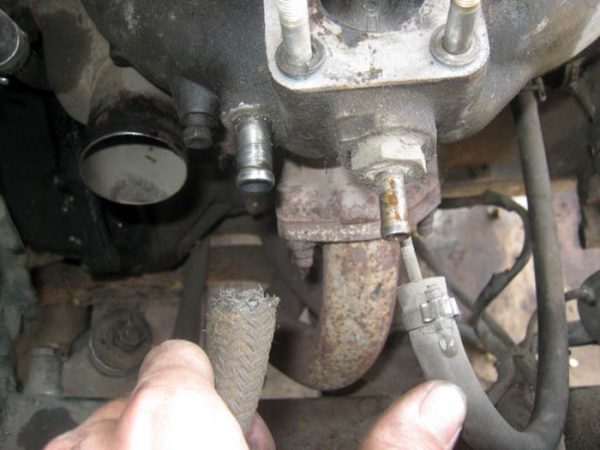
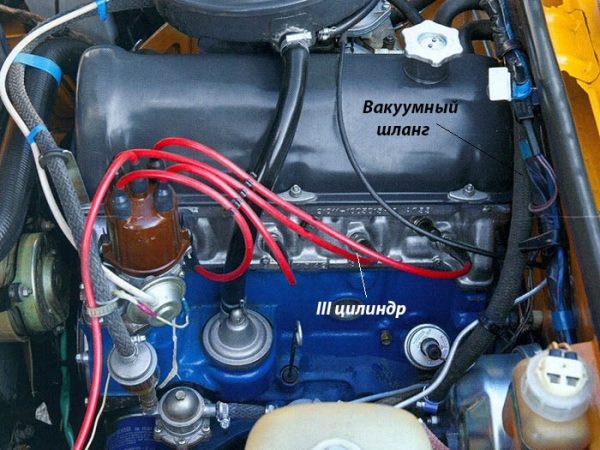
The vacuum sampling hose is connected to the intake manifold from the side of the channel leading to the III cylinder. The second end of the branch pipe is connected to the fitting of the check valve installed outside the VUT body.
In fact, the vacuum booster does the physical work for the driver. It is enough for the latter to lightly press on the pedal so that the car starts to slow down.
Device and principle of operation VUT
The vacuum booster is a metal "barrel" consisting of the following parts (the numbering in the list matches the positions in the diagram):
- Cylindrical body.
- The pressure rod of the main brake cylinder.
- Cover connected to the body by point rolling.
- Piston.
- Bypass valve.
- Brake pedal pusher.
- Air filter.
- buffer insert.
- Inner plastic case.
- rubber membrane.
- Spring for return of the internal case with a membrane.
- Connecting fitting.
- Non-return valve.
- Vacuum tube.
 The internal cavity of the amplifier is divided by a rubber diaphragm into 2 working chambers
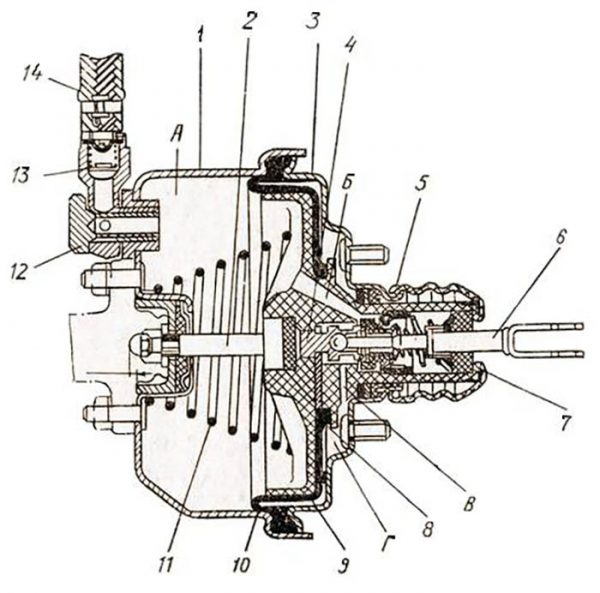
The letter "A" in the diagram indicates the chamber for supplying vacuum, the letters "B" and "C" - internal channels, "D" - the cavity communicating with the atmosphere. Stem pos. 2 rests against the mating part of the main brake cylinder (abbreviated as GTZ), the pusher pos. 6 attached to the pedal.
The unit is capable of operating in 3 modes:
- The motor runs, but the driver does not apply the brakes. The vacuum from the collector is supplied through channels "B" and "C" to both chambers, the valve is closed and does not allow atmospheric air to enter. The spring holds the diaphragm in its original position.
- Regular braking. The pedal is partially depressed, the valve starts the air (through the filter) into the “G” chamber, which is why the vacuum force in the “A” cavity helps to put pressure on the GTZ rod. The plastic housing will move forward and rest against the piston, the movement of the rod will stop.
- Emergency braking. In this case, the effect of vacuum on the membrane and the body is not limited, the rod of the main cylinder is squeezed out to the stop.
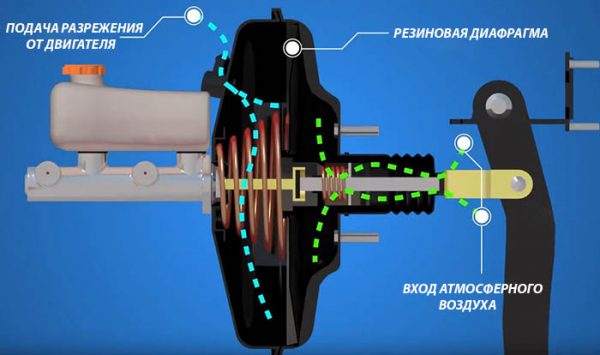
After releasing the pedal, the spring throws the body and the membrane back to their original position, the atmospheric valve closes. The non-return valve at the nozzle inlet serves as protection against sudden air injection from the collector side.
Video: how the vacuum brake booster works

Brake Booster Faults
Since the brake force is replaced by vacuum, most VUT malfunctions are associated with loss of tightness:
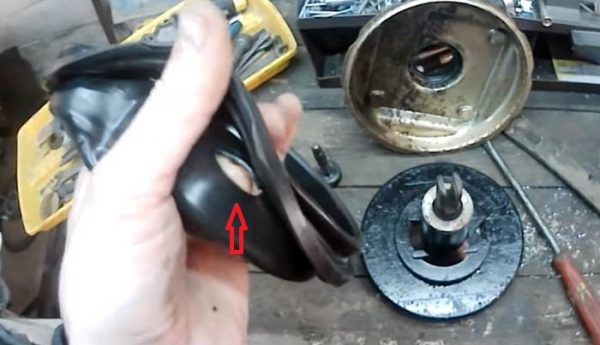
- breakdown of the rubber diaphragm due to critical wear;
- air intake along the edge of the case - at the junction between two covers;
- the same, through the stuffing box on the GTZ rod;
- problems with the suction hose - cracks or leaks at the joints.A typical VUT malfunction is a worn diaphragm that breaks and lets air through
Much less common is the failure of the internal bypass valve, clogging of the air filter and shrinkage of the spring from natural wear. In very rare cases, the spring breaks into 2 parts.
Sometimes a brake fluid leak is observed between the flange of the GTZ and the vacuum booster. But this problem does not apply to VUT breakdowns, because fluid is leaking from the main cylinder. The reason is the wear and loss of tightness of the sealing rings (cuffs) inside the GTZ.
Troubleshooting
The first sign of loss of tightness of the vacuum booster is by no means the deterioration of the brakes, as many sources on the Internet describe the malfunction. When air just begins to seep through the leaky membrane, the VUT continues to function properly, since the motor has time to maintain a vacuum in the anterior chamber. The first symptom is changes in the operation of the engine itself:
- due to air leakage into the third cylinder, the engine starts to “troit” at idle;
- crankshaft speed “floats”, the stronger the suction, the greater the amplitude of oscillations;
- a running engine reacts to the brake pedal, stalls when pressed sharply;
- increases the consumption of gasoline.
If the motorist ignores the primary symptoms, the situation worsens - the pedal becomes harder and requires more physical effort to slow down and stop the car. The car can be operated further, the breakdown of the VUT does not lead to a complete failure of the brakes, but it significantly complicates the ride, especially if you are not used to it. Emergency braking will be a problem.
How to make sure that the vacuum booster is leaking:
- Loosen the clamp and remove the vacuum tube from the fitting on the manifold.
- Plug the fitting with a tight homemade plug.
- Start the engine. If the revs even out, the problem is clearly in the amplifier.
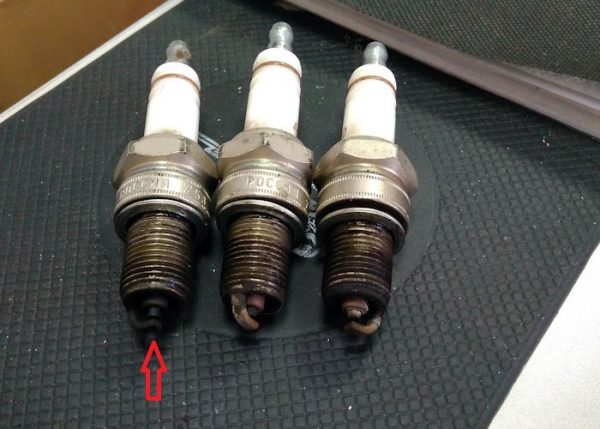
- Remove the high voltage wire and turn out the spark plug of cylinder III. If the VUT fails, the electrodes will be smoked with black soot.If soot is observed on the spark plug of cylinder III, and the rest of the spark plugs are clean, you need to check the condition of the vacuum brake booster
Similarly, the problem can be temporarily fixed in transit. Disconnect the pipe, plug the fitting and calmly go to the garage or service station - the power unit will work smoothly, without excessive fuel consumption. But remember, the brake pedal will become stiff and stop immediately responding to light pressure.
Additional diagnostic methods:
- Press the brake 3-4 times and start the engine while holding the pedal. If it did not fail, the valve must have failed.
- With the engine off, disconnect the hose from the fitting, remove the check valve and firmly insert the pre-squeezed rubber bulb into the hole. On a sealed amplifier, it will retain its shape, on a faulty one, it will fill with air.To check the tightness of the amplifier and the performance of the check valve, you can use a rubber bulb
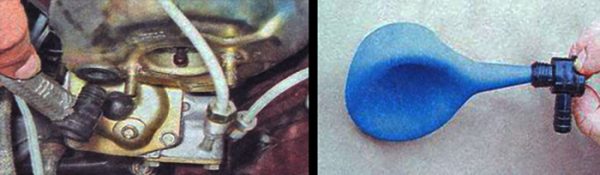
With the help of a pear, you can accurately determine the location of the defect, but the vacuum booster will have to be removed. When pumping air into the chamber, wash the edges of the joints and the stem seal - bubbles will indicate the location of the damage.
Video: how to check the vacuum brake booster on the "seven"

Replacement Instructions
In the vast majority of cases, the owners of the "sevens" change the vacuum amplifier assembly, since the repair of the unit does not always give a positive result. The main reason is the difficulty with assembly, or rather, the restoration of the hermetic factory rolling of the case.
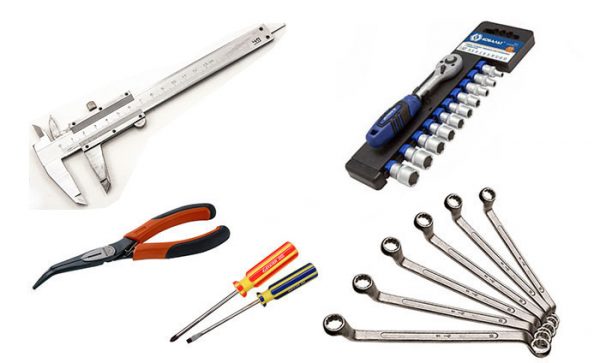
Replacement does not require special conditions and special devices; work is carried out in a garage or in an open area. Tools used:
- a set of heads with an extension and a ratchet;
- spanner wrench size 13 mm;
- open-end wrench 7 mm and caliper with depth gauge for adjustment;
- screwdriver flat and "phillips";
- passatizhi.With the help of a caliper - "columbine" it is most convenient to adjust the stem overhang on the new brake booster
Together with the brake booster, it is worth changing the vacuum hose and clamps - old parts can cause air leaks.
The VUT is replaced in the following order:
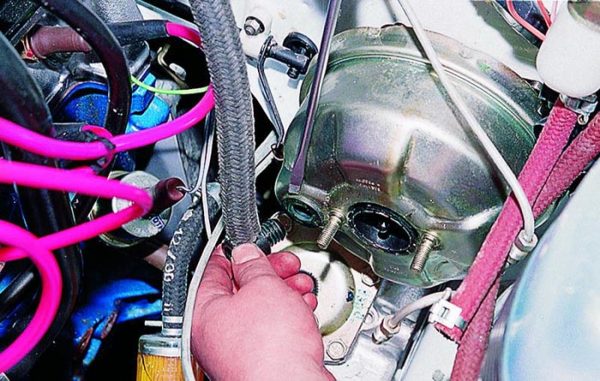
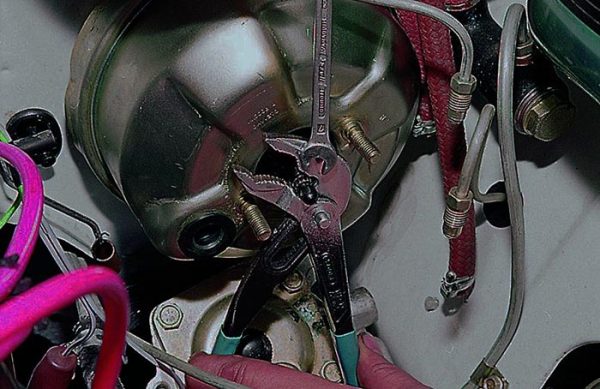
- Loosen the clamp and disconnect the vacuum hose from the check valve fitting.The vacuum tube can be removed together with the non-return valve by gently prying with a flat screwdriver
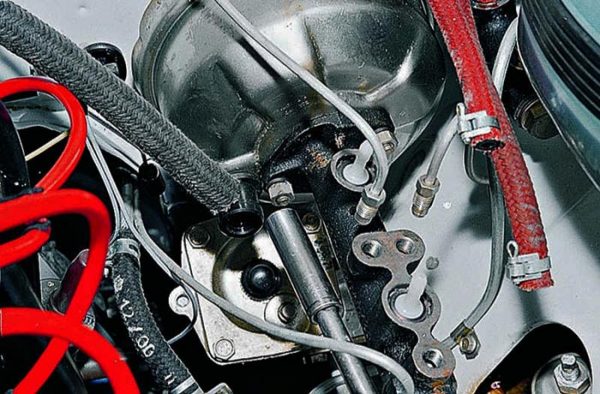
- Using a 13 mm socket and a wrench with an extension, unscrew the nuts securing the brake master cylinder.It is more convenient to unscrew the fixing nuts with a head on a long collar
- Carefully remove the GTZ from the studs and move to the side as far as the brake pipes allow.It is not necessary to unscrew and disconnect the brake pipes, it is enough to remove the GTZ from the studs and move it to the side
- Go to the passenger compartment and free access to the 4 nuts securing the unit. To do this, dismantle the lower decorative trim of the steering column (held by 4 screws).
- Disconnect the pedal arm from the pushrod by pulling out the circlip and metal pin.
- Using a 13 mm spanner, unscrew the fixing nuts and remove the vacuum booster from the side of the engine compartment.The body of the unit is screwed from the side of the passenger compartment with 4 nuts, the top 2 are hidden under the skin

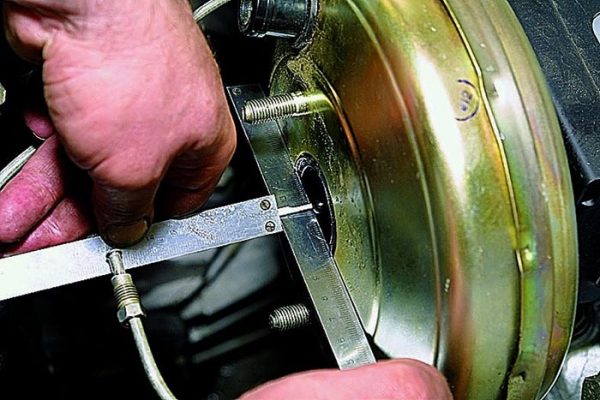
Assembly is performed in the same way, only in reverse order. Before installing a new VUT, be sure to adjust the length of the protruding part of the rod in order to provide the brake pedal with a small free play. How the adjustment is made:
- Pull out the plastic buffer insert from the side of the GTZ flange, sink the stem to the stop.
- Using a depth gauge (or other measuring device), measure the length of the stem head that protrudes from the plane of the body. Permissible range - 1 ... 1,5 mm.The measurement is made with a recessed stem; for convenience, a caliper with a ruler is used
- If the stem protrudes less or more than the specified limits, carefully grasp the rod with pliers and adjust the reach by turning the head with a 7 mm wrench.The rod can be adjusted directly on the car after installing the VUT
Also, before installation, it is recommended to treat the rubber elements with thick neutral grease - this will extend the life of the unit.
Video: do-it-yourself VAZ 2107 vacuum booster replacement

Unit Repair - Diaphragm Replacement
This operation is unpopular among Zhiguli owners, usually motorists prefer to change the entire amplifier. The reason is the discrepancy between the result and the efforts expended, it is easier to buy and install the VUT assembly. If you have definitely decided to disassemble and repair the vacuum booster, prepare the tools and consumables:
- mounting blade, powerful flat screwdriver;
- passages;
- a hammer;
- brush with metal bristles;
- vise locksmith large;
- repair kit for vacuum boosters VAZ 2103-2107;
- silicone sealant.When replacing a damaged diaphragm, it is recommended to change all VUT rubber products - the stem seal and o-rings
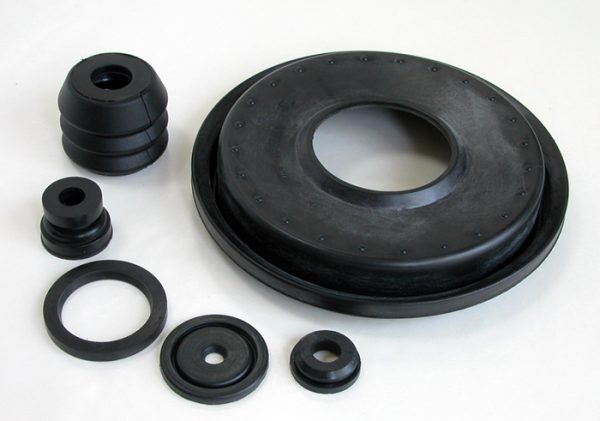
It is best to buy a repair kit from the Balakovo Rubber Products Plant. This enterprise is a direct supplier of parts for AvtoVAZ and produces high-quality original spare parts.
To perform repair work, the VUT must be removed from the vehicle, as described in the instructions above. Dismantling and replacement of parts is carried out in the following order:
- Put a mark on the body with a marker, flare the connections with the cover, bending the edges of the shell with a mounting spatula.The mark is necessary for the assembly of the amplifier in order to correctly align the cover with the body
- Carefully separate the elements, holding the cover with your hands, since a large powerful spring is installed inside.
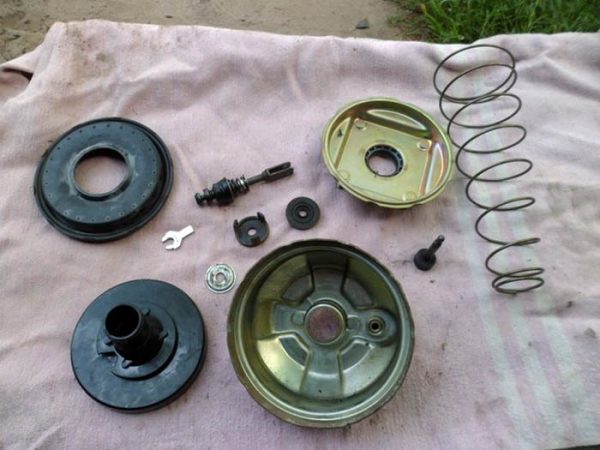
- Remove the stem and gland, remove the diaphragm from the inner case. When disassembling, lay out all the parts one by one on the table so as not to confuse anything during the installation process.To avoid confusion, it is better to lay out all VUT parts on the table during disassembly
- Brush the housing and the diaphragm seals. If necessary, dry the inside of the chambers.
- Assemble the elements of the vacuum booster in reverse order, using new parts from the repair kit.Before assembly, the new membrane is stretched over the plastic housing.
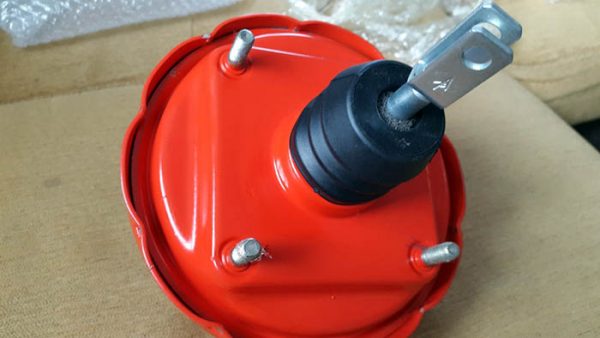
- Aligning the marks on the cover and body, insert the spring and squeeze both halves in a vise. Roll carefully using a pry bar, hammer and screwdriver.If desired, the repaired VUT can be painted with an aerosol can
- Check the tightness of the VUT using a rubber bulb inserted into the opening of the vacuum hose.

After assembly, install the unit on the car, adjusting the rod reach in advance (the procedure is described in the previous section). When finished, check the performance of the amplifier on the go.
Video: how to change the VUT aperture on the "classic"

Vacuum-type brake boosters rarely disturb the owners of the Zhiguli with breakdowns. There are cases when the factory VUT worked properly during the entire life of the VAZ 2107 car. In the event of a sudden failure of the unit, you should not panic either - a malfunction of the vacuum booster does not affect the operation of the brake system, only the pedal becomes hard and uncomfortable for the driver.

