How to test a fuel pump with a multimeter
Content
Your car won't start? How long has the check engine light been on?
If your answer to these questions is yes, then your fuel pump may be the problem.
The fuel pump is the electronic component in your car that supplies the engine with the right amount of fuel from the fuel tank to keep it running properly.
If it's bad, your combustion system or the whole car is simply not working.
Many people don't know how to test this component and we are here to help.
Let's get started.

What causes a fuel pump to fail?
Given the way a fuel pump works, there are three main factors that cause it to fail. These are natural wear, pollution and overheating.
Wear and tear is common for pumps that have been running for centuries and are naturally ready to be replaced due to weak gears.
Pollution causes large amounts of debris and dirt to enter the fuel pump system and clog the filter.
This prevents the device from drawing in and delivering enough fuel to the engine when needed.
Overheating is the most common cause of fuel pump failure.
Most of the fuel taken from your tank is returned to it, and this fluid helps to cool the entire fuel pump system.
When you constantly run low on fuel in the tank, you boycott this cooling process and your pump suffers.
Its electrical components get damaged over time, and then you start to notice certain symptoms such as poor engine performance, engine overheating, poor fuel efficiency, poor acceleration, or the car not being able to start.
These symptoms are the same when you have problems or need to check your ignition switch or even your PCM.
So, to make sure your pump is the culprit, you diagnose it.
However, there are certain components, such as the fuel pump relay, that are worth checking before diving into the pump itself with a multimeter.

How to test the fuel pump relay with a multimeter
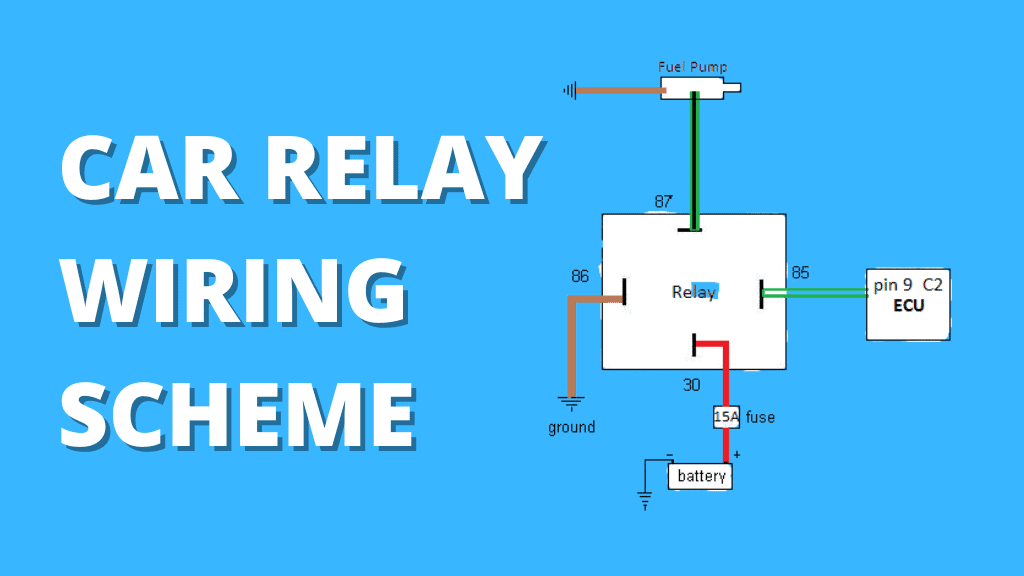
The relay is the electrical component of your combustion system that simply energizes the fuel pump when needed.
Checking the relay is a complex process worth paying attention to, but it will save you the stress of checking the fuel pump if a problem is found here.
The relay has four contacts; a ground pin, an input voltage pin, a load pin (which goes to the fuel pump), and a battery pin.

With this diagnostic, you want to check if the relay is working well, putting out the right amount of voltage. These four contacts are important for our test.
- Disconnect the fuel pump relay from your vehicle
The relay is usually located in the distributor fuse box next to the car battery or on the car's dashboard.
It may be located elsewhere in your vehicle, so you can search the internet for the exact location of your vehicle model.
Once you find it, you simply unplug it to expose the four pins.
- Get a 12V Power Supply
For this test, you will need to use an external power supply to supply 12 volts to your relay. We want to simulate the situation when it is still connected to the vehicle. Your car battery is a great source of 12V to use.
- Connect multimeter leads to battery and load terminals
With the multimeter set to the DC voltage range, connect the red test lead to the battery terminal and the black test lead to the load terminal.
- Apply power to the fuel pump relay
You will need wires with alligator clips to connect the power supply to the relay contacts. Be careful here.
Connect the negative wire from the source to the ground terminal and the positive wire to the input voltage terminal.
- Rate results
First, you should hear a clicking sound from the relay every time you apply current to it.
This is a signal that it is working, but in some cases you still need to make additional checks with a multimeter.
Looking at the meter, if you are not getting a reading of around 12V, the relay is faulty and needs to be replaced.
On the other hand, if you see a 12 volt reading, the relay is good and you can now move on to the fuel pump itself.
How to test a fuel pump with a multimeter
Connect the multimeter's positive lead to the live fuel pump connector wire, connect the negative lead to a metal surface nearby, and turn the ignition on without starting the engine. The multimeter should show about 12 volts if the pump is OK..
This procedure includes much more, as well as other parts to test using a multimeter, and we will go over them in detail.
- Check fuel pump fuse
As with the relay, another component that you can diagnose and relieve you of stress is the fuse.
This is a 20 amp fuse located in your junction box (location depends on your vehicle).
Your fuel pump won't work if it has a damaged fuse, and you can simply find out if your fuse is bad if it's broken or has a burnt mark.
Alternatively, a multimeter may also come in handy.
Set the multimeter to resistance mode, place the multimeter probes on each end of the fuse and check the reading.
Resistance mode is usually denoted by the symbol "Ohm".
If the multimeter shows you "OL", the fuse circuit is bad and needs to be replaced.
If you get a value between 0 and 0.5, the fuse is good and you can move on to the fuel pump.
- Set the multimeter to constant voltage
Your car runs on DC, so you'll want to set your multimeter to the DC voltage setting so your tests are accurate.
Moving forward, we will run two voltage drop tests on different wire connectors on your fuel pump.
These are the live wire connector and the ground wire connector.
- Turn the ignition to the "On" position.
Turn the ignition key to the "On" position without starting the engine.
You only need to energize your fuel pump wires to run its tests.
- Check live connector
The live wire is the connector that comes from the relay. It is expected to be at the same voltage as a car battery, so you may need to refer to the manual before proceeding with this test.
Despite this, most car batteries are rated at 12 volts, so we work with them.
With the multimeter connected to DC voltage, probe the positive wire with a pin and attach the red positive multimeter test lead to it.
You then ground your black negative probe to any metal surface nearby.
If the fuel pump is good, or there is the right amount of voltage applied to the live wire connector, you would expect to see a reading of 12 volts.
If the value drops by more than 0.5V, the fuel pump has failed the voltage drop test and needs to be replaced.
- Check ground wire connection
The ground wire is the connector that goes directly to your vehicle's chassis.
You want to test it to make sure it is well grounded and that there is no open circuit or fault in the fuel pump circuit.
After grounding the black test lead to a metal surface, connect the back test lead to the ground wire and attach the red test lead to the rear test lead.
You are expected to get a value of about 0.1 volts from your multimeter.
Any value above 0.5V means the fuel pump is not properly grounded and you need to check the wires for damage.
Replace or insulate wire connectors if you find them.
Conclusion
Only if you pay close attention to detail can you easily test your fuel pump. Similar to the inspection of other electrical components.
F.A.Q.
Should the fuel pump have continuity?
A healthy fuel pump is expected to have continuity between the positive (live) and negative (ground) wires. Using the multimeter in resistance (ohm) mode, you can easily check the level of resistance or open circuit in a circuit.
What can cause the fuel pump to not get power?
A damaged fuse will prevent your fuel pump from working. If the pump relay is also damaged, your fuel pump is not getting the power it needs to run properly.

