How to check your car's brakes
Content
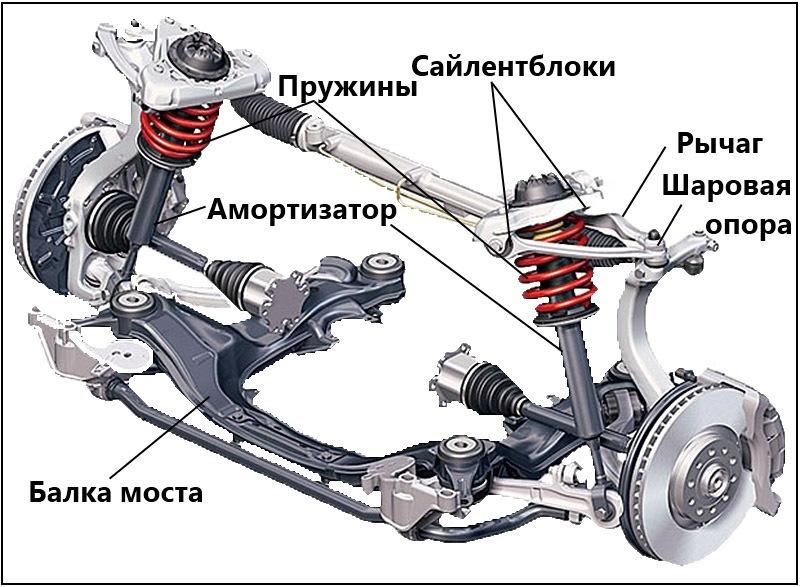
Checking the brakes of a car involves diagnosing the condition of the brake pads, brake discs, the operation of the hand (parking) and mountain (if any) brakes, the level of brake fluid in the system, as well as the degree of wear of individual components that make up the brake system and the efficiency of its work as a whole.
In most cases, a car enthusiast can make the appropriate diagnostics on their own, without seeking help from a car service.
Signs of brake wear
Road safety depends on the effectiveness of the brakes. Therefore, the brake system must be checked not only when a decrease in its efficiency is detected, but also periodically, as the vehicle mileage increases. The regularity of the general check of a particular node depends on the requirements of the manufacturer, which are directly specified in the manual (routine maintenance) of the vehicle. However, an unscheduled check of the car’s brakes must be performed when at least one of the following factors appears:
- Squealing when braking. Most often, extraneous sounds indicate wear on the brake pads and / or discs (drums). Often, so-called “squeakers” are installed on modern disc pads - special devices designed to produce squeaking sounds, indicating critical pad wear. True, there are other reasons why the pads creak when braking.
- Silly noise when braking. Such noise or rattle indicates that a foreign object (pebble, debris) has got into the space between the pad and the brake disc, or a lot of brake dust is coming from the pad. Naturally, this not only reduces the braking efficiency, but also additionally wears out the disc and the pad itself.
- Car pulls to the side while braking. The reason for this behavior of the car is a jammed brake caliper. Less commonly, the problems are varying degrees of wear on the brake pads and/or brake discs.
- Vibration felt when braking. this usually occurs when uneven wear on the working plane of one (or several) brake discs. An exception may be the situation when the car is equipped with an anti-lock system (ABS), since during its operation there is a slight vibration and recoil in the brake pedal.
- Inappropriate behavior of the brake pedal. that is, when it is pressed, it may be tight or fall down heavily, or the brake is activated even with a slight pressure.
And of course, the brake system must be checked simply while reducing the efficiency of its workwhen the braking distance increases even at low speeds.
Checking the brake system - what and how is checked
Before moving on to a more detailed analysis of the individual parts of the brake system, you need to perform a few simple steps aimed at finding out the effectiveness and serviceability of its operation.
- GTC check. When the internal combustion engine is running in an immobilized car, you need to press the brake pedal all the way and hold it for 20 ... 30 seconds. If the pedal normally reaches the stop, but after that it starts to fall further, the main brake cylinder is most likely faulty (most often the piston seals of the main brake cylinder are leaking). Similarly, the pedal should not immediately fall into the floor, and should not have too little travel.
- inspection brake booster check valve. On a running internal combustion engine, you need to press the brake pedal all the way, and then turn off the engine but do not release the pedal for 20 ... 30 seconds. Ideally, the brake pedal should not “push” the foot back up. If the pedal tends to take its original position, the check valve of the vacuum brake booster is probably faulty.
- inspection vacuum brake booster. Performance is also checked with the internal combustion engine running, but first you need to bleed it with a pedal while it is turned off. You need to press and release the brake pedal several times in order to equalize the pressure in the vacuum brake booster. In this case, sounds accompanying the air leaving it will be heard. Repeat pressing this way until the sound stops and the pedal becomes more elastic. Then, with the brake pedal pressed, you need to start the internal combustion engine by turning on the neutral position of the gearbox. In this case, the pedal should go down a little, but not so much that it falls to the floor or remains completely motionless. If the brake pedal remains at the same level after starting the internal combustion engine and does not move at all, then the car’s vacuum brake booster is probably faulty. in order to check vacuum booster for leaks you need to apply the brakes while the engine is running at idle. The motor should not react to such a procedure, with jumps in speed and no hiss should be heard. Otherwise, the tightness of the vacuum brake booster is probably lost.
- Carry out the procedure for checking the operation of the brakes. To do this, start the internal combustion engine and accelerate to 60 / km / h on a straight road, then press the brake pedal. At the moment of pressing and after it there should be no knocking, hitting or beating. Otherwise, there are probably breakdowns such as play in the caliper mounting, guide, wedging of the caliper piston, or a damaged disc. The knocking noise can also occur due to the lack of a brake pad retainer. If the knocking noise comes from the rear brakes, then there is a possibility that it is caused by loosening of the parking brake tension on the drum brakes. At the same time, do not confuse knocking and beating on the brake pedal when the ABS is activated. If a beating is observed when braking, then the brake discs have probably moved due to their overheating and sudden cooling.
Note that when braking the car at low speed, it should not be accompanied by a skid, otherwise this may indicate a different brake actuation force on the right and left sides, then an additional check of the front and rear brakes is needed.
When subklinivaet support in a clamped position when the car is moving, the car can pull to the side not only during braking, but also during normal driving and during acceleration. However, additional diagnostics are needed here, since the car can “pull” to the side for other reasons. Be that as it may, after the trip you need to check the condition of the disks. If one of them is severely overheated and the others are not, then the problem is most likely a stuck brake caliper.
Checking the brake pedal
To check the brake pedal stroke of the car's internal combustion engine, you can not turn it on. So, to check, you just need to press the pedal several times in a row. If it falls down, and with subsequent pressing rises higher, then this means that air has entered the hydraulic brake system. Air bubbles are removed from the system by bleeding the brakes. However, first it is desirable to diagnose the system for depressurization by looking for a brake fluid leak.
If, after pressing the pedal, it slowly sags to the floor, this means that the master brake cylinder is faulty. Most often, the sealing collar on the piston passes the liquid under the stem cover, and then into the cavity of the vacuum booster.
There is another situation ... For example, after a long break between trips, the pedal does not spring like it does when air enters the brake hydraulic system, but nevertheless, on the first press, it falls too deep, and on the second and subsequent presses it already works normally mode. The cause of a single drawdown may be a low level of brake fluid in the expansion tank of the master brake cylinder.
On vehicles equipped drum brakes, a similar situation may arise as a result of significant wear of the brake pads and drums, as well as due to jamming of the device for automatically adjusting the supply of linings from the drum.
The table shows the force and travel of the brake pedal and parking brake lever for passenger cars.
| Management | Type of brake system | The maximum allowable force on the pedal or lever, Newton | The maximum allowable pedal or lever travel, mm |
|---|---|---|---|
| foot | working, spare | 500 | 150 |
| Parking | 700 | 180 | |
| Manual | spare, parking | 400 | 160 |
How to check the brakes
A more detailed check of the health of the brakes on a car involves examining its individual parts and evaluating the effectiveness of their work. But first of all, make sure that you have the right level of brake fluid and its proper quality.
Checking the brake fluid
Brake fluid must not be black (not even dark grey) and must not contain foreign debris or sediment. it is also important that the smell of burning does not come from the liquid. If the level has dropped slightly, but the leak is not noticeable, then topping up is allowed, while taking into account compatibility fact old and new fluid.
Brake fluid has a limited shelf life and use, and over time it loses its properties (is saturated with moisture), which directly affects the efficiency of the brake system. The percentage of moisture is measured by a special one that evaluates its electrical conductivity. At a critical water content, the TJ may boil, and the pedal will fail during emergency braking.
Checking the brake pads
Brake test video
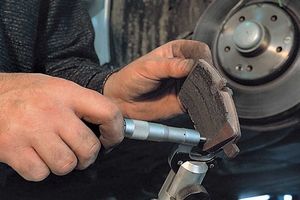
First of all, you need to check the thickness of the brake linings that are in contact with the brake disc or drum. The minimum allowable thickness of the friction lining should be at least 2-3 mm (depending on the particular brand of pad and the car as a whole).
To control the permissible working thickness of the brake pad on most disc brakes, it is controlled by a squeaker or an electronic wear sensor. When checking front or rear disc brakes, make sure that such a wear controller does not rub against the disc. The friction of the metal base is completely unacceptable, then you actually lose the brakes!
also, during a visual inspection, you need to make sure that the wear on the pads of one axle of the car is approximately the same. Otherwise, wedging of the brake caliper guides takes place, or the master brake cylinder is faulty.
Checking the brake discs
The fact that cracks on the disc are not acceptable is known, but in addition to actual damage, you need to inspect the general appearance and wear. Be sure to check the presence and size of the side along the edge of the brake disc. Over time, it wears out, and even if the pads are relatively new, a worn disc will not be able to provide effective braking. The size of the edge should be no more than 1 mm. If this happens, then you need to change both the discs and pads, or at least grind the discs themselves.
Reducing the thickness of the brake disc of a passenger car by about 2 mm means 100% wear. The nominal thickness is often indicated on the end part around the circumference. As for the magnitude of the end runout, its critical value is no more than 0,05 mm.
Traces of overheating and deformation are undesirable on the disk. They are easily identified by a change in the color of the surface, namely the presence of bluish spots. The reason for overheating of the brake discs can be both the driving style itself and wedging of the calipers.
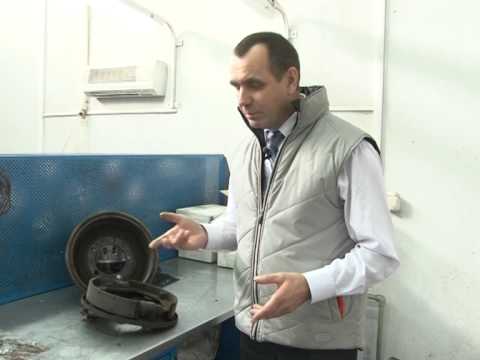
Checking drum brakes
When checking drum brakes, it is necessary to check the thickness of the friction linings, the tightness of the seals of the wheel brake cylinder and the mobility of its pistons, as well as the integrity and force of the tightening spring, and the residual thickness.
Many drum brakes have a special viewing window with which you can visually assess the condition of the brake pad. However, in practice, without removing the wheel, nothing is visible through it, so it is better to remove the wheel first.
The state of the drums themselves is assessed by their inner diameter. If it has increased by more than 1 millimeter, then this means that the drum needs to be replaced with a new one.
How to check the handbrake
Checking the parking brake is a mandatory procedure when checking the brakes of a car. You need to check the handbrake every 30 thousand kilometers. This is done either by setting the car on a slope, or simply when trying to move off with the handbrake on, or trying to turn the wheel with your hands.
So, to check the effectiveness of the handbrake, you need an even slope, the relative value of the angle of which must be selected in accordance with the rules. According to the rules, the handbrake must hold a passenger car with a full load on a slope of 16%. In the equipped state - a slope of 25% (such an angle corresponds to a ramp or a trestle lift 1,25 m high with an entrance length of 5 m). For trucks and road trains, the relative slope angle should be 31%.
Then drive the car there and apply the handbrake, and then try to move it. So, it will be considered serviceable if the car remains stationary after 2 ... 8 clicks of the brake lever (the less, the better). The best option would be when the handbrake securely holds the car after lifting 3 ... 4 clicks up. If you have to raise it to the maximum, then it is better to tighten the cable or check the mechanism for adjusting the dilution of the pads, because it often turns sour and does not fulfill its function.
Checking the parking brake according to the second method (spinning the wheel and starting off with the lever raised) will be performed according to the following algorithm:
- the machine is installed on a flat surface;
- the handbrake lever will rise up two or three clicks;
- hang out the right and left rear wheel alternately with a jack;
- if the handbrake is more or less serviceable, then manually it will not be possible to turn the test wheels one by one.
The fastest way to check the parking brake is to lift its lever all the way up on a flat road, start the internal combustion engine, and in this state try to move off in first gear. If the handbrake is in good condition, the car simply will not be able to move, and the internal combustion engine will stall. If the car was able to move, you need to adjust the parking brake. In more rare cases, the rear brake pads are “to blame” for not holding the handbrake.
How to check the exhaust brake
Exhaust brake or retarder, designed to limit the movement of the vehicle without using the basic brake system. These devices are usually installed on heavy vehicles (tractors, dump trucks). They are electrodynamic and hydrodynamic. Depending on this, their breakdowns also differ.
The reasons for the failure of the mountain brake are breakdowns of the following components:
- speed sensor;
- CAN wiring (possible short circuit or open circuit);
- air or coolant temperature sensor;
- cooling Fan;
- electronic control unit (ECU).
- insufficient amount of coolant in the mountain brake;
- wiring problems.
The first thing a car owner can do is check the coolant level and top up if necessary. The next thing is to diagnose the condition of the wiring. Further diagnostics is quite complicated, so it is better to contact a car service specialist for help.
Brake master cylinder
With a faulty master brake cylinder, brake pad wear will be uneven. If the car uses a diagonal brake system, then the left front and rear right wheels will have one wear, and the right front and left rear will have another. If the car uses a parallel system, then the wear will be different on the front and rear axles of the car.
also, if the GTZ malfunctions, the brake pedal will sink. The easiest way to check it is to slightly unscrew it from the vacuum booster and see if liquid is leaking from there, or remove it completely and check if liquid has got into the vacuum booster (you can take a rag and put it inside). True, this method will not show a complete picture of the state of the main brake cylinder, but will only give information about the integrity of the low pressure cuff, while other working cuffs can also be damaged besides it. So additional checks are also needed.
When checking the brakes, it is desirable to check the operation of the master brake cylinder. The easiest way to do it is when one person sits behind the wheel and pumps the brakes by starting the engine (by pressing and releasing the pedal to set the neutral speed), and the second, at this time, inspects the contents of the expansion tank with brake fluid. Ideally, no air bubbles or swirls should form in the tank. Accordingly, if air bubbles rise to the surface of the liquid, this means that the main brake cylinder is partially out of order, and it must be disassembled for additional verification.
In garage conditions, you can also check the condition of the GTZ if you simply install plugs instead of its outgoing pipes. After that, you need to press the brake pedal. Ideally, it should not be pressed. If the pedal can be pressed, then the main brake cylinder is not tight and leaks fluid, and therefore needs to be repaired.
If the car is equipped with an anti-lock braking system (ABS), then the cylinder check must be performed as follows ... First of all, you need to turn off the ABS and check the brakes without it. it is also desirable to disable the vacuum brake booster. During the test, the pedal should not fall through, and the system should not inflate. If the pressure is pumped up, and when pressed, the pedal does not fail, then everything is in order with the master cylinder. If the pressure in the system is released when the pedal is depressed, then the cylinder does not hold, and the brake fluid goes back into the expansion tank (system).
Brake line
In the presence of brake fluid leaks, the condition of the brake line should be inspected. Places of damage should be looked for on old hoses, seals, joints. usually, fluid leaks occur in the area of \uXNUMXb\uXNUMXbcalipers or the main brake cylinder, in places of seals and joints.
To detect brake fluid leaks, you can put white clean paper under the brake calipers while the car is parked. Of course, the surface on which the machine is standing must be clean and dry. Similarly, a piece of paper can be placed under the engine compartment in the area where the brake fluid expansion tank is located.
How to check ABS brakes
On vehicles with ABS, vibration occurs in the pedal, which indicates the operation of this system during emergency braking. In general, it is advisable to carry out a complete check of brakes with an anti-lock system in a specialized service. However, the simplest ABS brake test can be done somewhere in an empty car park with a smooth and level surface.
The anti-lock brake system should not work at a speed of less than 5 km / h, so if the ABS comes into operation even with a slight movement, it is worth looking for the cause in the sensors. it is also necessary to inspect the condition of the sensors, the integrity of their wiring or the hub crown if the ABS light comes on on the dashboard.
The easiest way to understand whether the anti-lock brakes are working is if you accelerate the car to 50-60 km / h and sharply press on the brakes. Vibration should clearly go to the pedal, and besides, it was possible to change the trajectory of movement, and the car itself should not go skidding.
Checking the brake system on a specialized stand
Although self-diagnosis does not take much time and effort, in some cases it is better to seek help from a car service. Usually there are special stands for checking the operation of the brake system. The most important parameter that the stand can reveal is the difference in braking forces on the right and left wheels on the same axle. A large difference in the corresponding forces can lead to a loss of vehicle stability when braking. For all-wheel drive vehicles, there are similar, but special stands that also take into account the features of an all-wheel drive transmission.
How to test the brakes on the stand
For the car owner, the procedure comes down only to driving the car to the diagnostic stand. Most stands are drum type, they simulate the speed of the car, equal to 5 km / h. further, each wheel is checked, which receives rotational movements from the rolls of the stand. During the test, the brake pedal is pressed all the way, and thus the roll fixes the force of the brake system on each wheel. Most automated stands have special software that corrects the received data.
Hack and predictor Aviator
Often, the efficiency of work, as well as the condition of individual elements of the brake system of a car, can be done by simply sitting behind the wheel of a car and performing the appropriate actions. These manipulations are enough to identify problems in the system. A more detailed diagnosis involves examining individual parts.