Front and rear suspension VAZ 2106: malfunctions, repair and modernization
Content
High loads are placed on the suspension of the car, which are worked out and absorbed by its elements. Taking into account the quality of the road surface, sometimes you have to deal with the repair of the depreciation system of the VAZ 2106. In particular, attention should be paid to the suspension in the spring, because after winter there are many potholes, and driving with a faulty system is not very comfortable, and even unsafe.
Suspension VAZ 2106
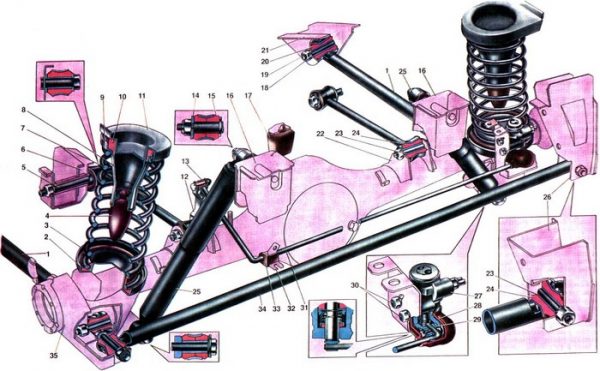
Any car, including the VAZ 2106, is equipped with a suspension, which ensures the fastening of the wheels, comfort and safety of movement. This design is installed in the front and rear of the car and consists of a number of elements. The essence of its work is to reduce the impact force when hitting an obstacle, which is transmitted to the body, increasing the smoothness of the ride. But in addition to softening the impact, it is also necessary to dampen the vibrations created by the elastic elements. In addition, the suspension transfers the force from the wheels to the vehicle body and counteracts the rolls that occur when cornering. To repair the front and rear shock absorption system, you need to take a closer look at its design features, as well as learn how to identify and fix faults.
Front suspension
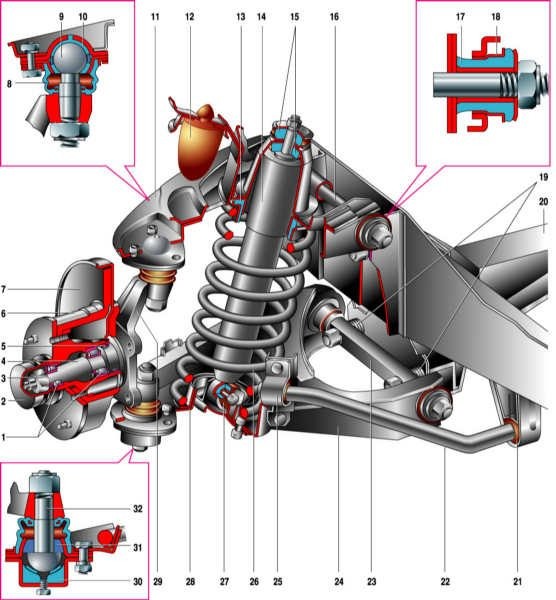
On the front end of the VAZ "six" there is a more complex suspension design, since the front wheels are steerable and it is this part of the car that bears heavy loads. The suspension of the front of the car is an independent double wishbone with helical coil springs, hydraulic shock absorbers and anti-roll bar.
More about the design of the front and rear shock absorber VAZ 2106: https://bumper.guru/klassicheskie-modeli-vaz/hodovaya-chast/amortizatory-na-vaz-2106.html
Cross-beam
The forward beam is a power element of a volumetric design. The product is made of steel. The cross member is located in the engine compartment from below. The power unit is fixed to it through the pillows, as well as the lower levers of the depreciation system.
Levers
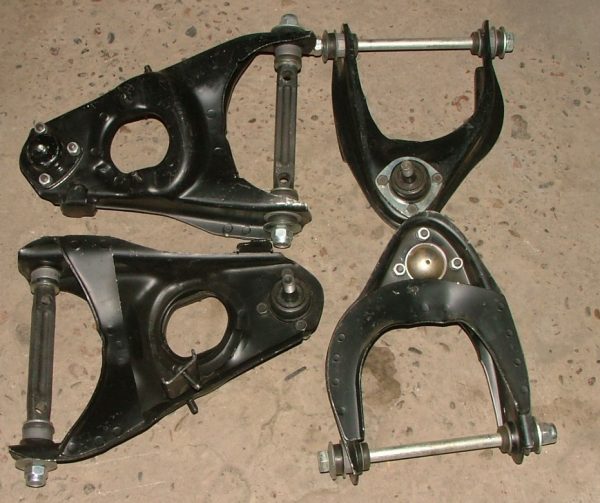
The front suspension consists of four levers - two upper and two lower. The lower elements are fixed to the cross member with an axle. Washers and shims are located between the beam and the axle, which change the camber and the angle of inclination of the axis of rotation of the front wheel. The upper arm axle is a bolt that goes through the fender strut. In the holes of the levers, rubber-metal products are installed - silent blocks, through which the suspension elements in question can move. With the help of ball joints, a steering knuckle (trunnion) is mounted to the levers. On it, with the help of tapered roller bearings, the wheel hub with the brake disc is fixed. On the trunnion, the hub is pressed with a nut, and the fastener has a left-hand thread on the right, and a right-hand thread on the left.
Shock absorbers
By means of shock absorbers, a smooth ride of the car is ensured, that is, bouncing on bumps is excluded. Damping devices are installed in front and behind almost identical in design. The difference lies in the size, mounting methods and the presence of a buffer in the front shock absorber. The front dampers are mounted with their bottom part to the lower arm, and are mounted on the support cup from above.
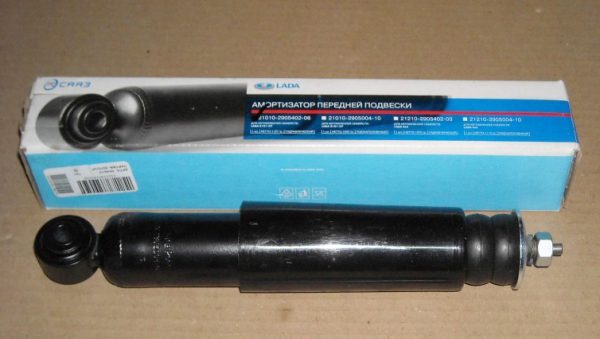
Table: parameters of shock absorbers "six"
| SKU | Rod diameter, mm | Case diameter, mm | Body height (excluding stem), mm | Rod stroke, mm |
| 2101–2905402 2101–2905402–022101–2905402–04 (перед) | 12 | 41 | 217 | 108 |
| 2101–2915402–02 2101–2915402–04 (зад) | 12,5 | 41 | 306 | 183 |
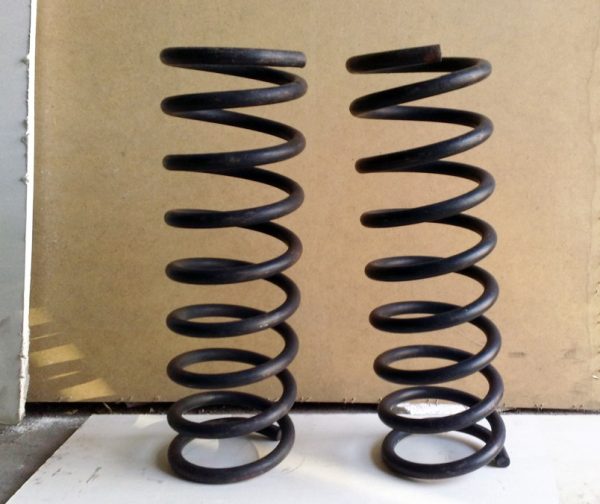
springs
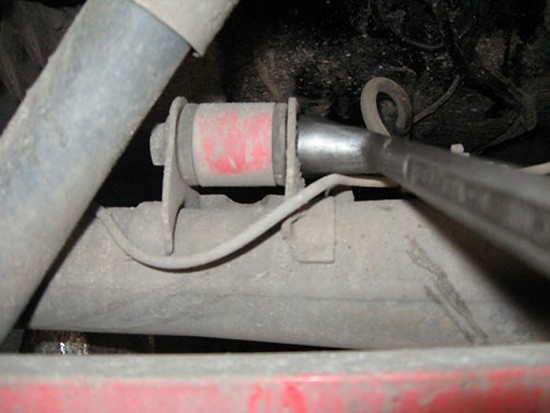
Coil springs are installed on the “six”, which rest against the rack with the upper part through the gasket and the support cup, and with the lower part against the recess of the lower arm. The purpose of the elastic elements is to provide the necessary clearance of the car and smooth out shocks while driving on rough roads.
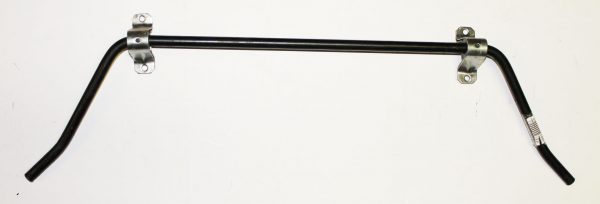
Stabilizer
The stabilizer is a part that reduces body roll when cornering. It is made of special steel. In the middle, the product is fixed to the front spars through rubber elements, and along the edges - to the lower levers.
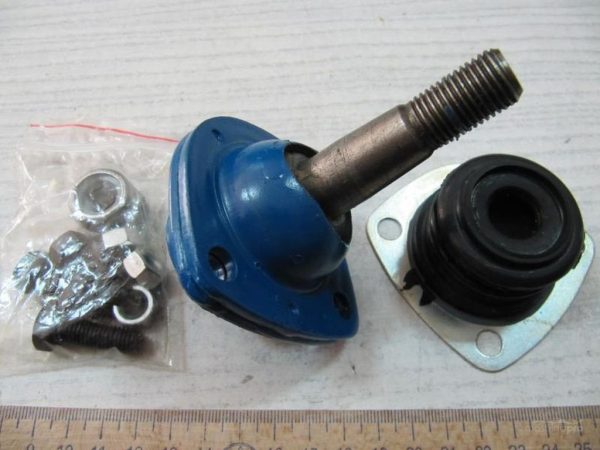
Spherical bearing
The ball joints of the front suspension are a hinge, thanks to which the machine is able to maneuver and move smoothly. In addition, these elements make it easy to control the front wheels. The support consists of a body with a ball pin and a protective element in the form of a rubber boot.
Rear suspension
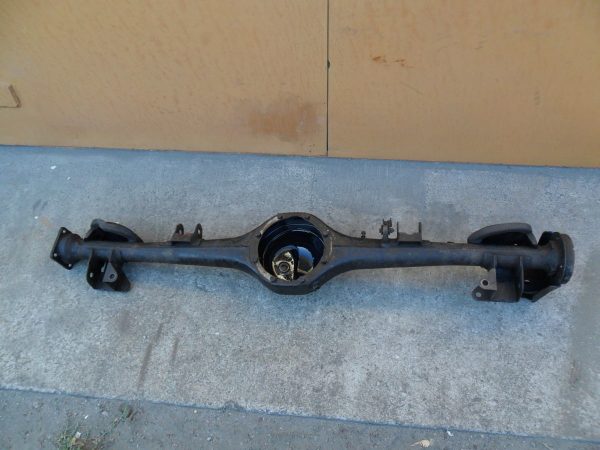
The design of the rear suspension of the VAZ 2106 is dependent, since the wheels are connected to the body by a stocking of the rear axle (ZM), the fixation of which is provided by four longitudinal and one transverse rod.
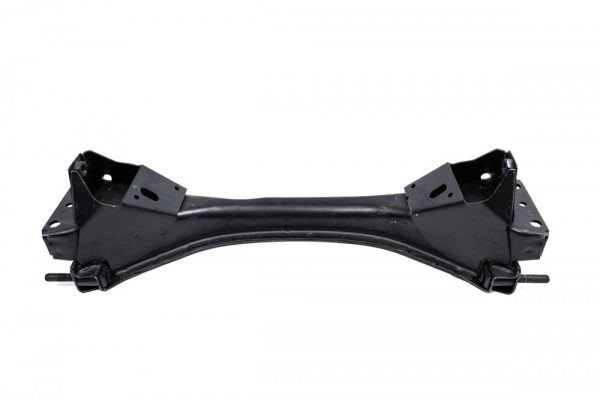
Rear beam
The rear axle beam is the main element of the rear suspension, on which both the components of the shock absorption system and the axle shaft with the gearbox are fixed.
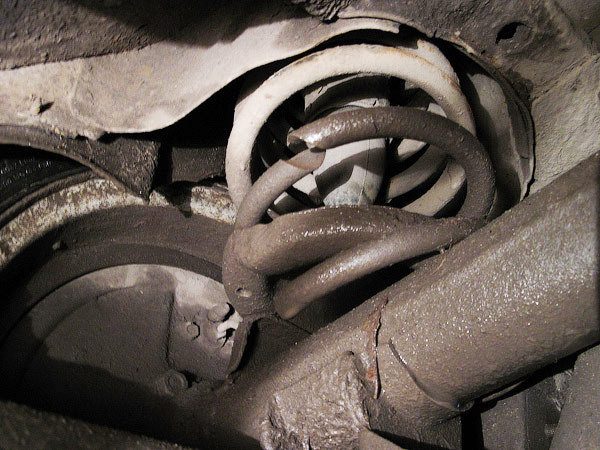
Shock absorbers and springs
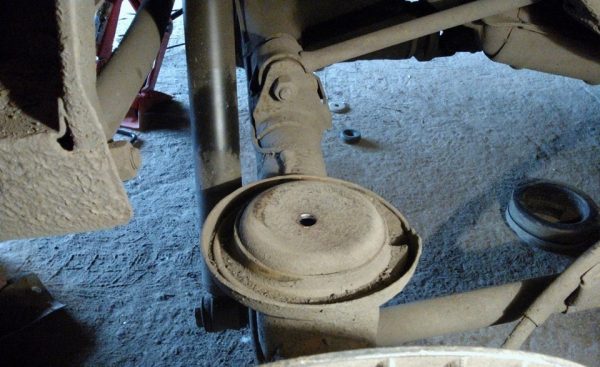
The rear dampers perform the same function as the front dampers. They are fixed with the upper part to the body, and from the bottom to the beam. The elastic element from below rests against the XNUMXM cup, from above - through the rubber bands into the body. The springs have compression stroke limiters in the form of cylindrical stops, on the ends of which rubber bumpers are fixed. An additional bump stop is fixed on the bottom, which prevents the rear axle crankcase from hitting the body when the suspension is strongly compressed.
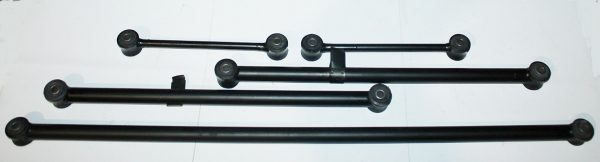
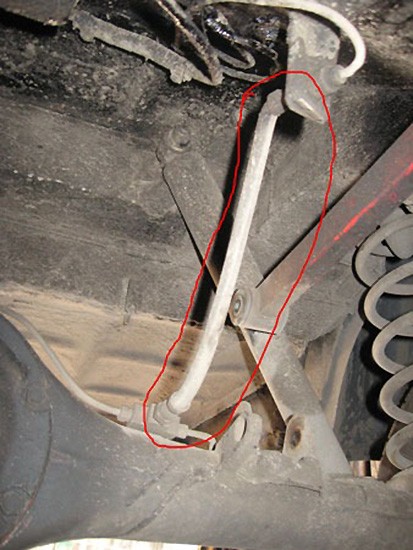
Reactive thrust
To exclude the longitudinal movement of the bridge, 4 rods are used - 2 short and 2 long. Panhard rod prevents lateral movement. The bars are attached through rubber-metal products with one side to the beam, the other - to the body.
Suspension malfunctions
It cannot be said that the VAZ 2106 suspension is unreliable, but taking into account the quality of our roads, it is still necessary to carry out diagnostics and carry out repair work from time to time. The occurrence of a particular malfunction can be judged by the characteristic symptoms, based on which it will be easier to determine the damaged part.
Knocks
Knocks can appear at different moments of the car’s movement, which indicates the following malfunctions:
- at the start of the movement. Indicates damage to the rear axle rods or brackets to which they are attached. Silent blocks themselves may also wear out. First you need to inspect the attachment points of the rods and their integrity, check the rubber-metal elements. Replace defective parts;
- during movement. With such a manifestation of a malfunction, the shock absorbers and their bushings may fail or the fasteners may loosen. With heavy wear, ball bearings can also knock;
- when compressing the damping system. The malfunction can manifest itself when the rebound buffer is damaged and is eliminated by inspecting and replacing the damaged elements.
In addition to the problems listed above, knocking can also occur with loose wheel bolts.
Video: causes of knocks at the beginning of the movement

Driving the car to the side
There can be many reasons when the car leads away from rectilinear movement:
- Tires are inflated at different pressures. Air check and adjustment required;
- incorrect wheel alignment. This can occur if one of the levers, their axles are damaged, or the silent blocks are heavily worn. It is necessary to inspect the front suspension, check the correct installation of the corners and, if necessary, adjust them;
- pin deformation. The part needs to be replaced;
- loss of elasticity or breakage of one of the springs. A sagging or failed spring must be replaced;
 Spring damage can cause the vehicle to pull to the side.
 - Tires have different wear. With this phenomenon, the tires must be replaced;
- balance is broken. It is necessary to check the balance and eliminate the imbalance;
- damage to the rear axle rod, which led to the displacement of the assembly. Inspection of the rear suspension and replacement of the defective element is required.
More about wheel alignment adjustment: https://bumper.guru/klassicheskie-modeli-vaz/hodovaya-chast/razval-shozhdenie-svoimi-rukami-vaz-2106.html
The car can also pull to the side for other reasons not related to the suspension, for example, if one of the wheels is not completely released. In this case, it is necessary to check the brake mechanism and eliminate the malfunction.
Extraneous sounds when turning
The reasons for the appearance of knocks or squeaks when turning the "six" can be as follows:
- loose wheel bolts. It is necessary to check and tighten the fastening;
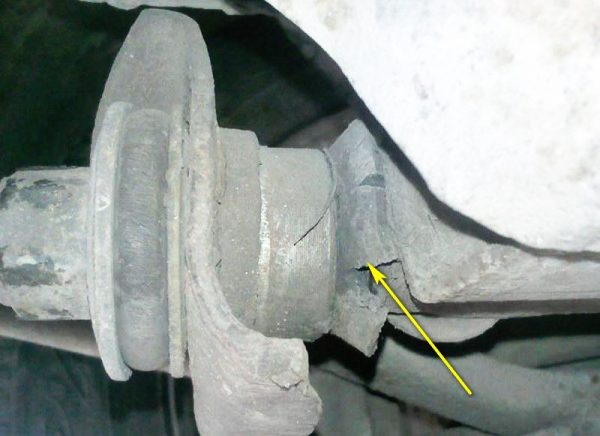
- excessive axial play of the front wheels. Such a sign indicates the failure of the wheel bearings or the weakening of the hub nut. Replacement of defective elements or tightening of fasteners is required;When the hub nut is loosened, there is play in the front wheels.
- spring damage. The suspension is inspected and the damaged part is changed. It is recommended to change the right and left springs at the same time, since the height of the new and old parts will be different;
- breakage of jet rods, free play in the bushings. It is necessary to replace defective elements;
- wear or lack of lubrication in ball bearings. If excessive wear occurs, the ball joint should be replaced. If the part has no wear, but creaks, it should be lubricated with ShRB-4;
- damage or wear of the silent blocks of the front end. Rubber-metal elements are subject to replacement;When the silent blocks are worn, suspension knocks occur
- the fastening of the levers or beams has loosened. Fasteners need to be checked and tightened if loose.
Suspension repair
Having established that the suspension of your car needs repair, depending on the proposed work, you need to prepare the tool and components, and then follow the step-by-step instructions.
Front suspension
Due to the more complex design of the front damping system, the repair procedure for it requires more time and labor than the rear.
Replacing the upper silent blocks
When damaged, rubber-metal products are replaced with new ones and cannot be repaired or restored. We change the hinges of the upper levers with the following tools:
- remover of silent blocks;
- ball joint puller;
- keys for 13, 22, 24;
- a hammer;
- chisel;
- mount;
- lubricant (for example, WD-40).
Repair consists of the following steps:
- Raise the front of the car and remove the wheel.
- Unbolt the bumper bracket.
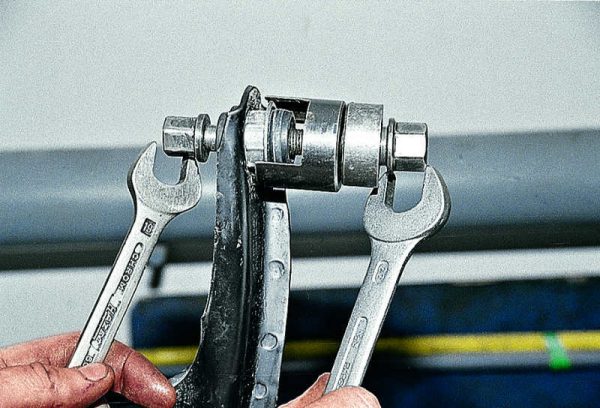
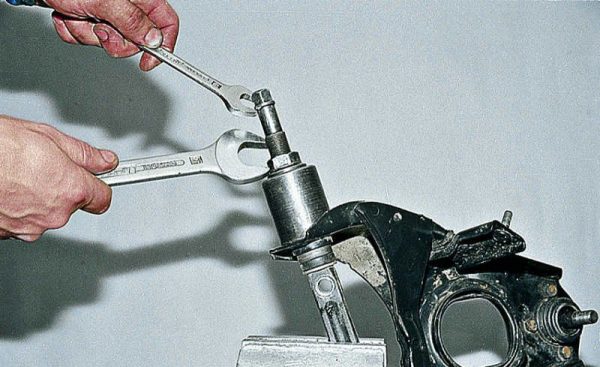
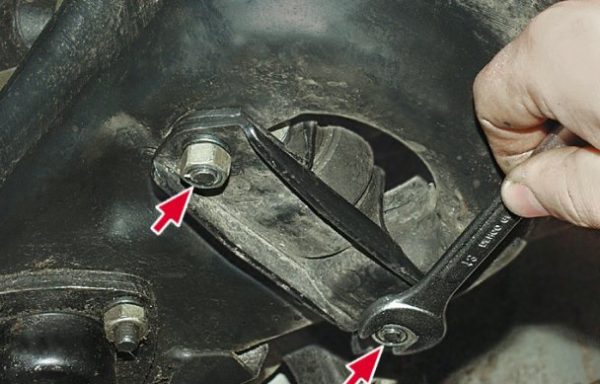
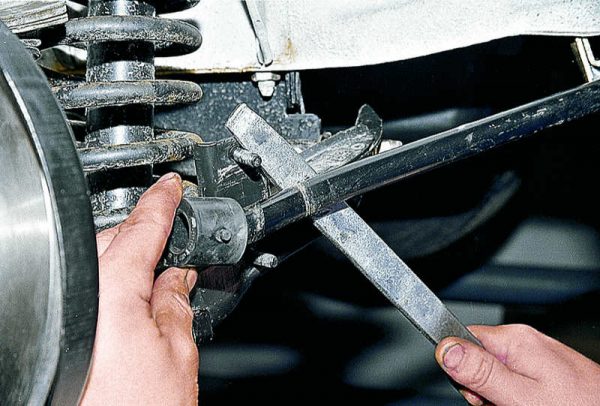
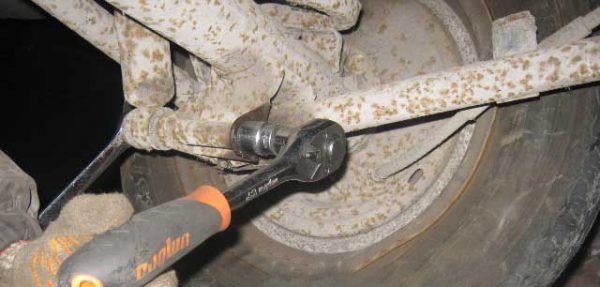
- With keys 13, we unscrew the ball fasteners.Loosen the upper ball joint
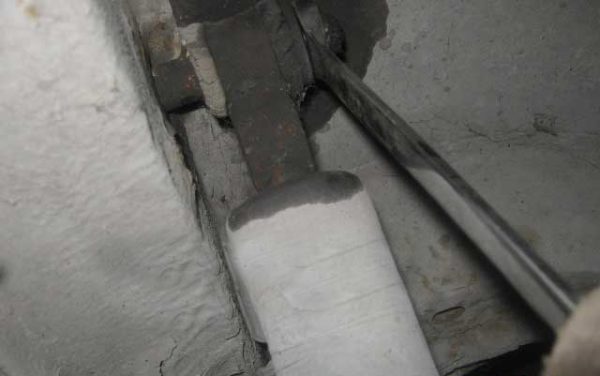
- If the ball joint needs to be replaced, unscrew the pin nut with a 22 wrench and squeeze it out of the trunnion with a special tool.To squeeze out the pin of the ball joint, we use a special tool or knock it out with a hammer
- Weaken, and then unscrew and take out the upper axis of the lever.After unscrewing the nut, remove the bolt
- We remove the suspension element from the car.
- We squeeze out the silent blocks that have become unusable with a puller, after which we press in new ones.We press out the old silent blocks and install new ones using a special puller
- Install all parts in reverse order.
Replacing the lower silent blocks
The lower arm pivots are replaced with the same tools used to repair the upper arms. The sequence of actions is as follows:
- We repeat step 1 to replace the upper silent blocks.
- Dismantle the shock absorber.
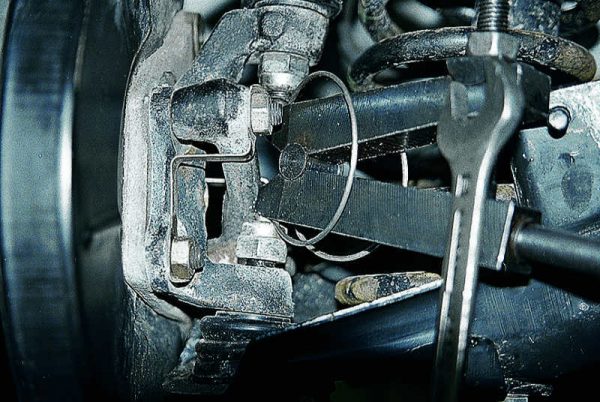
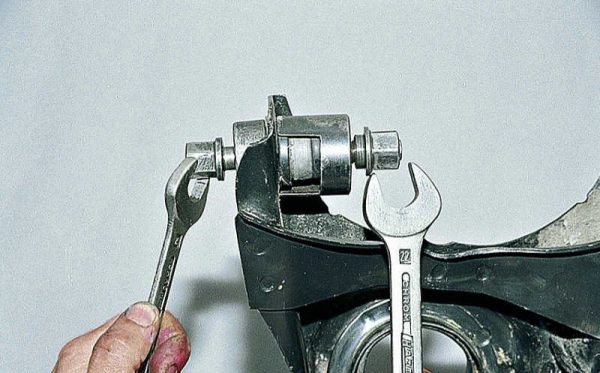
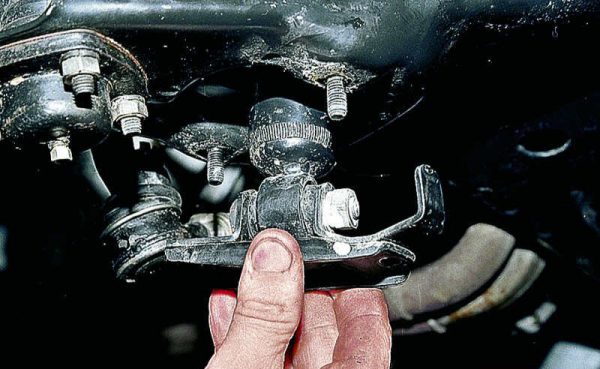
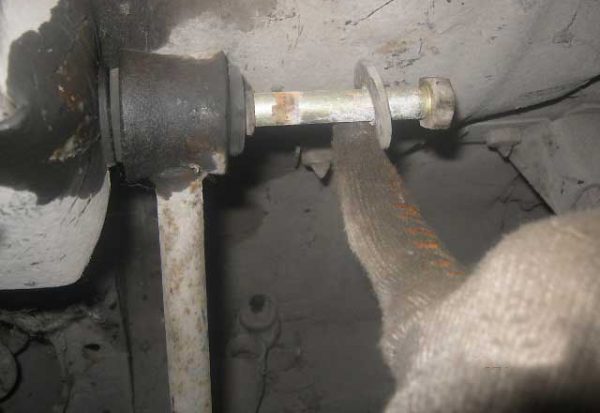
- We tear off the nuts of fastening the axis of the lever.Using a 22 wrench, unscrew the two self-locking nuts on the axis of the lower arm and remove the thrust washers
- We unscrew the bolts holding the transverse stabilizer.
- We drop the car.
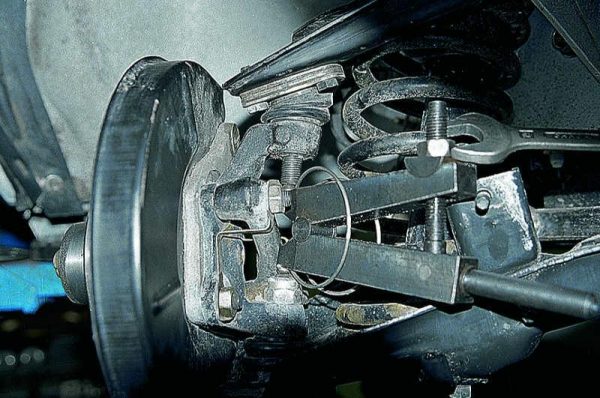
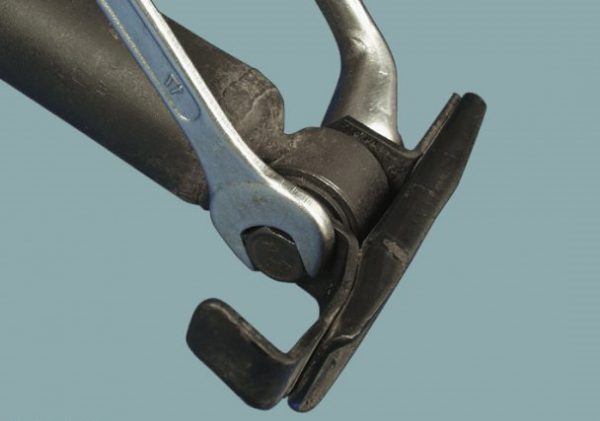
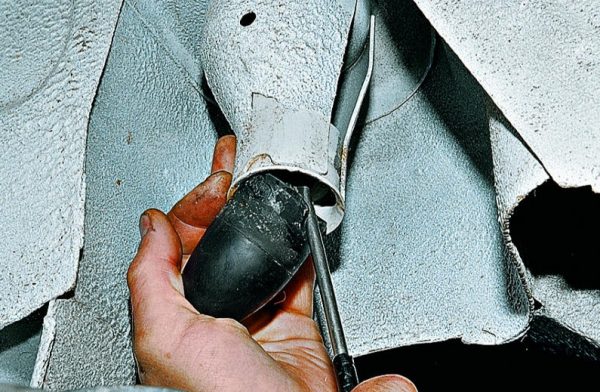
- We unscrew the fastening of the lower ball pin and squeeze it out with a special tool or knock it out with a hammer through a wood tip.We install the fixture and press the ball pin out of the steering knuckle
- To replace the ball, unscrew the bolts with keys 13.
- We raise the car and translate the stabilizer through the mounting pin.
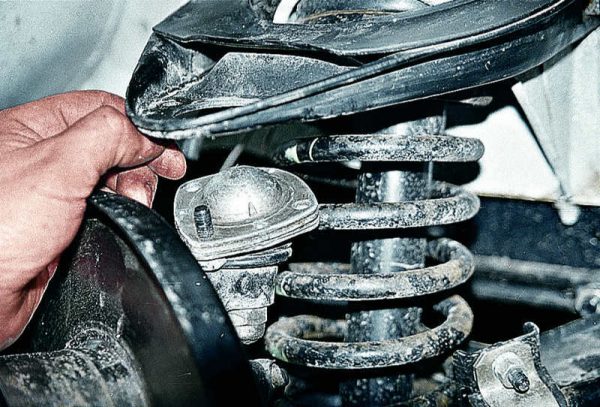
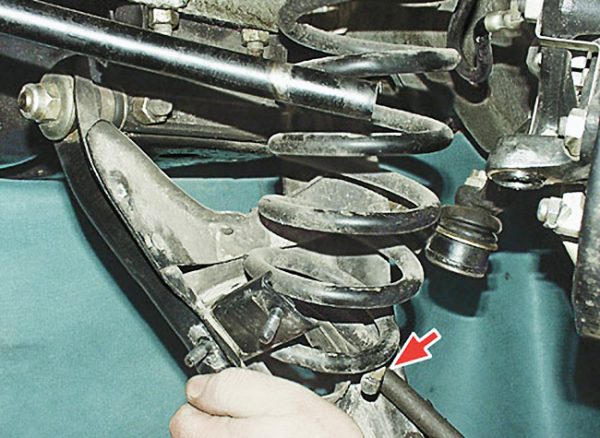
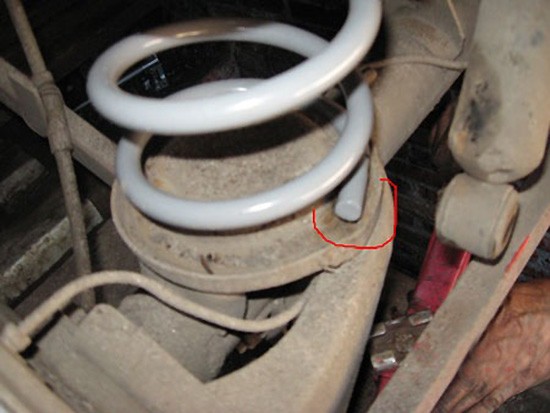
- Prying the spring, remove it from the support bowl. If necessary, change the elastic element.We hook the spring and dismantle it from the support bowl
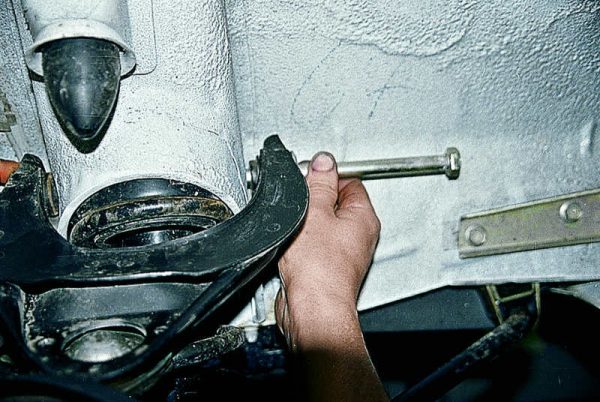
- Unbolt the lower arm axle.The axis of the lever is attached to the side member with two nuts
- We dismantle the washers, axle and lever.Sliding the lever from its place, remove it from the studs
- To remove the silent blocks, we clamp the lever in a vice and press out the hinges with a puller.We fix the axis of the lever in a vice and press out the silent block with a puller
- We mount new elements with the same device, after which we assemble the suspension back.Using a puller, install a new part in the eye of the lever


Learn more about replacing silent blocks with a VAZ 2107: https://bumper.guru/klassicheskie-modeli-vaz/hodovaya-chast/zamena-saylentblokov-na-vaz-2106.html
Replacing shock absorbers
We change the faulty damper using the keys to 6, 13 and 17 in the following sequence:
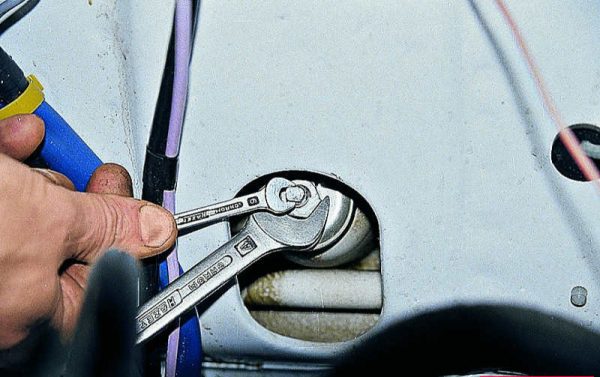
- With a key of 17, we unscrew the upper fasteners of the shock-absorbing element, while holding the rod itself with a key of 6.To unscrew the upper fastener, hold the stem from turning and unscrew the nut with a 17 wrench
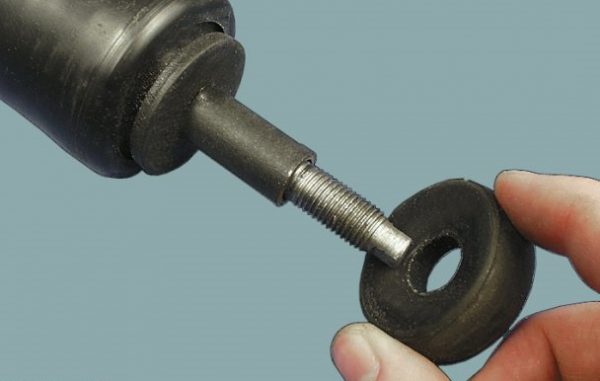
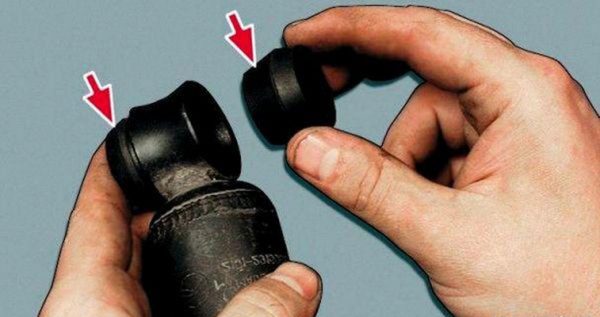
- We remove the elements of the shock absorber from the rod.Remove the washer and rubber cushion from the shock absorber rod
- From below, unscrew the mount to the lower arm.From below, the shock absorber is attached to the lower arm through the bracket
- We remove the shock absorber together with the bracket.Having unscrewed the mount, we take out the shock absorber through the hole of the lower arm
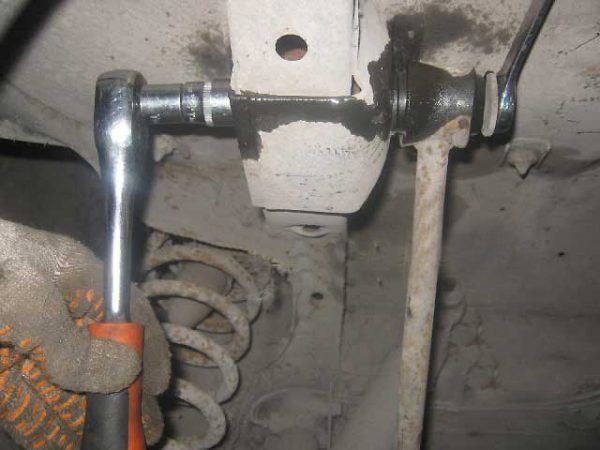
- We unscrew the mount, remove the bolt and remove the bracket.We unscrew the fastening of the lever with the help of two keys for 17
- We put the new damper in place, not forgetting to replace the bushings.
Replacing stabilizer bushings
If only the outer bushings need to be replaced, it is not necessary to completely remove the stabilizer. It will be enough to unscrew the mount around the edges. To replace all rubber elements, the part will have to be dismantled from the car. The tools you will need are the following:
- key on 13;
- mount;
- head for 10 and 13;
- crank.
The replacement procedure is as follows:
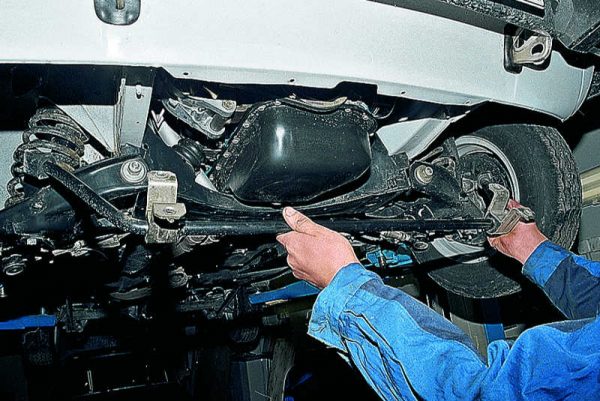
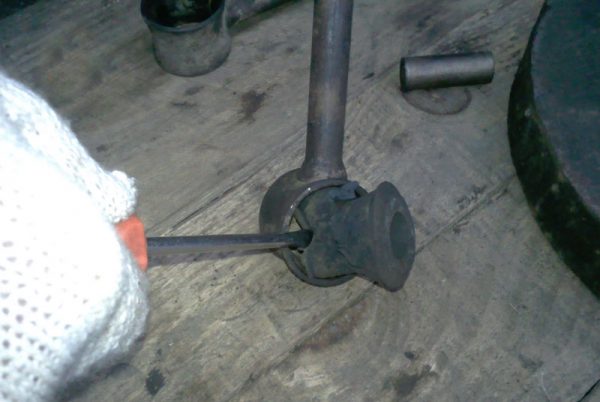
- We unscrew the fastening of the stabilizer bracket to the lower suspension element and remove it, having previously marked the location of the bracket for proper installation after repair.Along the edges, the stabilizer is held with staples with elastic bands
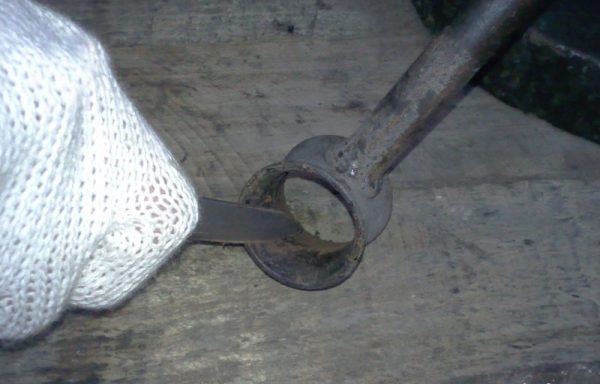
- We move the stabilizer aside with a mount, remove the worn bushing and install a new one in its place. The rubber product is pre-wetted with detergent. We install the part in such a way that the protrusion enters the hole in the bracket.Pushing the edge of the stabilizer with a mount, we change the old bushings to new ones
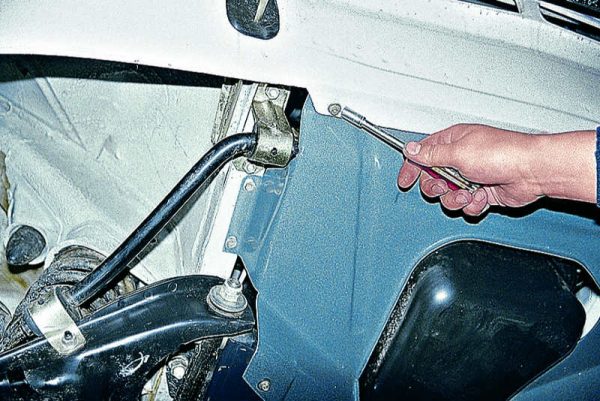
- To replace the middle bushings, with a head of 8, unscrew the screws that hold the mudguard.To replace the middle bushings of the stabilizer, it is necessary to dismantle the mudguard
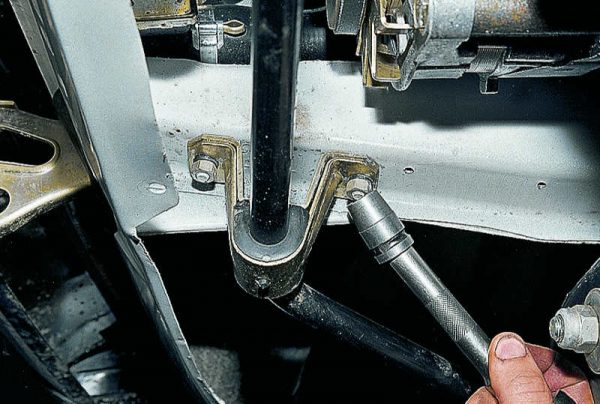
- We unscrew the fasteners of the stabilizer brackets to the power elements of the body.The middle part of the stabilizer is attached to the side members of the body
- Dismantle the stabilizer.Unscrew the mount, remove the stabilizer from the car
- We install new products and assemble the suspension.
Video: replacing the bushings of the transverse stabilizer on the "classic"

Rear suspension
In the rear suspension of the VAZ 2106, bushings of jet rods are more often changed, less often shock absorbers and springs. Let's consider the process in more detail.
Replacing dampers
Rear dampers are changed using the following list of tools:
- keys and head for 19;
- a hammer;
- crank;
- mount.
The procedure consists of the following steps:
- We put the car on the overpass.
- For better unscrewing, we apply grease like WD-40 to the fasteners.
- Loosen the damper lower bolt and remove it.From below, the shock absorber is held with a bolt and nut, unscrew them
- We unscrew the top nut, remove the washer together with the shock absorber and bushings.From above, the shock absorber is held on a stud fixed to the body
- Install new bushings or dampers in reverse order.If the shock absorber bushings are in poor condition, change them to new ones.
Replacing the springs
To replace the elastic elements of the rear suspension, you will need to prepare the following list:
- two jacks;
- keys for 19;
- big screwdriver.
To make repairs more convenient, it is better to put the car on a viewing hole. We perform the work in this order:
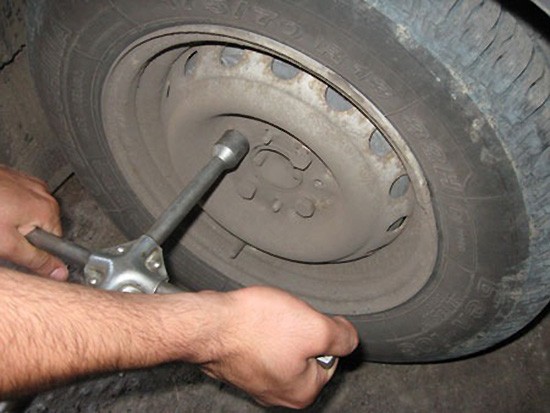
- Break off the rear wheel mount.We loosen the fasteners of the wheel to the axle shaft
- Unbolt the damper from below.
- We unscrew the fasteners of the short longitudinal rod to the stocking.We unscrew the fastening of the rod to the rear axle with a key of 19
- We first raise the rear part of the body with a jack, and then with the same device we jack the rear beam and dismantle the wheel.We use a jack to lift the body
- Carefully lower the stocking, while making sure that the brake hose is not damaged.When lifting the body, watch the spring and the brake hose
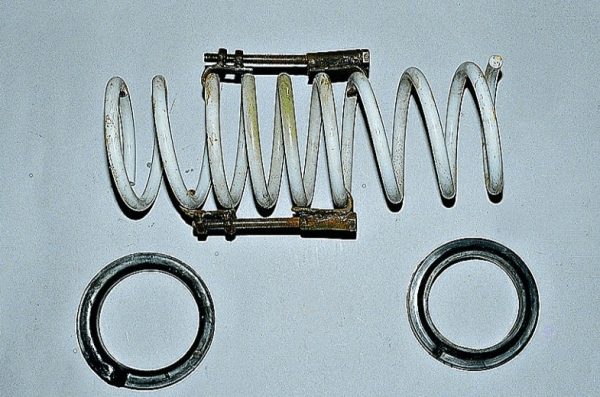
- We remove the spring and take out the old spacer.For convenience, the spring can be dismantled with special ties
- We inspect the end buffer, if necessary, replace it with a new one.Check the condition of the bumper and change it if necessary
- To simplify the installation of a new spring, we attach the spacers to it with a piece of wire.For ease of installation of the spring and spacer, we tie them with wire
- We put the part, placing the edge of the coil in the recesses of the cup.We mount the spring in place, controlling the location of the edge of the coil
- Raise the beam and mount the wheel.
- We lower the rear axle and fix the damper and longitudinal rod.
- We perform the same actions on the other side.

Video: replacing the springs of the rear suspension "Lada"

Replacing rods
To replace the jet rods or their bushings, the suspension needs to be disassembled. The list of tools for work will be the same as when replacing springs. The event consists of the following:
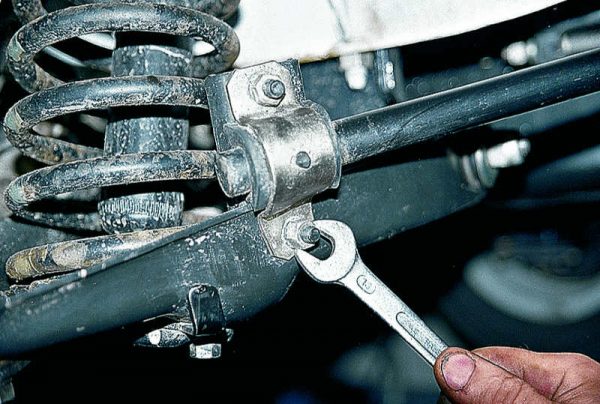
- We tear off the upper fasteners of the rod with a knob with a head of 19, holding the bolt itself on the other side with a wrench.From above, the rod is attached to the power element of the body with a bolt and nut, we unscrew them
- We unscrew the mount completely and remove it from the eyelet.Remove the bolt from the hole in the rod
- From the opposite edge, unscrew the bolt in the same way, after which we remove the thrust.Having unscrewed the mount on both sides, we dismantle the traction
- The remaining rods are dismantled in the same way.
- We knock out the inner part with the help of a tip, and push the rubber part out with a screwdriver.We pick out the old bushing with a screwdriver
- Inside the eye, we remove dirt and rubber residues.We clean the eye for the sleeve from the remnants of rubber with a knife
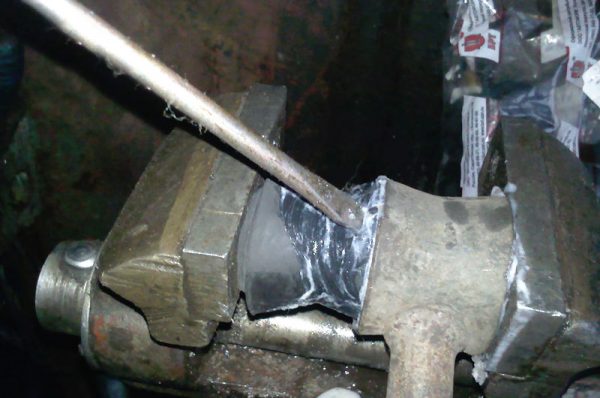
- We press new bushings with a vice, lubricating the rubber with soapy water.We press the new bushing with a vice
- Install the rods in place in the reverse order of removal.
Modernization of the VAZ 2106 suspension
Today, many owners of classic Zhiguli improve their cars and make changes not only to the appearance, interior, powertrain, but also to the suspension. VAZ 2106 - a car with a wide field of activity for tuning. The only limitation is the financial capacity of the owner. Let's dwell on the main points for finalizing the suspension.
Reinforced springs
The installation of reinforced springs on the "six" is resorted to when it is necessary to make the suspension stiffer, since many are not satisfied with its softness.
Equipping the machine with rigid spring elements will lead to the fact that when passing a sharp turn, there is a possibility of the wheels coming off on the other side, i.e., road grip will deteriorate.
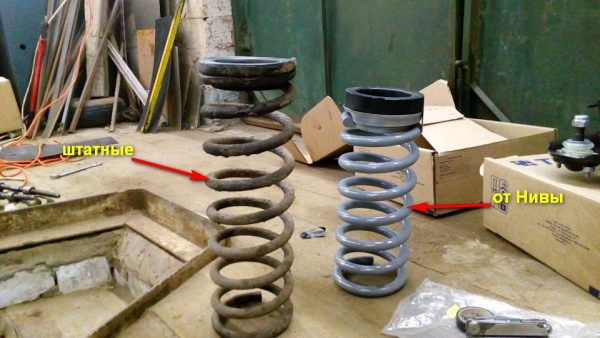
Springs from the VAZ 2121 are often placed on the front of the car along with a reinforced cushion. Such elastic elements have a somewhat greater coil thickness and rigidity. The rear suspension is mainly equipped with springs from the "four". In addition to them, Niva dampers are installed, which will be especially important for those cars that run on gas, since the equipment weighs a lot.
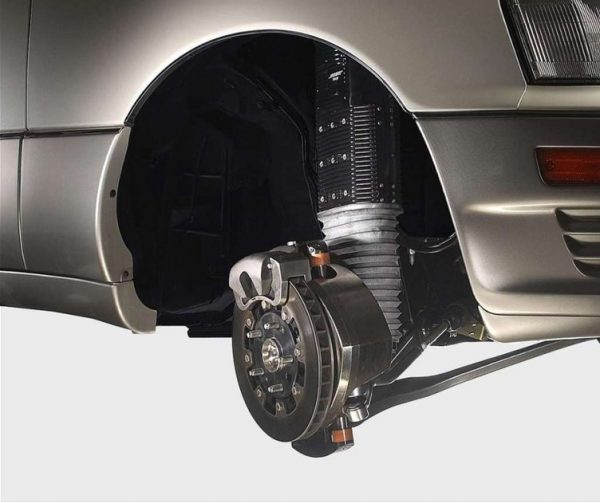
Air suspension
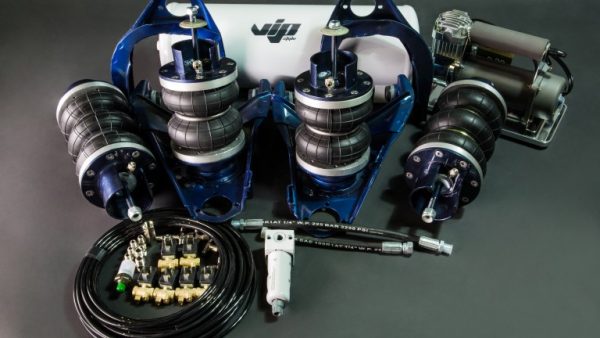
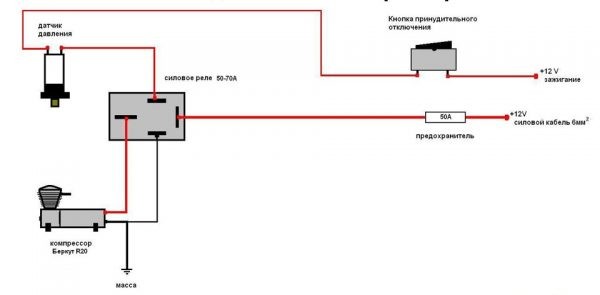
One of the options for upgrading the suspension is to install air struts. After the introduction of such a design, it becomes possible to change the ground clearance and generally increase the level of comfort. The car receives driving performance similar to the behavior of imported cars. When installing the air suspension, both the front and rear shock absorption systems are subject to conversion. For this, a kit is required, which includes:
- compressor;
- connecting elements;
- air struts;
- sensors, etc.
The factory suspension of the "six" for pneumatic changes in this order:
- Remove the springs from the suspension.
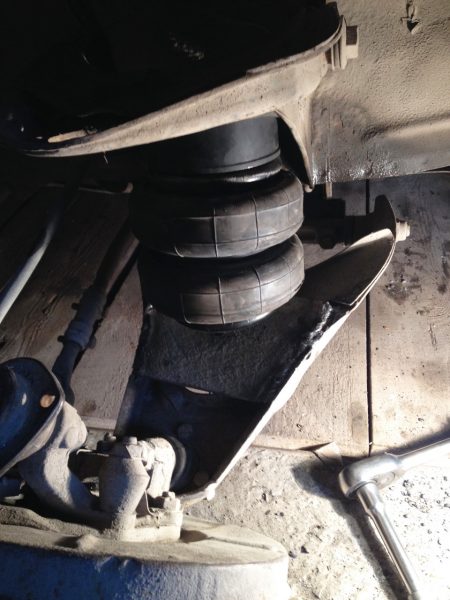
- We almost completely cut off the bump stop and make a hole for mounting the air strut in the lower cup and the upper glass.We drill a hole in the bottom bowl for the installation of an air strut.
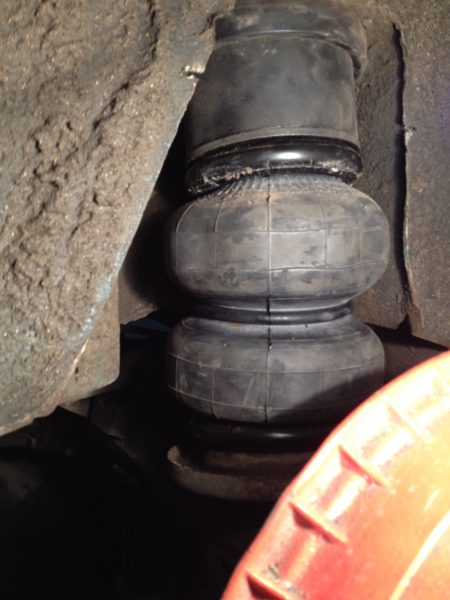
- Installing air springs.We mount the air spring, fixing it from above and below
- The front suspension is also completely disassembled.
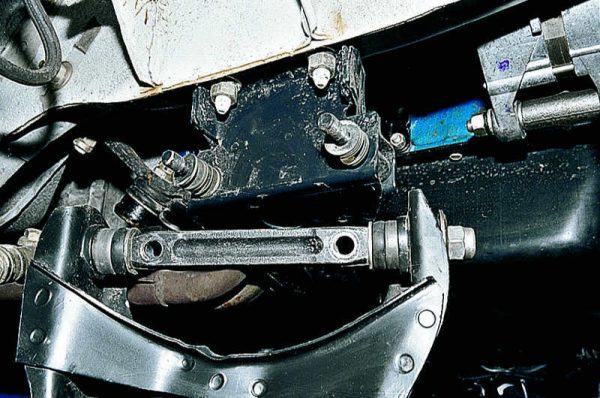
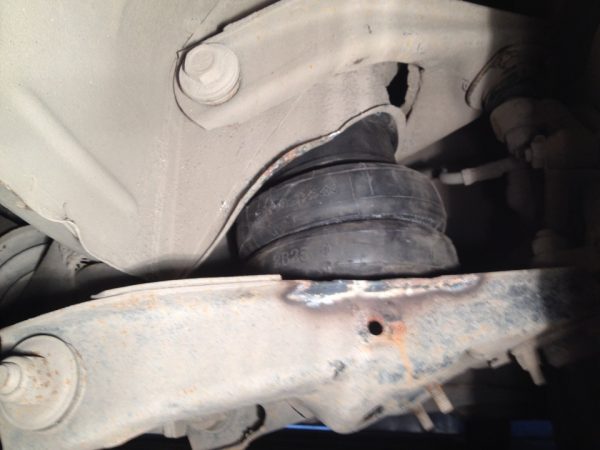
- We weld a plate onto the lower arm for the possibility of mounting the pillow, while removing the stabilizer mount.To mount the air spring from the front, it is necessary to weld a plate onto the lower arm
- We drill a hole in the plate for the lower mount of the air strut.
- We finalize the little things and install the air spring.After fitting, install the air strut and assemble the suspension
- We repeat the same steps on the other side.
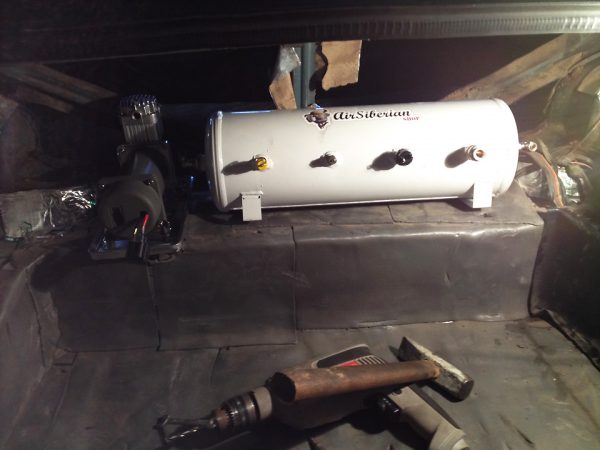
- In the trunk we install the compressor, receiver and the remaining equipment.The receiver and compressor are installed in the trunk
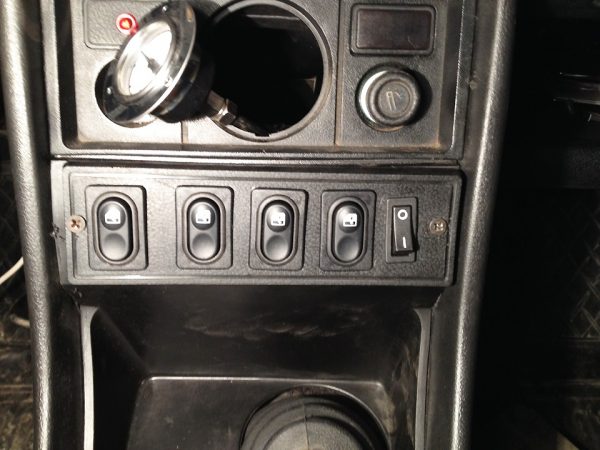
- The suspension control unit is located in an accessible place.Suspension control buttons are located in the cabin, where it will be convenient for the driver
- We connect the air struts and electrics in accordance with the diagram that comes with the kit.The air suspension is connected according to the diagram that comes with the equipment
Video: installing air suspension on classic Zhiguli

Electromagnetic suspension
Another option for improving the suspension of a car is an electromagnetic suspension. The basis of this design is an electric motor. It can work in the mode of a damping and elastic element. The work is controlled by a microprocessor. This type of suspension is installed instead of standard shock absorbers. The uniqueness of the design lies in the almost trouble-free operation. Plus, it has a high level of security. If for some reason the suspension loses power, the system will be able to go into mechanical mode thanks to the electromagnets. The most popular manufacturers of such pendants are Delphi, SKF, Bose.
The suspension of the VAZ "six" does not stand out for its complexity. Therefore, it is within the power of the owners of this car to repair it. You can identify and fix problems by reading the step-by-step instructions. When the first signs of problems appear, it is not worth delaying the repair, since other suspension elements will also be subject to increased wear.

