Rear axle gearbox VAZ 2106: troubleshooting, adjusting the assembly
The rear axle gearbox VAZ 2106 is a reliable unit, but sometimes it fails. This is explained by the operating conditions and maintenance of the mechanism. Malfunctions can be of a different nature, ranging from extraneous noise or oil leakage to a jammed gearbox. Therefore, when the first signs of problems with repairs appear, you should not delay.
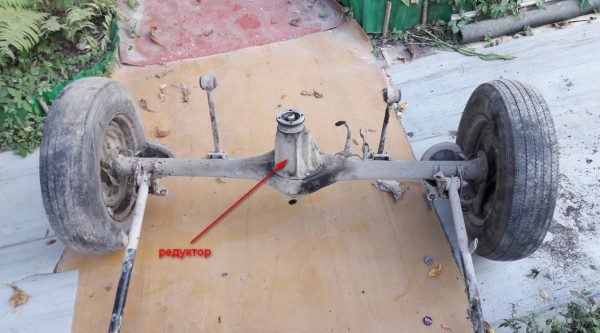
Rear axle reducer VAZ 2106
One of the transmission units of the VAZ 2106, through which the torque from the power unit is transmitted through the gearbox and cardan to the axle shafts of the rear wheels, is the rear axle gearbox (RZM). The mechanism has its own design features and characteristic breakdowns. It is worth dwelling on them, as well as on the repair and adjustment of the assembly, in more detail.
Technical specifications
Despite the fact that all gearboxes of the classic Zhiguli are interchangeable and made of similar parts, they still have differences that come down to different gear ratios.
Ratio
A parameter such as the gear ratio indicates how many revolutions the wheel will make in relation to the number of revolutions of the cardan shaft. A RZM with a gear ratio of 2106 is installed on the VAZ 3,9, which depends on the number of teeth of the gears of the main pair: 11 teeth on the drive, 43 teeth on the driven. The gear ratio is determined by dividing the larger number by the smaller one: 43/11=3,9.
If there is a need to find out the parameter of the gearbox in question, it is not necessary to remove the latter from the car. To do this, just hang one of the rear wheels and turn it 20 times, while counting the number of revolutions of the cardan. If a “six” RZM is installed on the car, then the cardan shaft will make 39 revolutions. Based on the features of the differential, when one wheel rotates, its number of revolutions doubles. Therefore, to correct, the number of wheel revolutions must be divided by 2. As a result, we get 10 and 39. Dividing the larger value by the smaller one, we find out the gear ratio.
Video: determining the gear ratio without removing it from the car

It is generally accepted that a gearbox with a higher gear ratio is high-torque, and with a lower gear ratio it is high-speed. However, the characteristics of the car must be taken into account. If, for example, you install RZM from 3,9 to a “penny”, then the lack of engine power will be quite strongly felt, especially on climbs.
Operating principle
The essence of the operation of the rear gearbox VAZ 2106 is quite simple and boils down to the following:
- The torque from the power plant is transmitted through the gearbox and cardan shaft to the RZM flange.
- By rotating the bevel gear, the planetary gear rotates along with the differential on tapered roller bearings, which are installed in special sockets in the gearbox housing.
- The rotation of the differential drives the rear axle shafts, which engage with the side gears.
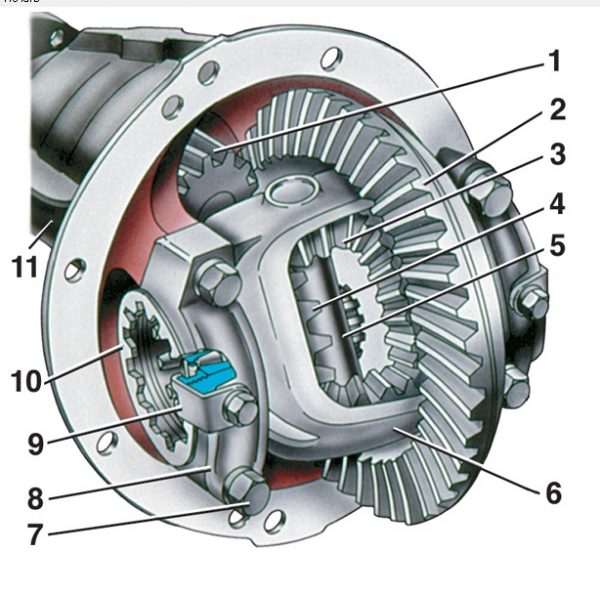
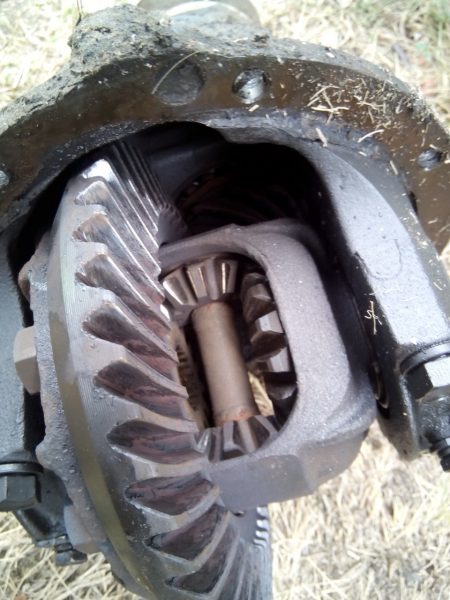
Gearbox device
The main structural elements of the "six" REM are:
- main couple;
- wheel differential.
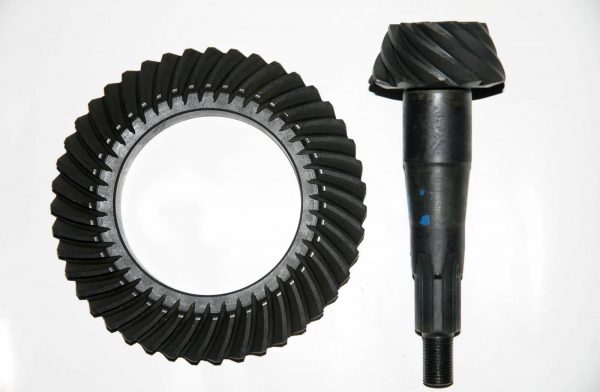
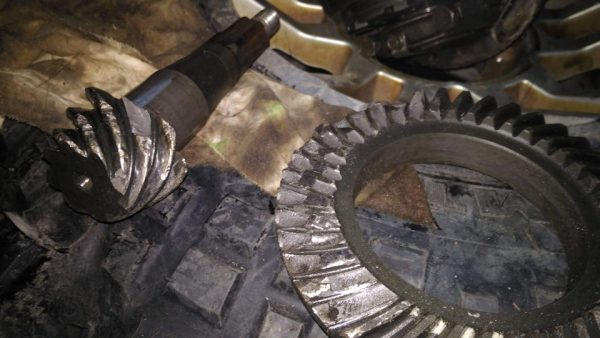
Main couple
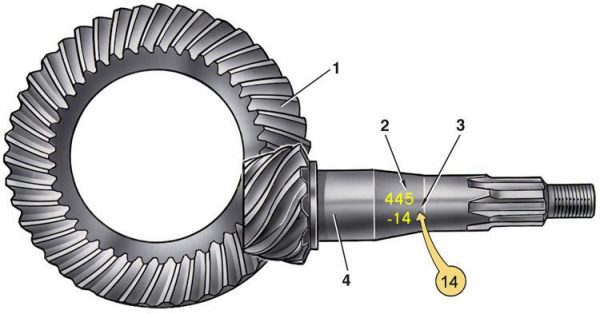
Structurally, the main pair of the gearbox is made of two gears - the leading one (tip) and the driven one (planetary) with hypoid (spiral) tooth engagement. The use of a hypoid gear provides the following benefits:
- silent operation;
- increased resource;
- increase in ground clearance.
However, this design has its own nuances. The final drive gears go only in pairs and are adjusted on special equipment. During this process, all gear parameters are monitored. The main pair is marked with a serial number, model and gear ratio, as well as the date of manufacture and the signature of the master. Then the main gear set is formed. Only after that the spare parts go on sale. If one of the gears breaks down, then the main pair must be completely replaced.
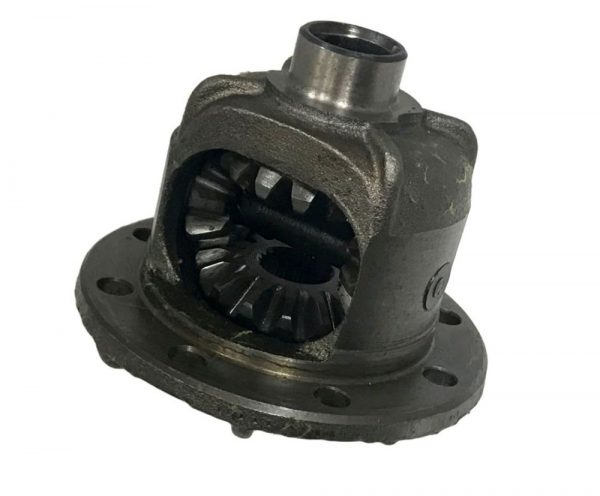
Differential
Through the differential, the torque is distributed between the drive wheels of the rear axle, ensuring their rotation without slipping. When the car turns, the outer wheel receives more torque, and the inner wheel receives less. In the absence of a differential, the described torque distribution would not be possible. The part consists of a housing, satellites and side gears. Structurally, the assembly is installed on the driven gear of the main pair. Satellites connect the side gears to the differential housing.
Other details
There are other elements in the REM that are an integral part of the design:
- housing - eliminates damage to the differential;
- flange - the part is fixed on the bevel gear of the main pair and is designed to connect the cardan with this gear;
- lip seal - is responsible for the tightness of the assembly, preventing the leakage of lubricant to the outside;
- bearings - provide rotation of the bevel gear and differential.
Symptoms of gearbox problems
The rear gearbox is one of the reliable mechanisms of the classic Zhiguli and breakdowns with it happen infrequently. However, like any other unit, it may have its own malfunctions, which are determined by characteristic features. It is worth dwelling on them in more detail.
Noise on acceleration
If during acceleration there is an extraneous sound from the gearbox installation site, then it can be caused by:
- development or incorrect adjustment of differential bearings. Dismantling, disassembly and diagnostics of parts with subsequent adjustment will be required;
- incorrect meshing of the gear teeth of the main pair. Eliminated by proper adjustment;
- lack of lubrication in the gearbox. The lack of oil in the crankcase is restored, after which it is checked for leakage at the installation sites of the sealing elements.
The axle shaft bearings are not a structural element of the gearbox, but if the part is out of order, then an extraneous sound may also be observed during acceleration.
Noise during acceleration and deceleration
With the manifestation of noise both during acceleration and during braking by the power unit, there may not be so many reasons:
- development or breakdown of bearings of the bevel gear of the main pair. Eliminated by replacing failed elements;
- incorrect adjustment of the gap between the tip and the planetary. The mechanism needs diagnostics and replacement of damaged parts, as well as setting the required gap between the gear teeth.
Video: how to determine the source of noise in the rear axle

Knocking, crunching when moving
If the gearbox began to make sounds uncharacteristic for its normal operation, then it will be possible to accurately diagnose a breakdown only after disassembling the assembly. The most likely reasons for the appearance of a crunch or knock can be:
- breakage of a tooth on the gears of the main pair;
- large wear of the main pair;
- malfunction or incorrect adjustment of the bevel gear bearings.
Noises when turning
Noises in the gearbox are also possible when turning the car. The main reasons for this may be:
- tight rotation of the satellites or the appearance of burrs on their surface. Eliminated by replacing damaged parts or processing roughness with sandpaper. If the defect cannot be removed, the failed parts must be replaced;
- jamming of side gears. If the gears have barely noticeable damage, they are cleaned with sandpaper. Elements with traces of heavy wear are replaced with new ones;
- The gap between the differential gears is incorrectly set. It is necessary to set the correct clearance between the gears;
- failure of semi-axial bearings. Ball bearings must be replaced with new ones.
Knocking at start up
The appearance of a knock in the rear gearbox of the VAZ 2106 at the beginning of the movement may be accompanied by:
- large gap between the splines of the bevel gear shaft and the flange. It is necessary to inspect the condition of both parts. If significant wear is found on the slots, the elements are replaced;
- increased gap between the teeth of the gears of the main pair. The problem is "treated" by adjusting the gap;
- large development of the seat under the axis of the satellites in the differential box. The box needs to be replaced;
- the fasteners of the reactive rods of the rear beam were loosened. It is necessary to inspect and tighten the mount.
Jammed reducer
Sometimes the REM can jam, i.e., torque will not be transmitted to the drive wheels. The reasons that can lead to such a malfunction are as follows:
- lack of lubrication in the mechanism, which could leak due to leaks in the assembly;
- breakdown of satellites;
- damage to the bearing on the bevel gear of the main pair.
If one wheel is jammed, then the problem may be related to the brake mechanism or axle bearing.
Oil leakage can be determined without resorting to disassembly of the gearbox, but it will not be possible to identify other malfunctions without this procedure. If, after disassembly, scoring, broken teeth, or visible damage to the bearing are found on the gears, then the parts need to be replaced.
Oil leak
Leakage of lubricant from the gearbox "six" is possible for two reasons:
- failure of the shank gland;
- damage to the gasket between the gearbox and the stocking of the rear axle.
To accurately determine where the oil is leaking from, it is necessary to wipe the grease with a rag and inspect the gearbox after a while: the leak will be noticeable. After that, it will be possible to take further actions - remove the entire gearbox to replace the gasket, or dismantle only the universal joint and flange to replace the lip seal.
Gearbox repair
Practically any repair work with the REM "six", except for the replacement of the stuffing box, is associated with the dismantling and disassembly of the assembly. Therefore, if characteristic signs of malfunctions were noticed in the operation of the mechanism, for further actions it is necessary to prepare a certain list of tools:
- hexagon 12;
- set of open-end wrenches;
- persistent shoes;
- jack;
- supports for the rear axle;
- oil container.
Dismantling the gearbox
Removing the gearbox is done as follows:
- We install the car on a viewing hole, placing shoes under the front wheels.
- Substituting a suitable container under the drain hole, unscrew the plug and drain the oil.
 We unscrew the drain plug and drain the oil from the gearbox
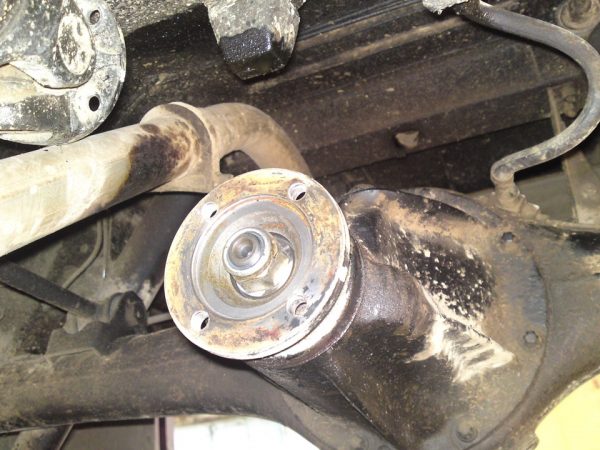
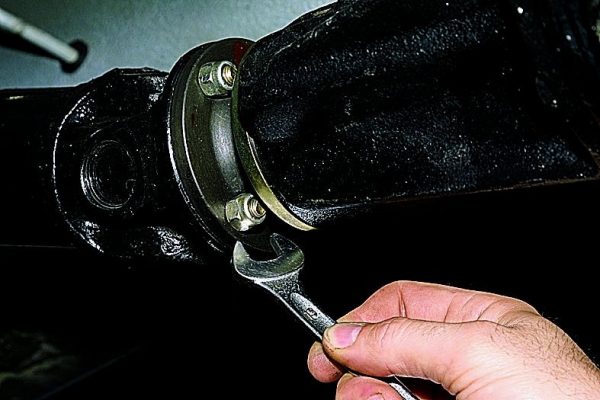
 - We unscrew the cardan mount to the flange, move the shaft to the side and tie it with wire to the jet thrust of the bridge.We unscrew the cardan fasteners to the flange and move the shaft to the side
- We raise the rear beam and put supports under it.
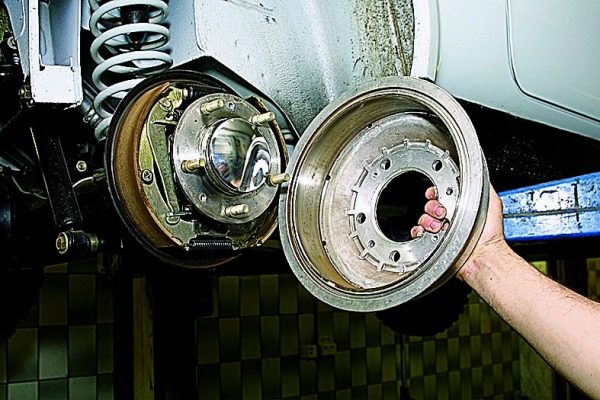
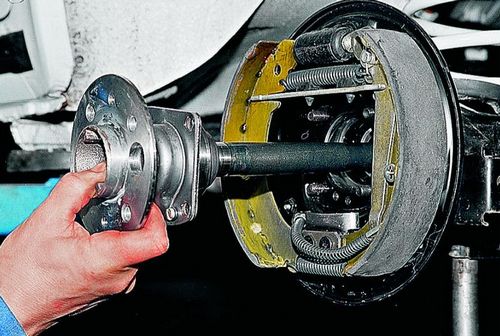
- We dismantle the wheels and drums of the brake mechanism.To remove the axle shaft, it is necessary to dismantle the brake drum
- Having unscrewed the fasteners, we take out the axle shafts from the stocking of the rear axle.We unscrew the axle shaft mount and push it out of the stocking of the rear axle
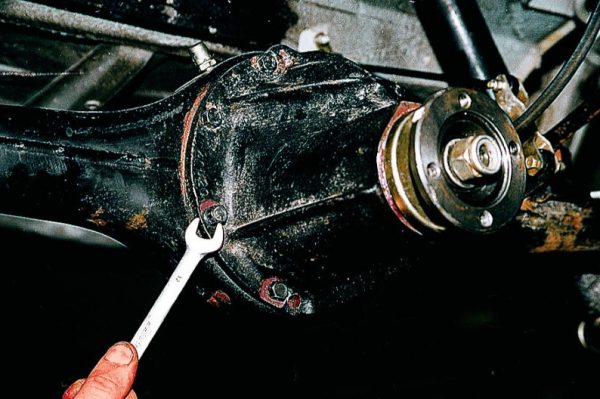
- We turn off the fastening of the gearbox to the rear beam.We unscrew the fastening of the gearbox to the rear beam
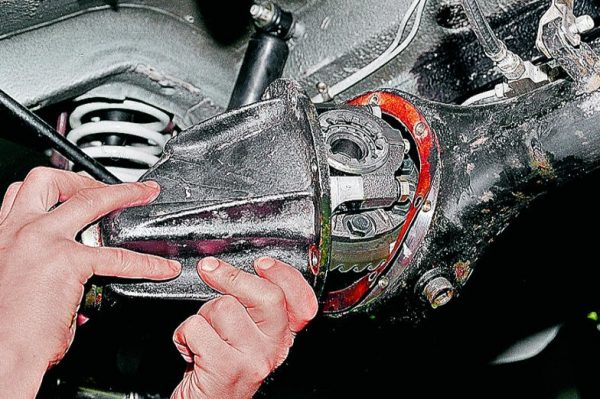
- We remove the mechanism from the car.Unscrew the mount, remove the gearbox from the machine

Cuff replacement
The RZM lip seal is changed using the following tools:
- head 24;
- crank;
- a hammer;
- flat screwdriver.
To replace the oil seal, it is necessary to remove the cardan from the side of the gearbox and drain the oil, then perform the following sequence of actions:
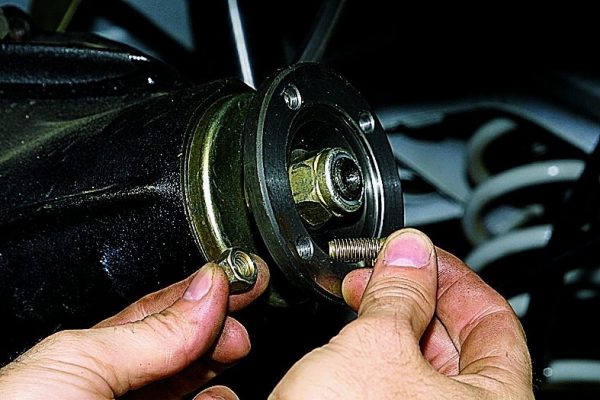
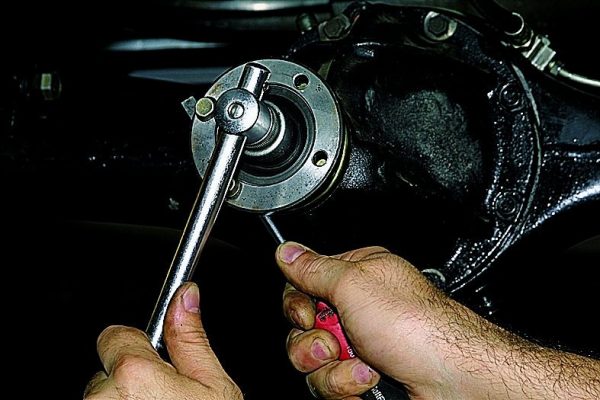
- We insert the bolts into the two nearest holes of the flange and screw the nuts onto them.We insert cardan bolts into the holes of the flange
- We place a screwdriver between the bolts and unscrew the flange mount.With a 24 head and a wrench, unscrew the flange fastening nut
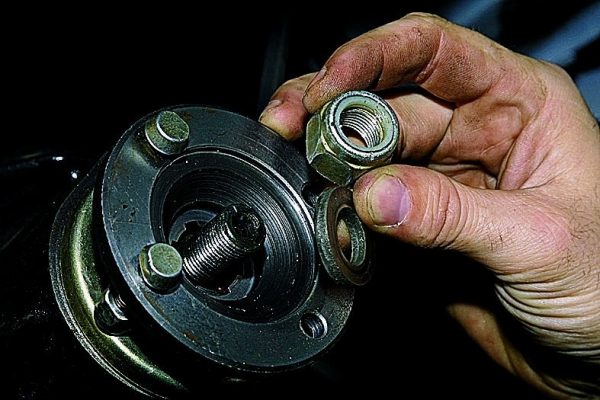
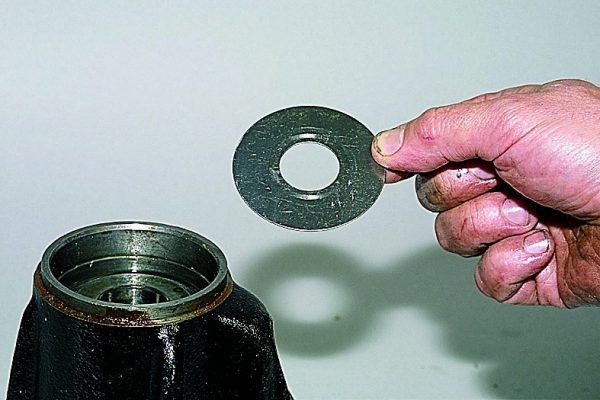
- Remove the nut along with the washer.Remove the nut and washer from the drive shaft
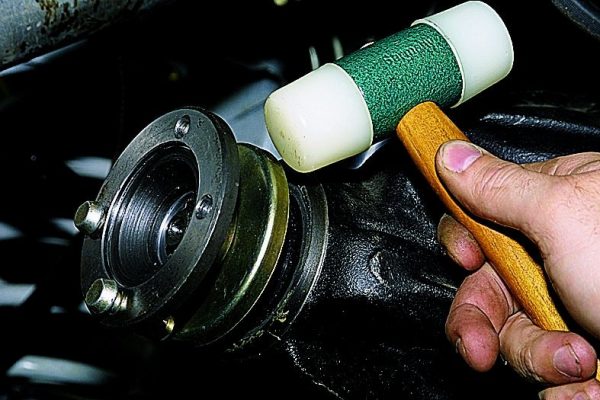
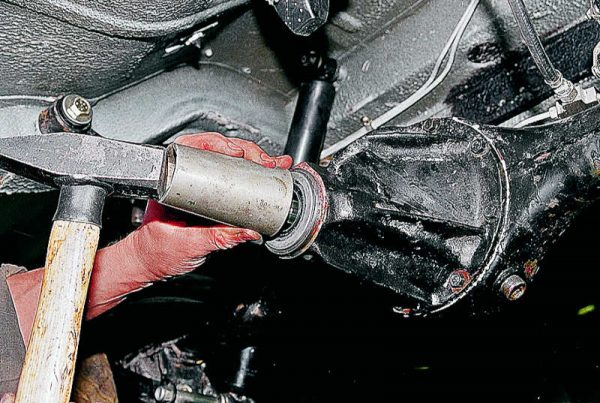
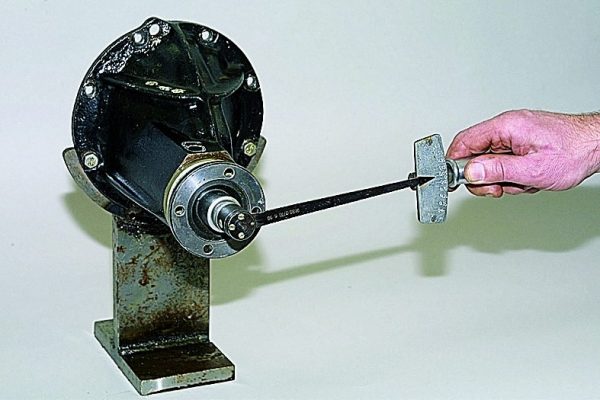
- Using a hammer, knock the flange off the bevel gear shaft. For these purposes, it is better to use a hammer with a plastic head.We knock the flange off the shaft with a hammer with a plastic head
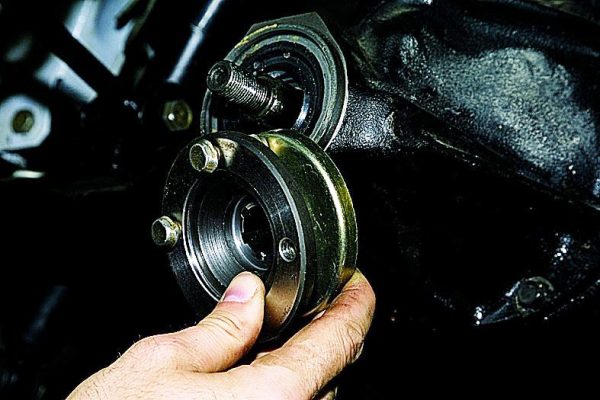
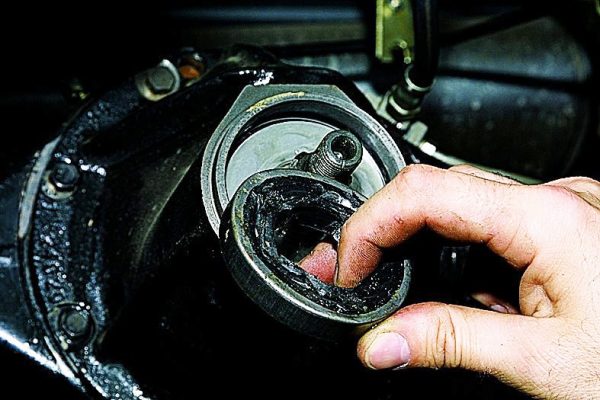
- Removable flange.We dismantle the flange from the gearbox
- Prying off the lip seal with a screwdriver, remove it from the gearbox housing.We pry the oil seal with a flat screwdriver and remove it from the gearbox
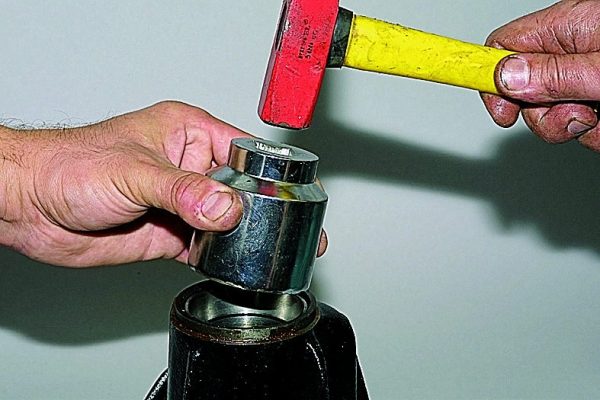
- We put the new sealing element in place and press it in with a suitable attachment, having previously treated the working edge with Litol-24 grease.We apply Litol-24 on the working edge of the stuffing box and press in the cuff using a suitable mandrel
- We install the flange in the reverse order of dismantling.
- We tighten the nut with a moment of 12–26 kgf * m.We tighten the flange nut with a moment of 12–26 kgf * m
Video: replacing the shank gland with REM "classics"

Disassembly of the gearbox
To disassemble the node in question, you will need the following tools:
- set of wrenches;
- a hammer;
- bearing puller.
For the convenience of work, the gearbox must be installed on a workbench. We disassemble in the following sequence:
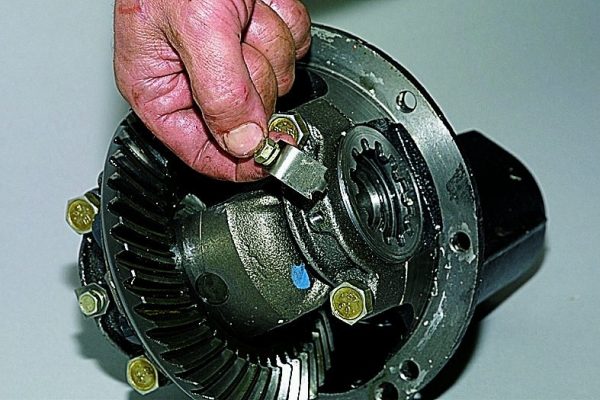
- We unscrew the bolt that secures the retaining element of the left bearing.The lock plate is held by a bolt, unscrew it
- We dismantle the part.Unscrew the mount, remove the locking plate
- In the same way, remove the plate from the right bearing.
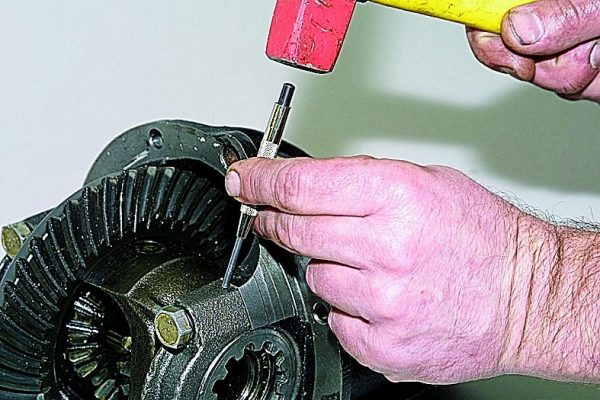
- Use a suitable tool to mark the location of the covers.Bearing caps marked with a beard
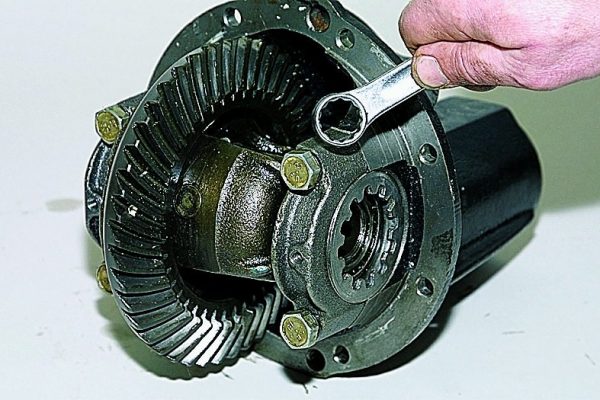
- We unscrew the fasteners of the cover of the left roller bearing and remove the bolts.Using a 17 key, unscrew the fastening of the bearing cover and remove the bolts
- We remove the cover.Unscrew the fasteners, remove the cover
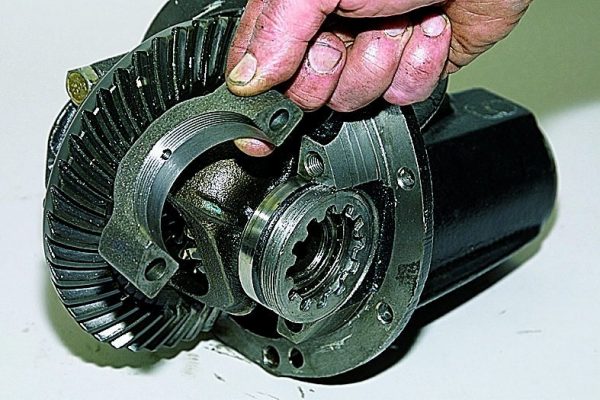
- Remove the adjusting nut.We take out the adjusting nut from the body
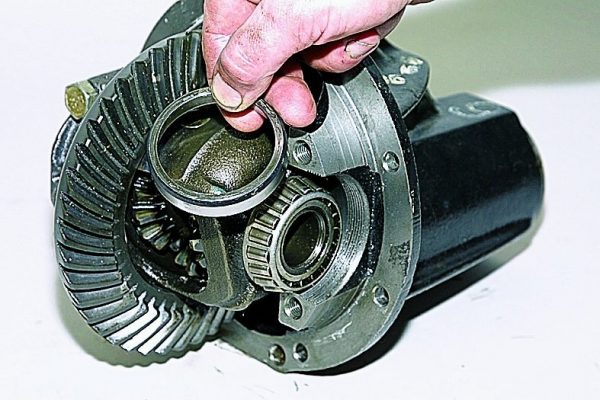
- Remove the outer race of the bearing.Remove the outer race from the bearing
- Similarly, remove the elements from the right bearing. If the replacement of bearings is not planned, we make marks on their outer races in order to put them in their places during installation.
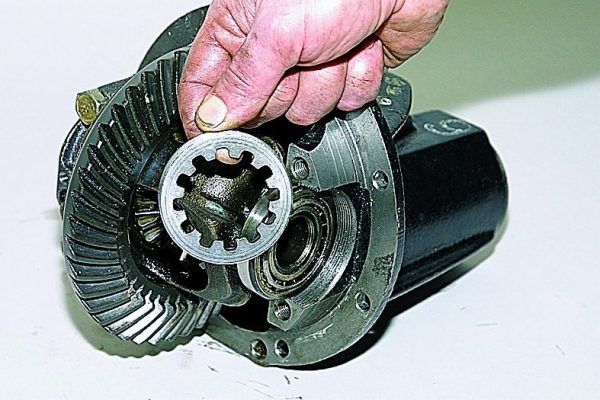
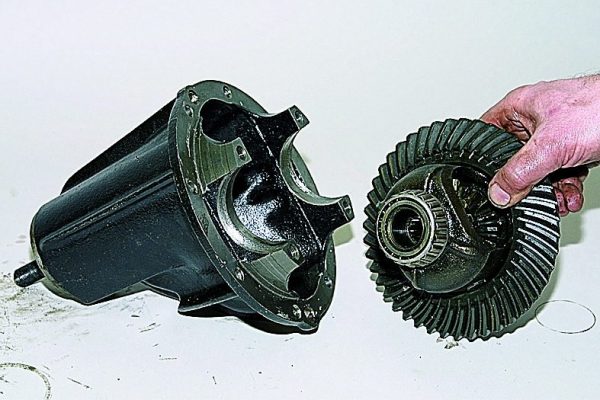
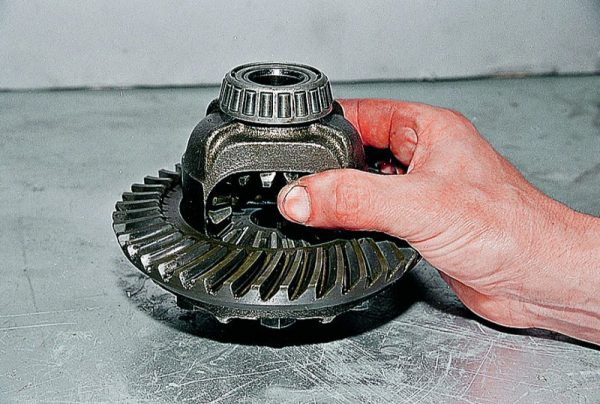
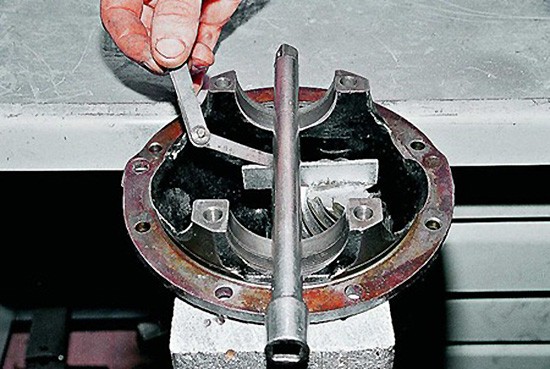
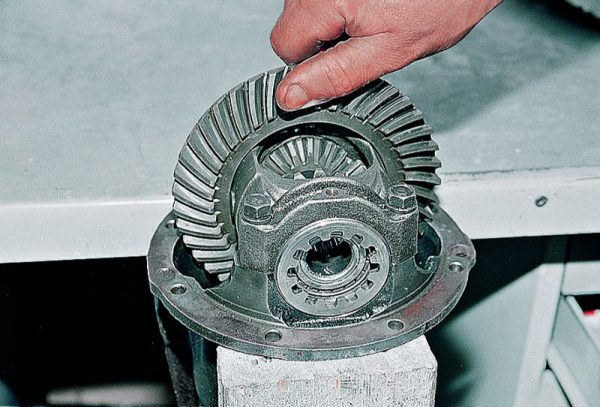
- We take out the differential with the planetary and other elements.From the gearbox housing we take out the differential box with the driven gear
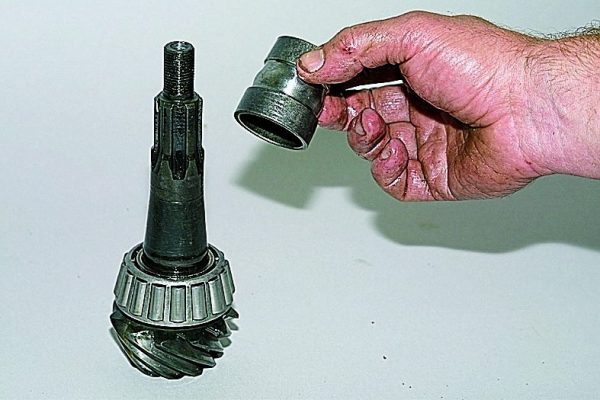
- From the crankcase we take out the tip with the parts located on it.We take out the bevel gear from the crankcase together with the bearing and spacer sleeve
- We remove the spacer sleeve from the gear shaft.Remove bushing from drive gear
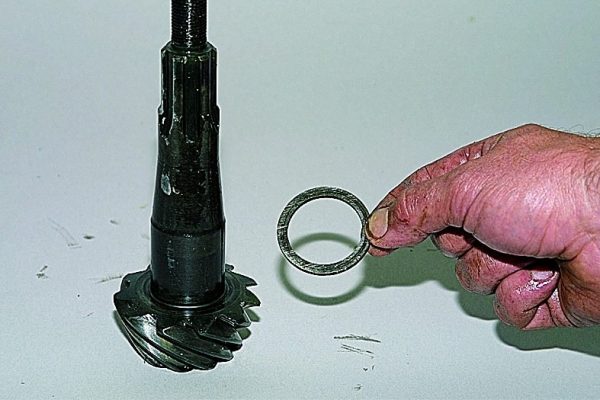
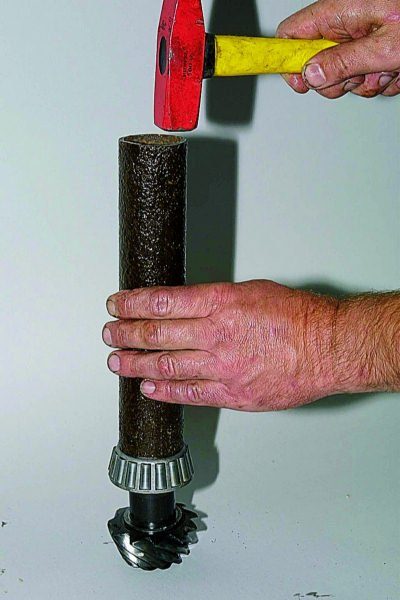
- Knock the rear bearing off the bevel gear shaft with a drift and remove it.Knock out the rear bearing with a punch
- Under it is an adjusting ring, remove it.Remove the adjusting ring from the shaft
- Pull out the seal.
- Take out the oil deflector.We take out the oil deflector from the gearbox housing
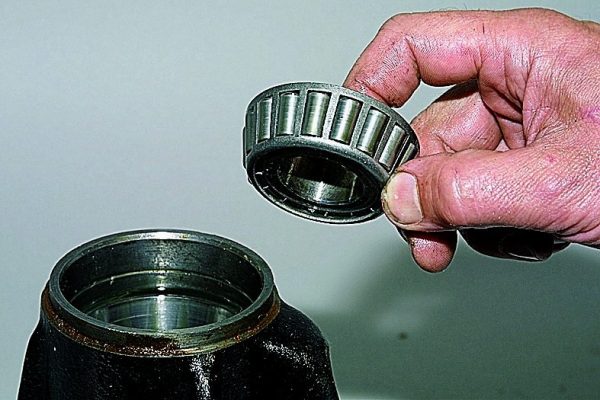
- Take out the bearing.Remove the bearing from the gearbox
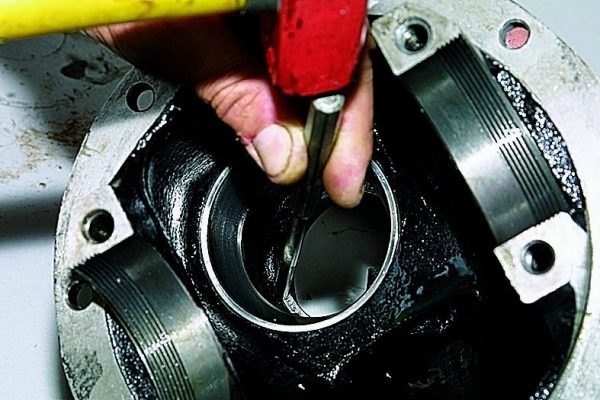
- Using a suitable tool, we knock out the outer race of the front bearing and remove it from the housing.Knock out the outer race of the front bearing with a punch.
- Turn the housing over and knock out the outer race of the rear bearing.


Dismantling the differential
After the gearbox has been disassembled, we proceed to remove the parts from the differential box:
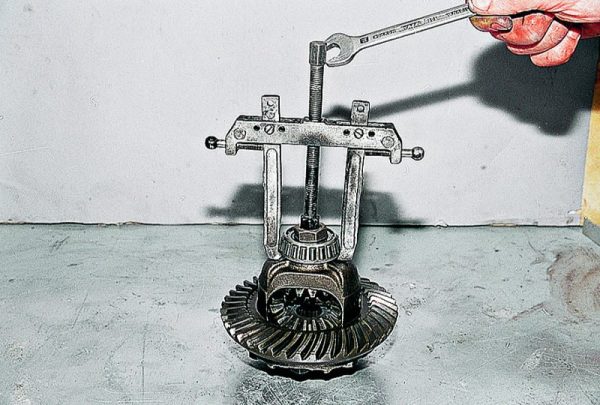
- Using a puller, pull the inner race of the bearing off the box.We dismantle the bearing from the differential box using a puller
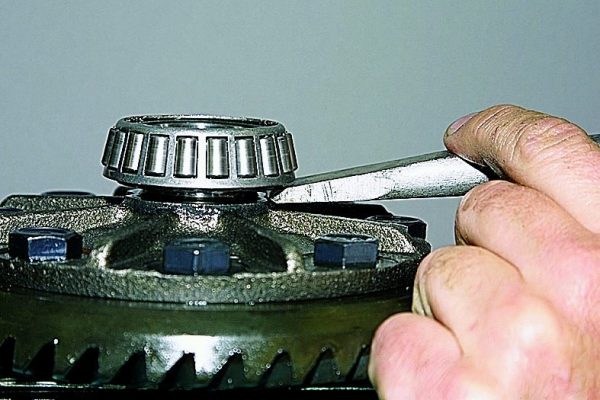
- If there is no puller, we dismantle the part with a chisel and two screwdrivers.Instead of a puller, you can use a chisel and two powerful screwdrivers, with which we knock down and remove the bearing from the seat
- Remove the second roller bearing in the same way.
- We clamp the differential in a vice, placing wooden blocks.
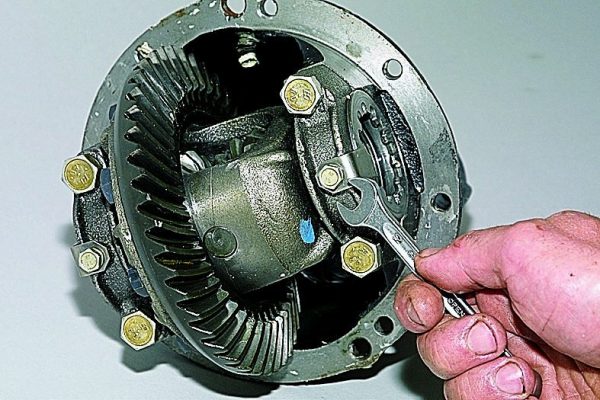
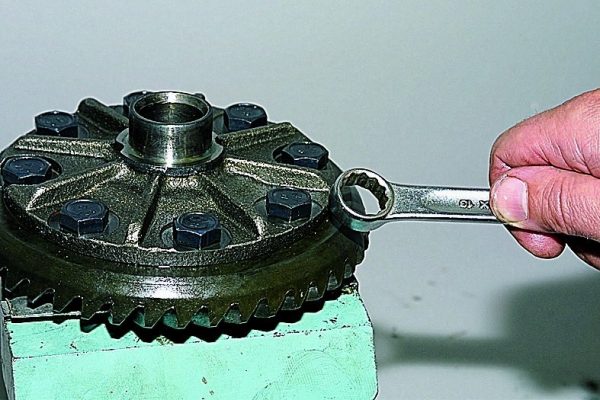
- We turn off the fasteners of the box to the planetarium.The differential is attached to the driven gear with eight bolts, unscrew them
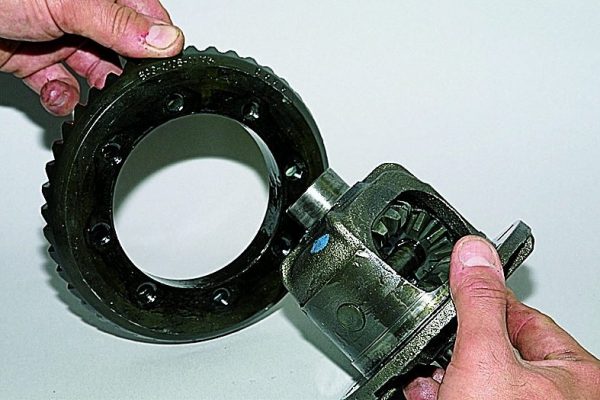
- We dismantle the differential by knocking it down with a plastic hammer.We knock down the gear with a hammer with a plastic striker
- We remove the driven gear.Dismantling the gear from the differential box
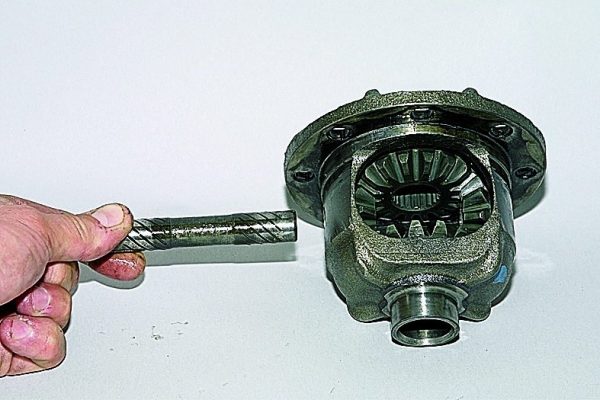
- We remove the axis of the satellites.We take out the axis of the satellites from the box
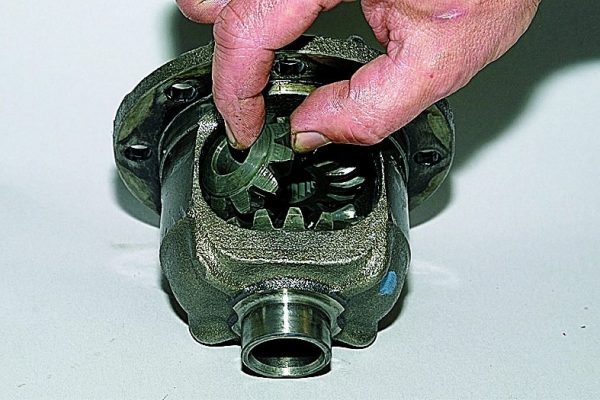
- Rotate the satellites and take them out of the box.We take out the satellites of the differential from the box
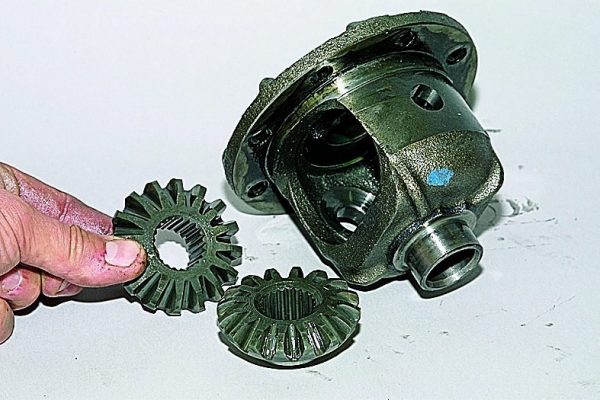
- We take out the side gears.Removing side gears
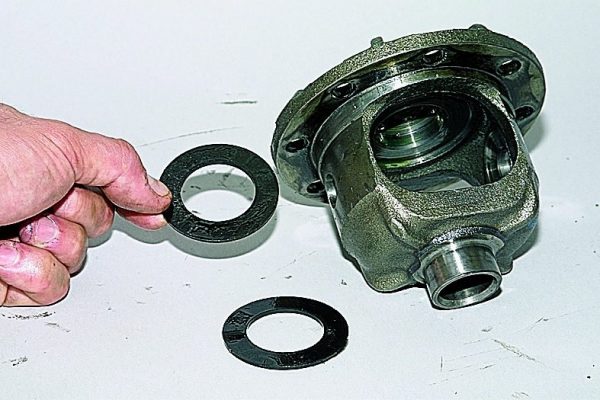
- We get the support washers.Lastly, take out the support washers from the box.

Troubleshooting details
To understand the state of the gearbox and its constituent elements, we first wash them in diesel fuel and let it drain. Diagnostics involves a visual inspection and is performed in the following order:
- Inspect the condition of the gear teeth of the main pair. If the gears are heavily worn, the teeth are chipped (at least one), the main pair needs to be replaced.If the gears of the main pair are damaged, we change them with a set with the same gear ratio
- We check the condition of the holes of the satellites and the surfaces mating with them on the axis. If the damage is minimal, then the parts are polished with fine sandpaper. In case of significant defects, the parts must be replaced.
- Similarly, we inspect the mounting holes of the side gears and the necks of the gears themselves, as well as the condition of the holes for the axis of the satellites. If possible, we repair the damage. Otherwise, we replace the failed parts with new ones.
- We evaluate the surfaces of the bearing washers of the side gears. In case of presence of even minimal damage, we eliminate them. If you need to replace the washers, we select them by thickness.
- We check the condition of the bearings of the bevel gear, as well as the differential box. Any defects are considered unacceptable.
- We inspect the gearbox housing and differential box. They should not show signs of deformation or cracks. If necessary, we change these parts for new ones.
Assembly and adjustment of the gearbox
The REM assembly process involves not only the installation of all elements in their places, but also their adjustment along the way. The performance and service life of the node directly depends on the correctness of the actions. The procedure is performed in the following order:
- We put the differential bearings on the box using the adapter, after which we fix the planetarium.
- Semi-axial gears, together with support washers and satellites, are treated with gear lubricant and mounted in the differential box.
- We rotate the installed gears in such a way that the axis of the satellites can be inserted.
- We measure the gap of each of the gears along the axis: it should not exceed 0,1 mm. If it is larger, then we put the washers thicker. The gears must rotate by hand, and the moment of resistance to rotation must be 1,5 kgf * m. If it is impossible to remove the gap even with the help of thick washers, the gears must be replaced.Differential gears must be rotated by hand
- Using a suitable adapter, we fit the outer race of the bevel gear bearings into the gearbox housing.Using a suitable adapter, we press in the outer race of the bevel gear bearing.
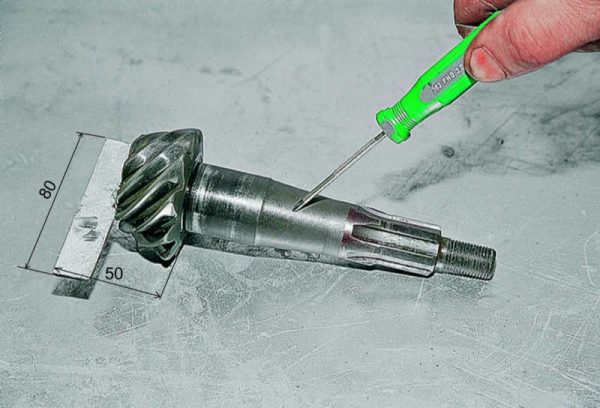
- To set the position of the gears of the main pair correctly, we select the thickness of the shim. To do this, we use an old tip as a tool, welding a metal plate 80 mm long to it, and adjusting the width to 50 mm in relation to the end of the gear.From the old drive gear we make a device for adjusting the gear engagement of the main pair
- The place where the bearing is mounted on the gear shaft is treated with fine sandpaper so that the clip fits easily. We mount the bearing and place the homemade fixture in the housing. We put the front bearing and flange on the shaft. We turn the latter several times to set the rollers in place, after which we tighten the flange nut with a torque of 7,9–9,8 Nm. We fix the REM on the workbench in such a position that the surface with which it is mounted to the stocking of the rear axle is horizontal. We put a round metal rod in the bed of bearings.
- Using a set of flat feeler gauges, we measure the gap between the installed bevel gear and the rod.We measure the gap between the fixture and the metal rod
- We select the washer in thickness based on the difference between the obtained value and the deviation from the nominal size on the new tip (taking into account the sign). So, if the gap is 2,8 mm, and the deviation is -15, then a washer with a thickness of 2,8-(-0,15) = 2,95 mm is required.The deviation from the nominal value is indicated on the drive gear
- We put the adjustment ring on the shaft of the tip and put the bearing on it by means of a mandrel.We install an adjusting ring on the gear shaft and fit the bearing itself
- We mount the gear in the housing. We put on a new spacer and cuff, front bearing, and then the flange.
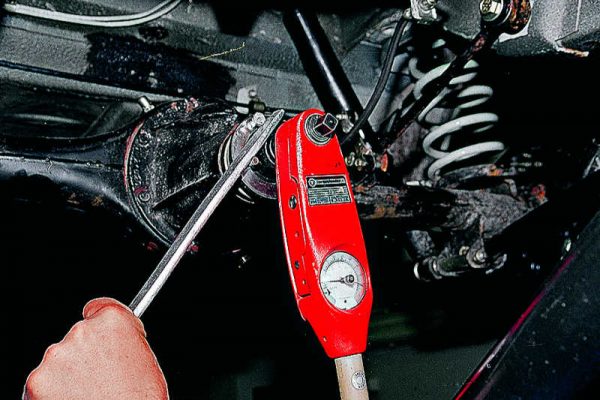
- We wrap the flange nut with a force of 12 kgf * m.Tighten the flange nut with a torque wrench
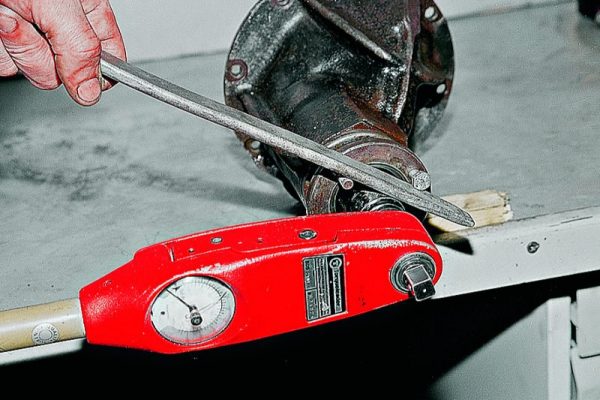
- With a dynamometer we determine with what moment the tip rotates. The rotation of the flange should be uniform, and the force in this case should be 7,96–9,5 kgf. If the value turned out to be smaller, we tighten the nut more, controlling the tightening torque - it should not be more than 26 kgf * m. In case of exceeding the turning moment of 9,5 kgf, we take out the tip and change the spacer element.The torque of the flange must be 9,5 kgf
- We place the differential in the crankcase and clamp the fasteners of the roller bearing caps.
- If during the assembly process a backlash is found in the side gears, we select adjusting elements with a greater thickness. Side gears should become tight, but at the same time scroll by hand.
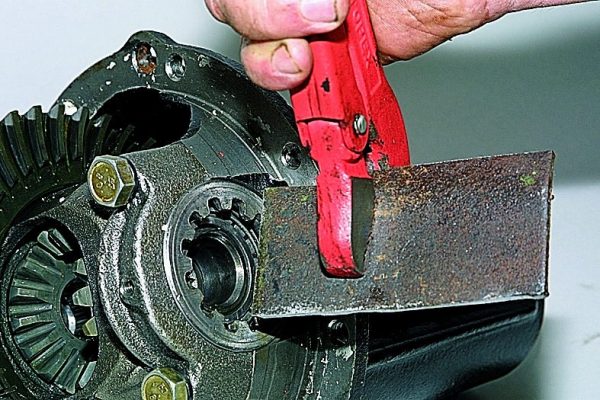
- From a piece of steel 3 mm thick, we cut out a part 49,5 mm wide: with its help we will tighten the bearing nuts. The gap between the tip and the planetary, as well as the preload of the differential bearings, is set at the same time.Cut out a metal plate to adjust the differential bearings
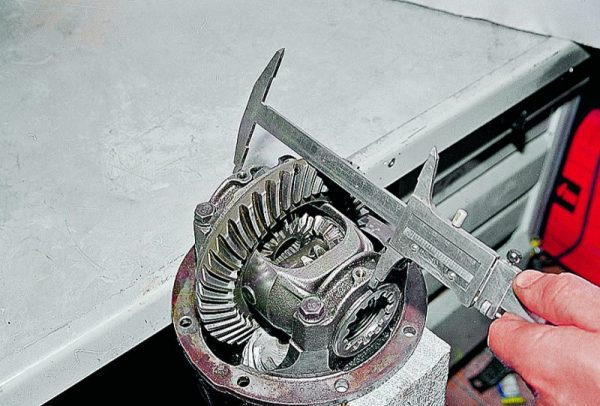
- With a caliper, we determine how far the covers are from each other.We measure the distance between the covers with a caliper
- We tighten the adjustment nut from the side of the planetary gear, eliminating the gap between the gears of the main pair.
- We wrap the same nut until it stops, but from the opposite side.
- We tighten the nut near the planetary, setting a side clearance of 0,08–0,13 mm between it and the tip. With such clearance values, a minimum free play will be felt when the driven gear is wiggled. During adjustment, the bearing caps move apart slightly.
- We set the bearing preload by evenly and alternately wrapping the corresponding nuts, achieving an increase in the distance between the covers by 0,2 mm.
- We control the gap between the teeth of the main gears of the gearbox: it must remain unchanged, for which we make several revolutions of the planetary gear, checking the free play between the teeth with our fingers. In the event that the value differs from the norm, then by turning the adjusting nuts, we change the gap. So that the bearing preload does not go astray, we tighten the nut on one side, and on the other, release it to the same angle.We turn the driven gear and control the free play
- At the end of the adjustment work, we put the locking elements in place and fix them with bolts.
- We mount the gearbox in the stocking of the rear axle using a new gasket.
- We put all the previously removed parts back, after which we fill in new grease into the mechanism (1,3 l).
Video: REM repair on the "classic"

The best option for repair work with the rear axle gearbox of the "six" would be a specialized car service equipped with the appropriate equipment. However, at home, you can eliminate the malfunctions of the node that have arisen. To do this, you will need to prepare the necessary tool and clearly follow the step-by-step instructions for disassembling, repairing, installing and adjusting the gearbox.

