Do-it-yourself repair and replacement of the clutch master cylinder VAZ 2107
Content
In all classic VAZ models, the clutch is hydraulically controlled. An important role in the hydraulic drive system is given to the clutch master cylinder.
Clutch master cylinder VAZ 2107
The hydraulic clutch drive VAZ 2107 is the best option for rear-wheel drive vehicles. An important role in the hydraulic drive system is assigned to the clutch master cylinder (MCC).
Appointment of the GCC
GCC converts the force of pressing the pedal into the pressure of the working fluid (RJ), which is transmitted through pipelines using the piston of the working cylinder (RTS) to the fork rod. As a result, the latter rotates on a hinged support and moves the pressure bearing, turning on or off the clutch (MC). Thus, the GCC performs two functions:
- converts pressing the clutch pedal into pressure RJ;
- transfers pressure to the working cylinder.
Learn how to assess the need for clutch replacement: https://bumper.guru/klassicheskie-modeli-vaz/stseplenie/regulirovka-stsepleniya-vaz-2107.html
The principle of operation of the GCC
To create pressure in the hydraulic system, you need:
- workspace;
- cylinder with piston;
- the force that will cause the piston to move.
As a working fluid in the MC VAZ 2107 drive, brake fluid is used (ROSA DOT-4 is recommended), which practically does not compress and does not adversely affect rubber products.
The piston is moved by means of a rod connected to the clutch pedal. The pressure in the system is created by analogy with a medical syringe due to the fact that the piston and the hole through which the RJ is pushed out have different diameters. The system differs from a syringe in that the GCC provides for a forced return of the piston to its original position. In addition, the heating of the RJ and moving parts during operation is taken into account.
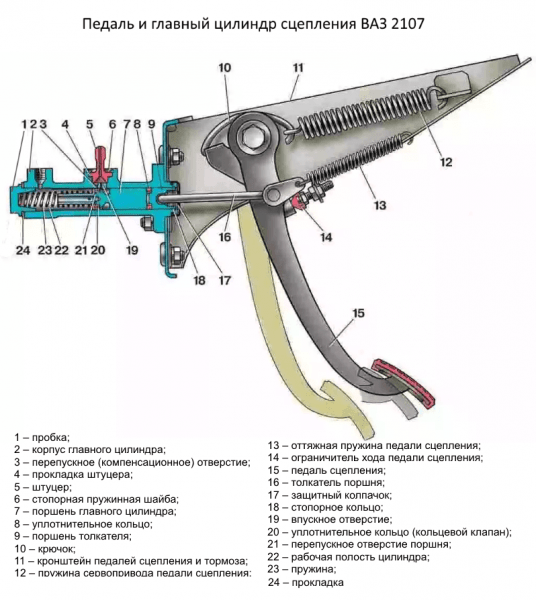
The GCC works as follows. The working fluid through the hole 19 is fed from the tank into the working cavity 22 in front of the piston. When you press the pedal 15, the pusher 16 moves and, resting against the piston 7, moves it forward. When the piston closes holes 3 and 19, the RJ pressure in front of it will begin to increase sharply and will be transferred through the pipelines to the RCS piston. The latter will turn the fork through the pusher, and its front ends will move the clutch with the release bearing (VP) forward. The bearing will press on the friction spring of the pressure plate, which, moving towards the VP, will release the driven disk, and the clutch will turn off.
More about clutch device and diagnostics: https://bumper.guru/klassicheskie-modeli-vaz/stseplenie/stseplenie-vaz-2107.html
When the pedal is released, the reverse process will begin. The pressure on the piston will disappear, and due to the return spring 23 it will begin to move to its original position. At the same time, the RCS piston with the return spring of the fork will also begin to move in the opposite direction and create pressure in front of it, which will be transferred back to the GCS through the pipeline. As soon as it becomes greater than the force of the GCC piston return spring, it will stop. Through the bypass channel in the piston 21, the inner surface of the floating sealing ring 20, which acts as a check valve, will be under pressure. The ring will flatten out and block the bypass hole 3 in the cylinder body. As a result, a slight excess pressure will remain, which will remove all the backlash resulting from wear of the pushers, fork eyes and release bearing. With an increase in temperature in the working chamber of the cylinder, all parts and working fluid will expand. The pressure in front of the piston will increase, and it will move back a little, opening the compensation hole 3, through which the excess RJ will flow into the tank.
This explanation is necessary in order to understand how important it is to monitor the health and cleanliness of the GCC. If the compensation hole in the piston or in the housing becomes clogged, the temperature inside the cylinder will quickly rise, which will create excessive pressure in the master cylinder. It can squeeze out the gaskets, and the fluid will begin to leak. The pedal will become tight and the o-rings will wear out faster.
Location of the GCC
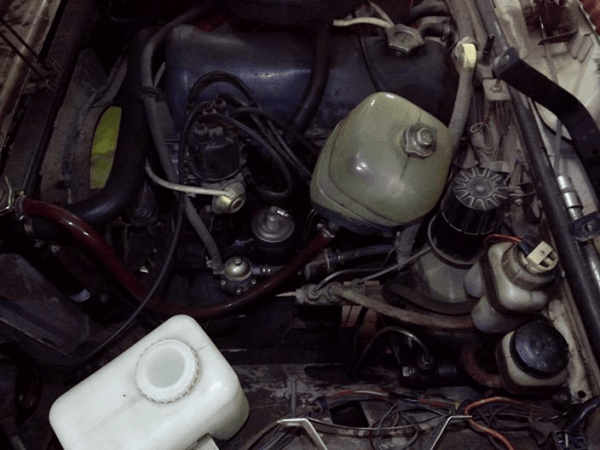
Since the pusher must be horizontal and fit exactly into its piston, the GCC is mounted on the front partition of the engine compartment on the left side. It is impossible to install it otherwise - it is screwed onto two studs welded to the partition. No additional conditions are needed for its dismantling. Access to the mounting nuts, pipe fittings and tank hoses is provided by simply lifting the hood cover. At the same time, the GCC should not be confused with the main brake cylinder (MCC), which is located nearby, a little further from the sidewall of the left wing. The GTS has a larger size and a more complex device, more tubes fit it.
The choice of GCC for the VAZ 2107
The best option for replacement is to purchase a GCC designed specifically for classic VAZ models. Clutch master cylinders from UAZ, GAZ and AZLK cars will not work. The same applies to foreign counterparts - on foreign cars with rear-wheel drive, GCCs are installed, which only highly qualified specialists can adapt to the VAZ 2107 (other sizes, other threads for pipelines, other tube configurations). However, you can easily replace the native cylinder with a GCC from the VAZ 2121 and from the Niva-Chevrolet.
Manufacturer selection
When buying a new GCC, you should focus on the products of trusted Russian manufacturers (JSC AvtoVAZ, Brik LLC, Kedr LLC), the Belarusian company Fenox, which is adapted to our conditions and is affordable. The average cost of GCC is 600–800 rubles.
Table: Comparative characteristics of GCCs from different manufacturers
| Manufacturer, country | Trademark | Cost, rub. | Reviews |
| Russia, Togliatti | AvtoVAZ | 625 | Original GCCs are made with high quality, they are more expensive than analogues |
| Belarus | Fenox | 510 | Original GCCs are inexpensive, made with high quality, popular among drivers |
| Russia, Miass | Brick Basalt | 490 | Improved design: the absence of a technological plug at the end of the cylinder and the presence of an anti-vacuum cuff increase the reliability of the product |
| Germany | AND THOSE | 1740 | The originals are of the highest quality. The price is tied to the EURO exchange rate |
| Germany | HORT | 1680 | Original GCCs are reliable and durable in operation. The price is tied to the EURO exchange rate |
| Russia, Miass | Cedar | 540 | The original GCCs do not cause any particular complaints |
Recently, there are many fakes of famous brands on the market. You can distinguish them by poor quality performance and low price relative to the original analogues.
Repair of the clutch master cylinder VAZ 2107
If problems arise with the GCC, it must be removed from the car, disassembled, eliminated defects, assembled and reinstalled. The work can be performed by any car owner with minimal locksmith skills. If there are no such skills, it is easier to change the cylinder assembly. The following tools and materials will be required to repair and replace the GCC:
- a set of open-end and box wrenches;
- a set of ratchet heads;
- long thin screwdriver;
- pliers-round-nose pliers;
- 0,5 l of brake fluid ROSA DOT-4;
- water repellent WD-40;
- a small container for draining RJ;
- hose for pumping;
- syringe of 22–50 ml.
Dismantling of the CCS
To dismantle the GCC VAZ 2107, you will need to perform the following steps:
- Unfasten the expansion tank fastening belt and put it aside.
 To provide access to the GCC, you need to unfasten the belt and move the expansion tank to the side
 - Unscrew the tank lid.
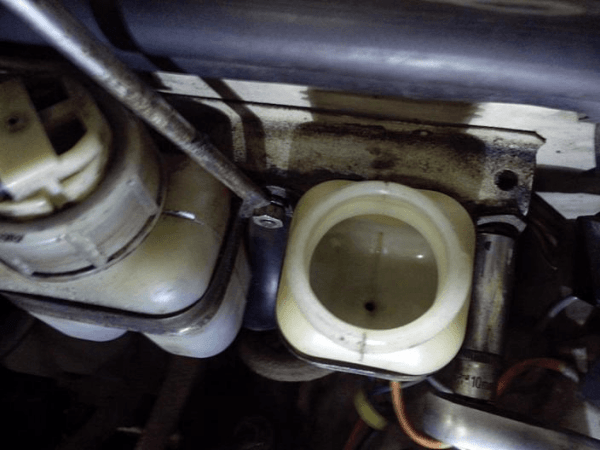
- Suck out the working fluid with a syringe.Before removing the GCS, it is necessary to pump out the working fluid from the cylinder reservoir with a syringe
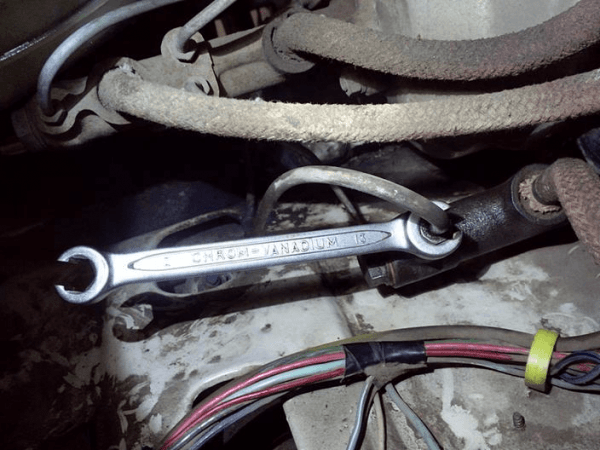
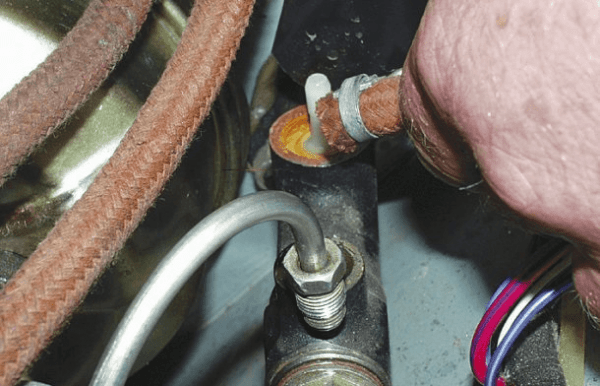
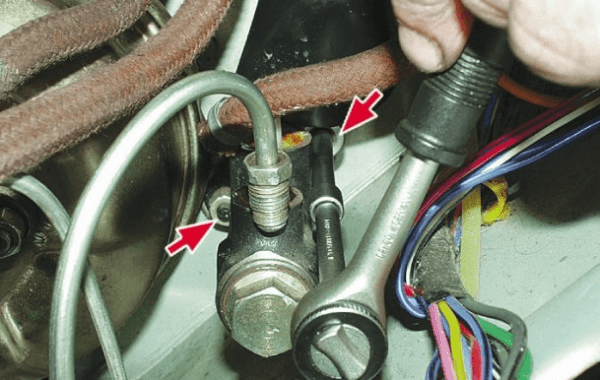
- With a 13 open-end wrench, unscrew the fitting of the tube going down to the working cylinder.To dismantle the GCC, you will need to unscrew the fitting of the pipeline going down to the working cylinder with a key of 13 and move the tube to the side
- Release the clamp, remove the sleeve from the GCS fitting and pour the remaining RJ out of it into a previously substituted container.In order to remove the hose from the fitting, you need to loosen the clamp with a screwdriver
- Unscrew the two stud fasteners with an extension and a 13 head.Two GCC fastening nuts are unscrewed with a 13 head and a ratchet extension
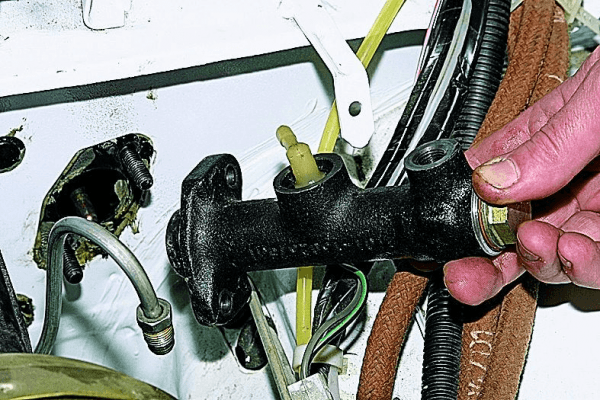
- Pull the GCC out of the seat with your hands.To dismantle the GCC, you need to press the clutch pedal, move the cylinder from its place and carefully pull it out
Read also about the repair of the hydraulic clutch: https://bumper.guru/klassicheskie-modeli-vaz/stseplenie/kak-prokachat-stseplenie-na-vaz-2107.html
Disassembly of the GCC
Before disassembly, it is necessary to clean the GCC from dirt, smudges, dust. The disassembly itself is carried out as follows:
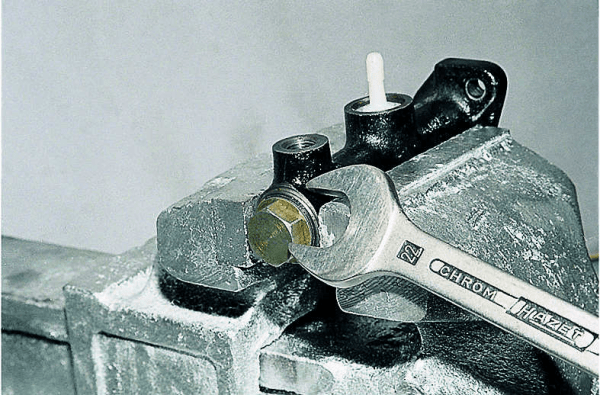
- Clamp the GCC in a vise, unscrew the plug with a 22 wrench and pull out the spring that returns the piston to its original position.When disassembling the GCC, you must first clamp its vise and unscrew the plug with a 22 wrench
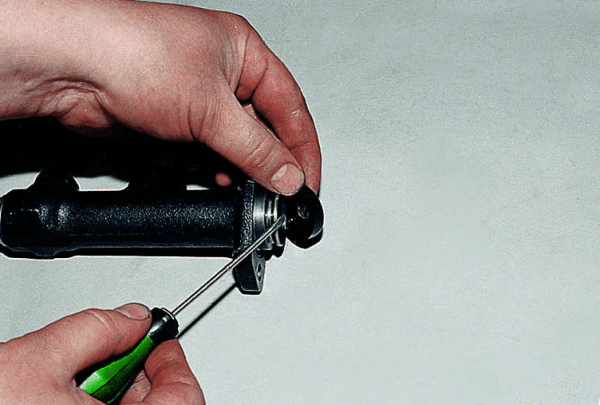
- Remove the protective cap with a screwdriver.The protective cap is removed with a screwdriver
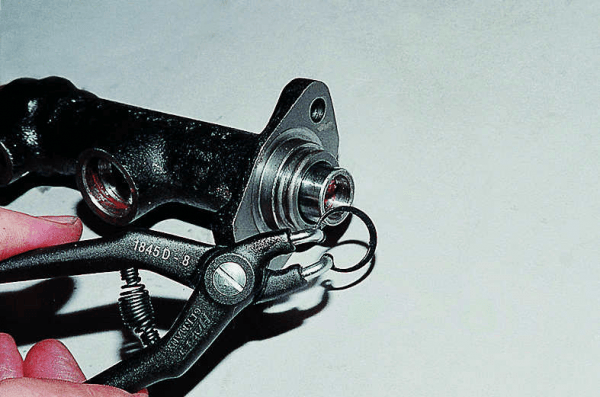
- Pull out the retaining ring with round nose pliers.Removing the retaining ring will require round nose pliers.
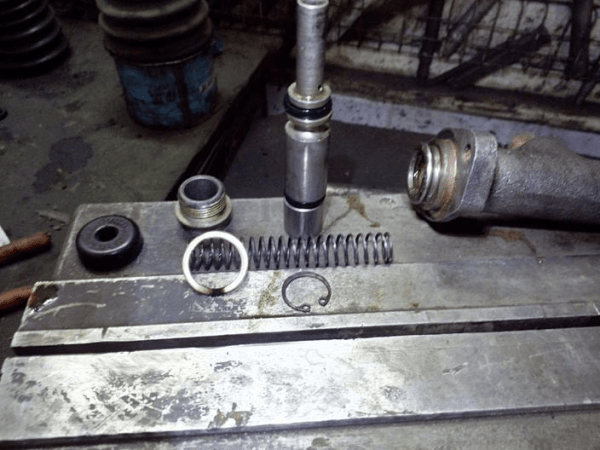
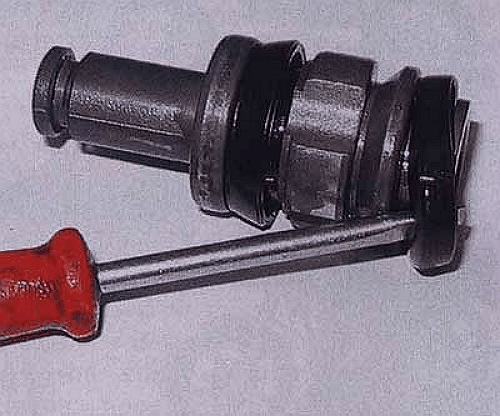
- From the side of the cork, gently push the piston out of the cylinder with a screwdriver and lay out all the parts of the GCC on the table.Individual elements of the GCC are laid out on the table
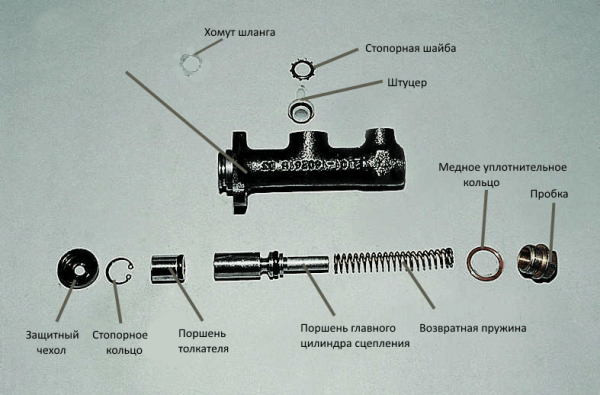
- Pry off the lock washer with a screwdriver and remove the fitting from the socket.To remove the fitting from the socket in the GCC housing, you need to pry off the lock washer with antennae with a screwdriver
- Clean the compensation and inlet holes with wire.
Replacement of rubber sealing rings
With each disassembly of the GCC, it is recommended to change the rubber sealing rings. For this you need:
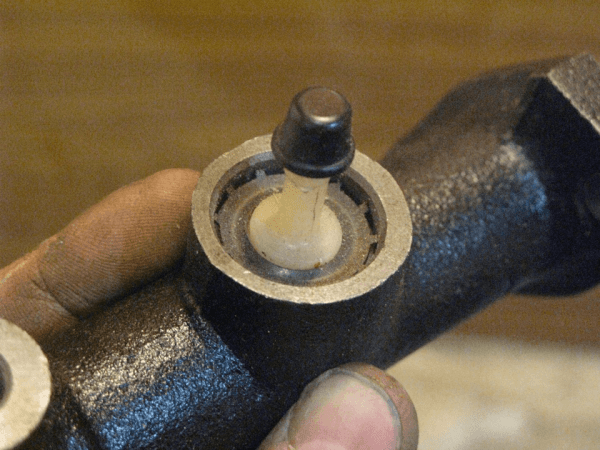
- Carefully pry off the sealing ring with a screwdriver and pull it out of the groove.To remove the sealing ring, gently pry it with a screwdriver and pull it out of the piston groove.
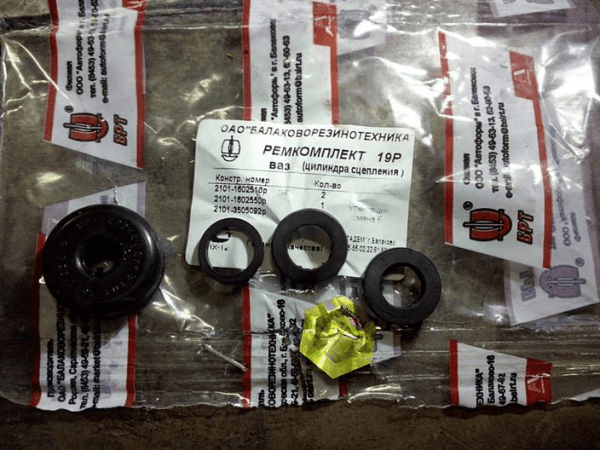
- Wash the piston in clean brake fluid. The use of solvents and motor fuels is not recommended as they may damage the rubber.The cuff and sealing rings for replacement are included in the repair kit
- Using a screwdriver, put the cuffs in place (matte side towards the pedal, shiny side towards the cork).
GCC assembly
- Rinse the cylinder mirror with fresh working fluid ROSA DOT-4.
- Lubricate the piston and o-rings with the same fluid.Assembly of the clutch master cylinder is carried out in the reverse order of disassembly
- Insert the pistons into the cylinder in the reverse order of disassembly.
- Install the circlip into the groove in the housing. Insert the return spring on the other side of the housing.
- Tighten the cork, after putting a copper washer on it.
GCC installation
The installation of the GCC is carried out in the reverse way to removal. Pay special attention to the correct installation of the pusher in the piston and uniform tightening of the fastening nuts.
Clutch bleeding
After repairing or replacing the GCC VAZ 2107, the clutch must be pumped. This will require a viewing hole or overpass.
Selection and filling of working fluid
The brake fluid ROSA DOT-2107 or DOT-3 is used as a working fluid in the hydraulic clutch drive of the VAZ 4.

RJ is poured into the GCS tank located in the engine compartment on the front partition. To properly fill the system, before filling, it is necessary to loosen the air bleed fitting on the working cylinder by one or two turns and tighten it after the liquid begins to flow out without gas bubbles. The tank must be filled to the correct level.
Bleeding the clutch hydraulic drive
It is desirable to carry out the bleeding of the hydraulic drive together - one presses the clutch pedal, the other unscrews and tightens the air bleed valve on the working cylinder, after putting a hose on it. You will need to do the following:
- Press down firmly on the pedal several times and lock it in the depressed position.
- Unscrew the fitting and drain the liquid along with the air.
Continue the operation until all air is removed from the clutch hydraulic drive.
Video: replacing the clutch master cylinder VAZ 2107

The clutch master cylinder fails quite rarely. The reasons for its malfunction may be dirty or poor-quality working fluid, a damaged protective cap, wear of seals. Repairing and replacing it with minimal plumbing skills is quite simple. It is only necessary to strictly follow the instructions of professionals.

