Detection and elimination of clutch malfunctions on the VAZ 2106
Content
The clutch is an integral part of any vehicle. This mechanism has a direct effect on the transmission of torque to the rear wheels of the VAZ 2106. Classic "Zhiguli" are equipped with a single-plate clutch. Breakage of any part in this design can cause a lot of problems to the car owner, but it is possible to solve them on your own.
Clutch VAZ 2106
On modern cars, the clutch may have a slightly different design from older cars, but the essence of the application of this mechanism remains the same. Like any other part of a vehicle, a clutch consists of a number of parts that wear out and become unusable over time. Therefore, it is worth dwelling in more detail on identifying the causes and eliminating malfunctions of the VAZ 2106 clutch.
What is the clutch for?
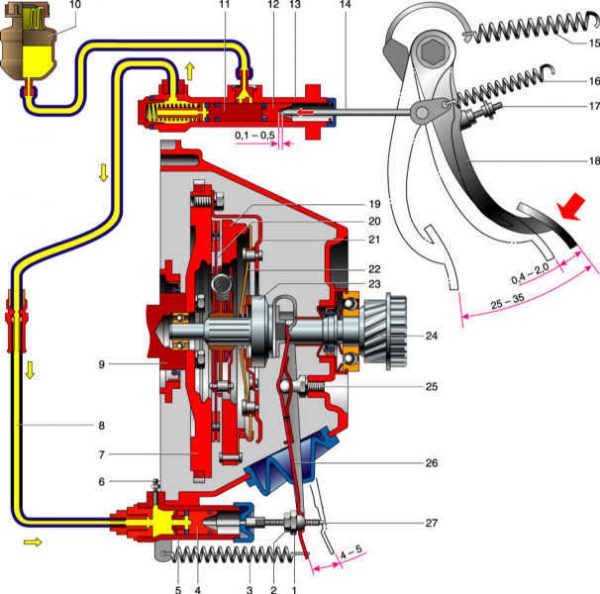
Equipping the car with a clutch is necessary to disconnect the gearbox and the power plant, their smooth connection at the beginning of the movement, as well as when changing gears. The mechanism is located between the gearbox and the engine, while part of the clutch elements are fixed on the engine flywheel, and the other part in the clutch housing.
What it consists of
The main structural elements of the unit under consideration are:
- master cylinder;
- working cylinder;
- basket;
- slave drive;
- release bearing;
- fork.
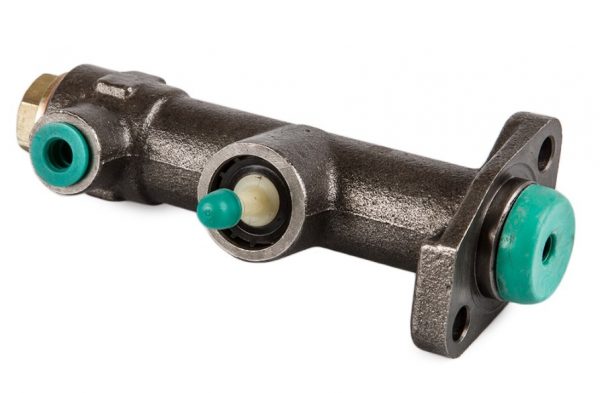
Master cylinder
The clutch master cylinder (GCC) provides effective transmission of force from the pedal to the clutch fork by means of the brake fluid and the slave cylinder, interacting through the release bearing with the spring elements of the basket. The GCC is located under the hood near the expansion tank and communicates with the working cylinder using a hose. The unit under consideration consists of a body, two cylinders with seals and a spring.
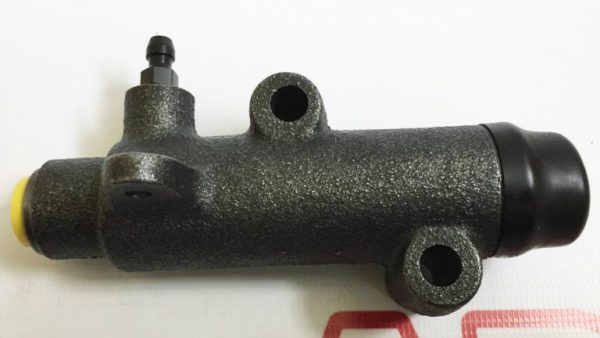
Slave cylinder
The function of the clutch slave cylinder (RCS), although simple, is important - to take the force transmitted from the master cylinder for the subsequent movement of the clutch release fork. On the VAZ 2106, the RCS is installed on the clutch housing. Structurally, it is similar to the working cylinder, but has one piston.
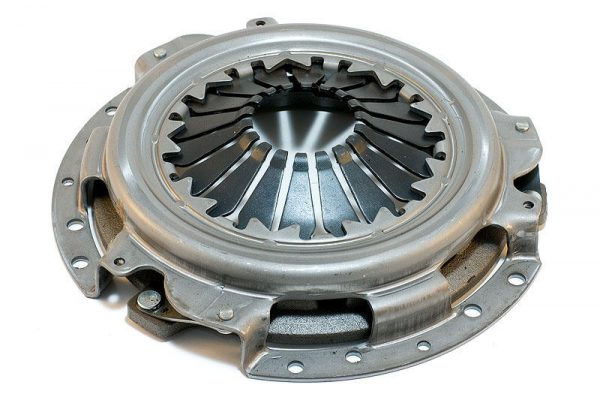
Cart
By means of a pressure plate (basket), the interaction of the driven disc with the flywheel is ensured. If there is a problem with the basket, the system stops working. The pressure disk (LP) is pressed against the slave by means of special springs, which, at the moment of disengaging the clutch, work as returnable ones, that is, they squeeze the LP. With this method of operation, smooth gear shifting is ensured, which increases the service life of the gearbox elements.
The basket is made of a diaphragm spring, a pressure plate and a casing. The spring presses on the LP and creates a compression force, transferring rotation. The outer part of the spring structure acts on the edges of the pressure plate. On the inner diameter, the spring is made in the form of petals, which are pressed by the release bearing.
Slave drive
The driven disc provides a soft connection of the box to the motor. It is located between the basket and the flywheel of the power plant. To ensure that the clutch engages without jerking, springs are provided in the disc design, which help to damp vibrations. Both sides of the disc are fitted with friction material pads that can withstand high temperatures.
Clutch release
The purpose of the release bearing is to separate the basket from the driven disk by pressing the LP petals. The bearing is installed in the clutch housing and is moved by means of the clutch fork.

Clutch problems
The VAZ 2106 clutch, although rare, still causes problems for the owners of this car. Malfunctions can be of a different nature and they also manifest themselves in different ways. Let's consider them in more detail.
Leaking brake fluid
The working environment of the "six" clutch mechanism is brake fluid, which sometimes leads to some problems:
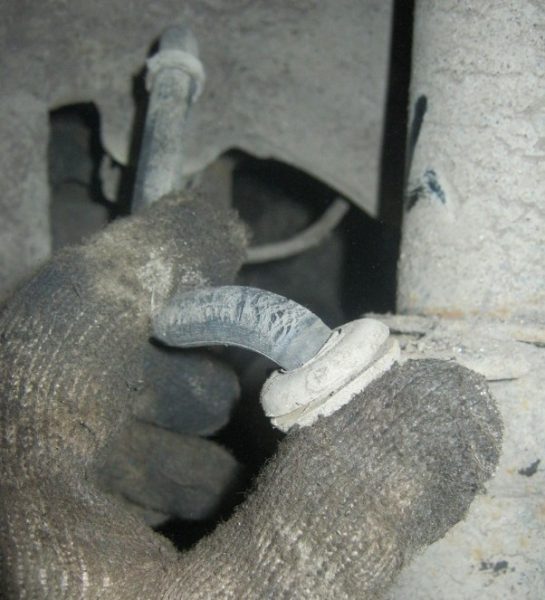
- fluid leakage due to damage to the hose between the master and slave cylinder. The connecting element may become unusable when installing a poor-quality product or as a result of aging of the rubber. To eliminate the malfunction, the hose will need to be replaced;
 Fluid leakage is possible if the hose connecting the GCC and RCS is damaged
 - depressurization GCS. Tightness in the cylinder is ensured by lip seals, which wear out over time, coarsen, as a result of which they begin to let fluid through. The way out of the situation is to replace the cuffs with subsequent pumping of the system.
Leads the clutch
Such a concept as "clutch leads" is used when the mechanism is not completely disengaged. This can happen for several reasons:
- the driven disk was damaged, which caused the end runout. The most correct solution is to replace the part;
- cracks have formed on the lining of the driven disc. The appearance of flaws is reflected in the inability to engage the clutch in a timely manner. In this case, you should replace the disc completely or the linings themselves;
- the rivets of the friction linings are out of order. When the rivets are worn out, the fixing of the linings weakens, which leads to problems during clutch disengagement and increased wear of the linings themselves;
- air has entered the hydraulic system. The problem is "treated" by pumping liquid;
- skewed basket. Although the malfunction is rare, if it occurs, you will have to purchase a new pressure plate.
Clutch slips
When clutch slippage occurs, the mechanism does not work completely, but this happens for the following reasons:
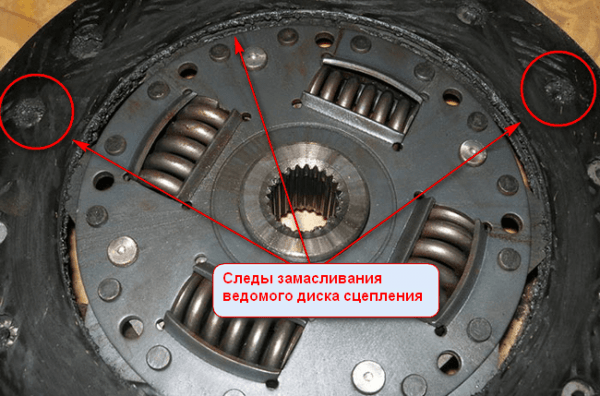
- oil has spilled onto the friction elements of the driven disc. We'll have to remove the gearbox and disassemble the clutch mechanism to clean the linings with white spirit;
- the expansion hole in the HVC is clogged. To fix the problem, you will need to remove the cylinder, remove the blockage, and then rinse the product in kerosene;
- the friction linings are burnt. The malfunction is eliminated by replacing the driven disk.
Clutch pedal creaks
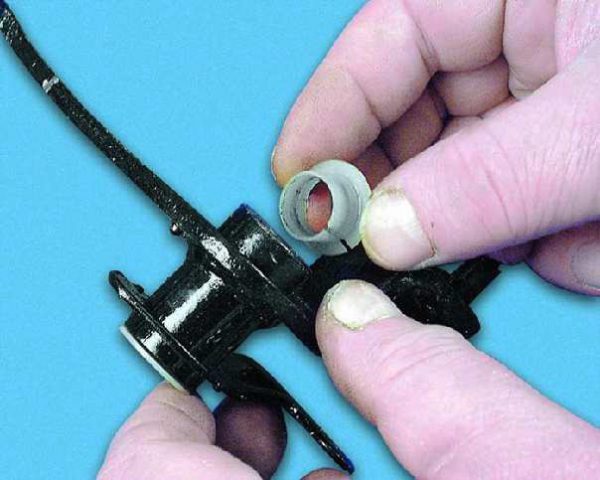
The pedal may squeak due to lack of lubrication in the bushings or when the bushings themselves are worn. To fix the problem, the pedal will need to be removed, check the bushings for wear, if necessary, replace and apply grease.
Noise when depressing the clutch pedal
On a VAZ 2106, noise when releasing the clutch pedal may appear for the following reasons:
- malfunction of the bearing on the input shaft of the gearbox. A malfunction manifests itself in the form of a characteristic crackling when the clutch pedal is released. In this case, the bearing will have to be replaced;
- wear of the release bearing. The part fails due to a lack of lubricant, which is squeezed out over time. To eliminate the malfunction, the bearing must be replaced.
Noise when pressing the clutch pedal
The clutch can also make noise when the pedal is pressed. The reasons may be as follows:
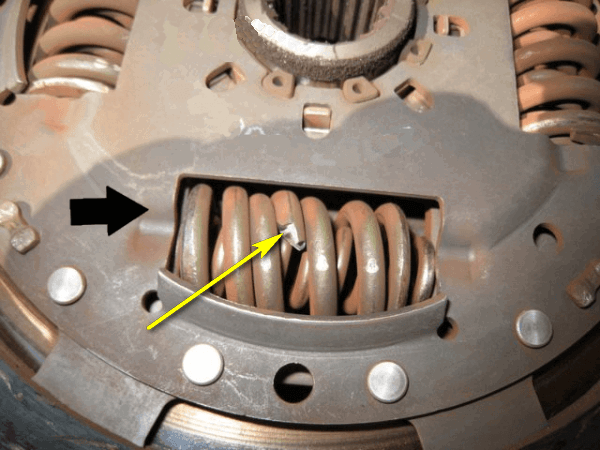
- loss of stiffness or breakage of the springs of the driven disk. This leads to vibrations that cannot be extinguished in a timely manner. The solution to the problem is to replace the driven disk;A broken spring in the driven disc can cause noise when the clutch pedal is depressed.
- release bearing or basket damage.
If, when noise appears, the problem is not eliminated within a short time, then the broken part can disable other elements of the mechanism.
Pedal fails
There are times when on the VAZ "six" after pressing the clutch pedal, it does not return to its original position. There are few reasons for this:
- air entering the hydraulic system. The pedal in this case "falls" after a few clicks, so the system will have to be pumped;
- the spring responsible for the return of the pedal has fallen off. It is necessary to check the spring, and if necessary, replace it.
Video: clutch problems and solutions

Replacing the clutch VAZ 2106
It is not necessary to remove the clutch infrequently and, as a rule, due to the occurrence of certain problems. To carry out the work, you first need to prepare the tools:
- a set of keys and heads;
- wrench and extension cord;
- support under the checkpoint.
Removing the transmission
To repair the clutch mechanism, you will need to dismantle the gearbox. We do it like this:
- We install the car on a viewing hole, remove the negative terminal from the battery and substitute wheel chocks under the wheels.
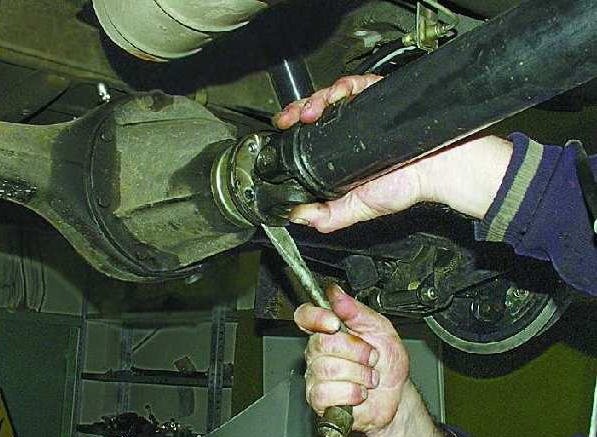
- We unscrew the fasteners and remove the cardan from the car.We unscrew the fasteners and remove the driveline
- Remove the wire terminals of the reverse light switch.
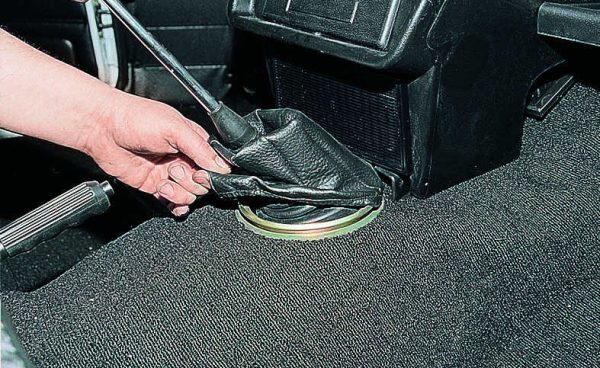
- From the passenger compartment we dismantle decorative and sealing elements, as well as the gearshift handle.In the cabin, remove the decorative cover and the handle itself from the gearshift knob
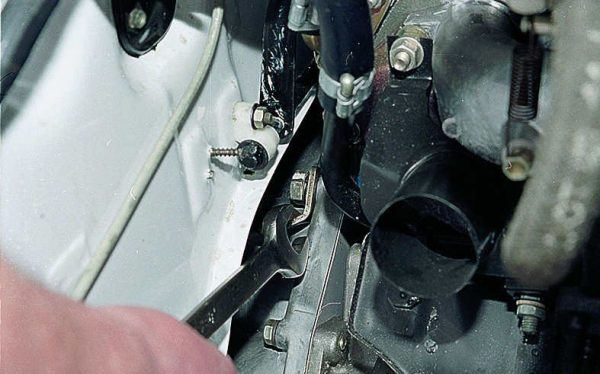
- We unscrew the fastening of the clutch housing to the power unit with a key of 19.At the top of the clutch housing, unscrew the bolt 19
- With a key of 13, we unscrew the starter mount.Using a 13 key, we unscrew the starter mount to the clutch housing
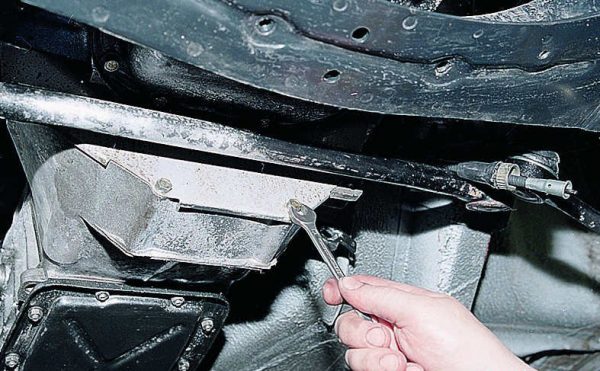
- From below, unscrew the bolts securing the clutch housing cover.The clutch housing cover is held by four 10-key bolts, unscrew them
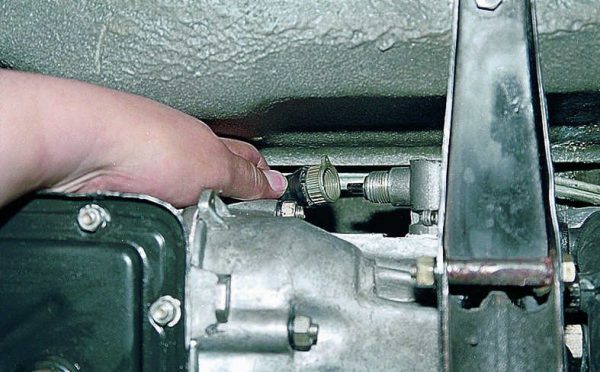
- We unscrew the fastening of the speedometer cable and disconnect it from the gearbox.We unscrew the fastening of the speedometer cable and disconnect it from the gearbox
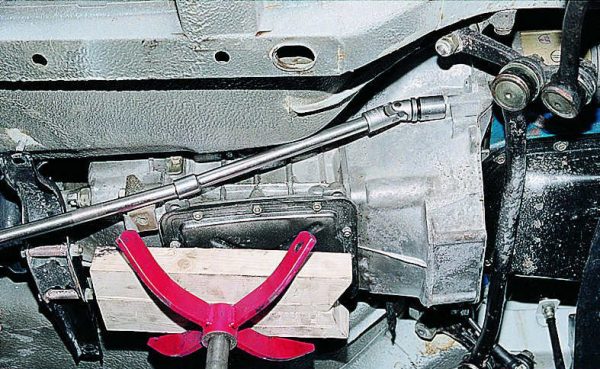
- Under the gearbox, we install an emphasis and with a knob with an extension cord and a head by 19, we unscrew the mount of the unit.We substitute the stop under the box and unscrew the mount of the unit to the motor
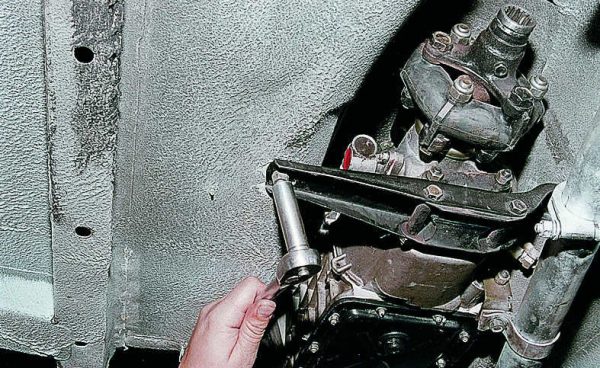
- We unscrew the fasteners of the cross member to the body.Unbolt the cross member to the body
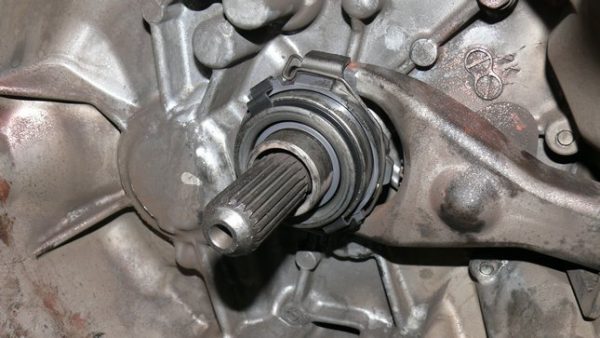
- We shift the box as far back as possible so that the input shaft comes out of the basket.We shift the gearbox as far back as possible so that the input shaft comes out of the basket

Removing the clutch
We remove the clutch mechanism from the car in this order:
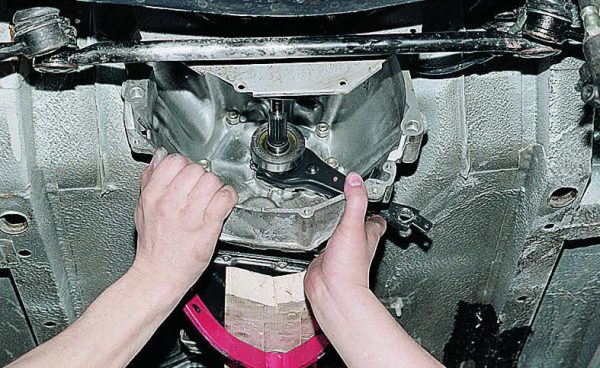
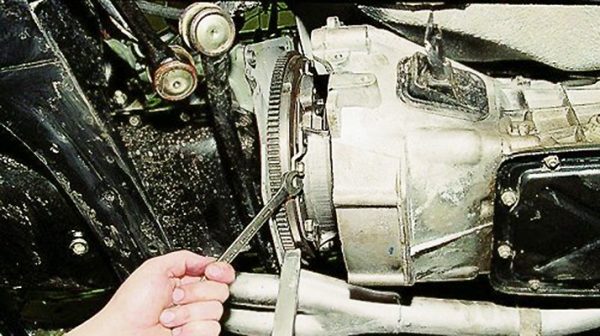
- With a key of 13, we unscrew the bolts holding the basket on the flywheel, turning the latter with a mount.Turning the flywheel with a mount, unscrew the basket mount
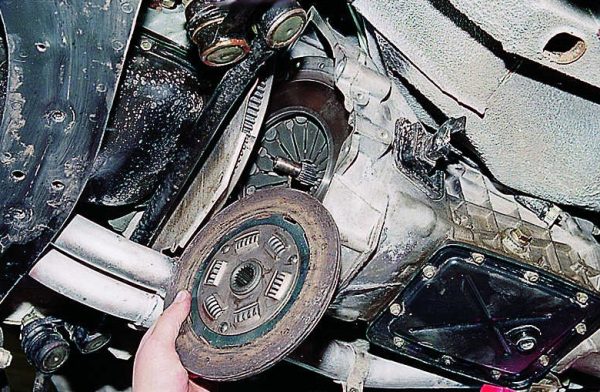
- We shift the basket to the checkpoint and take out the driven disk through the opening.Pushing the basket back, take out the clutch disc
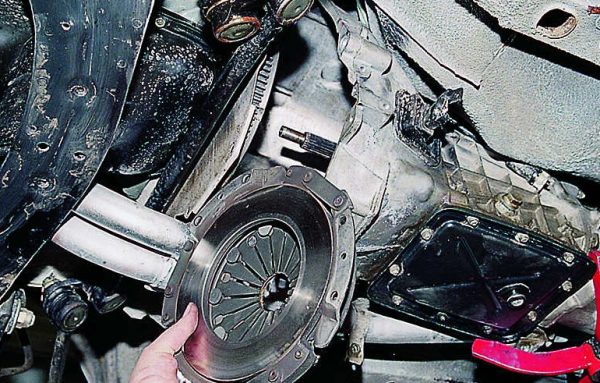
- We move the basket to the motor and remove it from the car.We take out the basket through the hole formed between the gearbox and the flywheel
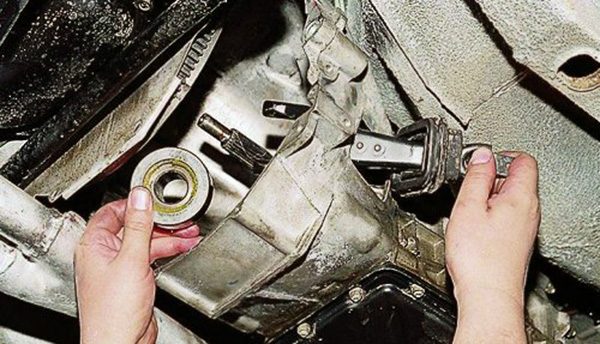
- We dismantle the fork from the crankcase together with the release bearing.Remove the clutch fork and release bearing from the crankcase.
Video: clutch replacement on the "six"

Rejection of parts
After the clutch is removed, all elements are subjected to a thorough inspection. To do this, perform the following steps:
- We clean the clutch elements from dirt, as well as the working plane of the flywheel.
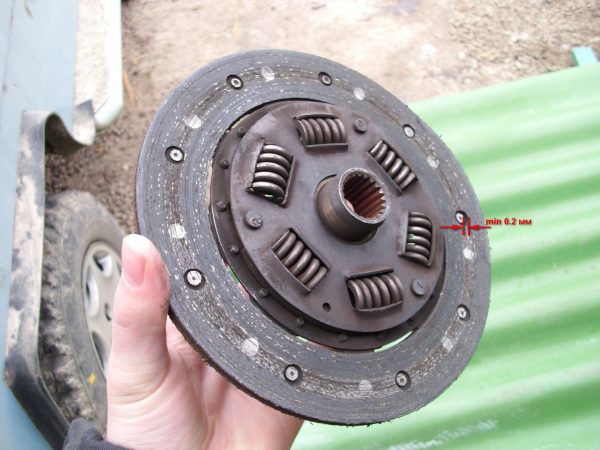
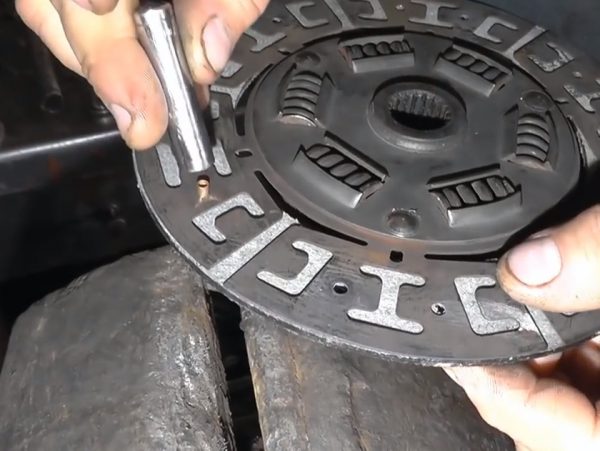
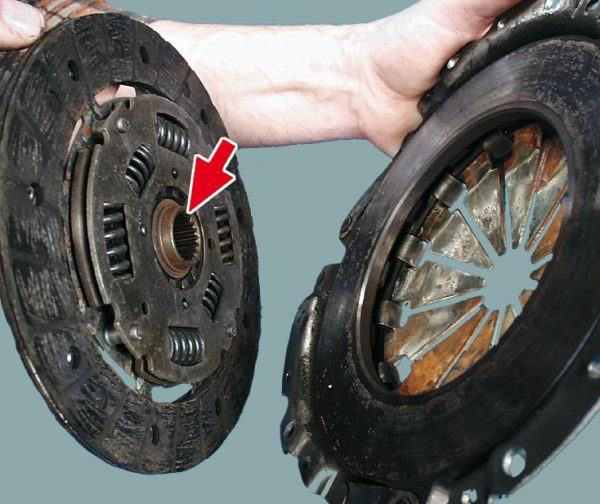
- We examine the clutch disc. The presence of cracks is unacceptable. If the thickness of the pads to the rivet heads is less than 0,2 mm or the rivets are loose, the driven disk or the pads themselves must be replaced. We check how securely the disc springs are fixed in the sockets. If there are damaged springs, the disc must be replaced.The minimum thickness of the lining to the rivets should be 0,2 mm
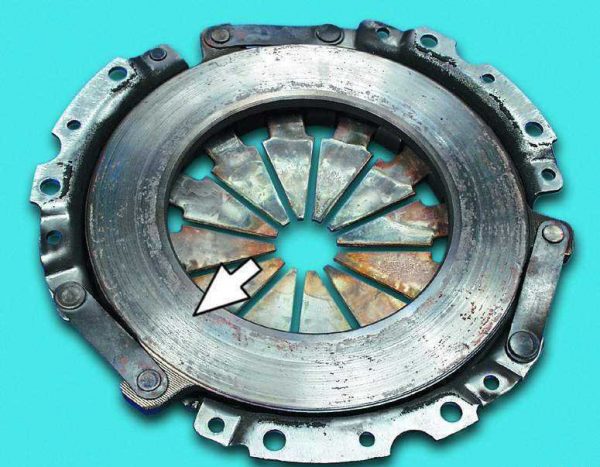
- We examine the working planes of the flywheel and basket. They should not have deep scratches, potholes and other defects. Weakening of elements in places of riveted joints is not allowed. If these defects are found, the parts must be replaced. To check the basket for warping, apply a metal ruler to the surface of the pressure plate. If a feeler gauge 0,3 mm thick can be inserted over the entire surface of the disc, the basket should be replaced.The pressure plate of the basket should not have deep scratches, potholes and other serious damage.
- We evaluate the appearance of the diaphragm spring of the basket. The areas where the spring tabs contact the release bearing should show no obvious signs of wear.
- We check how smoothly the driven disk moves along the spline connection of the gearbox input shaft. If burrs are found, remove them. If radial play is detected, it may be necessary to replace not only the disk, but also the input shaft.
- The clutch housing must not be cracked.
The basket is a non-separable and non-repairable unit and must be replaced in case of any damage.
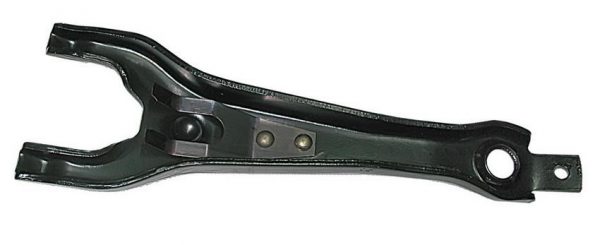
Fork and spring
The fork and spring element, as well as other components of the clutch mechanism, must be in good condition. Cracks on the fork are unacceptable, and if they are found, the part is replaced with a serviceable one.
Release bearing play
Since, as such, there is no tool for checking the release bearing, during diagnostics it is necessary to visually inspect the condition of the mechanism, scroll it to identify play, jamming, loud noise, and possible damage. If a large play or flaws of any other nature are found, the bearing needs to be replaced. If the part does not have visible damage, but at the same time makes noise, then it must be cleaned of contaminants and filled with grease, for which molybdenum grease is suitable.
Clutch bearing replacement
Replacing the release bearing for convenience is carried out on a completely removed box. The only tools required are a flathead screwdriver. The procedure consists of the following steps:
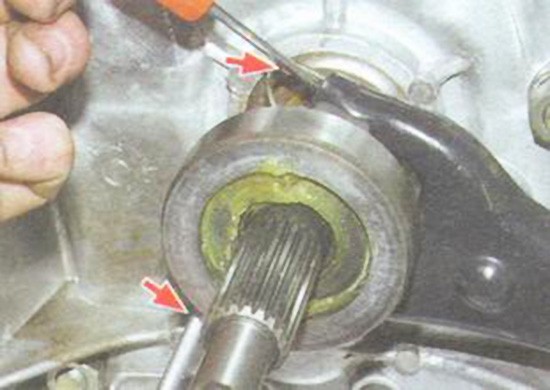
- We disengage the ends of the spring from the fork.We disengage the ends of the spring from the fork
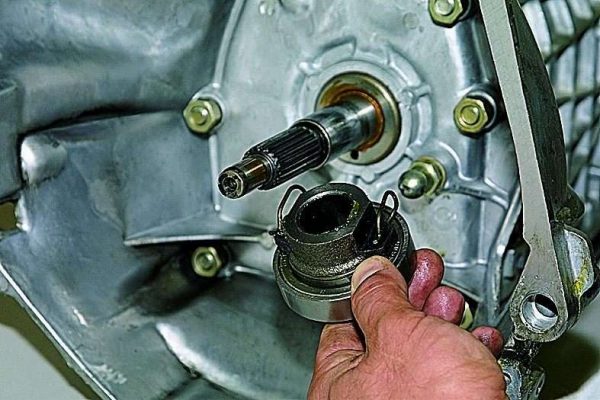
- We shift the bearing along the input shaft and remove it together with the clutch.We dismantle the release bearing by sliding it along the gearbox input shaft
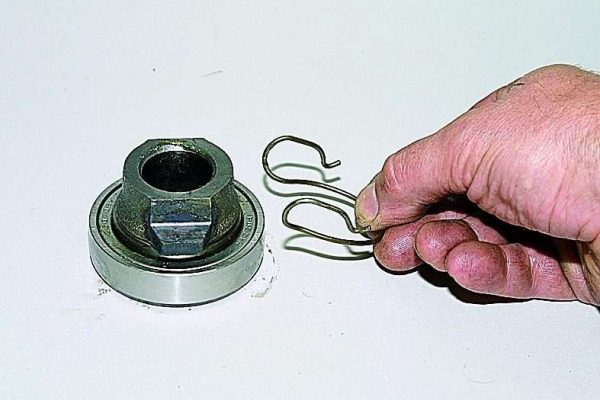
- We push the ends of the spring and remove it from the clutch.We push the ends of the spring and remove it from the clutch
- Install new bearing in reverse order.The release bearing is installed in reverse order.
- During installation, lightly lubricate the splines of the input shaft with Litol-24 grease.
Replacement of linings
If the VAZ 2106 clutch disc has serious damage to the friction linings, it is not necessary to replace the disc with a new one - it can be repaired by installing new linings. For this you will need:
- a set of overlays and rivets for the "six";
- electric drill with a drill 6–7 mm;
- flat screwdriver.
The sequence of actions is as follows:
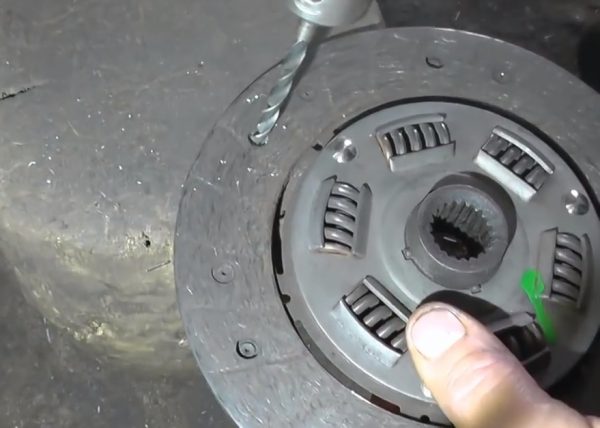
- We rest the disc on a wooden block and drill out the old rivets on both sides, avoiding damage to the disc itself.We drill out old rivets with an electric drill and a drill of a suitable diameter
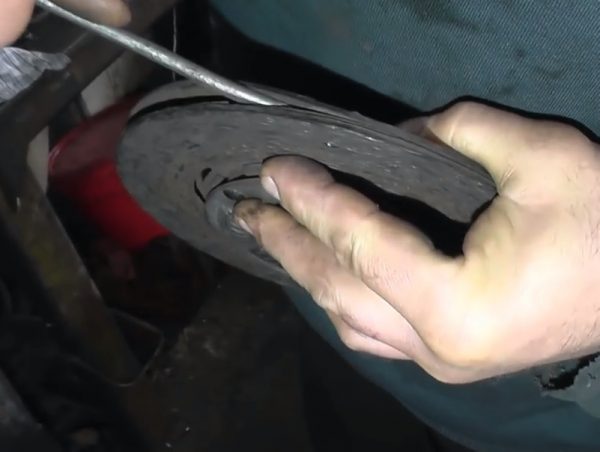
- Pry off the pads with a screwdriver, separating them from the disk.We pry off the lining with a flat screwdriver and disconnect them from the clutch disc
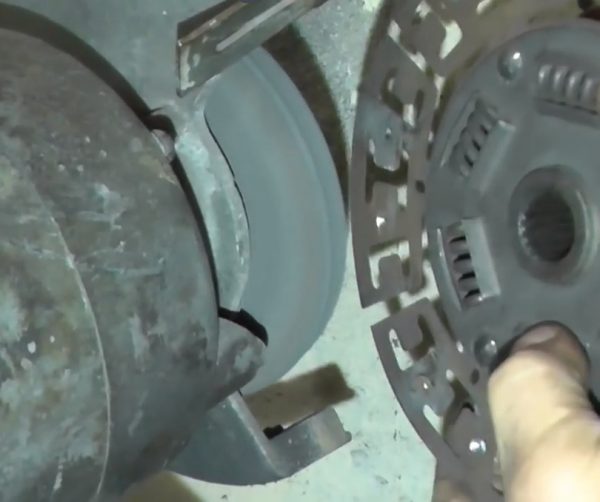
- We grind the rest of the rivets on the grinder.On the grinder, remove the remnants of rivets
- We mount new linings, for which we clamp a bolt of a suitable diameter with the head down in a vice, insert a rivet into the hole of the lining, set the rivet head on the bolt and strike with a hammer on a suitable guide, and then on the rivet itself, riveting it.We mount new linings with a vice and a suitable adapter.
- We fix the overlay first on one side, then on the other side of the disk.
Video: replacing clutch disc linings

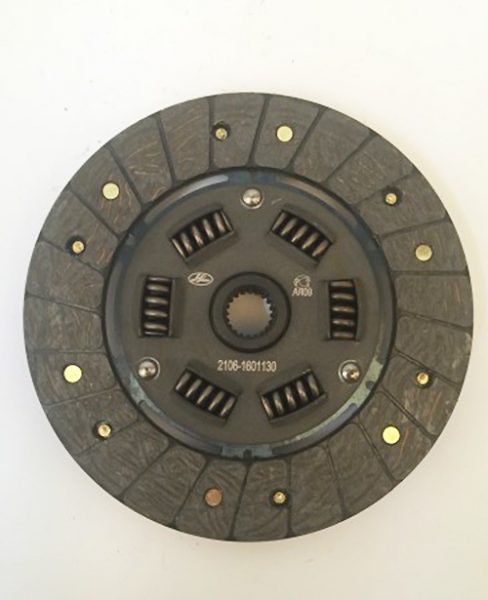
Clutch selection for VAZ 2106
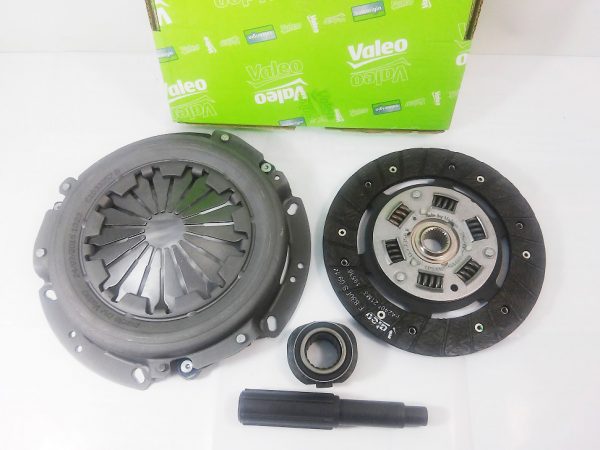
A clutch with a pressure plate diameter of 200 mm and 130 mm for the driven is installed on the "six". There are many manufacturers of these mechanisms today, but the most popular ones are still worth highlighting:
- VALEO (France). It produces a clutch, the work of which is distinguished by its softness and precise work. Car owners who use kits from this manufacturer note the high reliability of the mechanism, which runs without any nuances for more than 150 thousand km. The disadvantages include only the high cost of about 2600 rubles;The VALEO clutch is distinguished by its softness and precise operation.
- LUK (Germany). The kits of this manufacturer are considered optimal in terms of price-quality ratio. However, when buying, you need to be careful, because there are many fakes. A distinctive feature of such a clutch is the use of a damper on both the driven and pressure disks. The price of the kit is 2200 rubles;
- KRAFT (Germany). A well-known brand whose products have many positive reviews. The main advantages are soft squeeze, no overheating under harsh operating conditions and flywheel wear. Such a clutch costs about 1700 rubles;
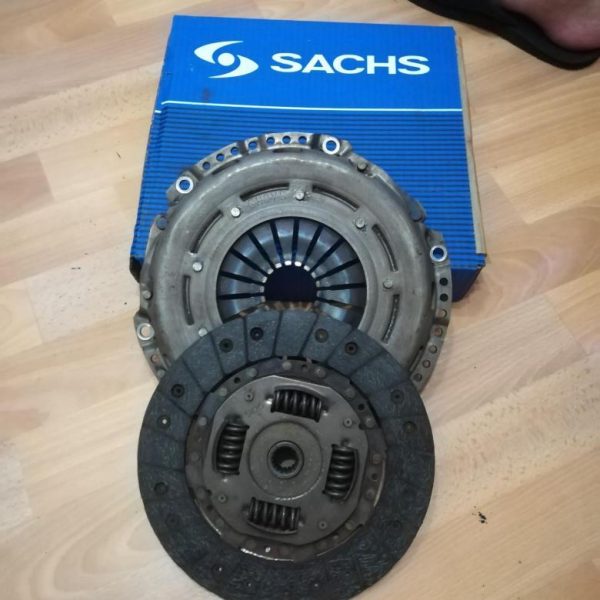
- SACHS (Germany). The manufacturer manufactures various transmission parts. The clutch is equipped with asbestos-free linings that optimally transmit torque and are characterized by increased resistance to high loads. The cost of the kit ranges from 2600 rubles;The SACHS clutch has increased resistance to loads
- VIS (Russia). Domestic manufacturer, which is a supplier of components for Lada cars. The clutch was developed by Togliatti engineers, but components are imported. Many owners of the classic Zhiguli install the clutch of this particular manufacturer, which is due to good quality and affordable price, which is about 1900 rubles;
- KRAFT TECH (Turkey). The clutch kit is characterized by soft work and adjusted to Russian conditions. Sometimes there are negative reviews, which boil down to a short life of the release bearing. The cost of the kit is about 2600 rubles;
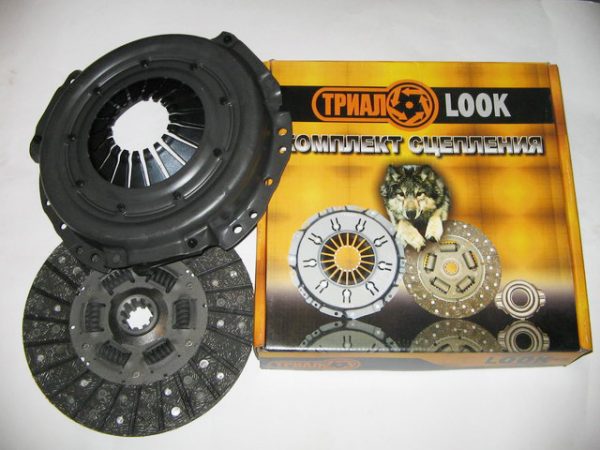
- TRIAL (Russia). The clutch of this manufacturer has an average mileage of 80 thousand km. Taking into account the reviews of some car owners, it is worth noting that over time, cracks appear on the driven disk near the springs, which simply fall out. However, problems arise after a few years of operation. The price for a set is 1700 rubles.The TRIAL clutch has a relatively low cost, but the reviews of car owners make you think about purchasing such a kit
Installing the clutch
After repair or replacement of the clutch, the installation is carried out as follows:
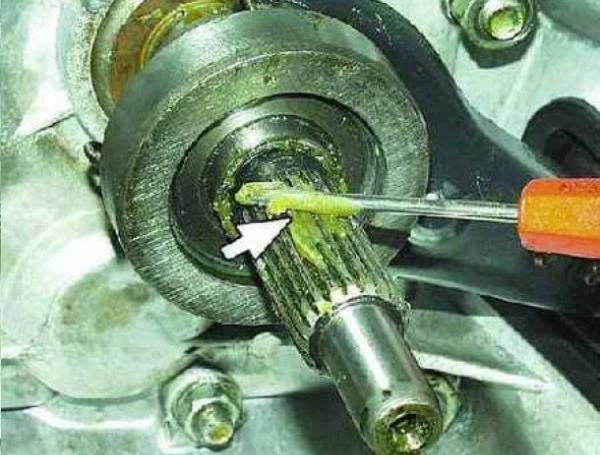
- The input shaft of the gearbox, as well as the ball bearing of the fork, lightly lubricate the SHRUS-4.We apply SHRUS-4 grease to the splines of the input shaft
- We apply the driven disk to the flywheel with the side with a smaller protrusion, and to the basket with a larger one.The driven disk is installed with a protruding part to the basket
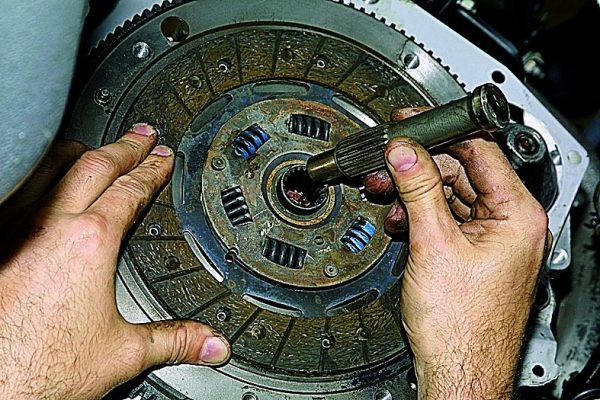
- We insert a mandrel in the center of the disk, which is placed in the inner race of the crankshaft bearing and will hold the hub.A special mandrel is used to center the clutch disc.
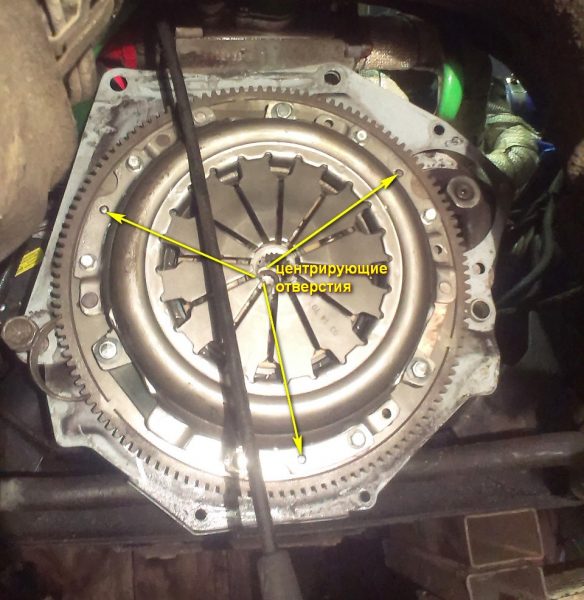
- We mount the basket on the flywheel, getting the centering holes of the casing on the flywheel pins.The basket is mounted with centering holes on the flywheel pins
- We tighten the fasteners with a torque of 19,1–30,9 Nm. After tightening, the mandrel should come out of the mechanism freely.
- We install the gearbox in the reverse order of dismantling, after which we carry out the adjustment.
Clutch adjustment "six"
The procedure is carried out on a viewing hole using the following tools and materials:
- open-end wrenches for 8, 10, 13 and 17;
- measuring ruler;
- passages;
- pincers;
- WD-40.
Clutch Pedal Adjustment
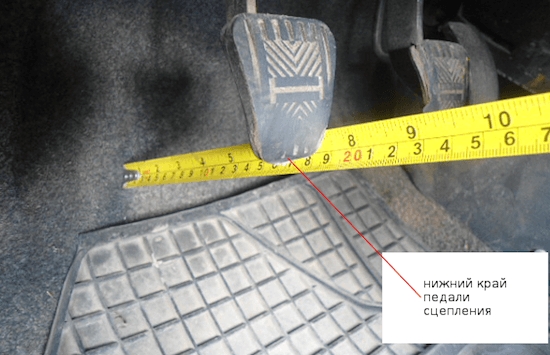
Adjusting the pedal comes down to setting the correct free play, which should be 0,5–2 mm. The operation is carried out from inside the vehicle by adjusting the required height of the pedal limiter. The event consists of the following steps:
- We loosen the limiter nut with an open-end wrench by 17, and with another of the same dimension we scroll the limiter itself, setting the required length.Free travel is regulated by changing the length of the pedal limiter with two keys to 17
- The amount of free play is controlled using a tape measure or ruler.Pedal free play is measured with a ruler.
- At the end of the procedure, tighten the locknut.
Adjustment of a rod of the working cylinder
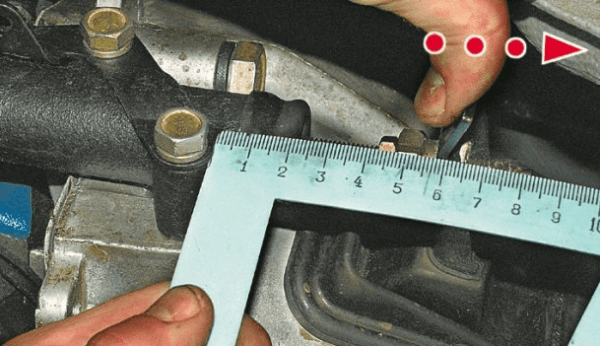
The free travel of the fork stem is determined by the distance between the fifth diaphragm spring of the basket and the release bearing. To adjust the car is installed on the inspection hole, after which the following steps are performed:
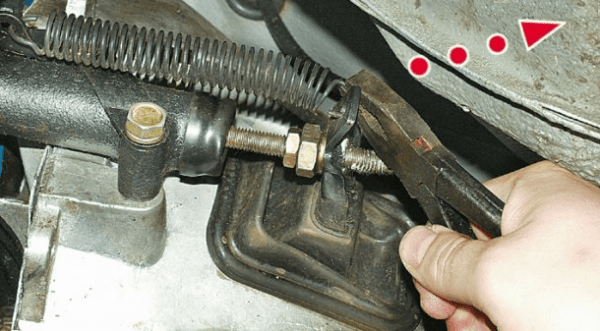
- Tighten the return spring with pliers.The ends of the return spring of the clutch fork can be easily removed with pliers
- We measure the free play of the fork with a ruler, which should be within 4–5 mm. If the values differ, adjust them by changing the length of the fork stem.Clutch fork free play should be 4-5 mm
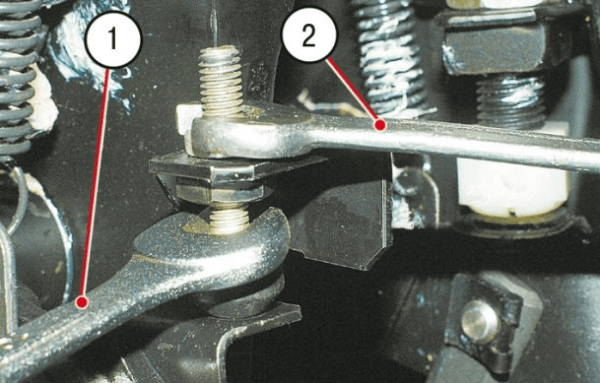
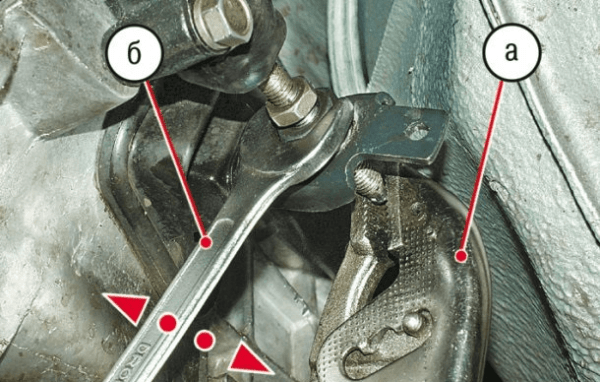
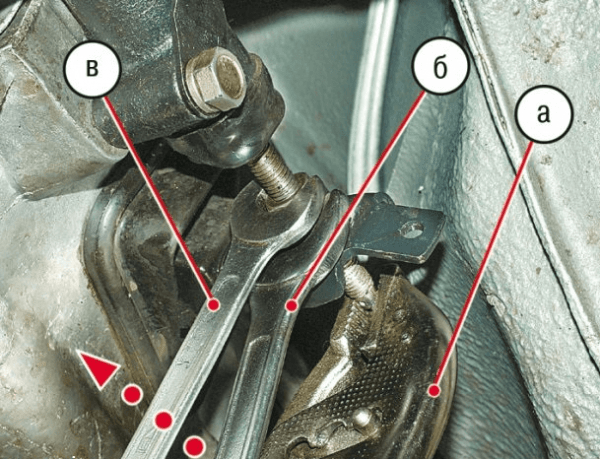
- With a 13 wrench, unscrew the lock nut, and with a 17 wrench, hold the adjusting nut.The adjusting nut is held with a 17 wrench (a), and the lock nut is loosened with a 13 wrench (b)
- We fix the stem from turning with special pliers and by rotating the adjusting nut we achieve the necessary free play of the stem.When the stem is fixed with pliers (b), the adjusting nut rotates with a key of 17 (a)
- Having set the required values, we wrap the lock nut.After adjustment, when tightening the locknut with a 13 wrench (c), the adjusting nut is held with a 17 wrench (b), and the rod flats with pliers (a)

Video: clutch adjustment

When properly adjusted, the clutch should work clearly and without jamming, the gears should be engaged without extraneous noise and any difficulties. During movement, the driven disk should not slip.
Troubleshooting the clutch on the VAZ 2106 is not an easy task. However, for repair and adjustment work, a standard set of tools, minimal car repair skills and following step-by-step instructions will be enough.

