Rear axle VAZ 2106: characteristics, malfunctions and repairs
Content
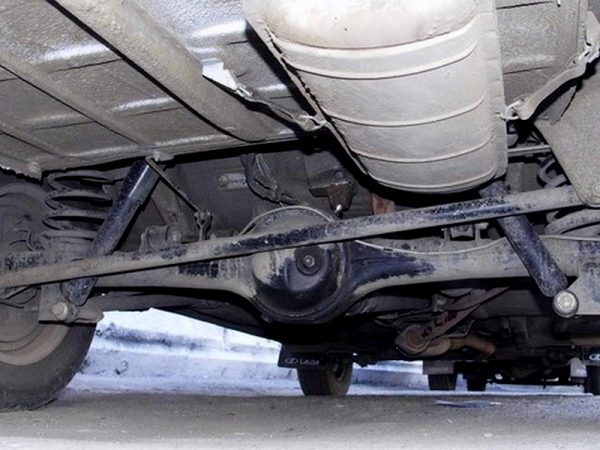
The rear axle of the classic Zhiguli is an integral part of the car, without which its movement would be impossible. The assembly consists of several mechanisms to which torque is transmitted from the engine and gearbox through the driveline. As the owner of the VAZ 2106, you need to be aware of possible problems with the rear axle and be able to fix them on your own.
Rear axle VAZ 2106 - purpose
In the design of the car, the rear axle (ZM) plays an important role. Through this node, the drive wheels are connected to each other, and they are also fastened to the body and torque is transmitted to them. The assembly consists of several separate elements that can wear out over time and require repair or replacement. Therefore, the design of the rear axle VAZ 2106, its malfunctions and repairs should be considered in more detail.
Specifications of the rear axle
In terms of their design and characteristics, the drive axles of all classic Zhiguli are the same. The difference lies only in the gear ratios of the main pairs.
Table: characteristics of the rear axle "six"
| Parameter | Index |
| Factory catalog number | 21062402010 |
| Length, mm | 1400 |
| Case diameter, mm | 220 |
| Stocking diameter, mm | 100 |
| Weight without wheels and oil, kg | 52 |
| Transfer type | Hypoid |
| Gear ratio value | 3,9 |
| Required amount of lubricant in the crankcase, cm3 | 1,3 – 1,5 Feet |
Rear axle device VAZ 2106
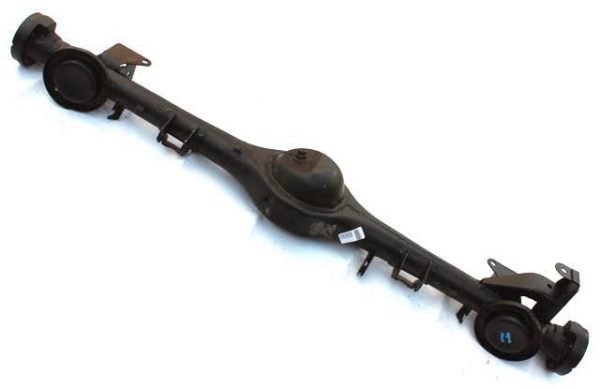
The design of the "six" ZM consists of such basic units as a stocking, a gearbox and half shafts. Each of them is an integral part, without which the normal functioning of the mechanism in question is impossible.

Chassis
The body or stocking of the rear axle consists of two stamped casings in the form of a pipe, which are interconnected by welding. From the outer side of the casings, flanges with machined seats for semi-axial bearings and cuffs are fixed by welding, which prevent lubricant from escaping. The flanges have 4 holes for bolts fixing the brake shield, on which the brake cylinder with pads is mounted. Also, through these bolts, the oil deflector and the plate are held, which ensures the fixation of the axle shaft bearing in the stocking. In the middle part of the body there is a widening, which is the rear gearbox housing. The crankcase has holes for a breather, as well as for filling and draining grease. Brackets for fastening elements of the rear suspension are welded directly on the stocking.
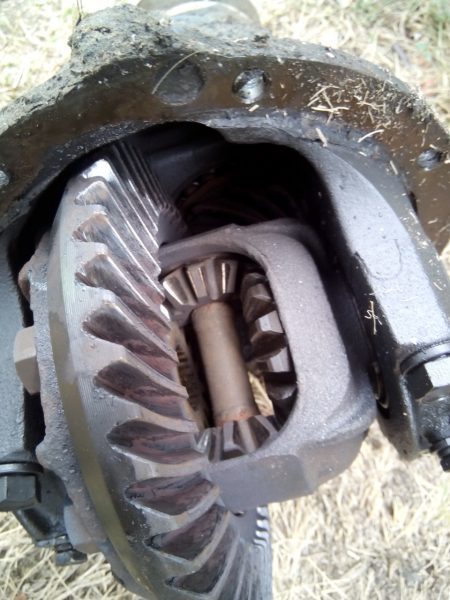
Reducer
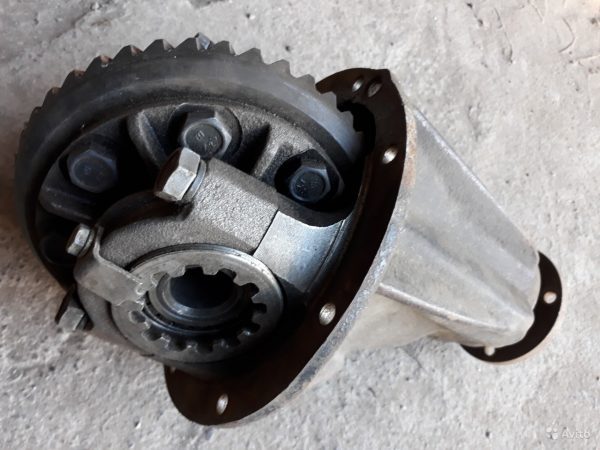
The main function of the rear gearbox is to reduce and transmit torque from the driveline to the wheels of the rear axle. Structurally, the unit is made of a housing, gears of the main pair, a differential box with roller bearings. The gear ratio of the assembly depends on the number of teeth on the tip and the planetary. On the VAZ 2106, the number of teeth of the driven gear is 43, and the leading gear is 11. The gear ratio is determined as follows: 43/11=3,9.
Half-shafts
The main purpose of the semi-axes is to transfer the torque converted by the gearbox to the wheels of the vehicle. On the one hand, the semi-axle has splines, through which it engages with the gears in the gearbox, and on the other, there is a ball bearing that ensures the rotation of the mechanism, and a flange for attaching the brake drum and rear wheel.

How bridge failures manifest themselves
The rear axle of the VAZ "six" is endowed with its own characteristic problems, which manifest themselves in one way or another.
Excessive noise from the rear wheels
There may not be many reasons for the appearance of a lot of noise from the rear axle wheels:
- loose wheel mount. In this case, it is necessary to check and tighten the fasteners;
- semi-axial bearing failure. The axle shaft bearing wears out over time, resulting in a characteristic noise. The axle shaft needs to be inspected and the defective element replaced.
Constant rear axle noise while driving
Sounds unusual for the normal operation of the ZM in most cases indicate a malfunction. The main causes of malfunctions include:
- stocking deformation. If the case is deformed, you can try to restore it, but it is better to replace it with a serviceable one;
- bending of the axle shafts and excessive runout. In this case, the part must be replaced;
- increased wear on the splines. Inspection of gears and splines of semiaxes is required, and after replacement of damaged elements;
- the gearbox is incorrectly adjusted, wear or breakage of gears or bearings. A complete disassembly, troubleshooting and repair of the mechanism is required;
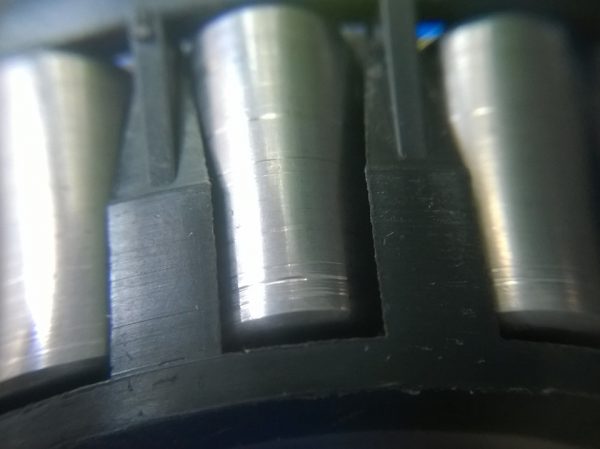
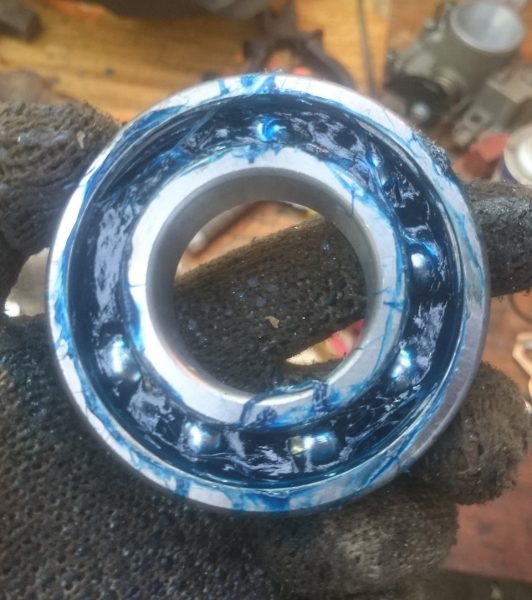
 If the bearing rollers are damaged, extraneous noises may appear in the operation of the rear axle
 - low oil level. It is necessary to check the level, bring it to normal and make sure that there is no leakage through the lip seals and gaskets.
Noise when accelerating car
The appearance of noise during acceleration of the vehicle may be accompanied by such reasons:
- Worn or incorrectly adjusted differential bearings. Requires dismantling, inspection and repair of the gearbox;
- the engagement between the teeth of the bevel and planetary gears is incorrectly set. The problem is solved by correct adjustment;
- wear of semi-axial bearings. It is necessary to remove the faulty axle shaft and replace the bearing;
- little lubrication. The problem is eliminated in the same way as with constant noise.The lack of lubrication in the gearbox leads to increased production and jamming of the mechanism
Noise during acceleration and deceleration
If noise from the ZM side is present during acceleration and deceleration by the motor, then the reason is possible in the following:
- excessive wear or damage to the shank bearings. Requires disassembly and diagnostics of the gearbox;
- incorrect setting of the meshing of the teeth of the bevel and planetary gears. It is eliminated by checking the integrity of the parts and setting the correct gap.
Video: identifying the cause of noise in the rear axle

Noises when cornering
Extraneous noise can occur not only during rectilinear movement, but also when cornering. This may be due to the following reasons:
- difficult scrolling of the satellites on the axis. Requires disassembly, serviceability check and replacement of elements whose condition does not allow them to be used further;
- wedging of semi-axial gears. If the gears and the surfaces with which they come into contact have minor damage, then they are cleaned with sandpaper. Otherwise, the failed elements must be replaced;
- incorrect setting of the gear engagement of the differential gears. Diagnostics and correct clearance adjustment are required;
- failure of semi-axial bearings. Defective elements must be replaced.
Knocking at start up
If the “six” rear axle gearbox (RZM) makes a knock as soon as the car starts moving, then this may indicate the following:
- excessive clearance between the flange and the tip. Inspection of the spline connection and replacement of worn parts is required;
- increased clearance between the shank and the planetary. Eliminated by setting a gap;
- increased wear of the landing site under the axis of the satellites. With such a breakdown, the box must be replaced;
- lowered rear suspension rod fasteners. Requires checking and, if necessary, tightening the bolts.
Oil leak
Lubrication from the ZM can flow for the following reasons:
- wear of the cuff of the bevel gear. If there is a leak from the side of the shank, the stuffing box must be replaced;
- half shaft seal damage. If traces of grease appear on the brake flaps, this indicates wear on the axle shaft seal, which requires its replacement;
- the fastening of the gearbox to the stocking of the ZM is loosened or the gasket is damaged. In such a situation, it is necessary to tighten the fasteners or replace the seal.

Rear axle repair
Having found out how malfunctions of the VAZ 2106 rear axle manifest themselves, you need to familiarize yourself with how to fix them. Depending on the breakdown that has occurred, it may be necessary to completely disassemble the bridge, i.e., dismantle the axle shafts and the gearbox, or partially. Therefore, we will consider the elimination of each of the possible malfunctions separately.
Replacing the semiaxis oil seal
The semi-axial oil seal is quite simple to change and requires a minimum set of tools:
- jack;
- crank;
- head 17;
- impact puller;
- flat screwdriver.
We change the lip seal in this order:
- We tear off the wheel bolts from the desired side, jack up the car and completely remove the wheel.
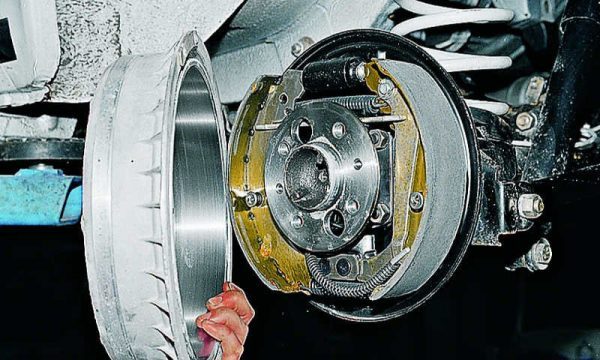
- We dismantle the brake drums.We remove the brake drum from the axle shaft, if necessary, knock it down through a wooden tip
- With a 17 head with a knob, we unscrew the fastening of the axle shaft to the stocking flange.To remove the axle shaft, it is necessary to unscrew 4 nuts with a head of 17
- Remove the engraving washers from the bolts.Unscrew the fasteners, remove the engraving washers
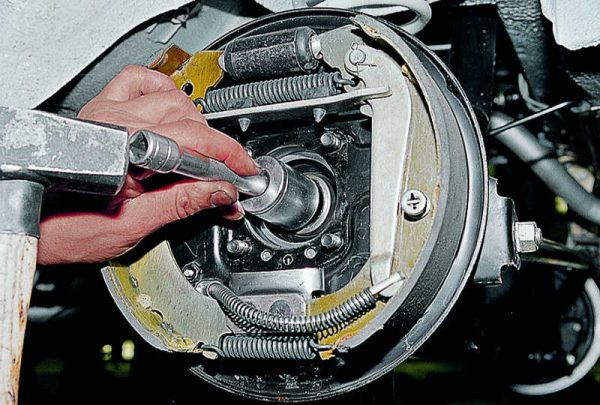
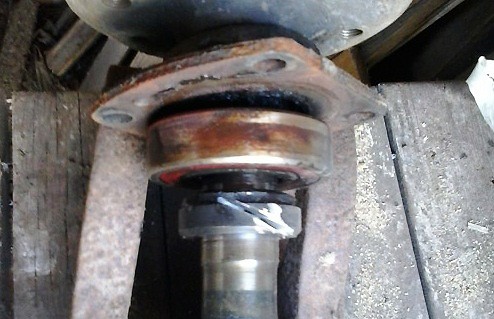
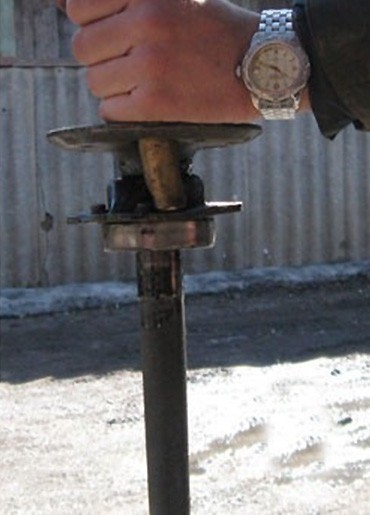
- Using a special puller or a suitable tool, we knock out the axle shaft from the ZM body.With the help of an impact puller, we knock out the axle shaft from the stocking of the rear axle
- Using a screwdriver, sliding pliers or other suitable tool, we take out the old oil seal.Using pliers, remove the axle shaft seal from the stocking
- We install a new lip seal using a suitable mandrel.A new cuff is installed using a suitable adapter.
- Lightly lubricate the working surface of the stuffing box with Litol and mount the axle shaft back.


Video: replacing the roller bearing of the Zhiguli axle shaft

Shank packing replacement
To replace the tip cuff, you will need the following list of tools:
- socket wrench for 13 and 17;
- head 24;
- crank;
- torque wrench;
- container for draining oil;
- hexagon according to the size of the oil filler plug;
- sliding pliers.
We replace the stuffing box on the flyover as follows:
- We put the car on the handbrake.
- We unscrew the drain plug of the XNUMXM crankcase and drain the lubricant into the prepared container.Unscrew the plug, drain the oil from the rear axle
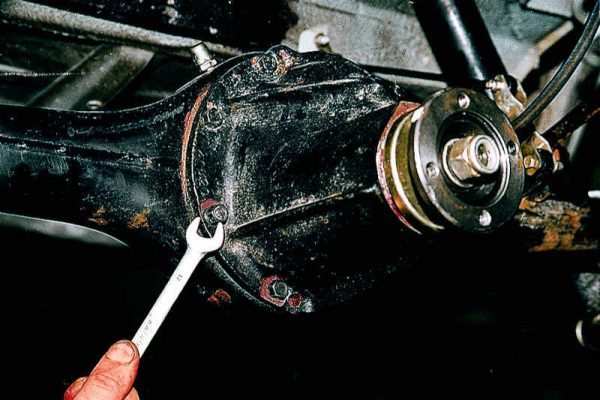
- Unscrewing the four nuts that secure the cardan to the gearbox flange and take the cardan to the side.To disconnect the cardan and the rear axle flange, unscrew the corresponding mount
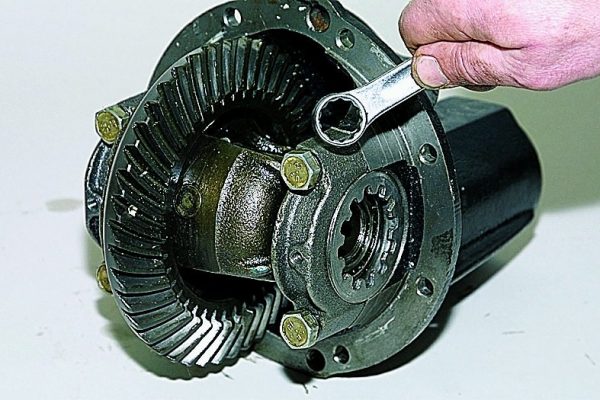
- Loosen the shank nut.We unscrew the flange fastening nut with a wrench or a head for 24
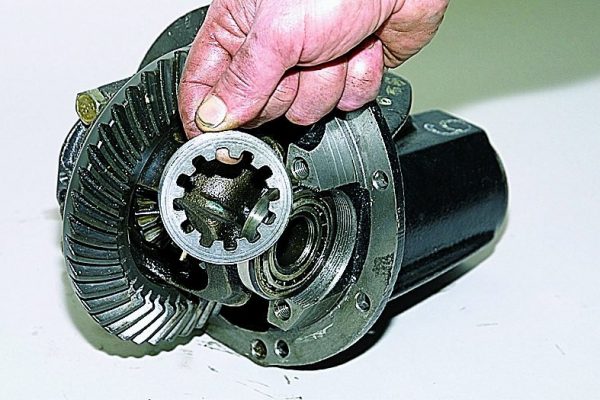
- Dismantle the flange and washer.Remove the flange from the shank along with the washer
- With a flat screwdriver or other tool, hook the oil seal and remove it from the gearbox.Pliers remove the old oil seal from the gearbox
- We install a new lip seal using the adapter, after which we collect everything back.To install the gland, use a suitable size adapter
- We tighten the shank nut with a torque wrench with a torque of 120–225 N.m.We tighten the shank nut with a torque wrench with a torque of 120–225 N.m
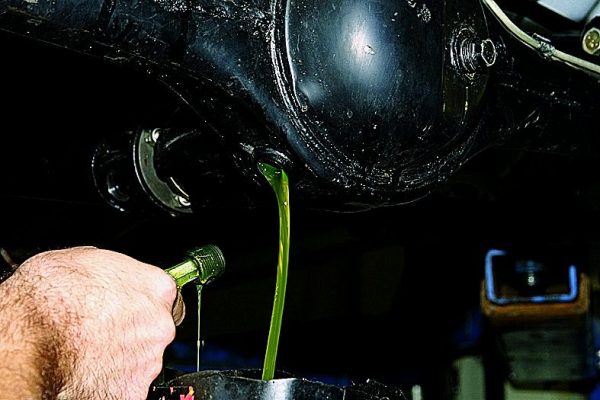
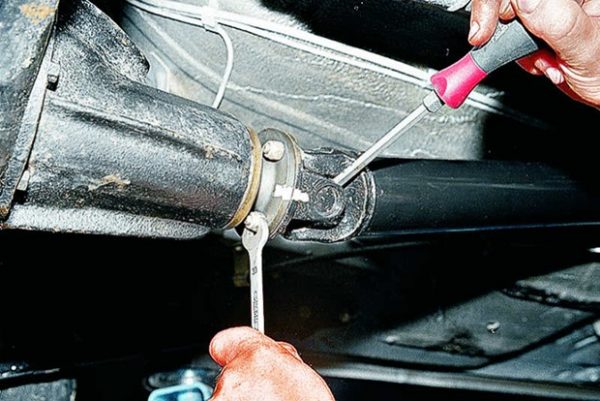
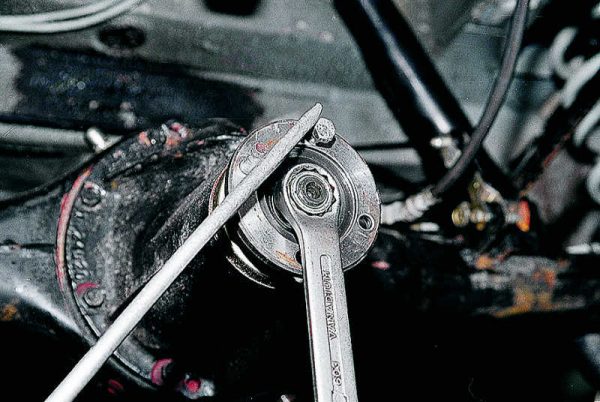

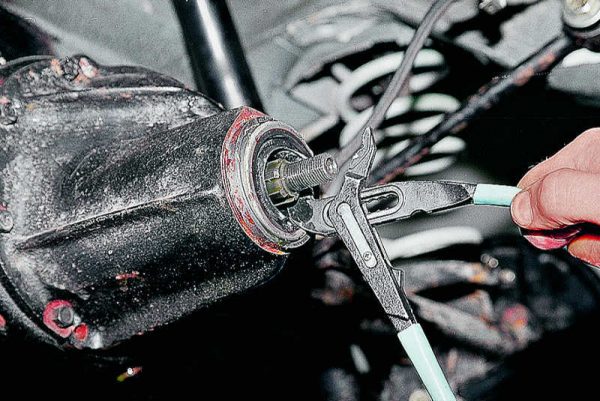
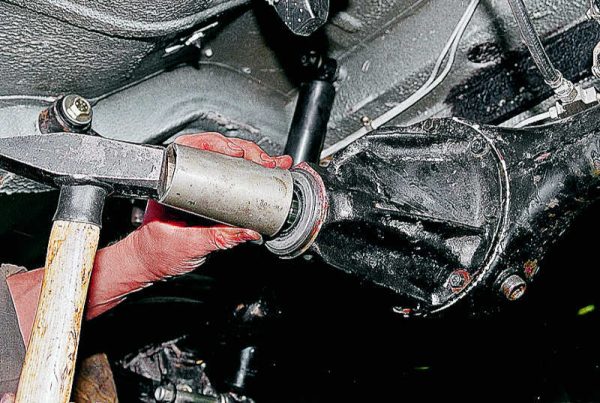
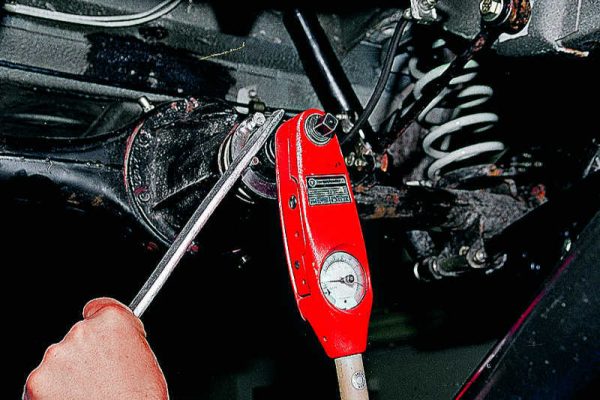
Table: parameters of the rear axle seals VAZ 2106
| Parameter | Stuffing box | |
| Half-shafts | Shank | |
| Outside diameter, mm | 45 | 68 |
| Inner diameter, mm | 30 | 35,8 |
| Thickness mm | 8 | 12 |
| SKU | 2101 – 2401034 Feet | 2101 – 2402052 – 01 |
Replacing the gearbox gasket
A lubricant leak between the REM and the stocking, although rare, does occur. In this case, it will be necessary to dismantle the assembly to replace the seal. For work, you will need the same tools as when dismantling the axle shaft. Additionally, you need to prepare a head for 12 and a ratchet. Repair is carried out as follows:
- We drain the oil from the ZM.
- We repeat steps 1–5 to replace the semi-axial cuff, dismantling the semi-axes on both sides.
- Detachable cardan and flange RZM.
- With a head with a knob or ratchet, we tear off and unscrew the fastening of the gearbox to the body.The gearbox is attached to the stocking with bolts, unscrew them
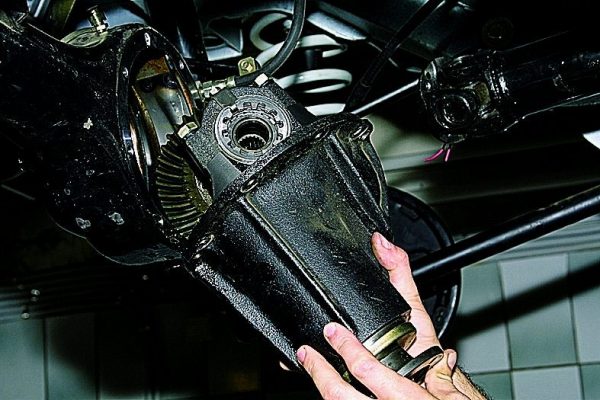
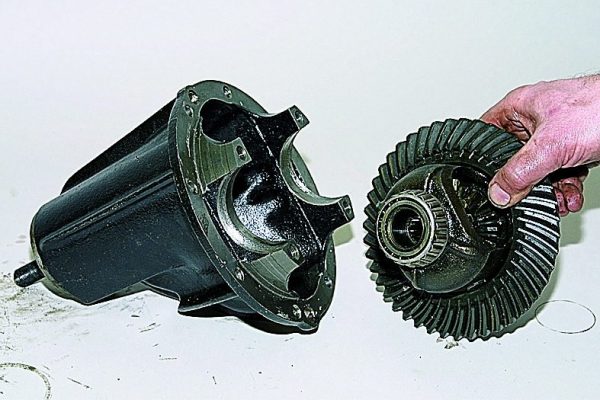
- We carefully dismantle the gearbox, given that its weight is more than 10 kg.Having unscrewed the fastening of the mechanism, we remove it from the car
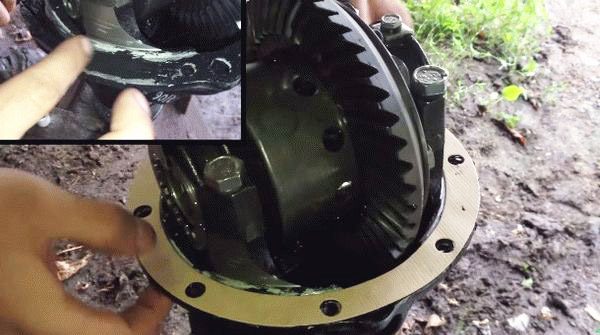
- The plane of the gearbox and the stocking, which are in contact with each other, are cleaned of contaminants. You may need to remove the old gasket with a knife.
- We install a new seal and assemble the ZM in the reverse order.After cleaning the surface, install a new gasket
Axle bearing replacement
The procedure for replacing the axle shaft bearing on the "six" is a rather time-consuming event. In addition to the ball bearing itself and a new bushing, you will need the following tools:
- crank;
- head 17;
- a hammer;
- flat screwdriver;
- chisel;
- Bulgarian;
- blowtorch or gas burner.
The process of replacing a bearing consists of the following steps:
- We repeat steps 1–5 to replace the axle shaft seal.
- After the axle shaft is removed, we clamp it in a yew.
- Using a grinder, cut the sleeve.We cut the sleeve with a grinder
- We point a chisel on the ring and strike it with a hammer.We break the sleeve with a hammer and chisel
- With a suitable guide, for example, a piece of pipe, we knock the bearing off the axle shaft. In extreme cases, we cut, and then split the outer ring and knock down the inner one.We knock the bearing off the axle shaft, pointing a wooden block at it and striking with a hammer
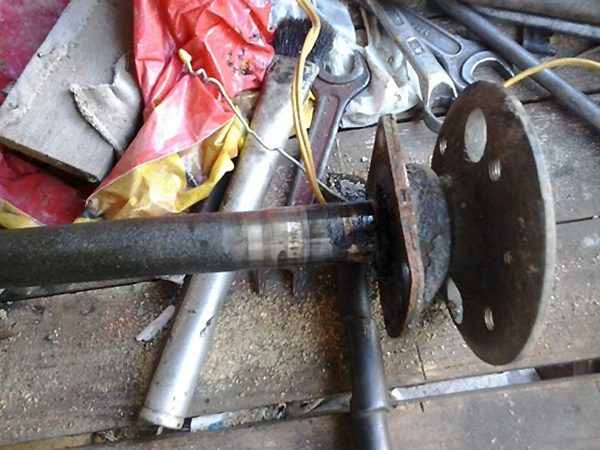
- By external inspection of the axle shaft, we find out whether it is possible to operate it further. If there are signs of wear on the splines or at the place where the bearing is mounted, then we change the axle shaft to a serviceable one.After removing the bearing, it is imperative to check the axle shaft for damage and deformation.
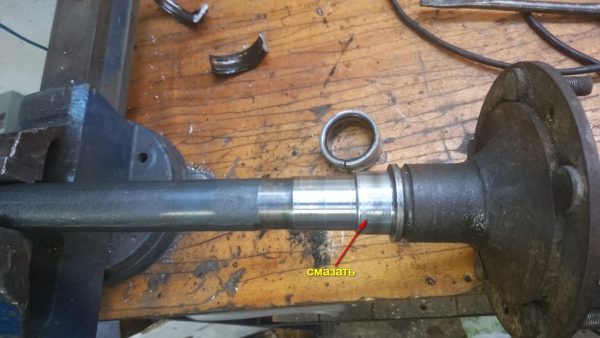
- Before pressing in a new bearing, remove the anther from it and stuff Litol-24 grease, after which we put the anther back.We fill the bearing with grease Litol-24 or similar
- Lubricate the bearing seat.We also lubricate the bearing seat
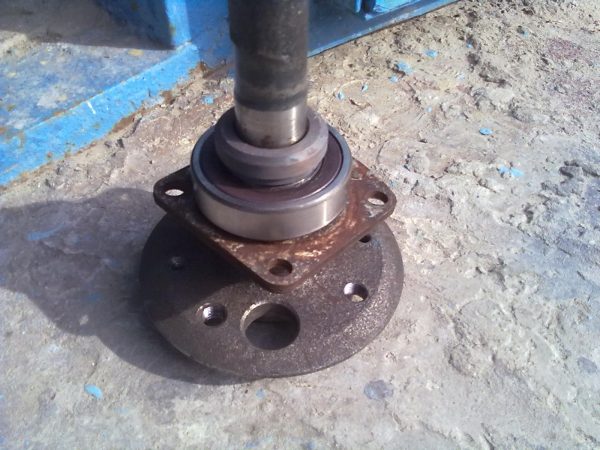
- We install the part with anther to the flange using a suitable adapter.
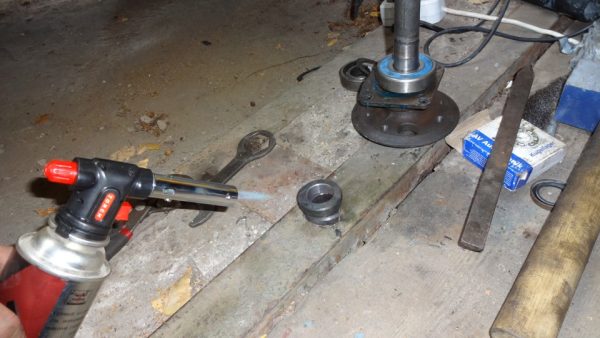
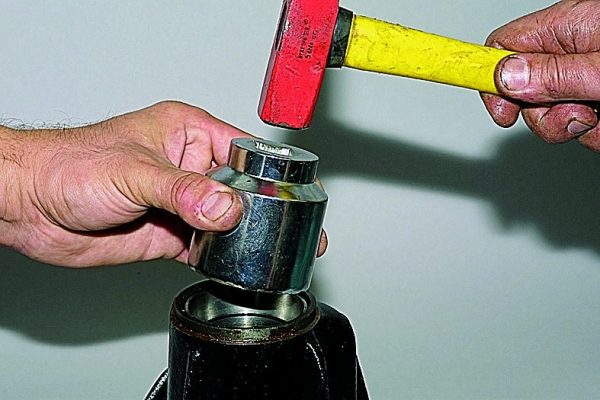
- To install the bushing, heat it with a gas burner until it is covered with a white coating.To make it easier to fit the ring on the axle shaft, it is heated with a gas burner or blowtorch
- We clamp the sleeve with pliers and put it on the axle shaft.
- For the tightest fit of the bushing to the bearing, we hammer it with a hammer and let it cool.When the sleeve is put on, let it cool down.
- Assemble in the reverse order.

During the replacement of the semi-axial bearing, a new oil seal must be installed even if there were no signs of oil leakage before.
Gearbox repair
Repair of RZM VAZ 2106 is performed when replacing the main pair, malfunctioning shank bearings or differential gears. In this case, the gearbox needs to be dismantled, disassembled and debugged, followed by the replacement of faulty elements, and then assembled and adjusted the assembly. For disassembly, you will need the following list of tools:
- set of wrenches;
- a hammer;
- bearing puller.
We perform the procedure in this order:
- After dismantling the gearbox, we clamp it in a vice.
- Using a 10 wrench, unscrew the mount and remove the fixing brackets of the nuts of both bearings.The locking plate is held by a bolt, unscrew it and remove the plate itself
- We make marks on the yokes with a beard to avoid confusion during assembly.Bearing caps marked with a beard
- Loosen the cover bolts.Using a 17 key, unscrew the fastening of the bearing cover and remove the bolts
- Remove the yokes, nuts and bearing rings.We take out the adjusting nut from the body
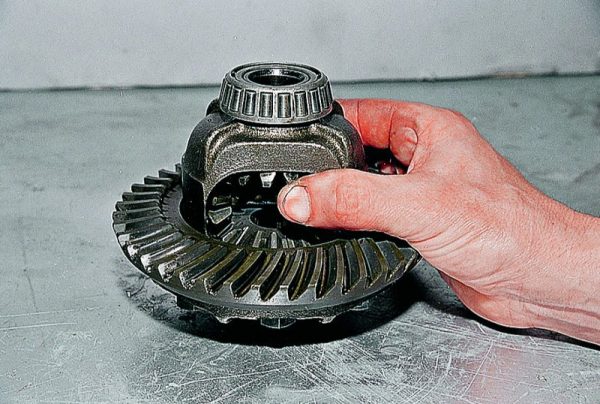
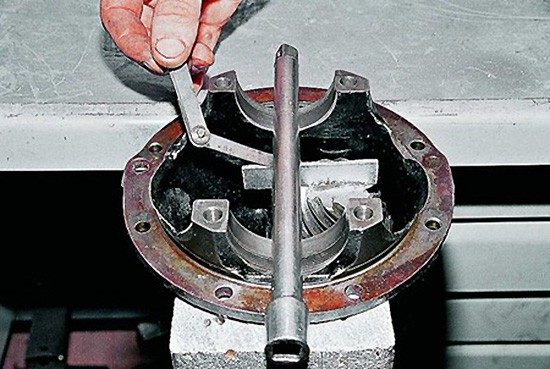
- We take out the driven gear from the REM housing along with the differential.From the gearbox housing we take out the differential box with the driven gear
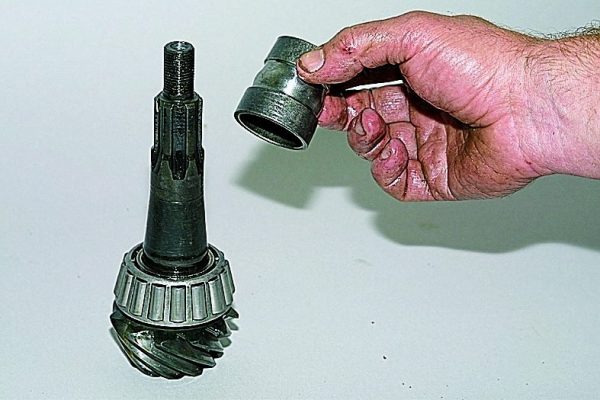
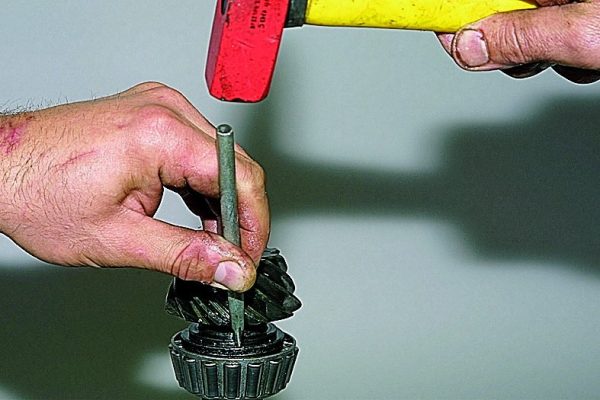
- We take out the shank shank with roller bearing.We take out the bevel gear from the crankcase together with the bearing
- The spacer sleeve remains inside the crankcase or on the shaft itself, remove it.Remove bushing from drive gear
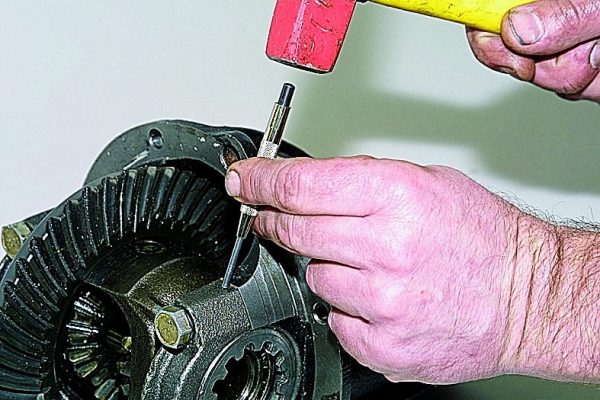
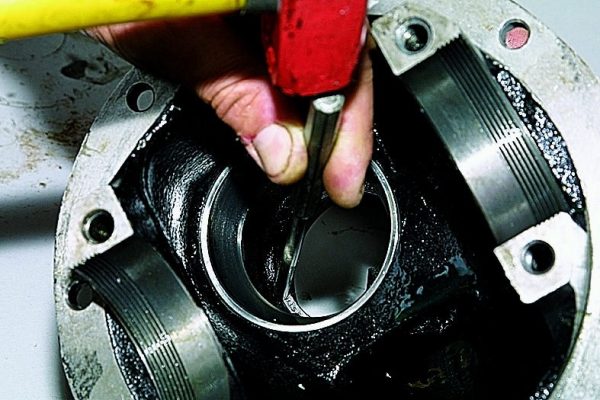
- Assess the condition of the inner bearing. If the separator or rollers are damaged, dismantle the part by knocking it off the gear shaft with a beard.Knock out the rear bearing with a punch
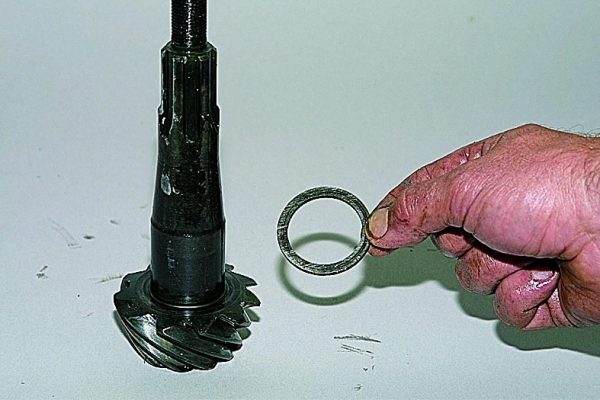
- There is a ring under the bearing, remove it from the shaft.Remove the adjusting ring from the shaft
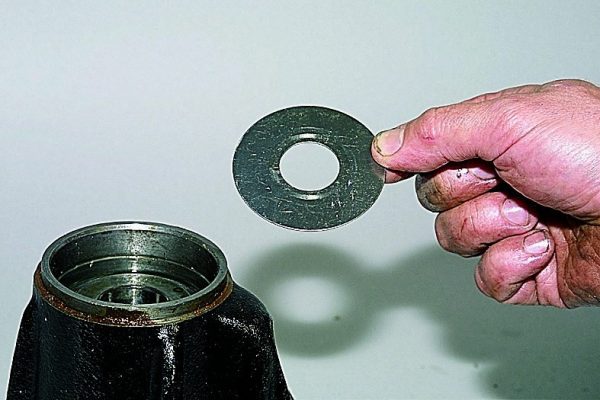
- We hook and remove the cuff from the housing and take out the oil deflector washer.We take out the oil deflector from the gearbox housing
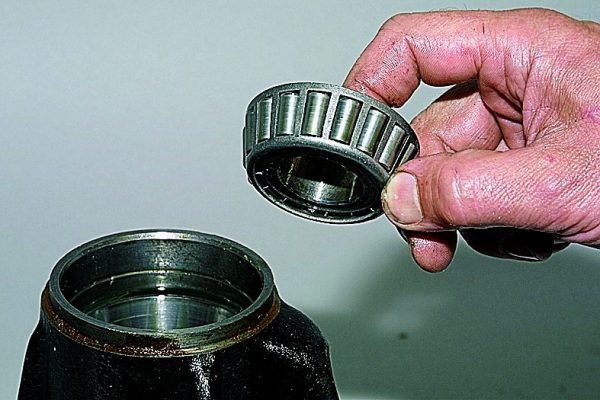
- We take out the second bearing of the drive gear. It must also be replaced in case of visible damage.Remove the bearing from the gearbox
- We knock out the outer rings of both bearings with a suitable insert.Knock out the outer race of the front bearing with a punch.
- If it is necessary to replace the differential bearings, we dismantle them with a puller. The procedure can also be performed with a chisel.We dismantle the bearing from the differential box using a puller
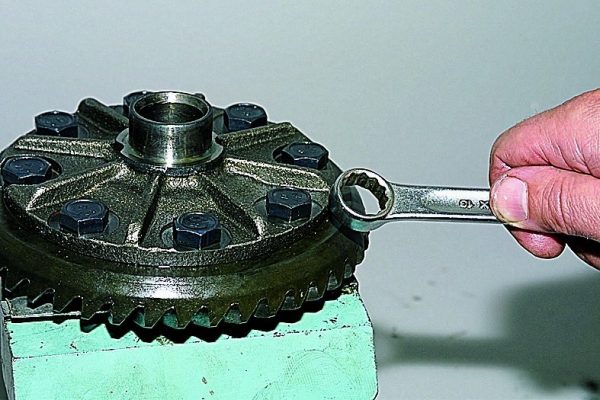
- To remove the planetary gear, we fix the differential box in a yew and unscrew the mount.The differential is attached to the driven gear with eight bolts, unscrew them
- To knock down the gear, it is enough to hit it several times with a plastic hammer.We knock down the gear with a hammer with a plastic striker
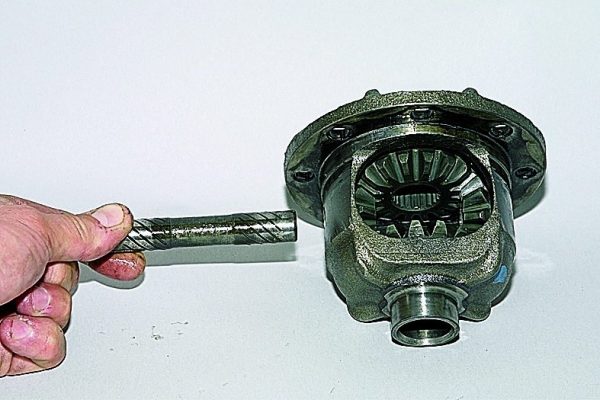
- We take out the axis of the satellites from the differential box.We take out the axis of the satellites from the box
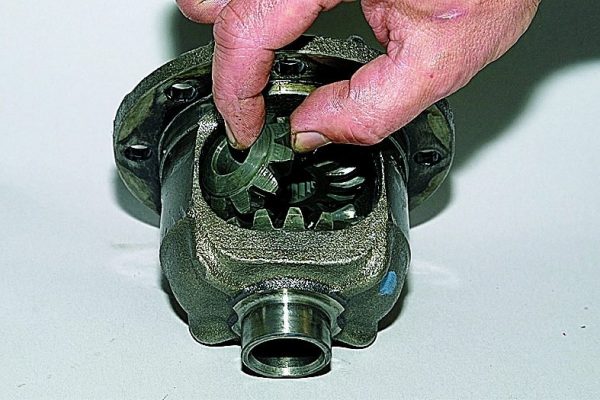
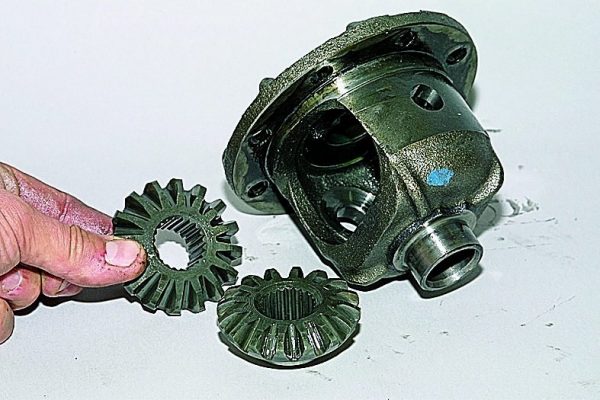
- Take out the satellites.We take out the satellites of the differential from the box
- Remove the axle gears and washers.We take out the side gears and washers


Without a complete disassembly of the gearbox, it is impossible to perform the defective assembly.
Checking the status of items
To assess the condition of the gearbox parts, we clean them from oil residues, possibly chips. We wash the elements in diesel fuel or kerosene, after which we carefully examine them:
- the main pair should not show signs of heavy wear or damaged teeth. Otherwise, both gears must be replaced;If the gears of the main pair are damaged, we change them with a set with the same gear ratio
- inspect the gears of the axle shafts and satellites, as well as their seats. Damaged elements are replaced;
- in the same way we evaluate the condition of the washers under the gears of the axle shafts. If there are flaws that cannot be eliminated with sandpaper, we change the washers for new ones;
- we check the differential and gearbox housing for damage of any nature. If required, we will replace them.

Table: rear axle bearing dimensions
| Parameter | Bearing | |||
| Shank front | Shank rear | Differential boxes | Half-shafts | |
| Outside diameter, mm | 67 | 73,03 | 62 | 72 |
| Inner diameter, mm | 28 | 34,93 | 33 | 30 |
| Thickness mm | 20,5 | 26,98 | 16 | 19 |
| SKU | 2101 – 2402025 Feet | 2101 – 2402041 Feet | 2101 – 2403036 Feet | 180306 |
Assembly and adjustment of RZM
Proper assembly and adjustment are the most critical steps in the process of repairing the gearbox and the rear axle as a whole. The correct operation of the mechanism and the duration of its operation depend on these procedures. We assemble the node as follows:
- We put on new differential bearings with a tip.
- We put all the components inside the box, lubricating them with gear oil.
- We move the gears and insert the axis of the satellites.
- We check the axial clearance of each of the gears. If it exceeds 0,1 mm, then we select thicker washers. If with the help of the latter it is not possible to eliminate the gap, the gears should be replaced.Differential gears must be rotated by hand
- We mount the outer rings of the drive gear bearings in the assembly housing.Using a suitable adapter, we press in the outer race of the bevel gear bearing.
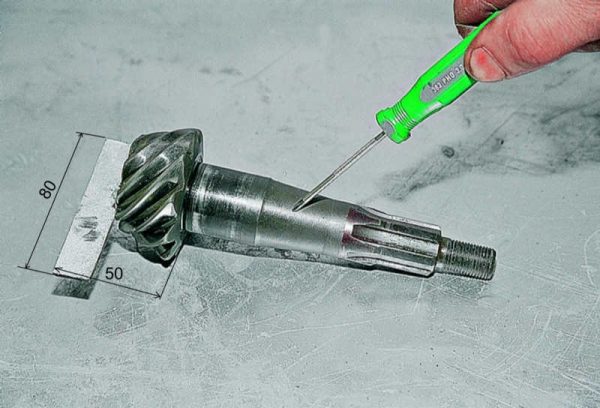
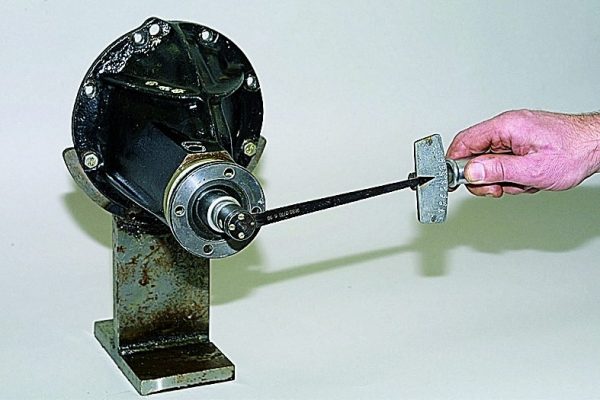
- In order to correctly install the tip and the planetary relative to each other, we select the thickness of the shim. To facilitate this process, we make a fixture using an old shank, to which we weld a metal plate 80 mm * 50 mm.From the old drive gear we make a device for adjusting the gear engagement of the main pair
- We put the bearing on the shaft and insert it into the housing. We put the second bearing and flange, tightening the nut with a torque of 7,9–9,8 Nm. We clamp the REM in a yew as shown in the photo. We place a metal ruler or bar on the places where the differential bearings fit.
- Using probes, we determine the distance between the tip and the tool used.We measure the gap between the fixture and the metal rod
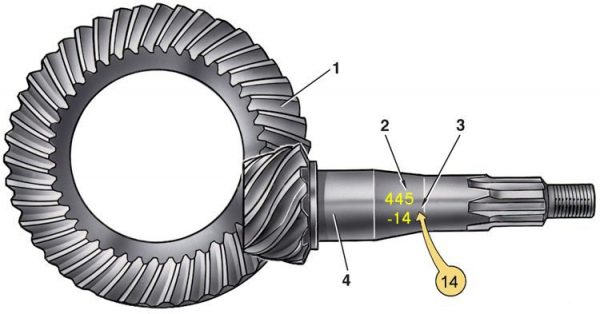
- According to the values obtained, as well as those indicated on the gear shaft, we calculate the adjusting washer. If the gap turned out to be 2,9 mm, and the value on the gear is -8 (hundredths of a millimeter), then the washer must be set with a thickness of 2,9-(-0,08) = 2,98 mm.The deviation from the nominal value is indicated on the drive gear
- We install the washer and bearing on the tip.We install an adjusting ring on the gear shaft and fit the bearing itself
- We place the small gear in the housing and put on a new bushing, bearing, oil deflector, mount the cuff and flange.
- We clamp the flange with a torque wrench with a force of 12 kgf * m.
- In order for the shank bearings to be tightened correctly, we check the moment of their rotation with a dynamometer: the value should be about 7,9–9,5 kgf. At lower values, we tighten the nut more, controlling the tightening torque so that it does not exceed 26 kgf * m.The torque of the flange must be 9,5 kgf
- We put the driven gear with the box in the housing and fasten the bearing caps.
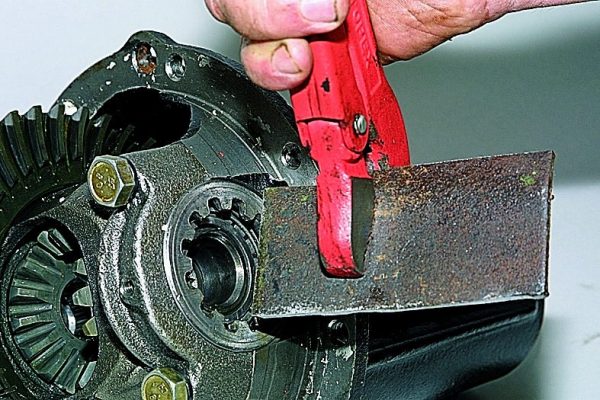
- We cut out a plate 49,5 mm wide from metal for turning the adjusting nuts.Cut out a metal plate to adjust the differential bearings
- We slightly tighten the nut near the driven gear, removing the gap between the shank.
- Tighten the same nut on the other side.
- We also slightly tighten the nut near the driven gear, selecting the side clearance between the tip of 0,08–0,13 mm.
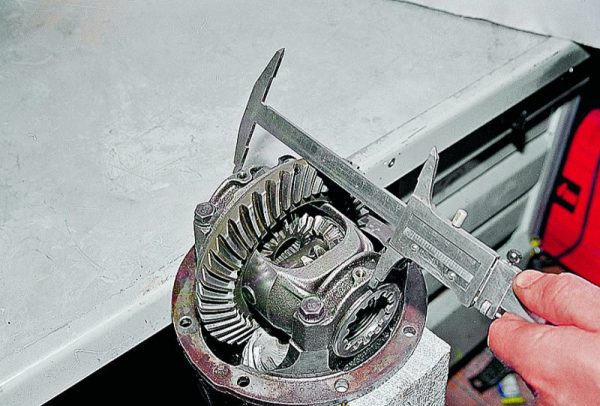
- To set the bearing preload, tighten the nuts until the bearing caps are 0,2 mm apart, which can be determined with a caliper.We measure the distance between the covers with a caliper
- During the adjustment, we simultaneously check the clearance between the shank and the planetary, as well as the clamping of the bearings. If the nut is tightened on one side, then the part should be released at the same angle on the other.
- When the adjustment is completed, we install all previously dismantled elements and fasten the gearbox to the stocking.

Video: repair of the rear gearbox on the "six"

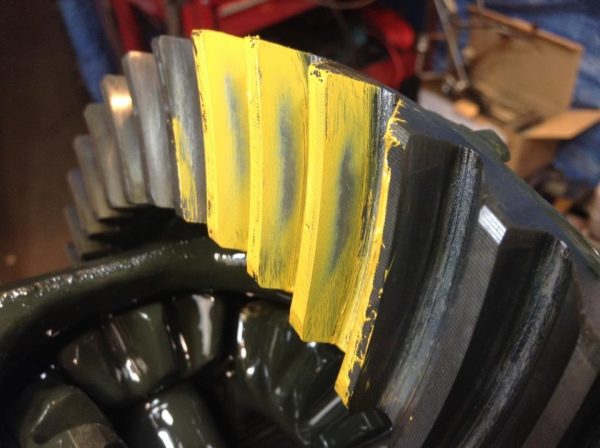
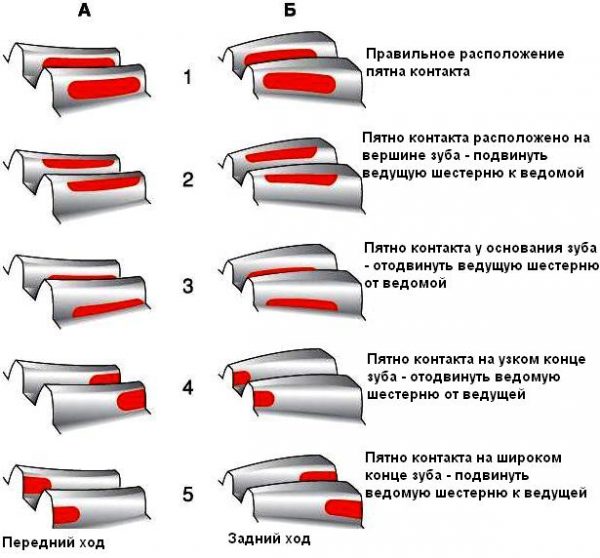
To understand how to adjust the gears according to the contact patch, you should refer to the image below.
Rear axle oil
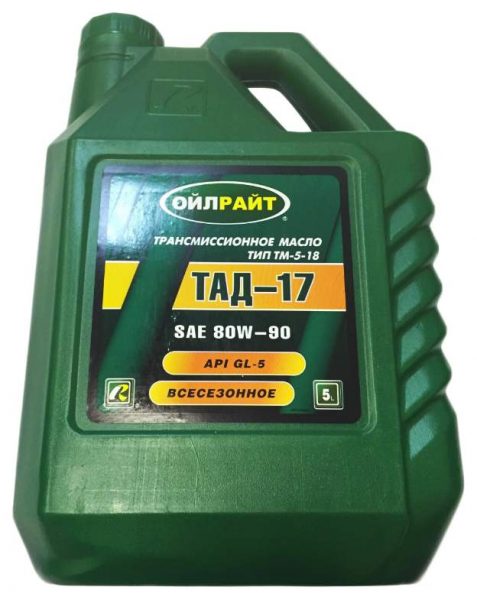
On the VAZ 2106, the friction of the internal elements of the rear axle is reduced by gear oil of class GL5 with a viscosity of 85W-90. The volume of the substance is 1,3 liters. There are many such oils today, but for Zhiguli you can use less expensive ones, for example, TAD-17.
It is recommended to change the lubricant in the rear axle every 50 thousand km. run.
Checking the oil level and adding oil
To check the level of lubrication and topping up, you will need a key for 17 and a special syringe. The procedure consists of the following steps:
- The car is placed on a level surface.
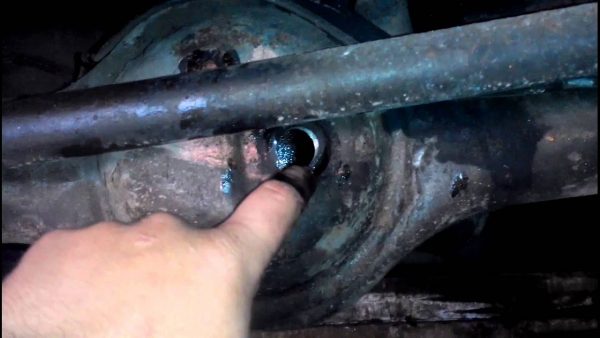
- We turn off the oil filler plug and evaluate the oil level with your finger: it should be at the level of the lower edge of the filler hole.You can check the oil level in the ZM with your finger by unscrewing the filler hole
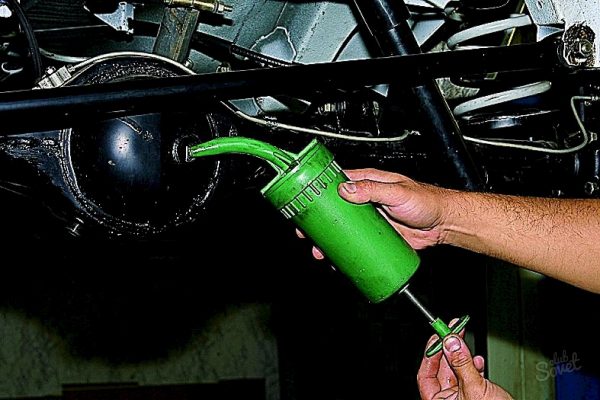
- If required, we top up with a special syringe to the required volume, after which we wrap the cork and wipe the smudges with a rag.To fill the oil, use a special syringe
If the oil needs to be replaced, then simply drain it into a suitable container, allowing it to drain well, and then fill in a new one in the required volume.
The rear axle of the VAZ "six" is a fairly reliable unit and does not require much attention. The need for repairs, if any, is rare. The most common problems are the leakage of axle shaft or shank oil seals. Their replacement is simple and does not raise questions. A more complicated procedure is to replace the axle shaft bearings or repair the gearbox. However, these mechanisms can also be repaired in a garage, by carefully reading and following the step-by-step instructions.

